Description
↑ Back to topThe Smart Wishlist for WooCommerce extension enables customers to save products of interest to a wishlist, allowing them to track prices and availability. It also lets customers create multiple wishlists, set privacy settings, and share them with others. Products can be added to the cart directly from the wishlist. Additionally, the admin can customize the “Add to wishlist” button and view all wishlists in a single table.
Features
↑ Back to top- Multiple Wishlists
- Allow Variations
- Allow Guest Users
- Wishlist Sharing
- Wishlist Popup
- Wishlist Button Customization
- Wishlist Page and Table columns
- Wishlist Privacy
Installation
↑ Back to top- Download the .zip file from your WooCommerce account.
- Go to WordPress AdminDashboard > Plugins > Upload Plugin > Choose File.
- Install Now and Activate Plugin.
Getting Started
↑ Back to topWishlist Settings
↑ Back to topFor the general settings of the Wishlist, Go to WordPress Admin Dashboard > WooCommerce > Settings > Smart Wishlist.

- There will be four tabs to configure the plugin settings.
- General
- Button
- Style
- Wishlist Page
General Settings
↑ Back to topEnable Wishlist
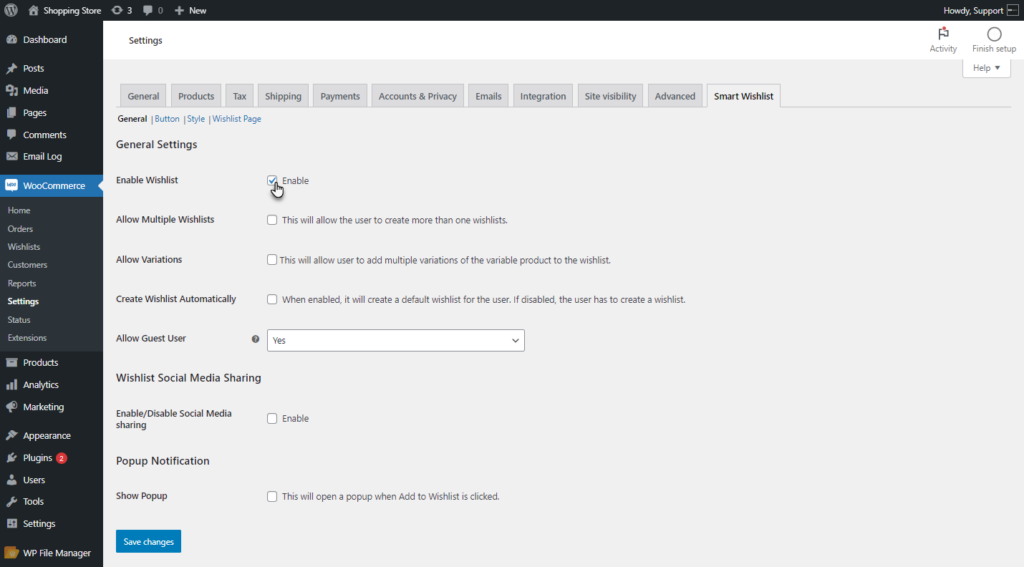
- Enable the wishlist feature by clicking on the Enable Wishlist checkbox. This will add an “Add to Wishlist” button on the front end.
Front End Impact (Adding Product to a Wishlist)
- Login to your account.
- Go to the Product page, where the “Add to Wishlist” button will appear.
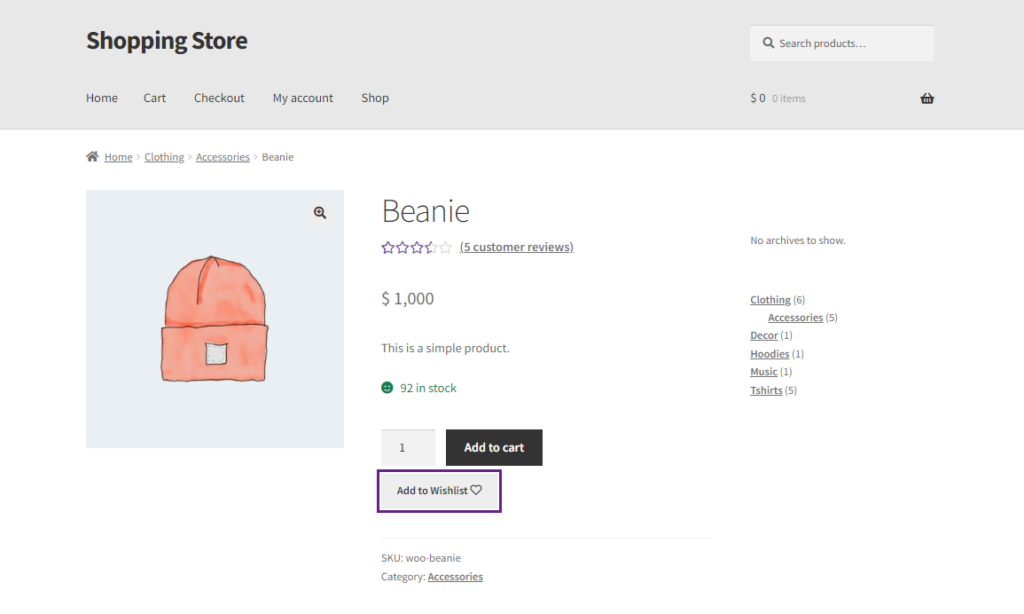
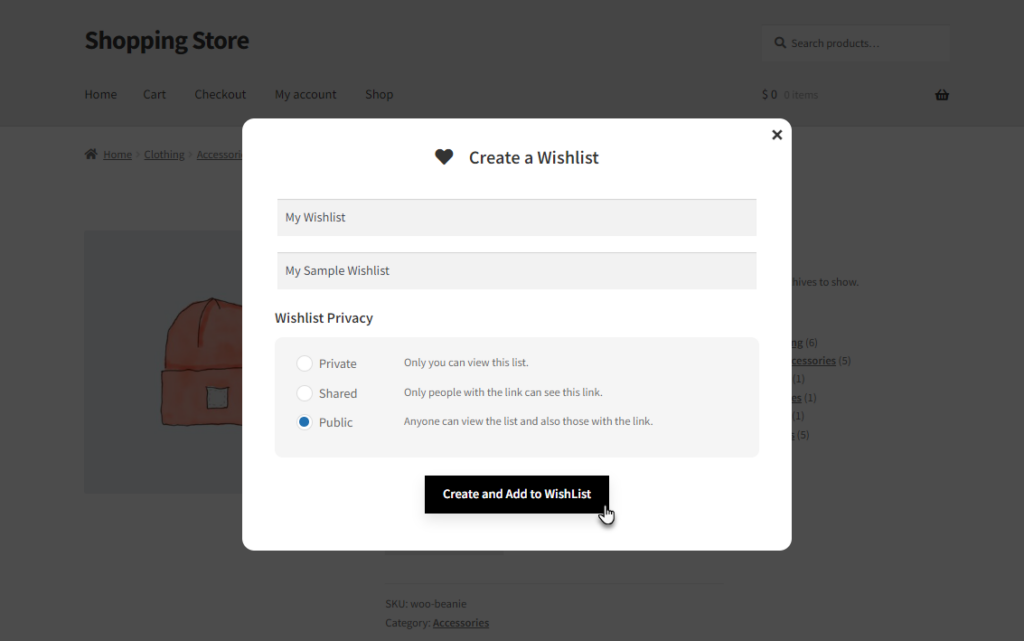
- Click on the Add to Wishlist button. A Create a Wishlist popup will appear.

- Users can name their wishlist, add a description, and set the privacy level according to their preferences.
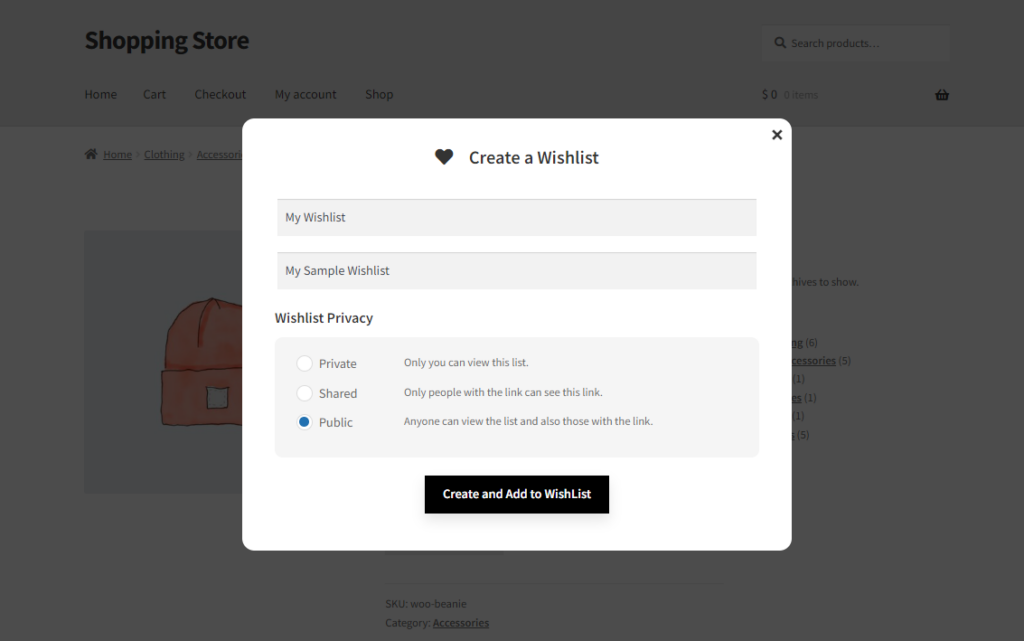
- Click on the Create and Add to Wishlist button. The wishlist will be created and the product will be added to the wishlist.
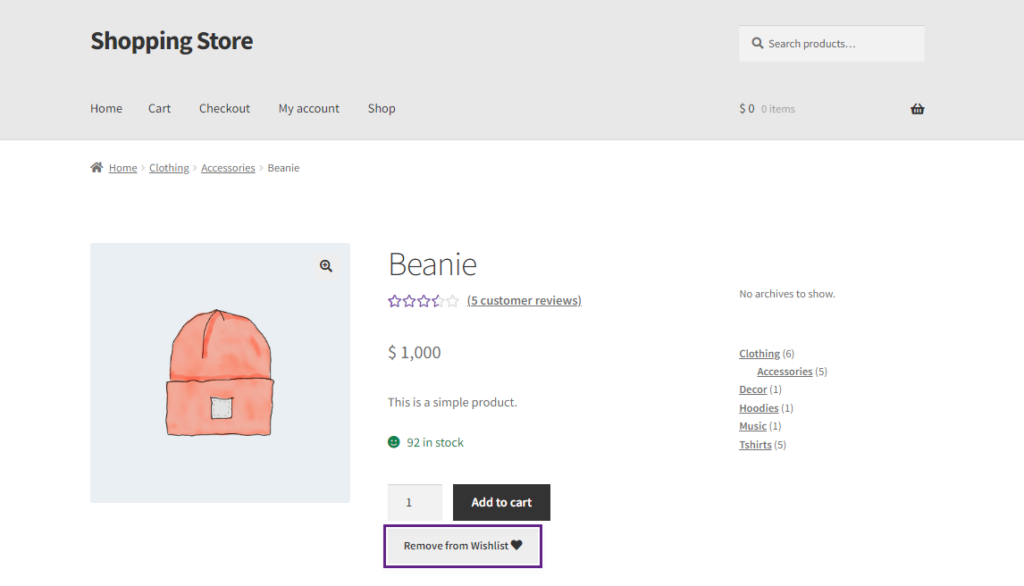
- Once a product is added to the wishlist, the “Add to Wishlist” button will be replaced by a “Remove from Wishlist” button. The user can remove the product by clicking on this button.
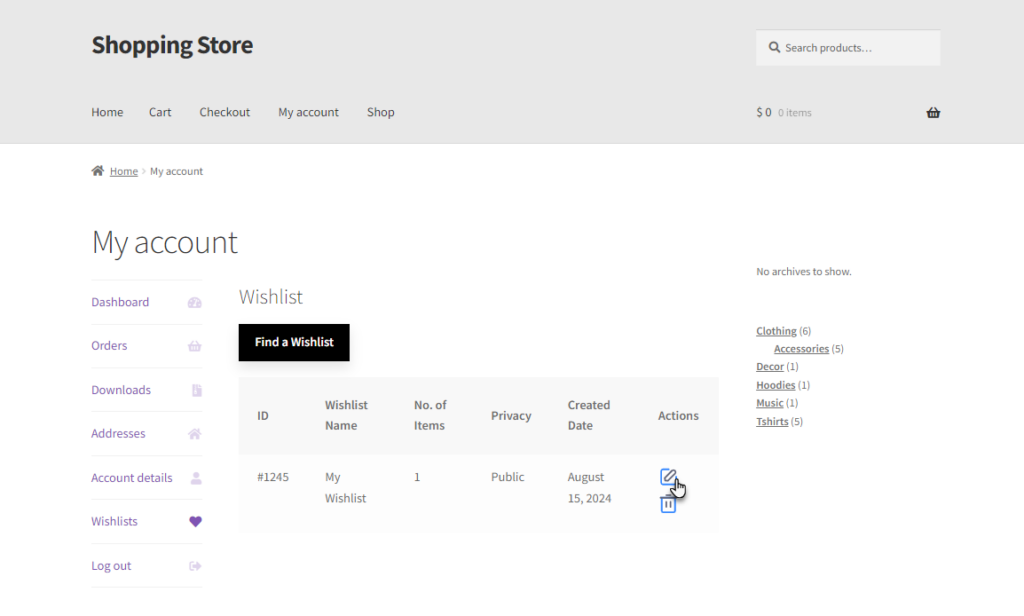
- A Wishlist tab will appear on the My Account page.

- The user can view and edit the created Wishlists by clicking on the Edit option in the actions column.
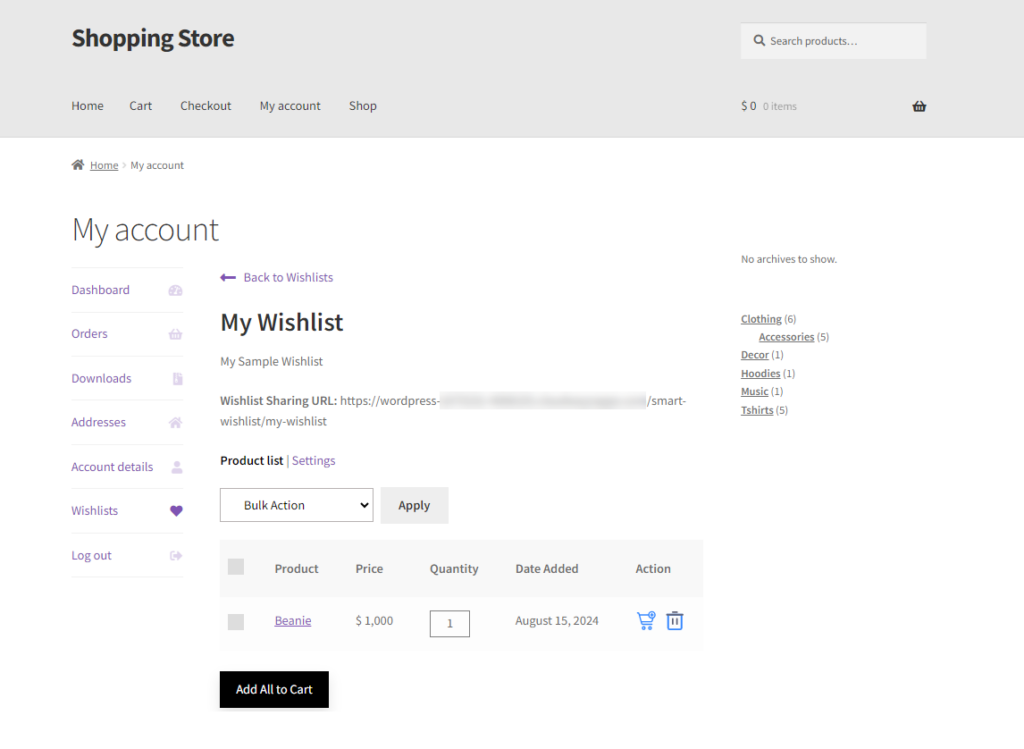
- A Wishlist screen will appear. There are two tabs on the Wishlist screen.
- Product list
- The user can view the products added to the Wishlist. The admin can add a product to the cart or delete it from the Wishlist.
- Settings
- Users can also edit the Wishlist details, such as name, description, and privacy settings.

Allow Multiple Wishlists
- Enable the “Allow Multiple Wishlists” feature. This will allow users to create multiple wishlists as needed, and they can add a product to various wishlists.

PLEASE NOTE: If multiple wishlists have been created and the admin disables the multiple wishlist option, only the first wishlist will remain active, while the other wishlists will be disabled.
Front End Impact
- Login to your account.
- Go to the Product page. An “Add to Another List” option will be available for the user to add the product to another wishlist.

- Click on the Add to another list. A Small section will appear having the option of creating a Wishlist.
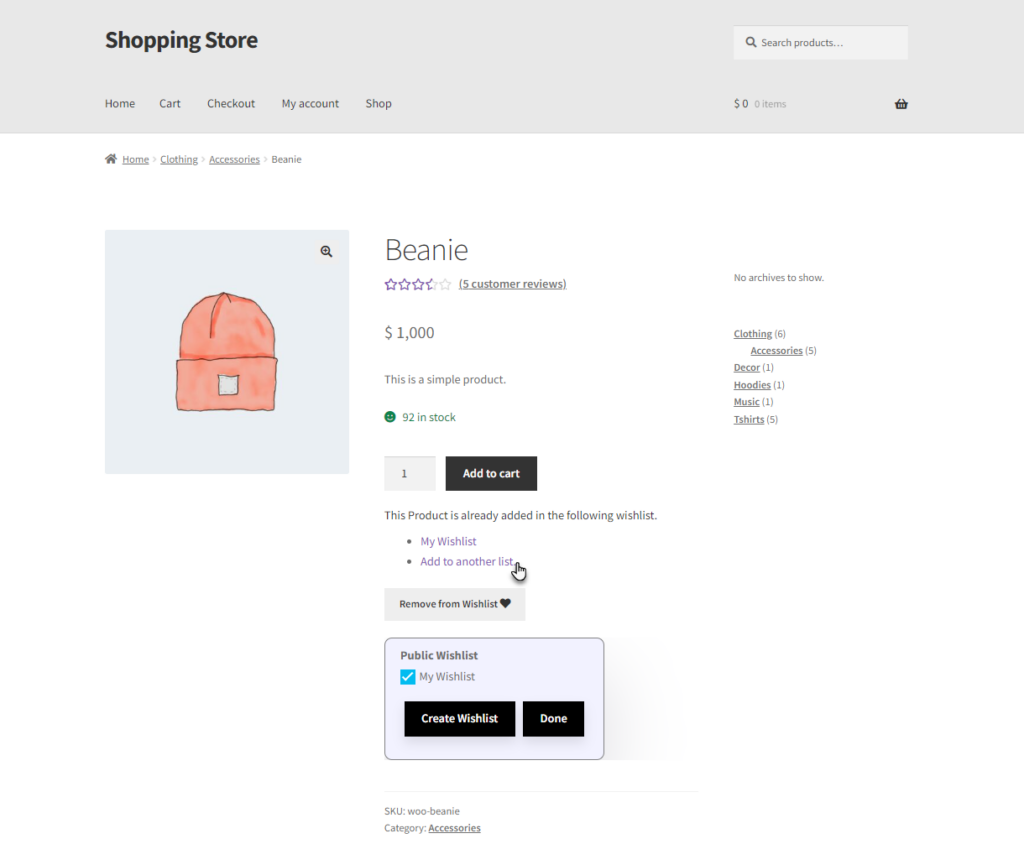
- Click on the Create a Wishlist.

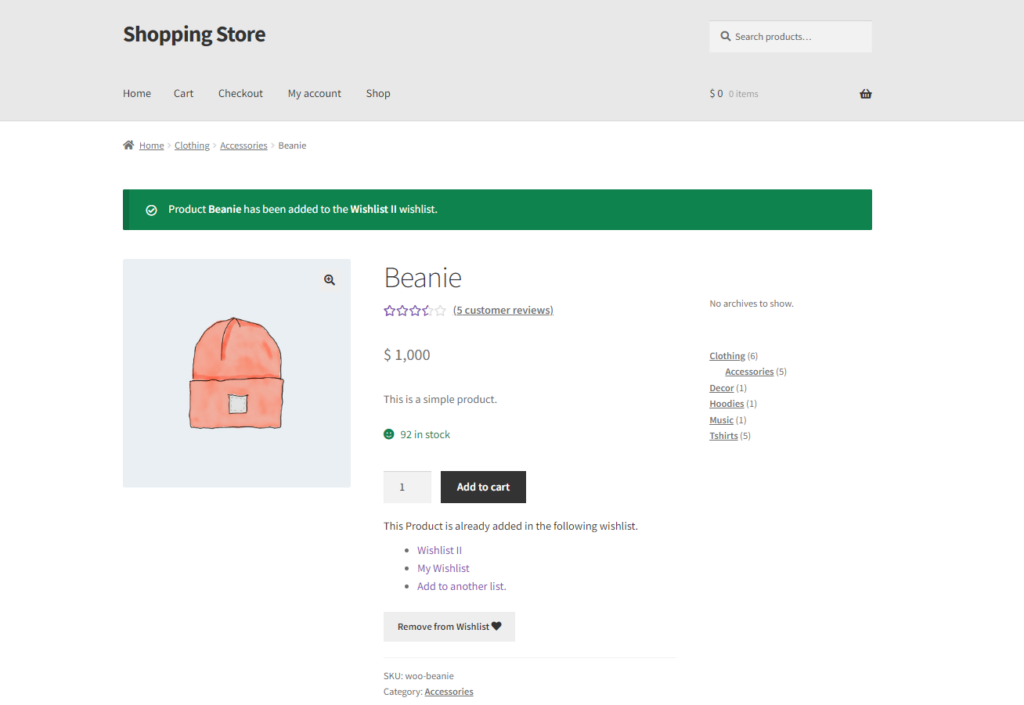
- A Create Wishlist section will appear and the user can create another wishlist as needed. Click on the Create and Add to Wishlist button.

- A second wishlist will be created, and the product will be added to this new wishlist as well.
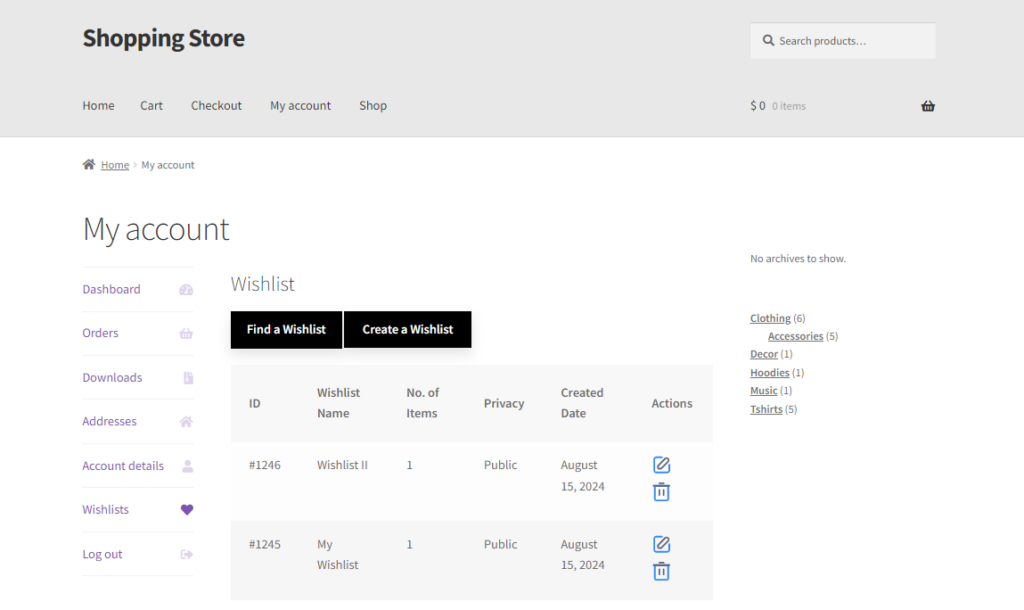
- The multiple Wishlists will be visible to the user on the Wishlist tab on the My Account page.
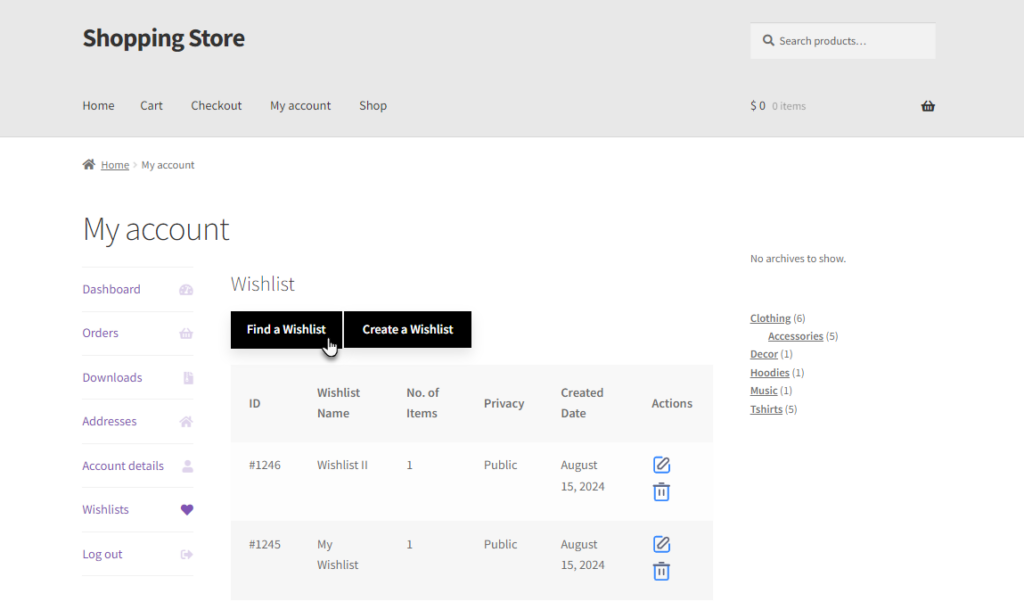
- The user can find a specific wishlist by using the Find a Wishlist button.
Allow Variations
- Enable the “Allow Variations” option. This allows users to add multiple variable product variations to their wishlist.
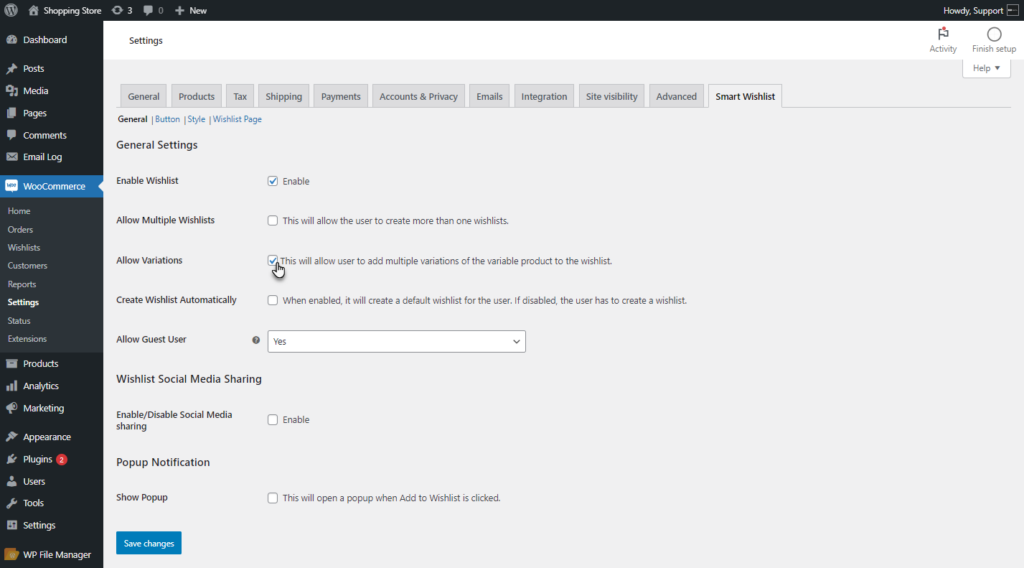
PLEASE NOTE: If disabled, the entire variable product will be added to the wishlist without individual variations.
Front End Impact
- Login to your account.
- Go to the Variable Product page.
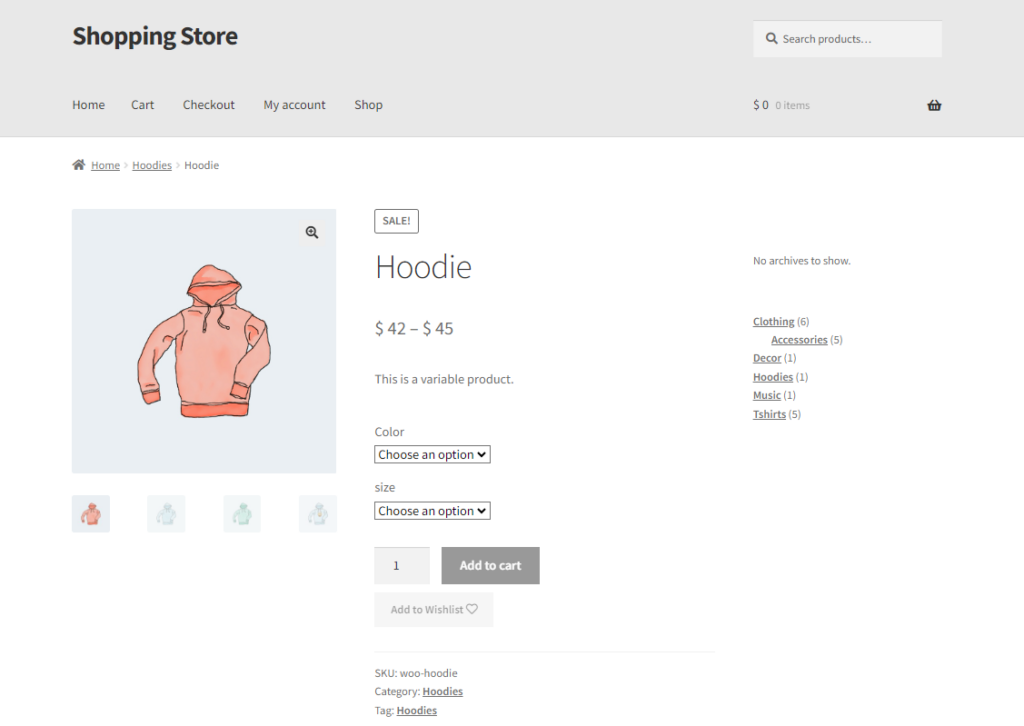
- Select the variation of the product.
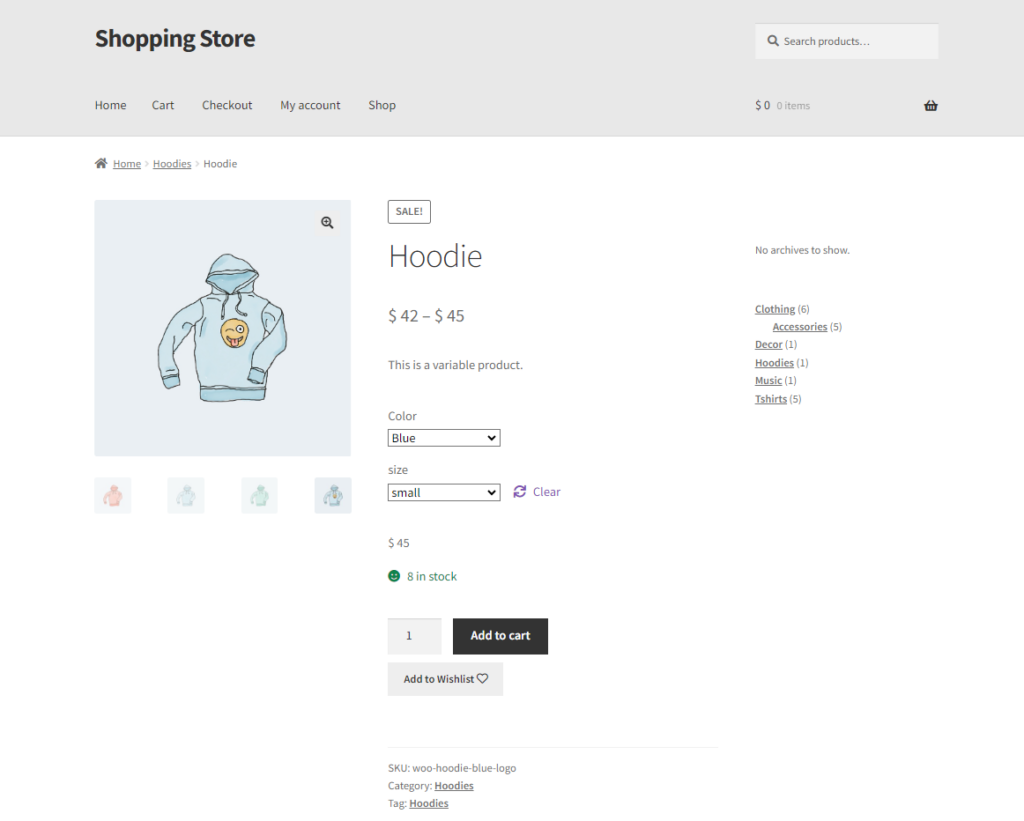
- Click on the Add to Wishlist button.
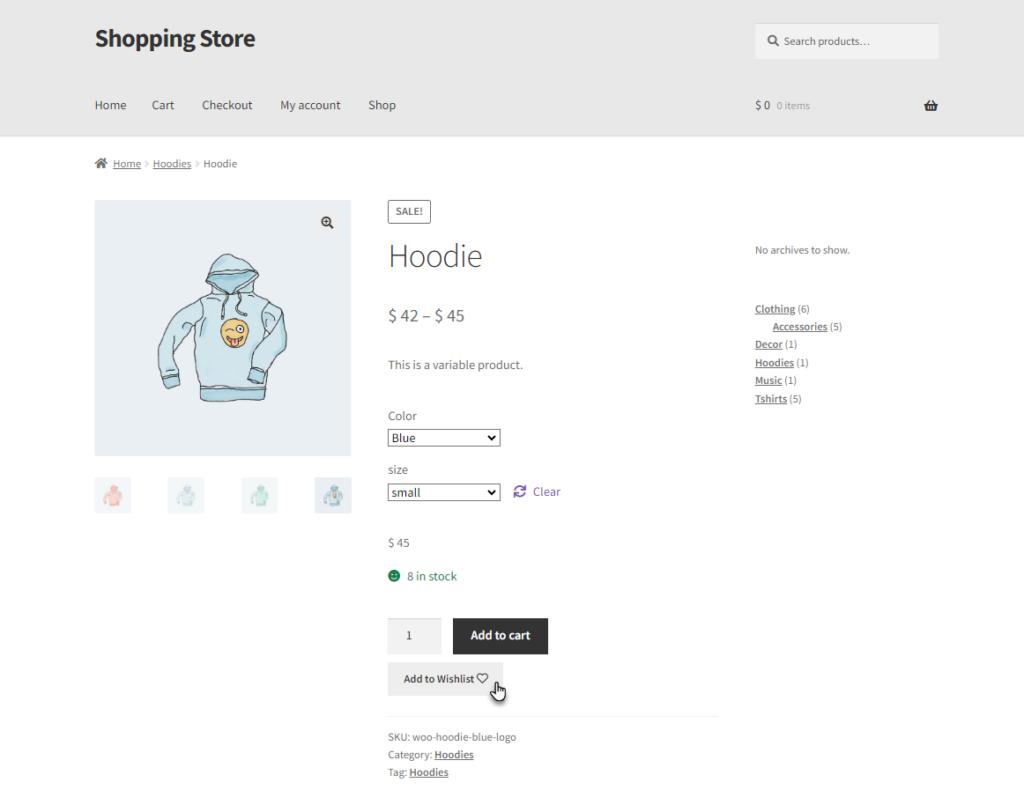
- The variation will be added to the Wishlist.

Create Wishlist Automatically
- Enable the “Create Wishlist Automatically” option. This will automatically create a wishlist for the user, and the option to create a wishlist manually will not be shown to them.
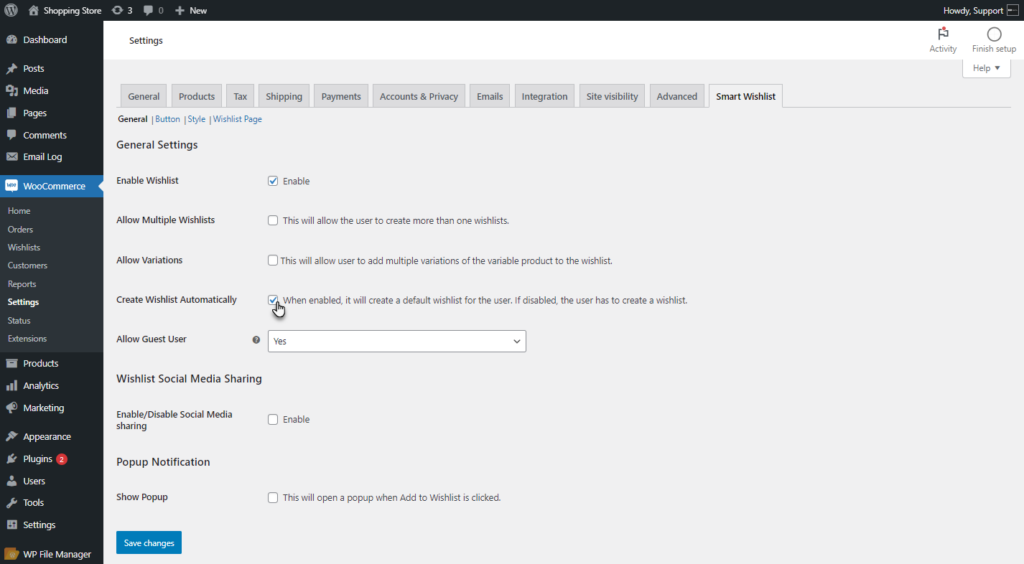
PLEASE NOTE: If disabled, clicking the “Add to Wishlist” button will open a popup window, allowing the user to create a wishlist.
Allow Guest User
PLEASE NOTE: Guest user wishlist will be saved for 30 days if browser history and cookie is not cleared.
- The “Allow Guest User” option enables the admin to allow, restrict, or require registration for guest users. The drop-down list provides three options.
- Yes – If “Yes” is selected, guest users can add products to temporary wishlists, which will be saved for 30 days or until browsing history is cleared. After 30 days, these wishlists will be removed.
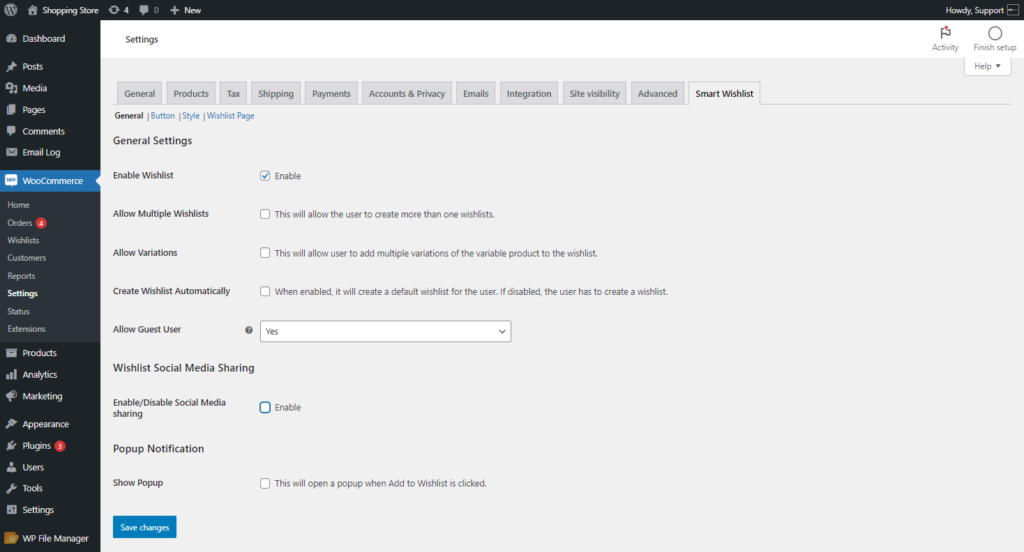
- No – If “No” is selected, the Add to Wishlist button will not be visible to guest users.
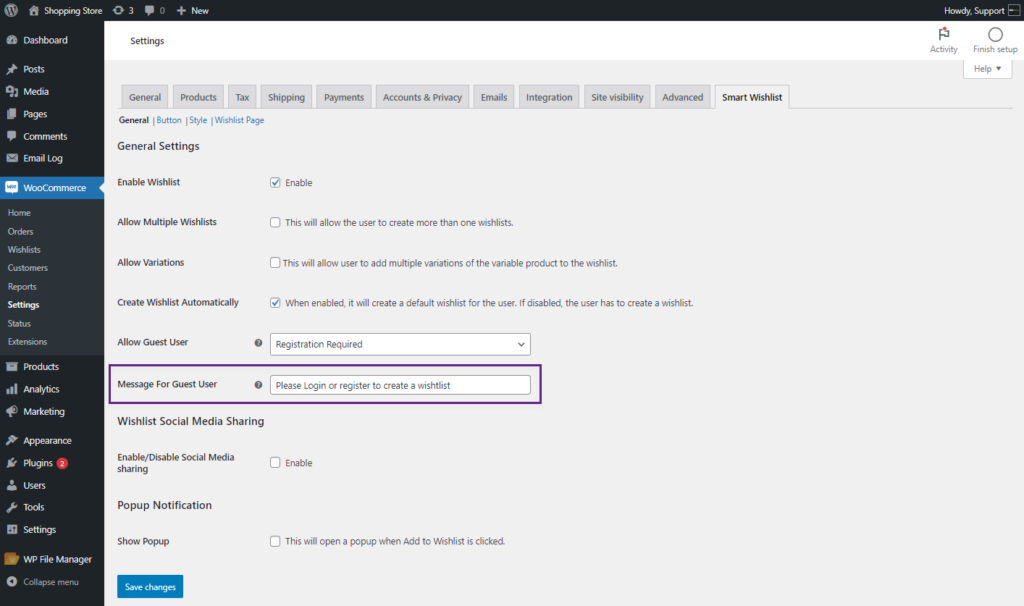
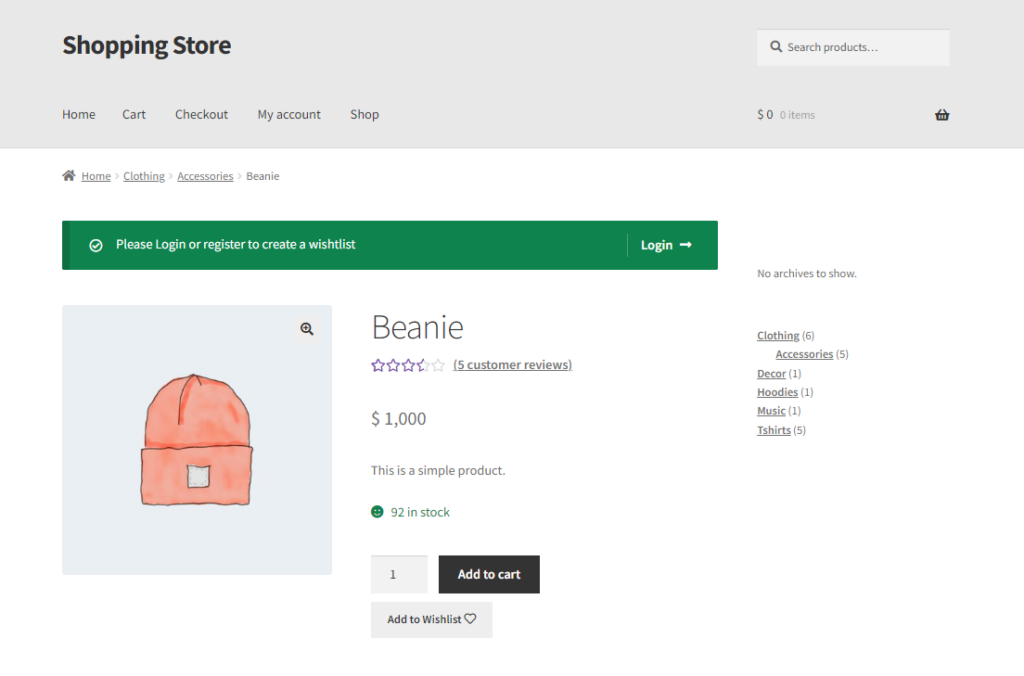
- Registration required – If “Registration Required” is selected, the Add to Wishlist button will be shown, but guest users will be prompted to log in when they click it.

- If Registration Required is selected, the Add to Wishlist button will be displayed, but clicking it will display a message to the guest users to log in.
Front End Impact
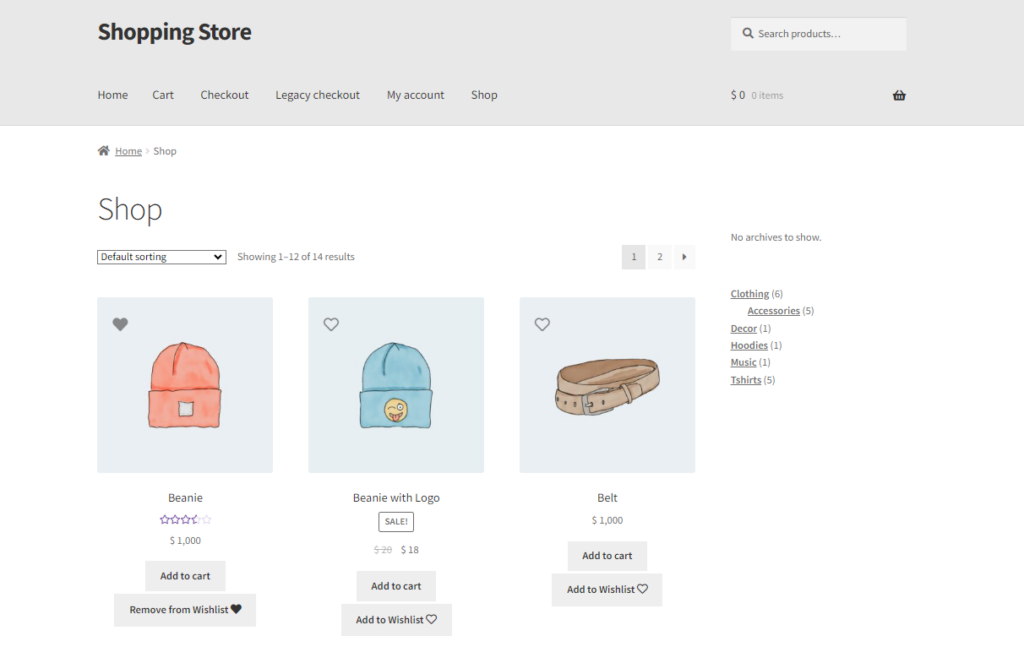
Guest User – Yes
- Go to the Shop Page. Add an item to the Wishlist.
- It will create a Temporary Wishlist at the backend.
Guest User – Registration Required
- Go to the Product page. Click on the Add to Wishlist button.
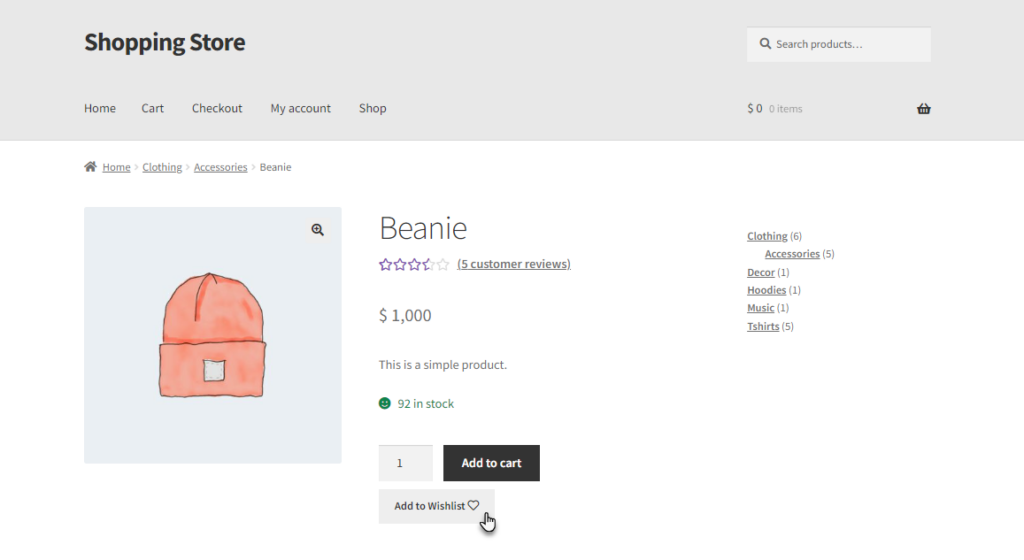
- A message will appear indicating the Guest User to log in to add the product to the Wishlist.
Wishlist Social Media Sharing
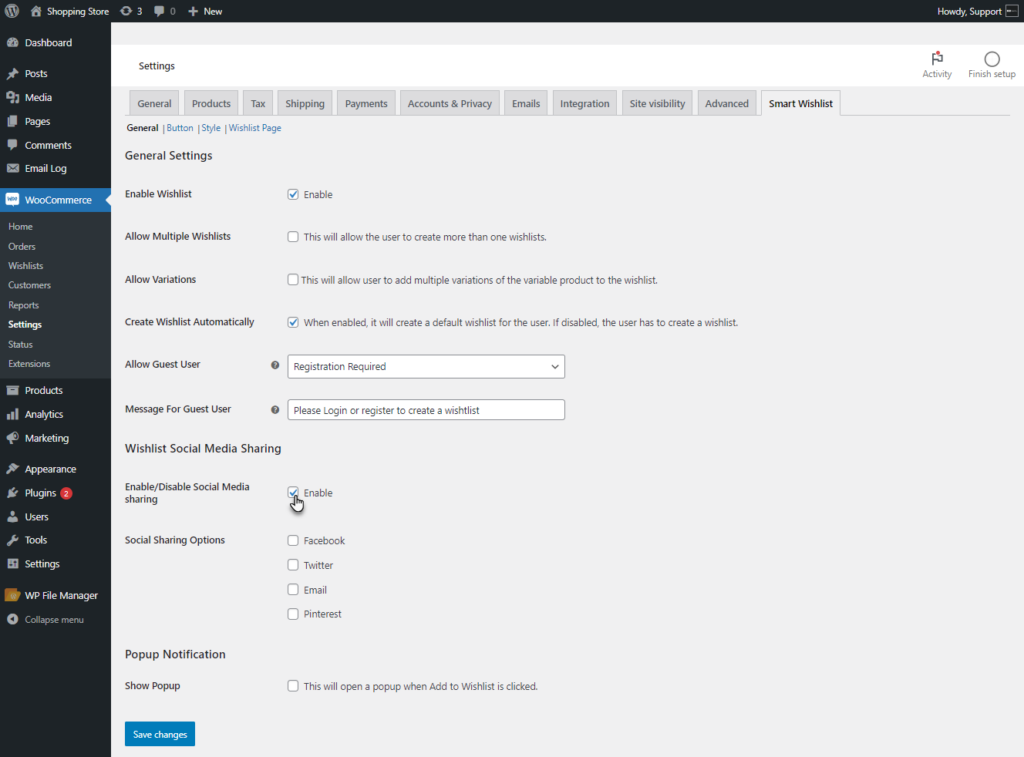
- Enable the Social Media Sharing option to allow users to share their wishlists on social media platforms.
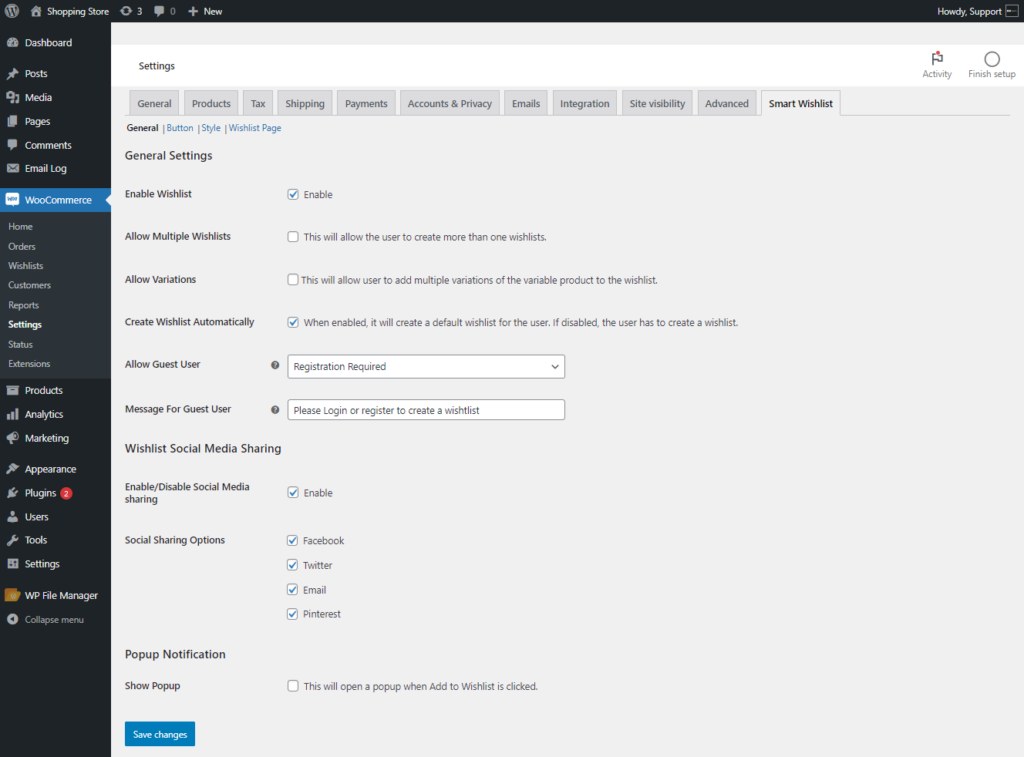
- Select the social media platforms from the list. The chosen platforms will be displayed on the front end.
Front End Impact
- Login to your account.
- Go to the My Account page. Navigate to the Wishlist tab.
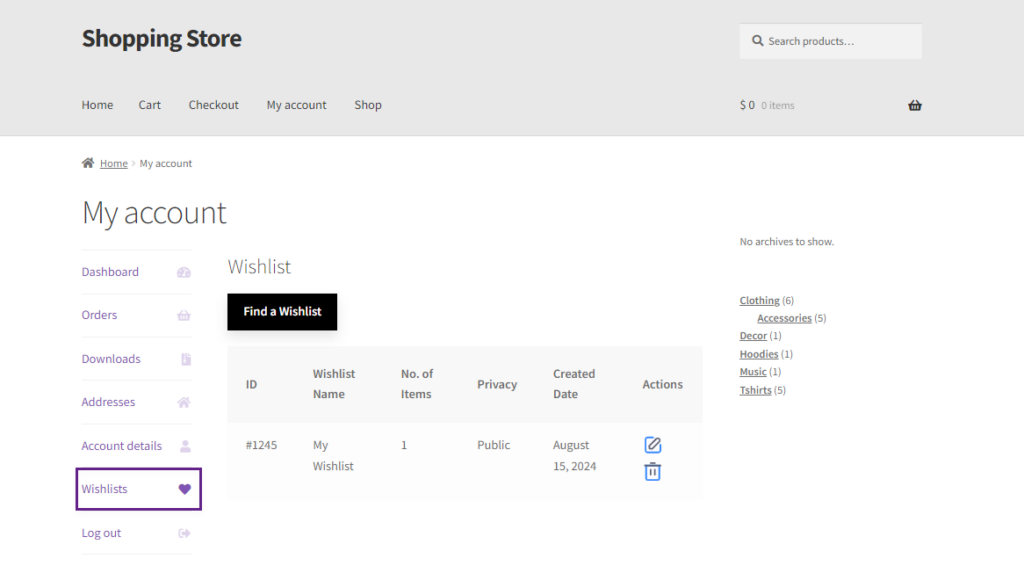
- Click on the Edit option in the action column of the wishlist.
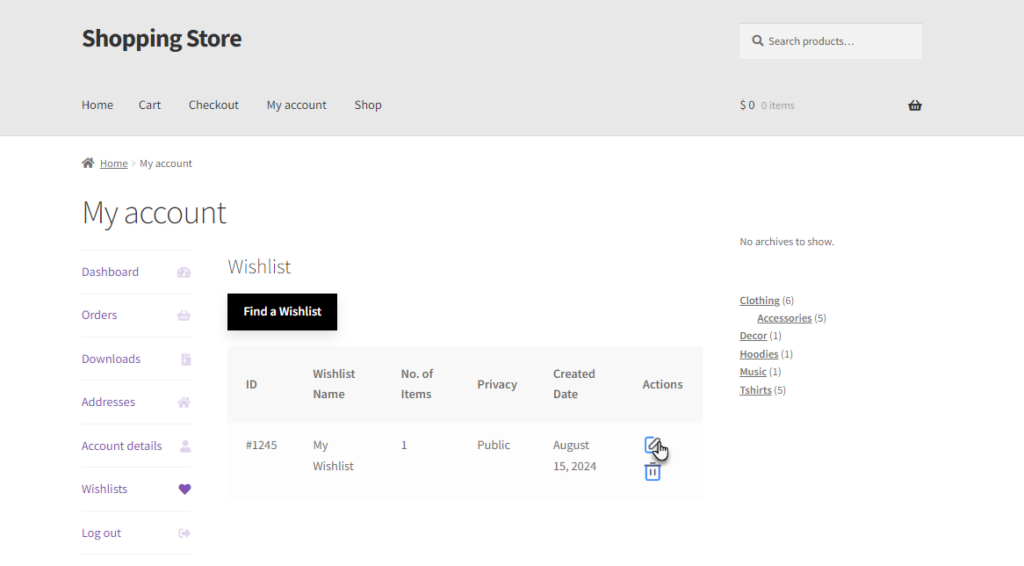
- A “Share on Social Platforms” option will be available, allowing the user to share their Wishlist on social media.

- Click on the social icon to share your wishlist.

- The Wishlist will be shared on your social media platform.

Popup Notification
- Enable the Show Popup option to display a popup window when the Add to Wishlist button is clicked.
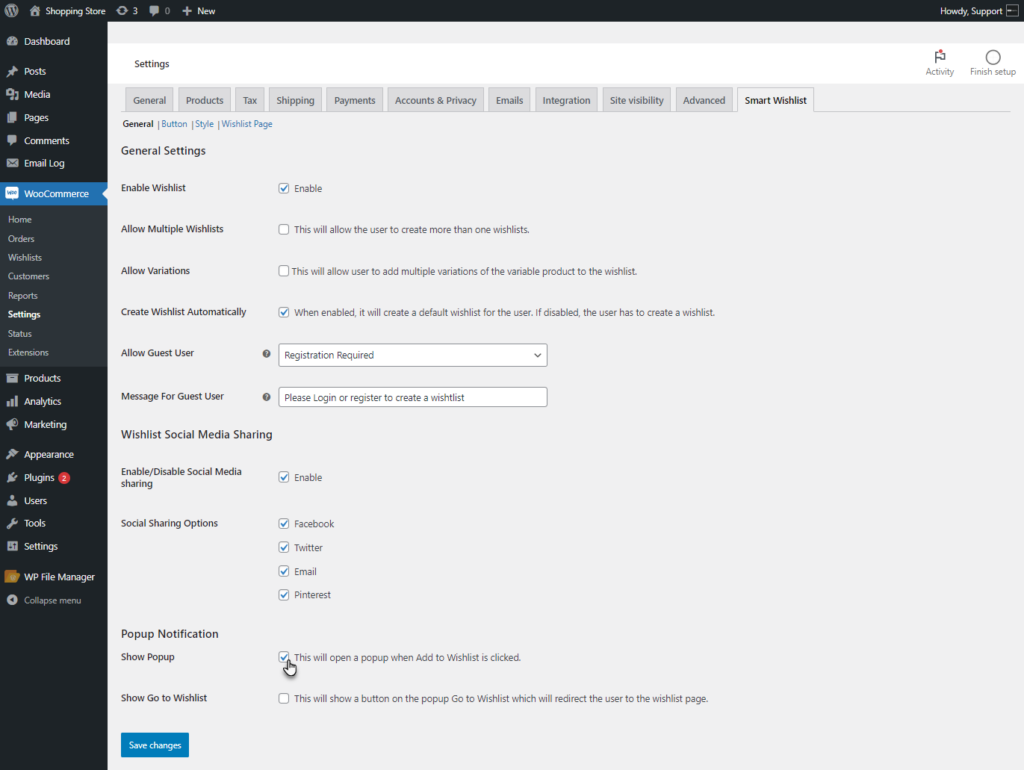
- Enable the Show Go to Wishlist option. This will add a Go to Wishlist button in the popup, which will redirect the users to their wishlists.

Front End Impact
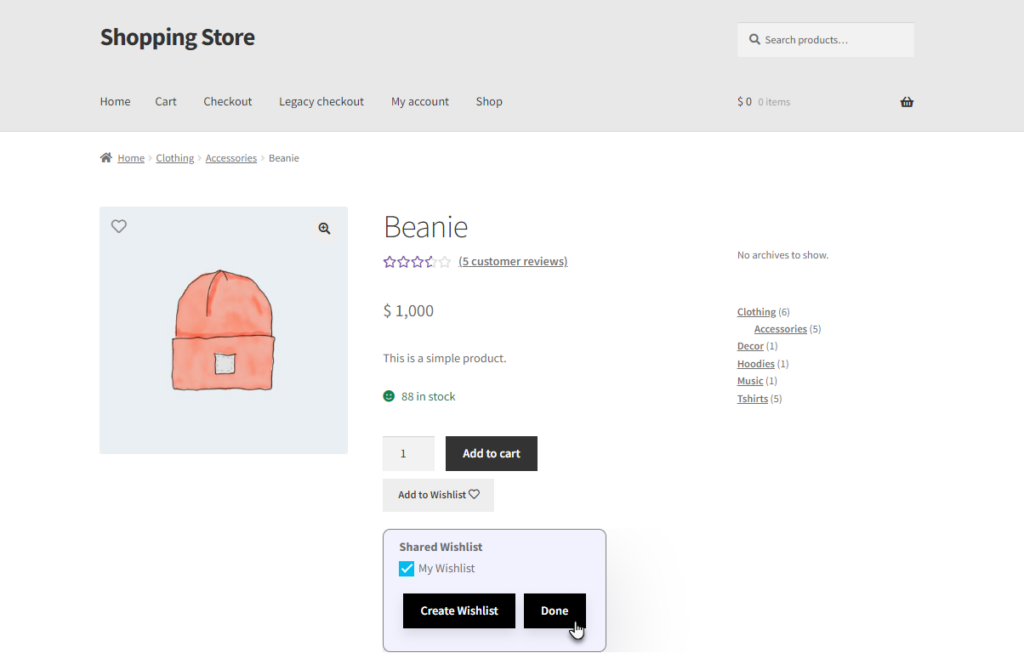
Before
- Login to your account.
- Go to the Product page. Click on the Add to Wishlist button.

- The product will be added to Wishlist without any popup.
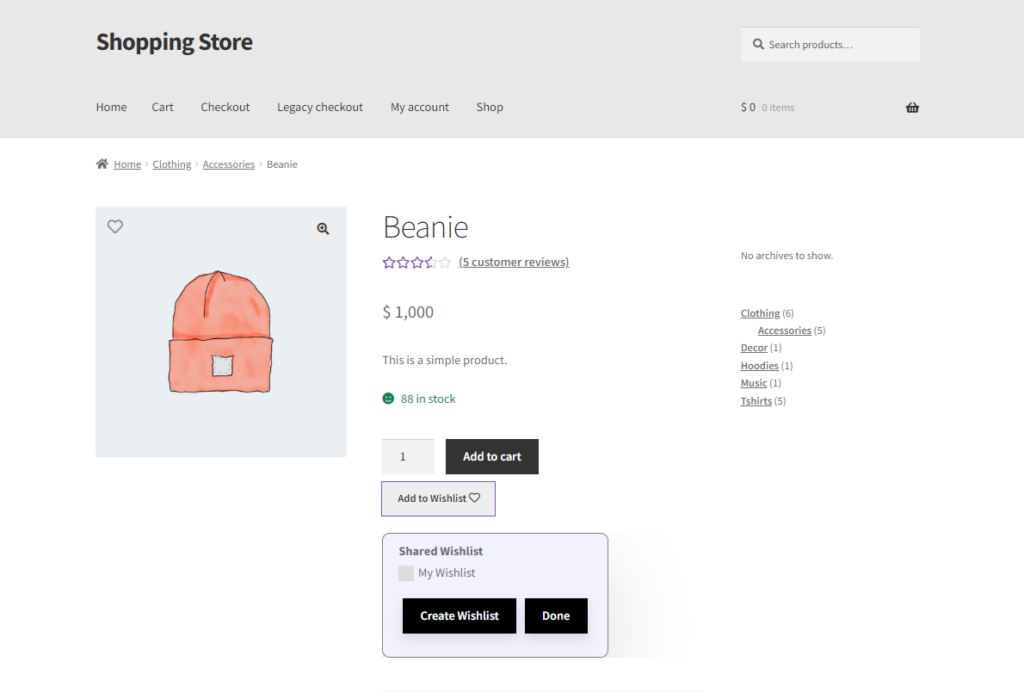
- Select the Wishlist OR click on the Create Wishlist button.
After
- Login to your account.
- Go to the Product page. Click on the Add to Wishlist button.
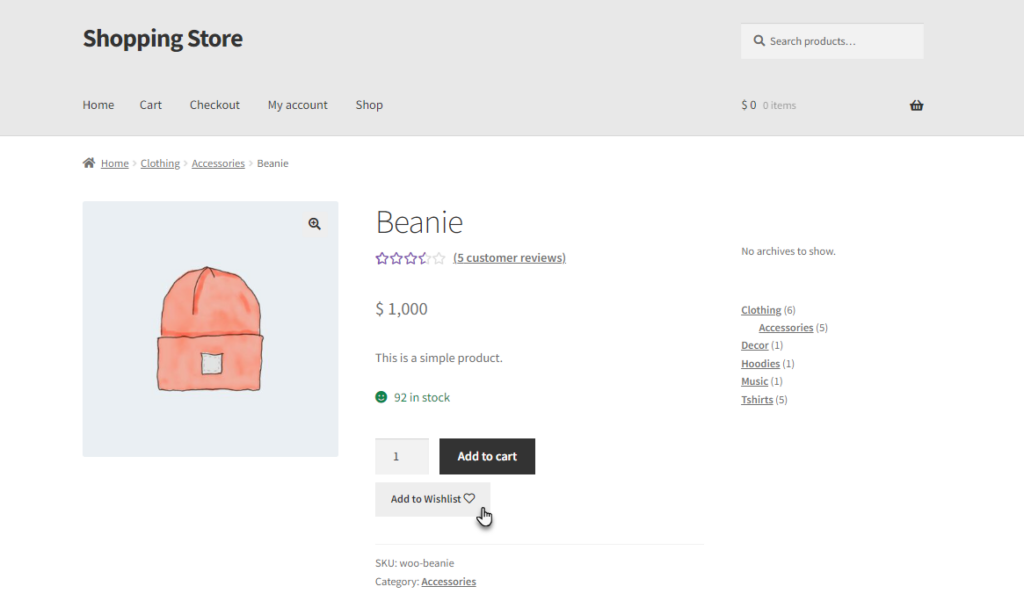
- A popup will appear. This popup will have two buttons, Go to Wishlist and Done.
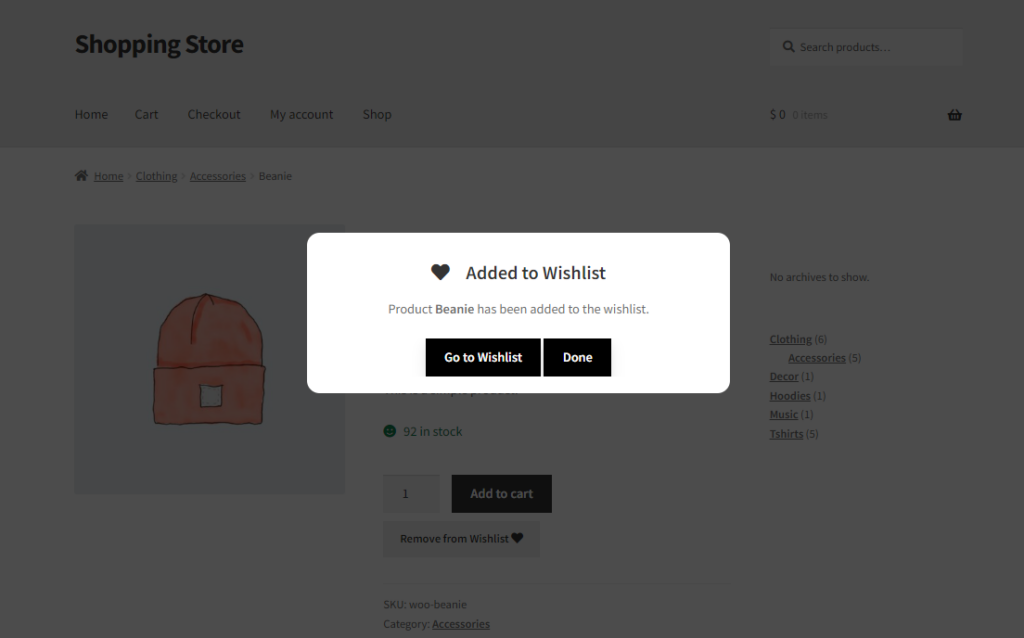
- Click on the Go to Wishlist button. It will redirect the user to the Wishlist.

Show Wishlist Nav Menu Item
↑ Back to topThis feature allows you to display a wishlist icon with a counter as a navigation menu item. The counter will display the total number of unique products in all of the customers’ wishlists
- WooCommerce > Settings > Smart Wishlist > General
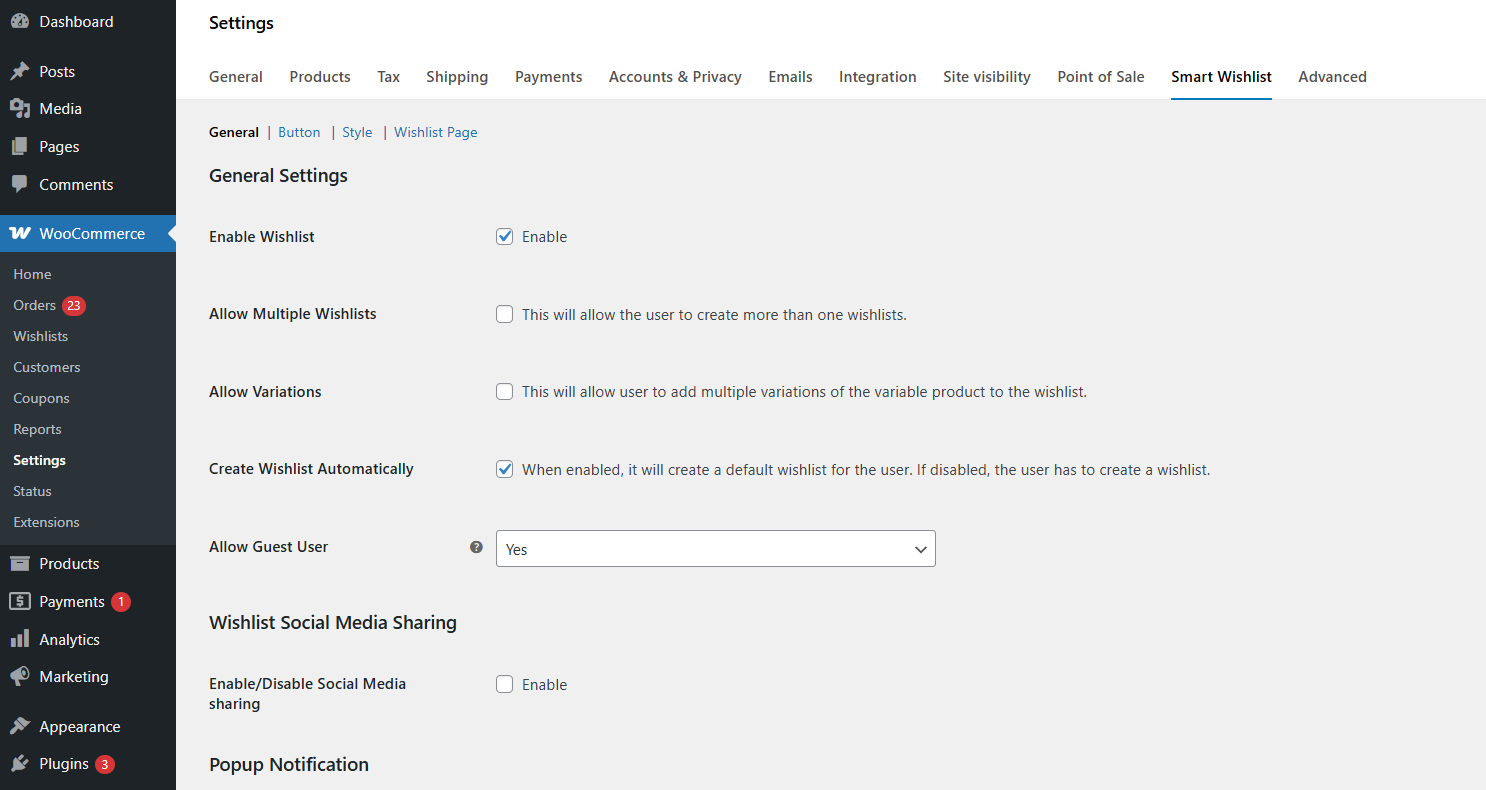
- Locate Show Wishlist Nav Menu Item.
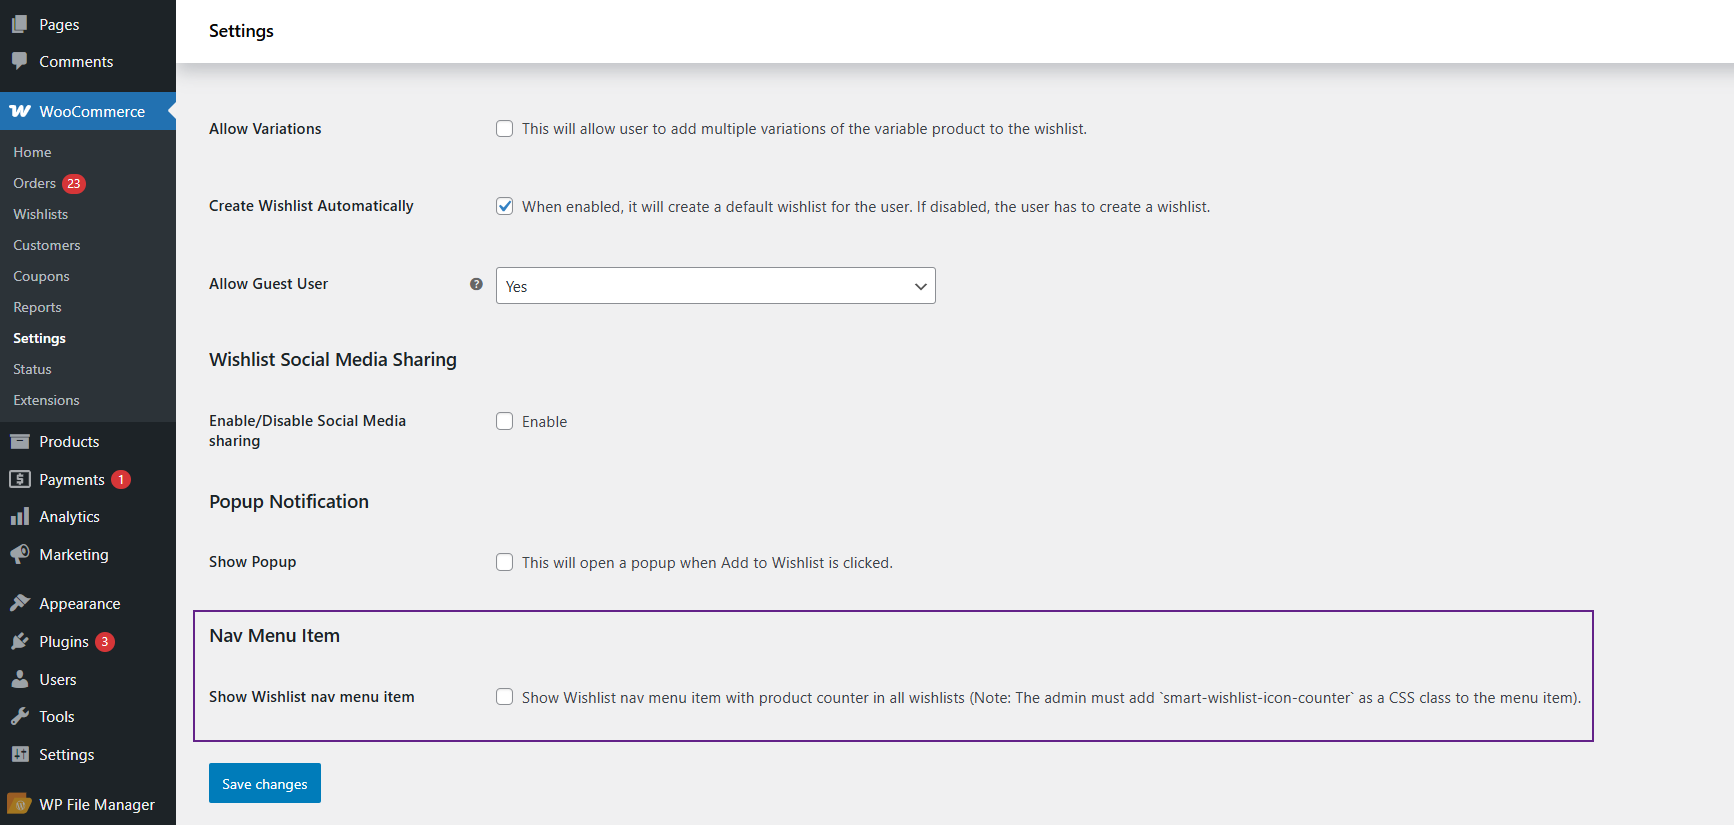
- Enable the checkbox to activate this feature.
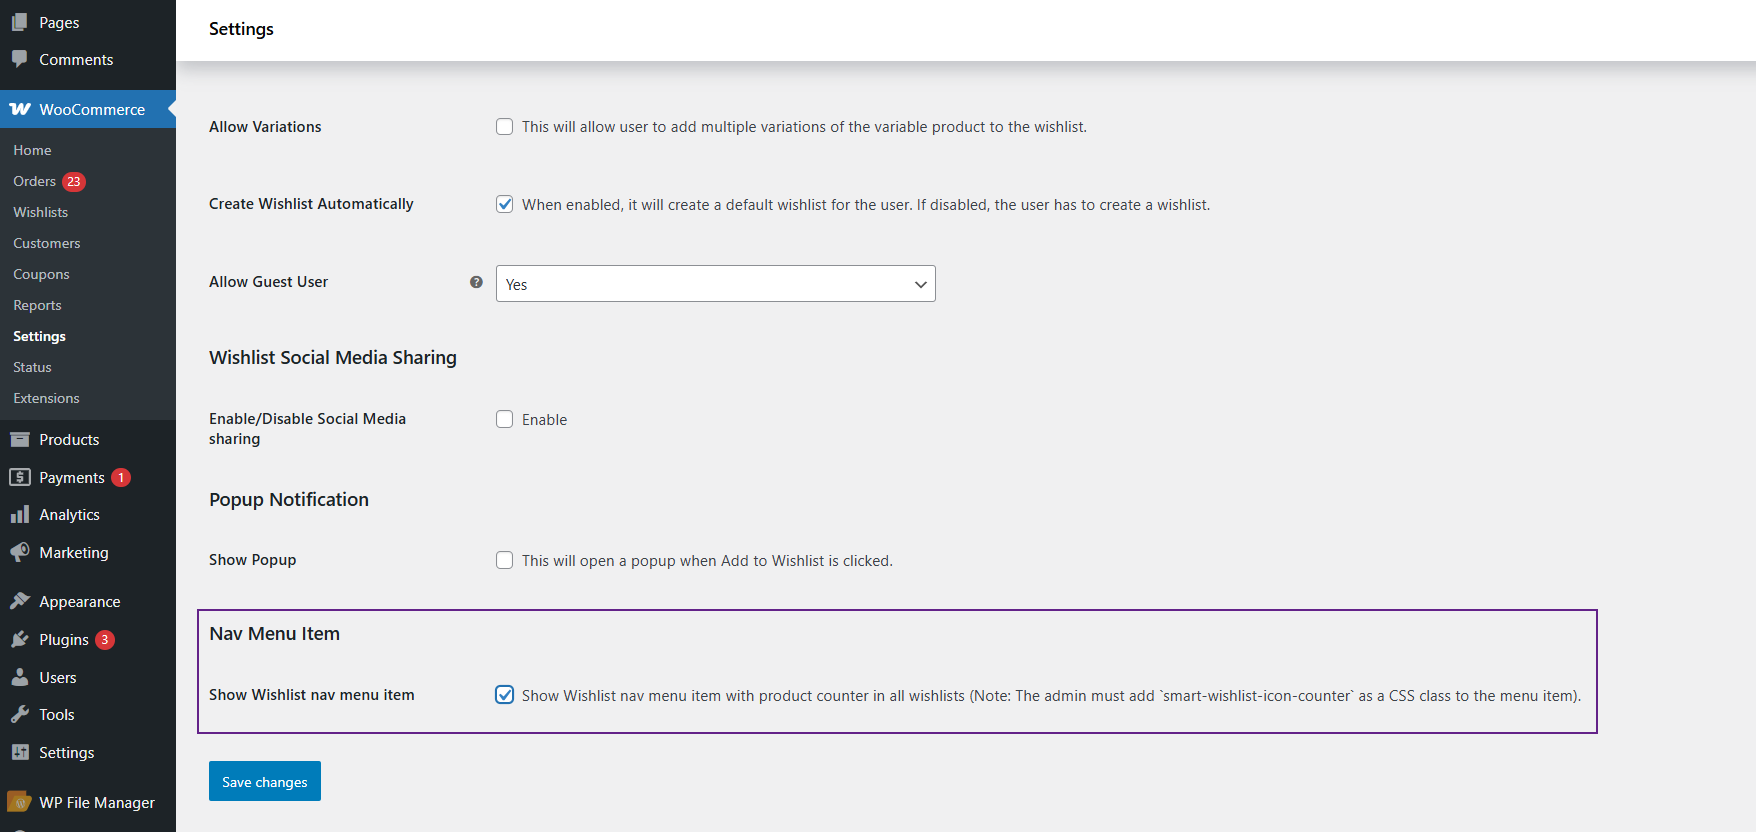
- Click the Save changes button.

Menu Setup
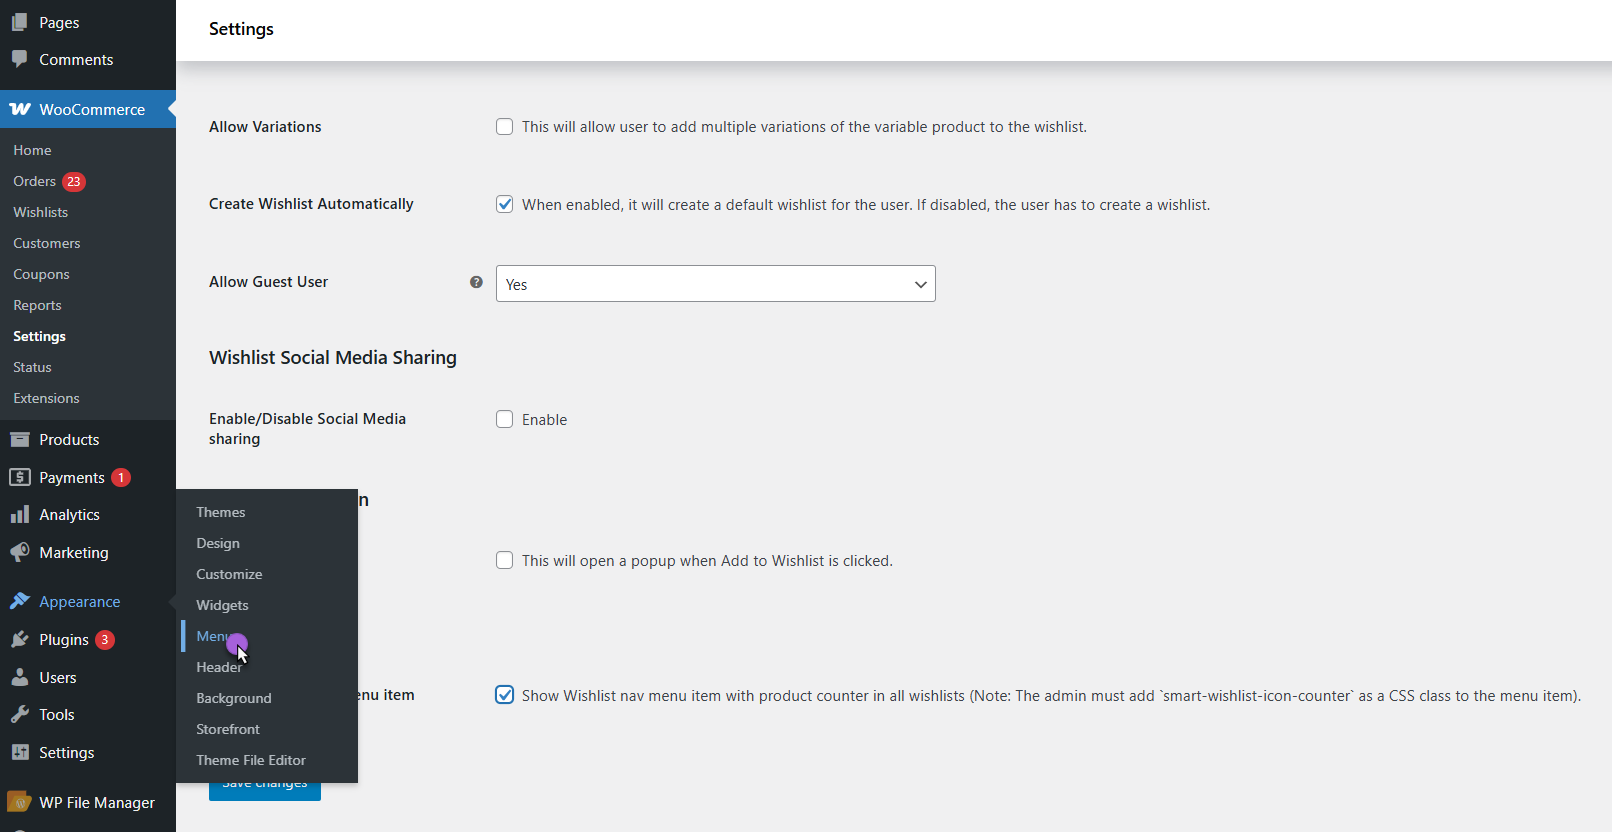
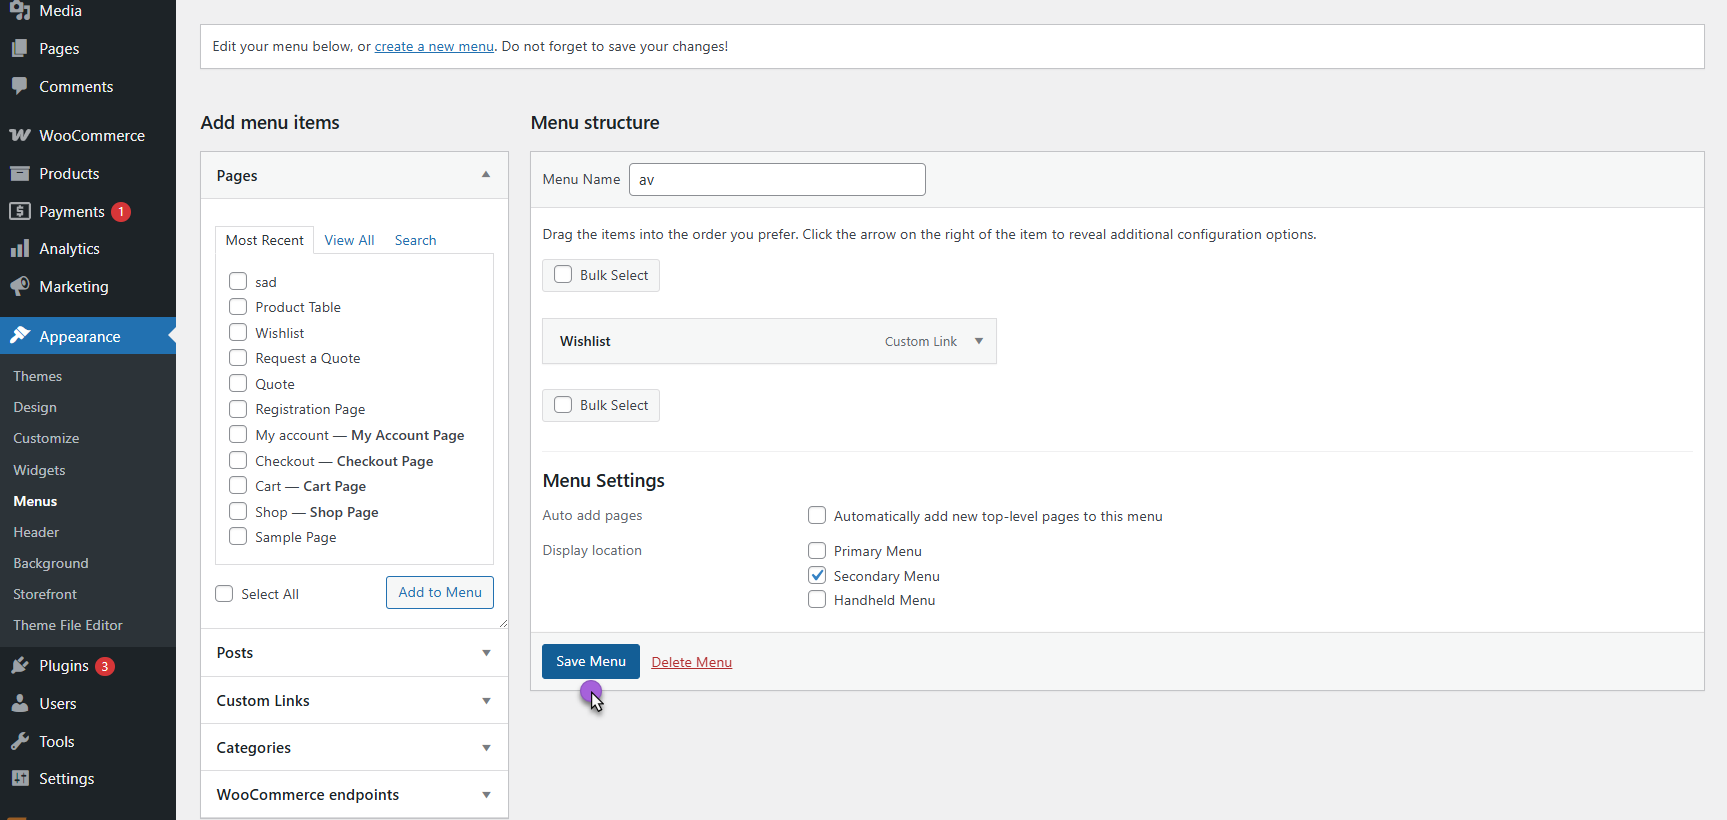
- Go to Appearance > Menus
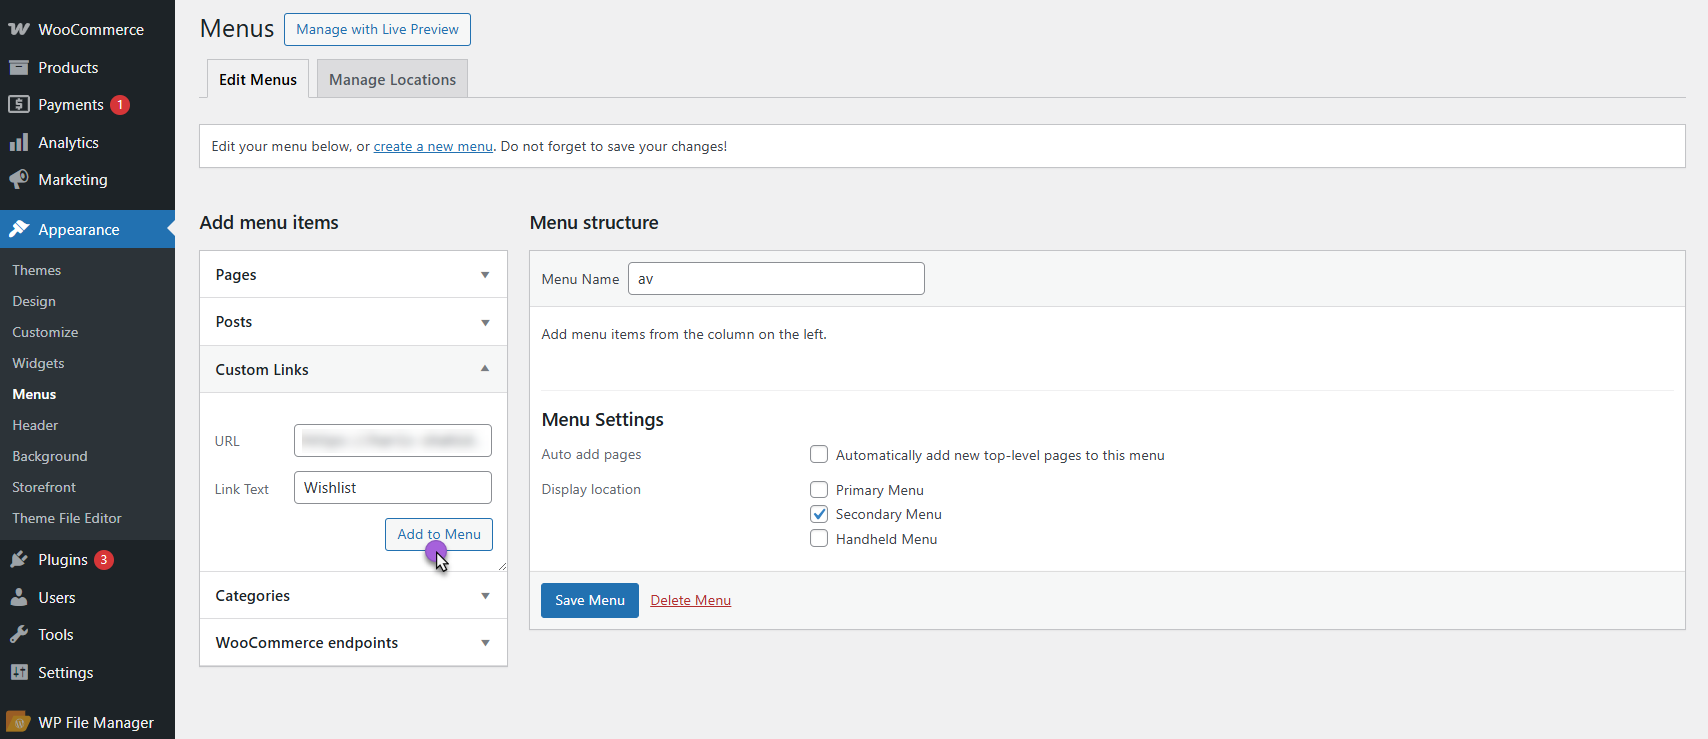
- Add a new menu item:
- Either create a Custom Link menu item.
- Or use a Page (if you already created a wishlist page using shortcode or block).
- In the menu item settings, add the CSS class:
- smart-wishlist-icon-counter

- Save the menu.
Front-End-Impact
- Navigate to the Shop page or any site page with the main navigation menu.

- You will see a wishlist icon in the menu bar.
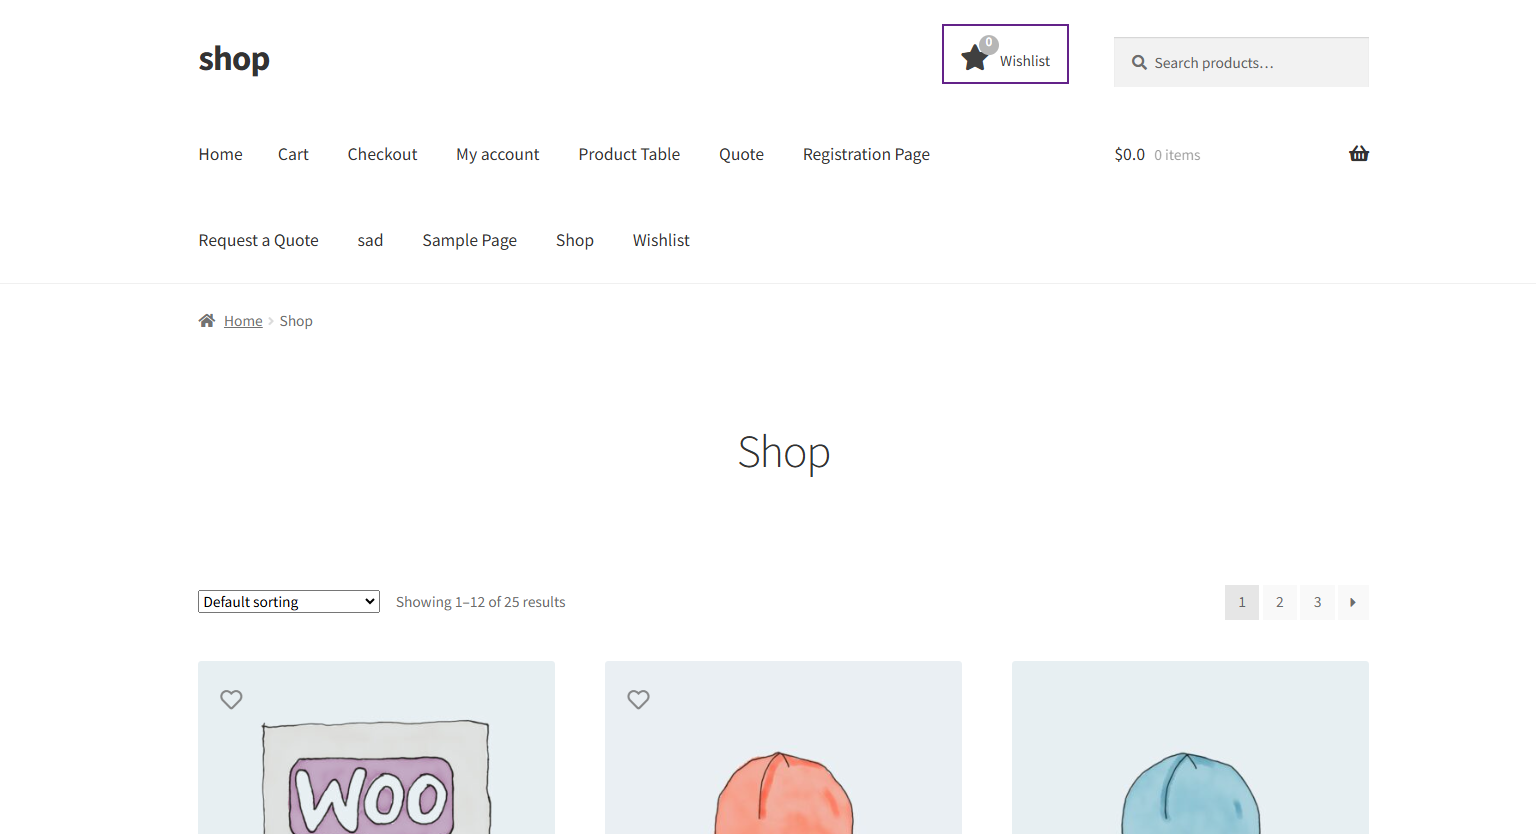
- The counter will display the total number of unique products added to all wishlists.
- When you click on the icon:
- By default, it will redirect to My Account > Wishlist tab.
- If you have added a custom URL in the menu link, it will redirect to that link instead.

Button Settings
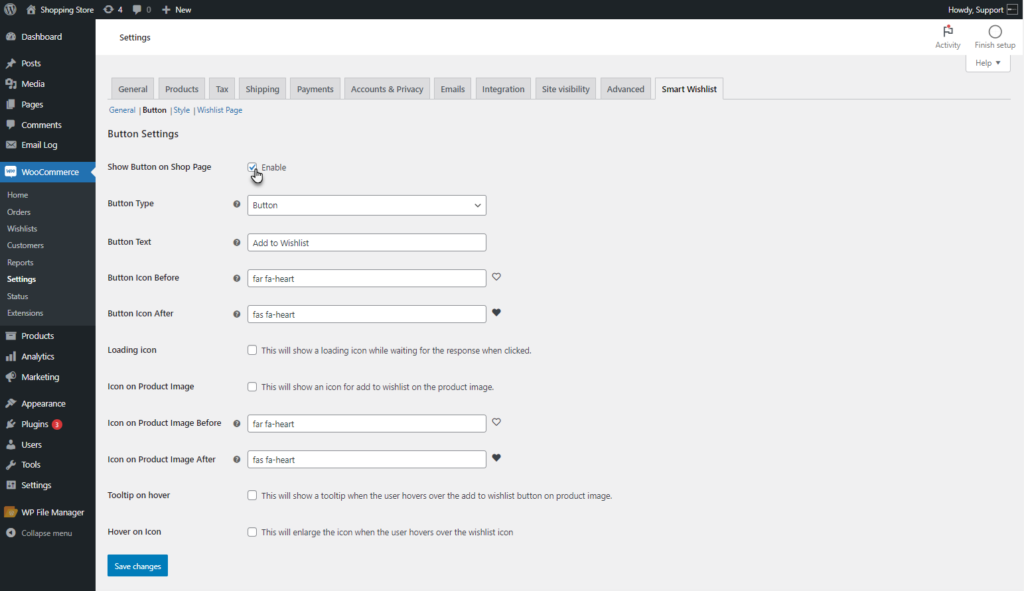
↑ Back to top- This tab enables the admin to configure the Add to Wishlist button settings.
Enable Wishlist Button
- Enable the Show Button on the Shop page. This will add an Add to Wishlist button on the Shop page.
Front End Impact
- Login to your account.
- Go to the Shop page.

Button Type
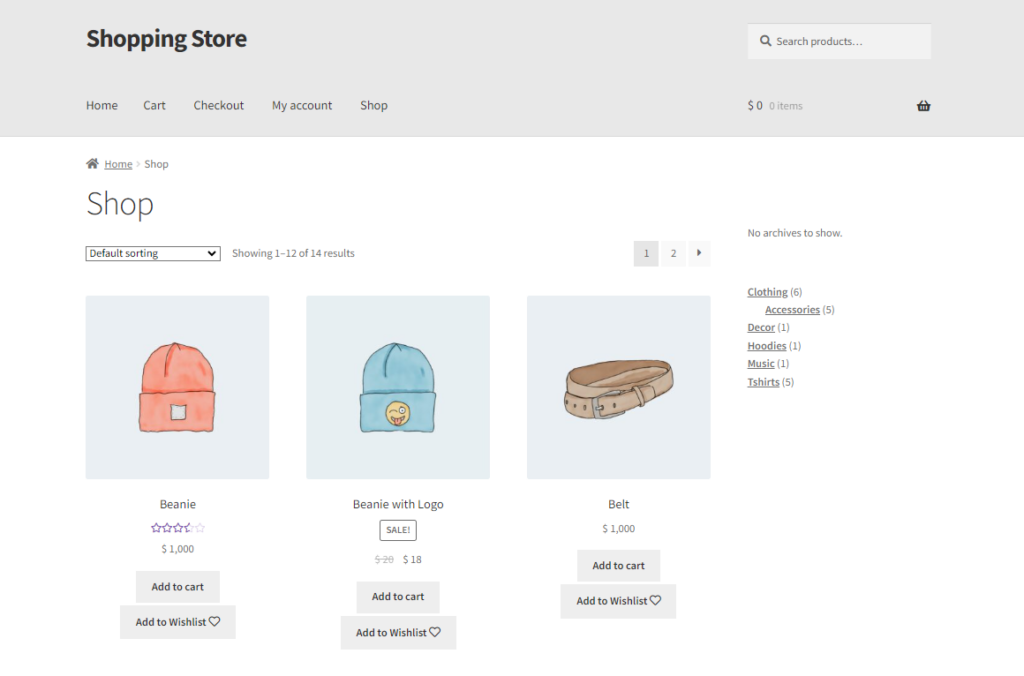
- The admin can select the Add to Wishlist button type from the drop-down. It provides the admin with two options, a Button and a Link.

Front End Impact
- Login to your account.
- Go to the Shop page.
Button
Link
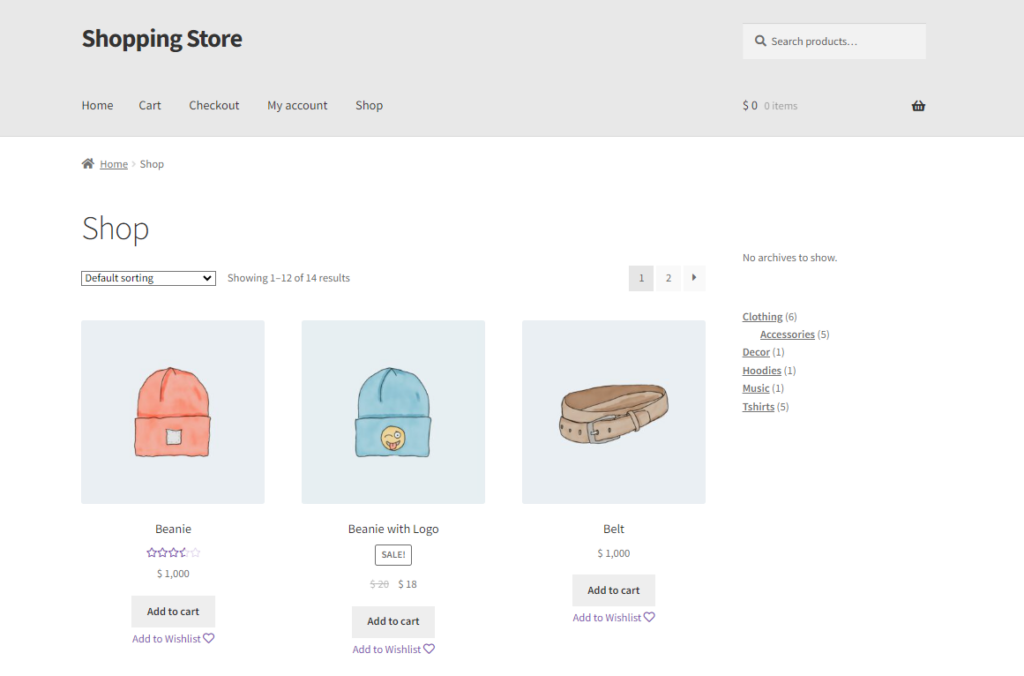
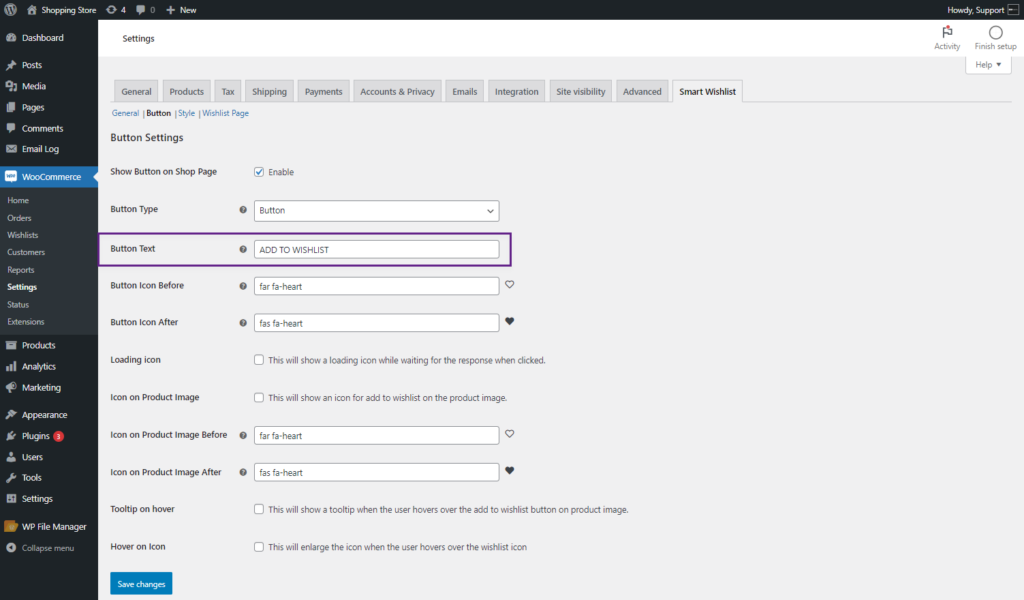
Button Text
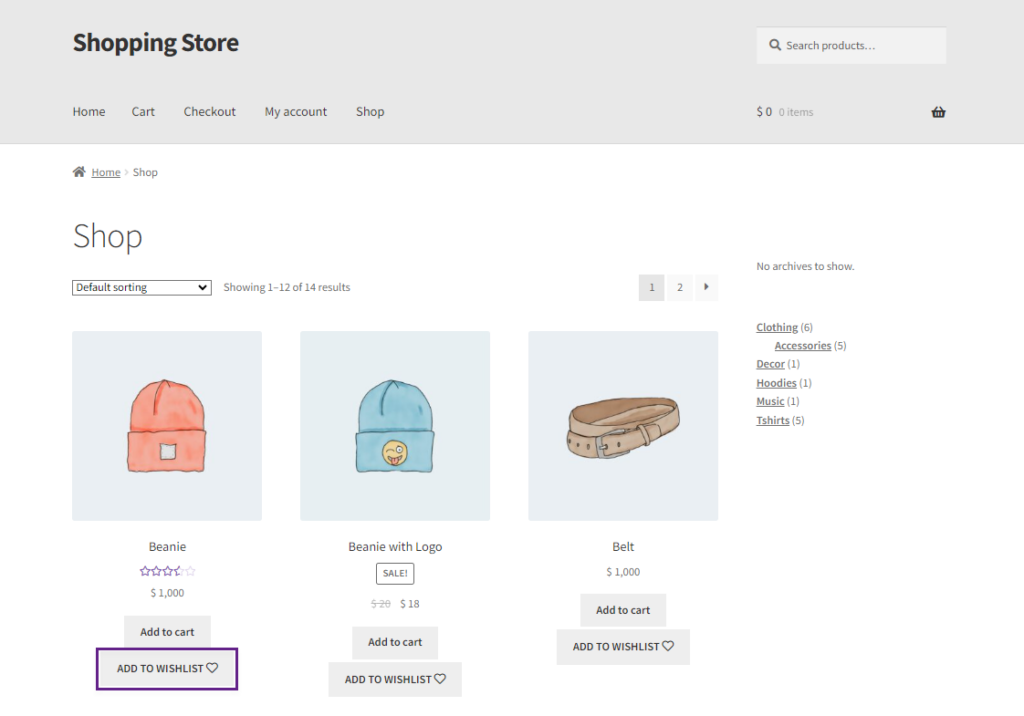
- The admin can change the Add to Wishlist button Text.
Front End Impact
- Login to your account.
- Go to the Shop page.
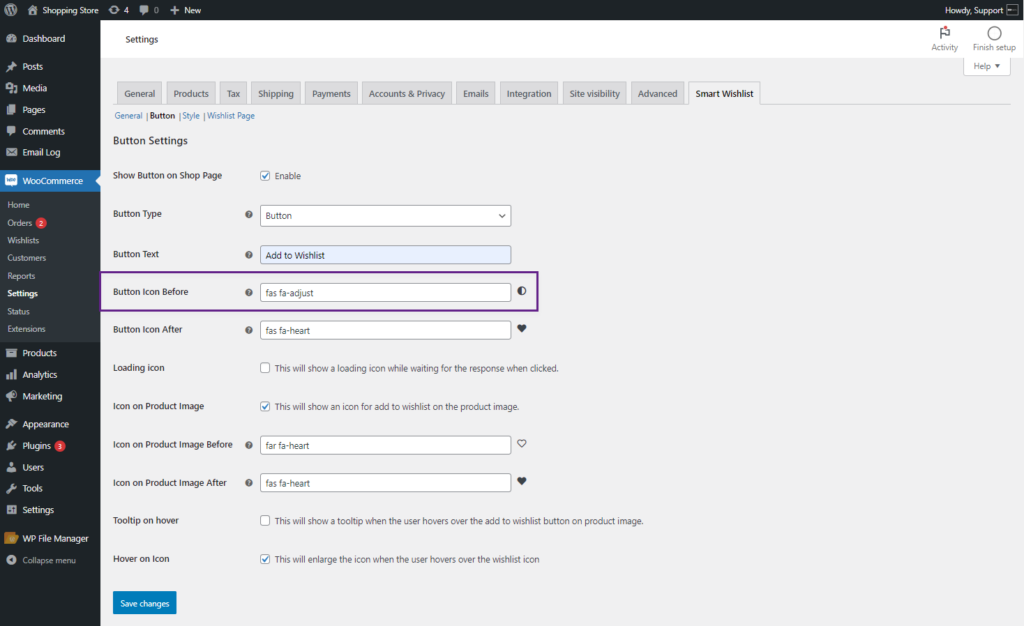
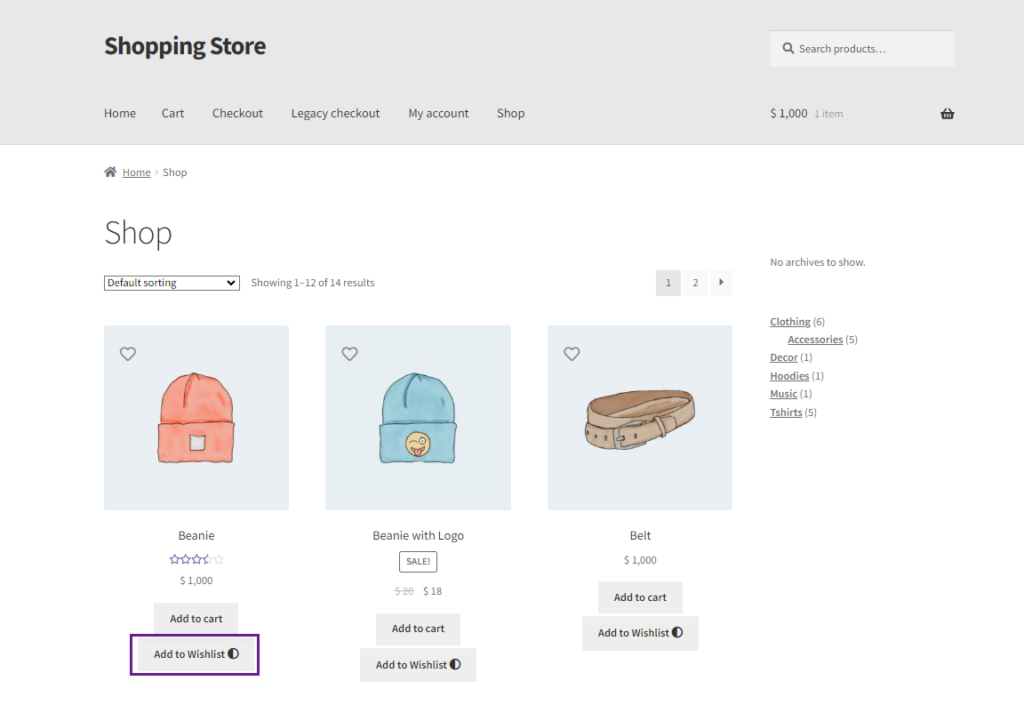
Button Icon before
- The admin can change the icon before the product is added to the wishlist.
Front End Impact
- Login to your account.
- Go to the Shop page.
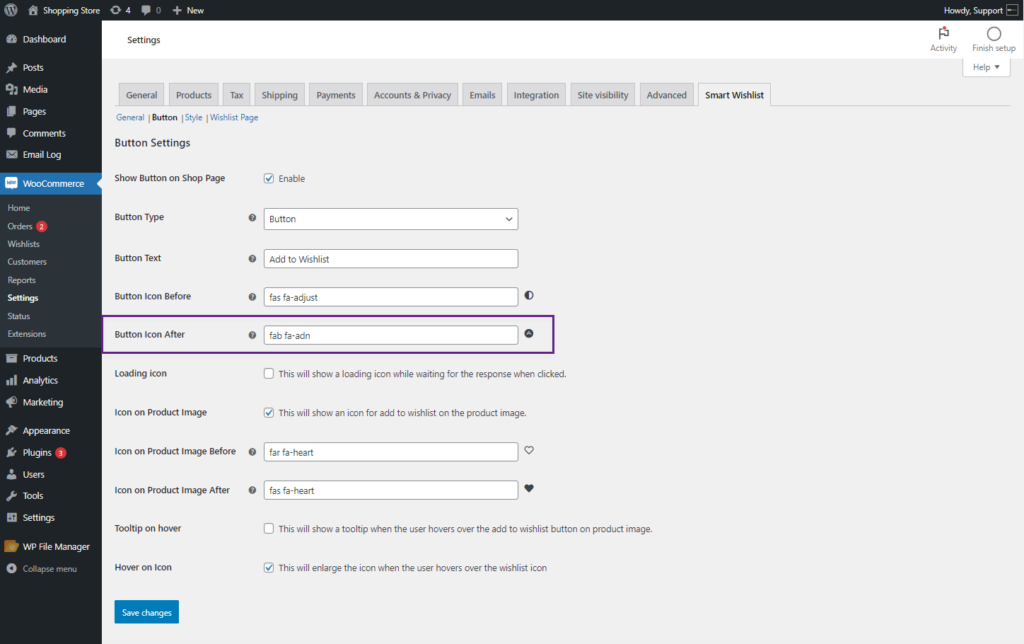
Button Icon after
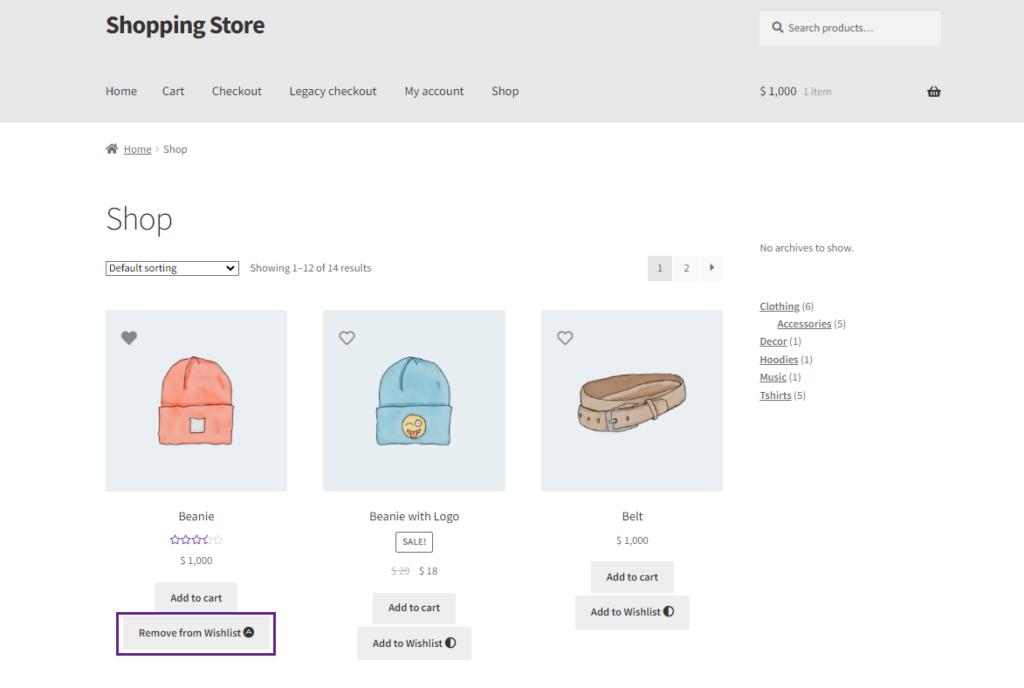
- The admin can change the icon after the product is added to the wishlist.
Front End Impact
- Login to your account.
- Go to the Shop page.
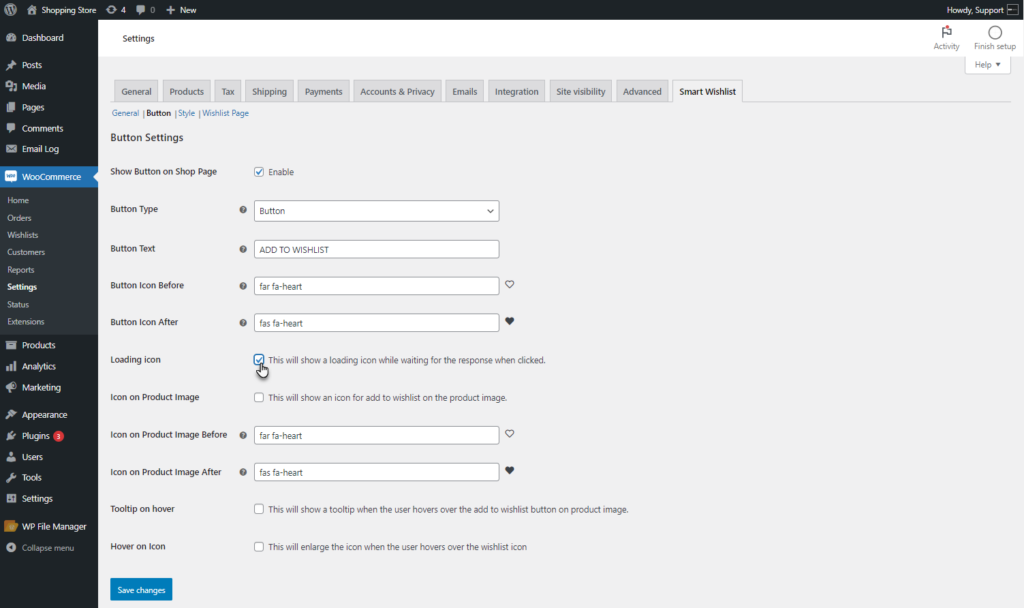
Loading icon
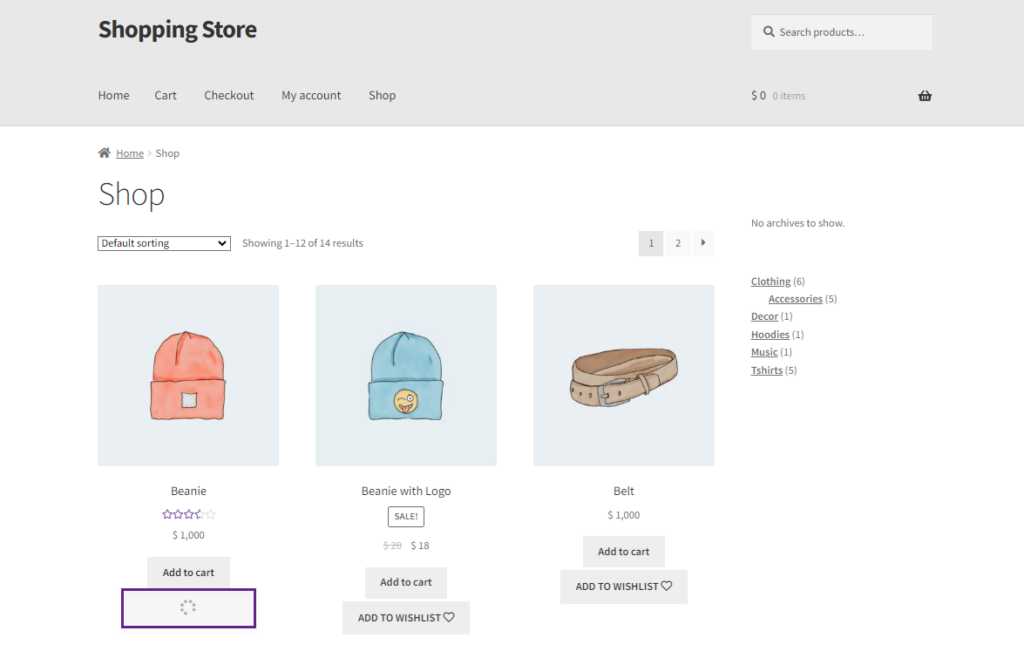
- Enable the Loading icon option. This will show a loading icon while waiting for the response when clicked.
Front End Impact
- Login to your account.
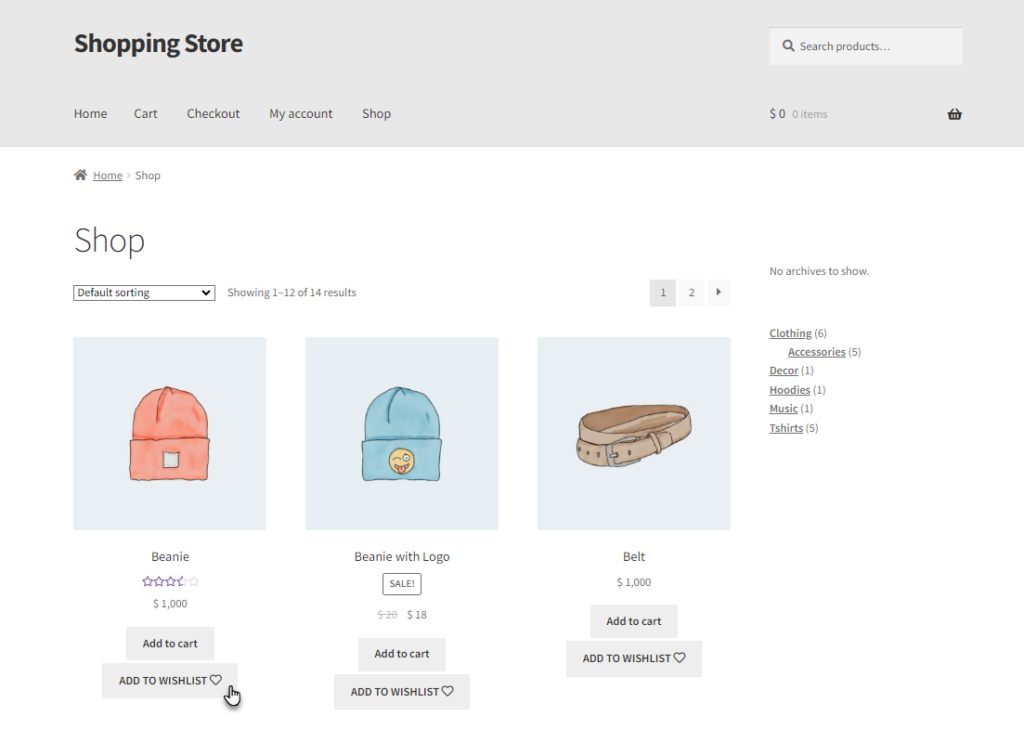
- Go to the Shop Page. Click on the Add to Wishlist button.
- It will show a loading icon while waiting for the response.
Icon on Product Image
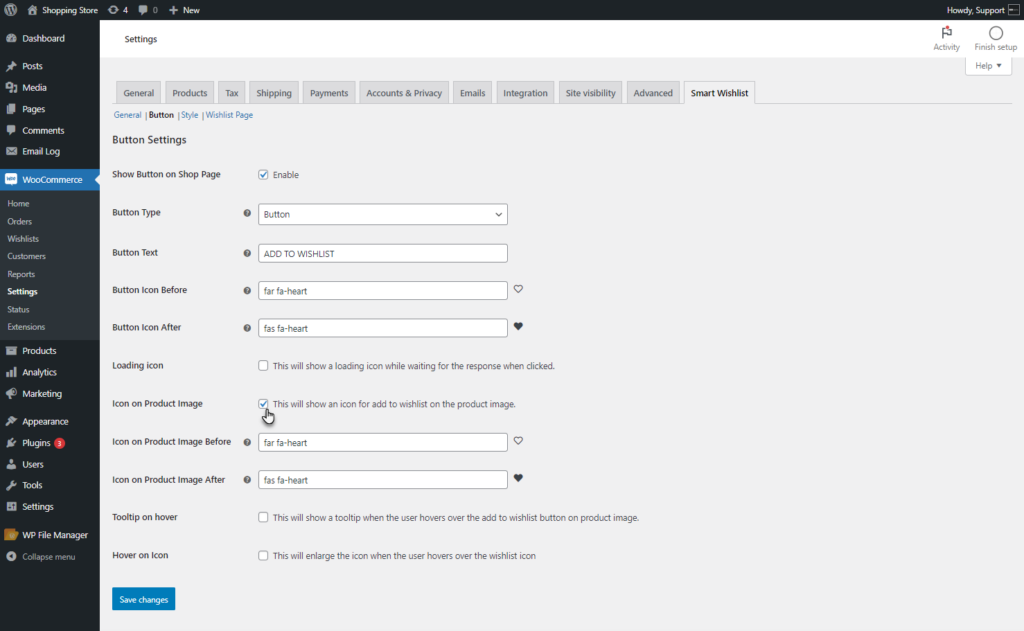
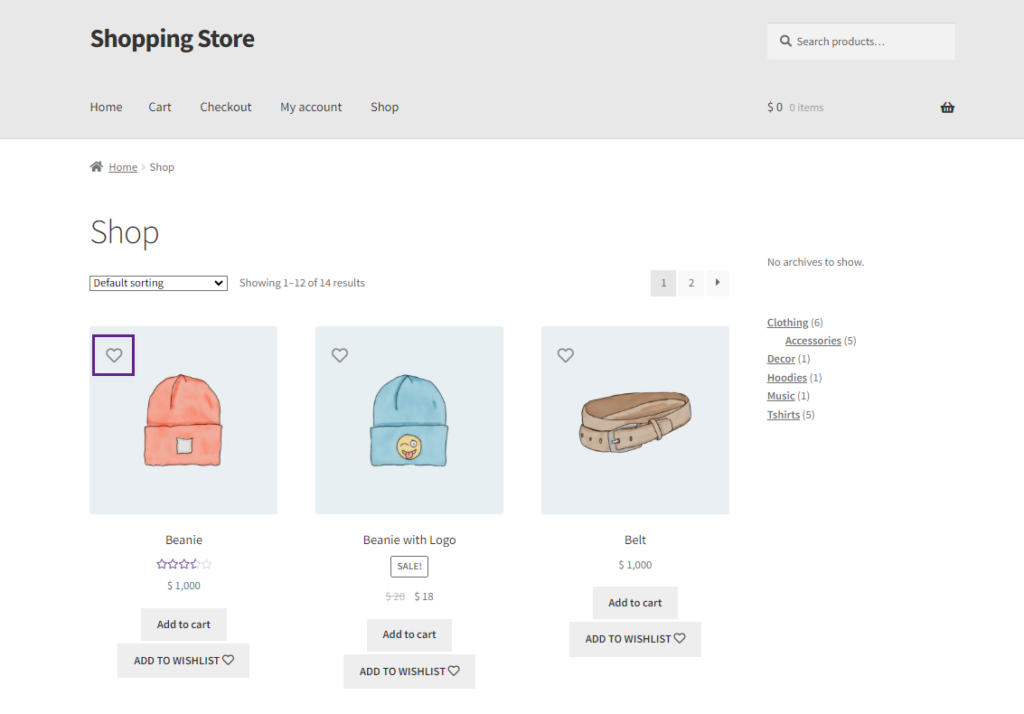
- Enable the Icon on the Product Image option. This will add an icon to the Product image.
Front End Impact
- Login to your account.
- Go to the Shop page.
Icon on Product Image Before
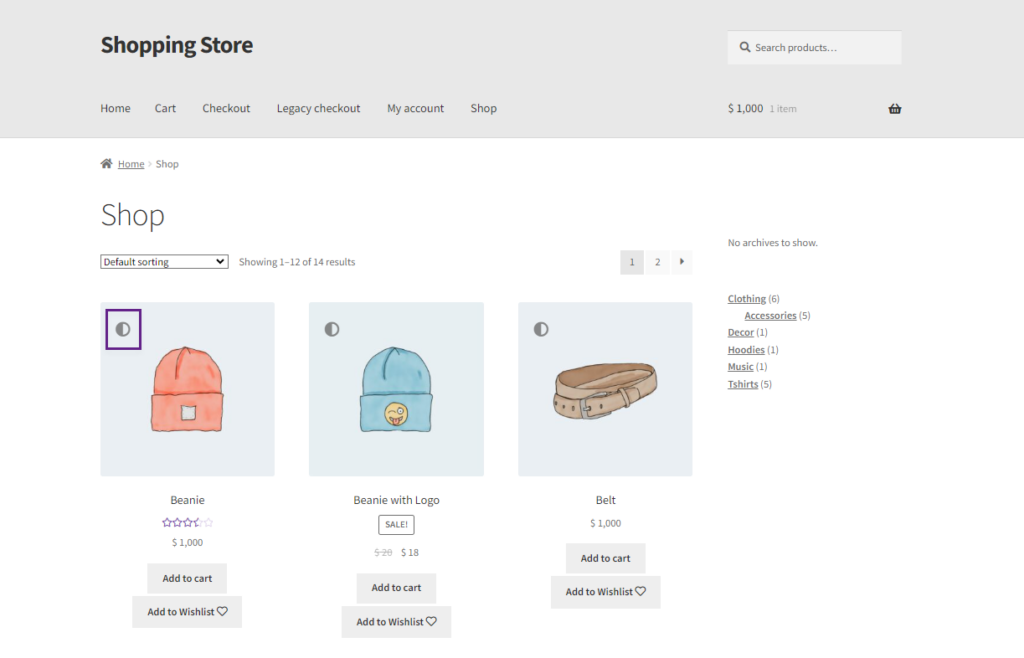
- The admin can change the icon on the Product Image before the product is added to the wishlist.
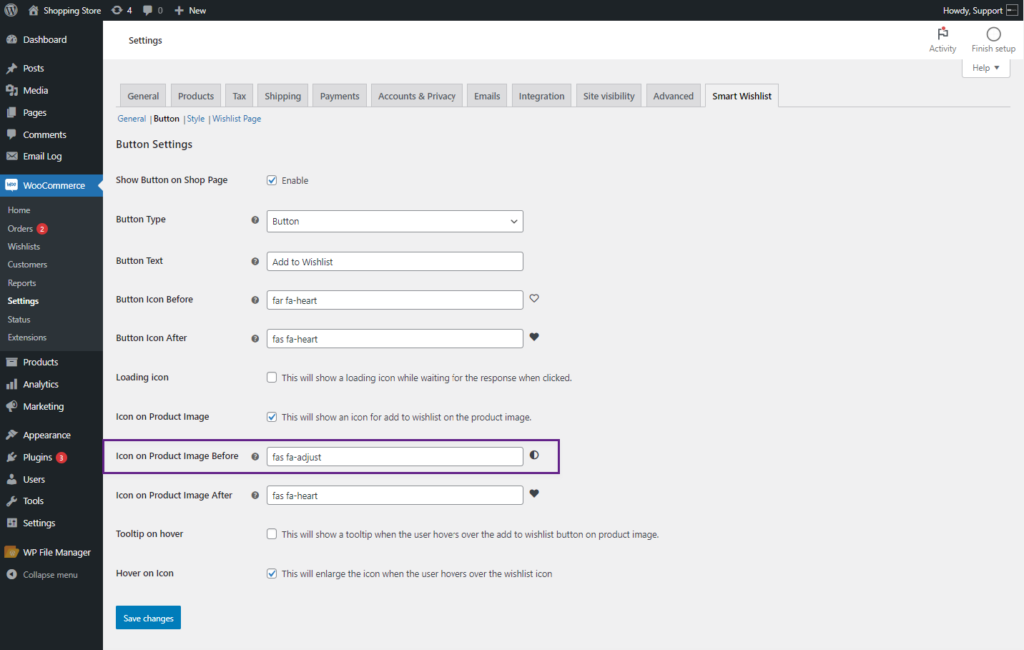
Front End Impact
- Login to your account.
- Go to the Shop page.
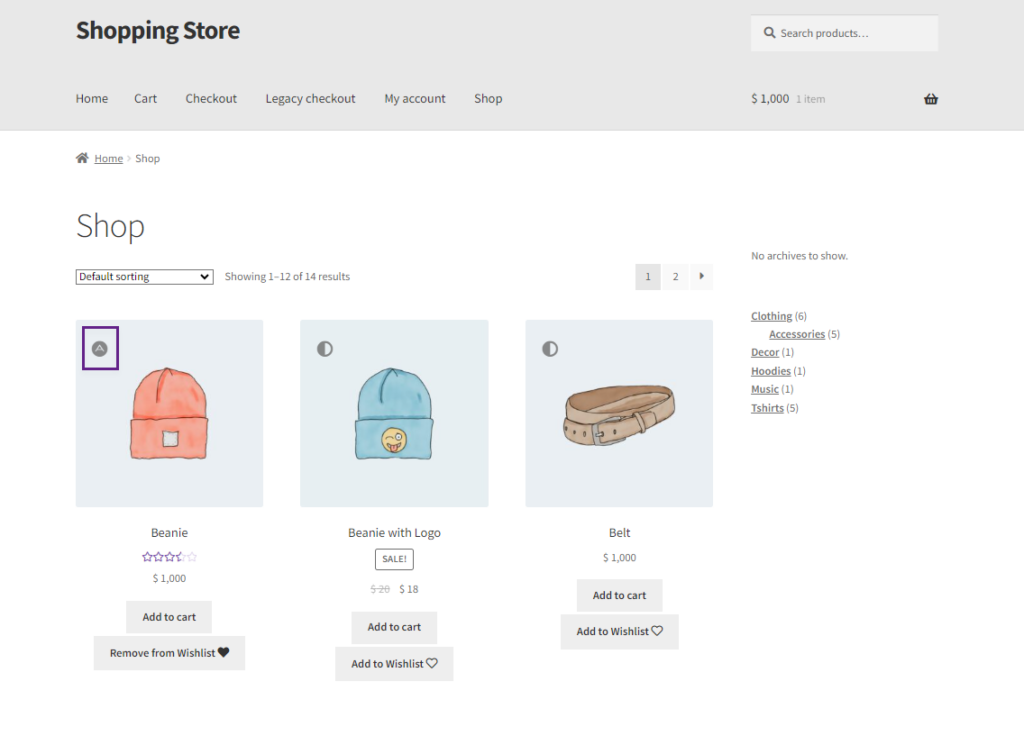
Icon on Product Image After
- The admin can change the icon on the Product Image After the product is added to the wishlist.

Front End Impact
- Login to your account.
- Go to the Shop page.
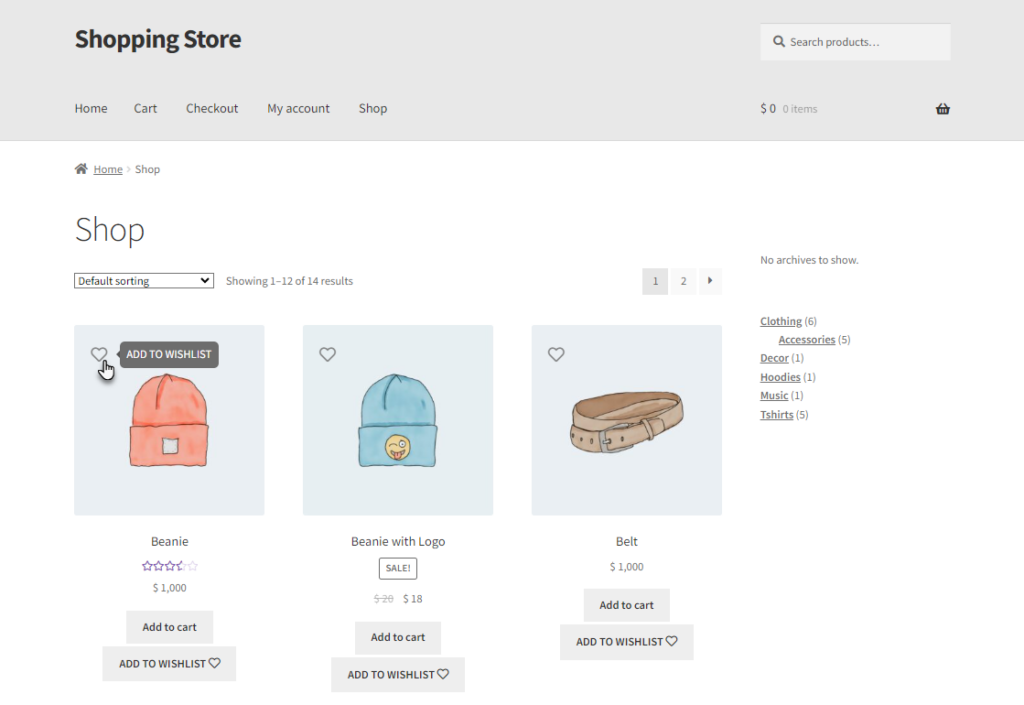
Tooltip on hover
- Enable the Tooltip on the hover option. This will show a tooltip when the user hovers over the add to wishlist button on the product image.

Front End Impact
- Login to your account.
- Go to the Shop page. Hover on the icon, a tooltip will appear.
Hover on Icon
- Enable the Hover on the Icon option. This will enlarge the icon when the user hovers over the wishlist icon.

Front End Impact
- Login to your account.
- Go to the Shop page.
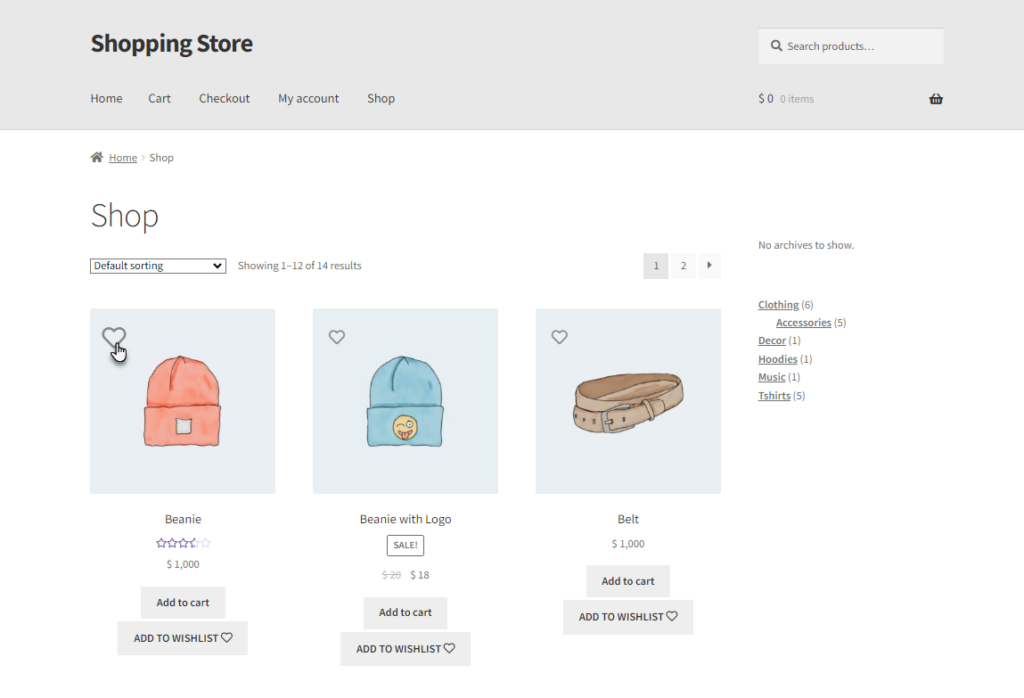
Display Add to Wishlist Button
↑ Back to topThis setting allows you to hide or show the Add to Wishlist button on products based on categories, tags, or specific product selections.
- Navigate to WooCommerce > Settings > Smart Wishlist > Display Add to Wishlist Button.
- Locate Display Add to Wishlist Button section.
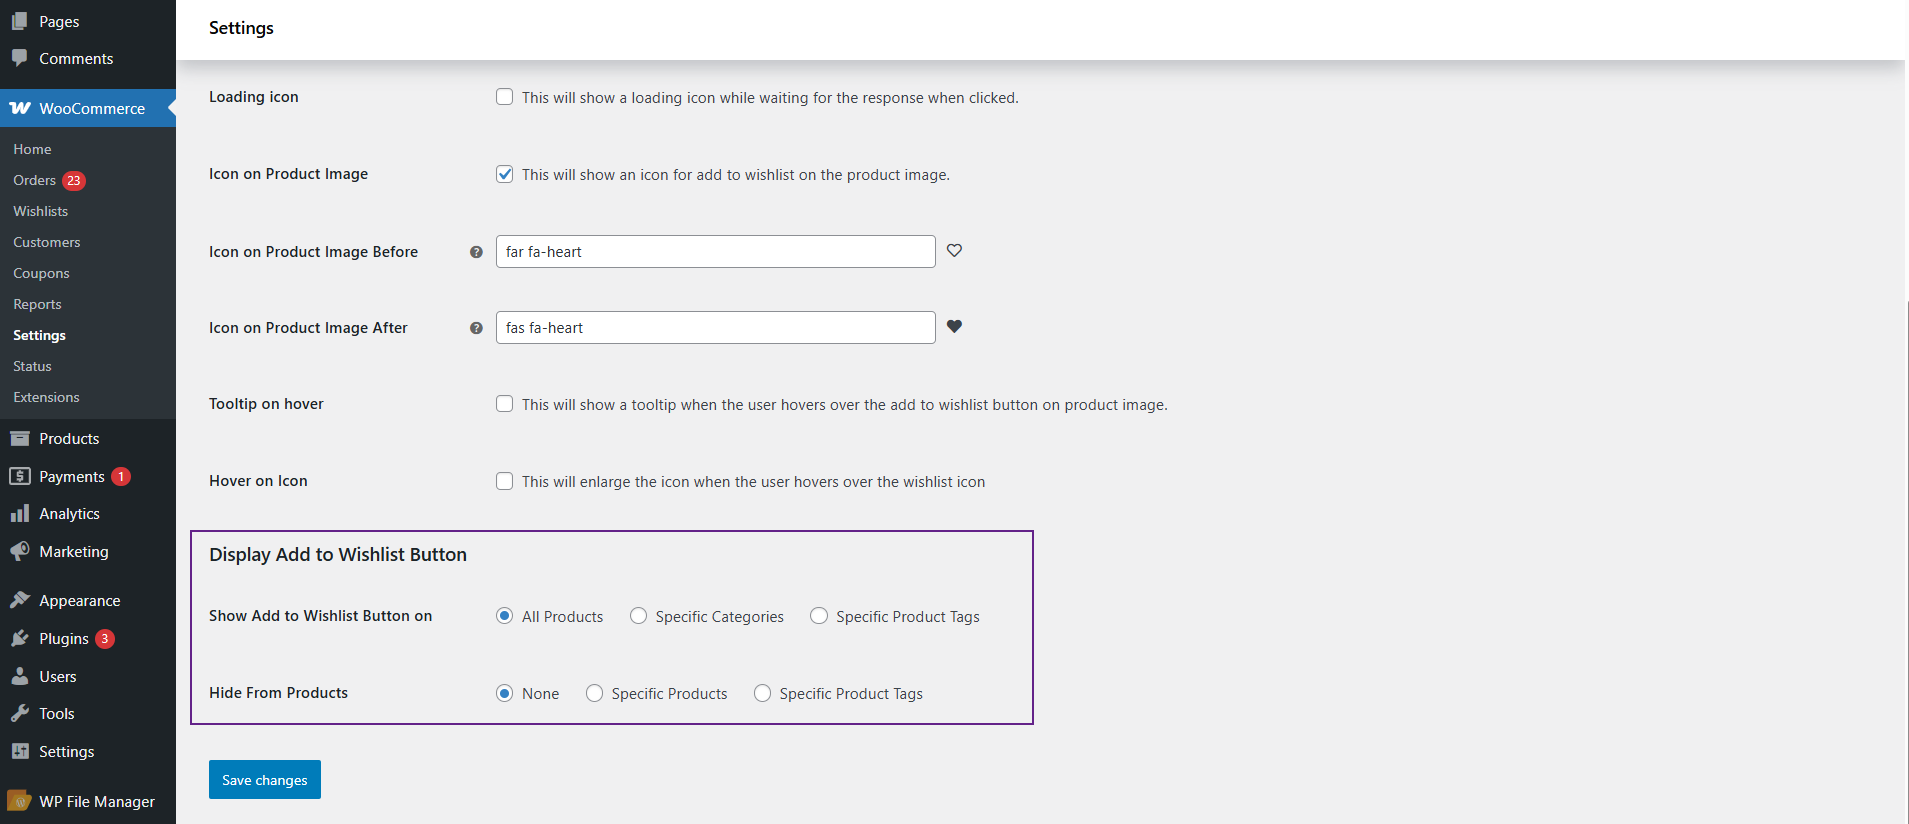
Show Add to Wishlist Button
- All Products
- The Add to Wishlist button will be displayed on every product in the shop.
- Works in conjunction with Hide From Products to exclude specific products or tags as needed.
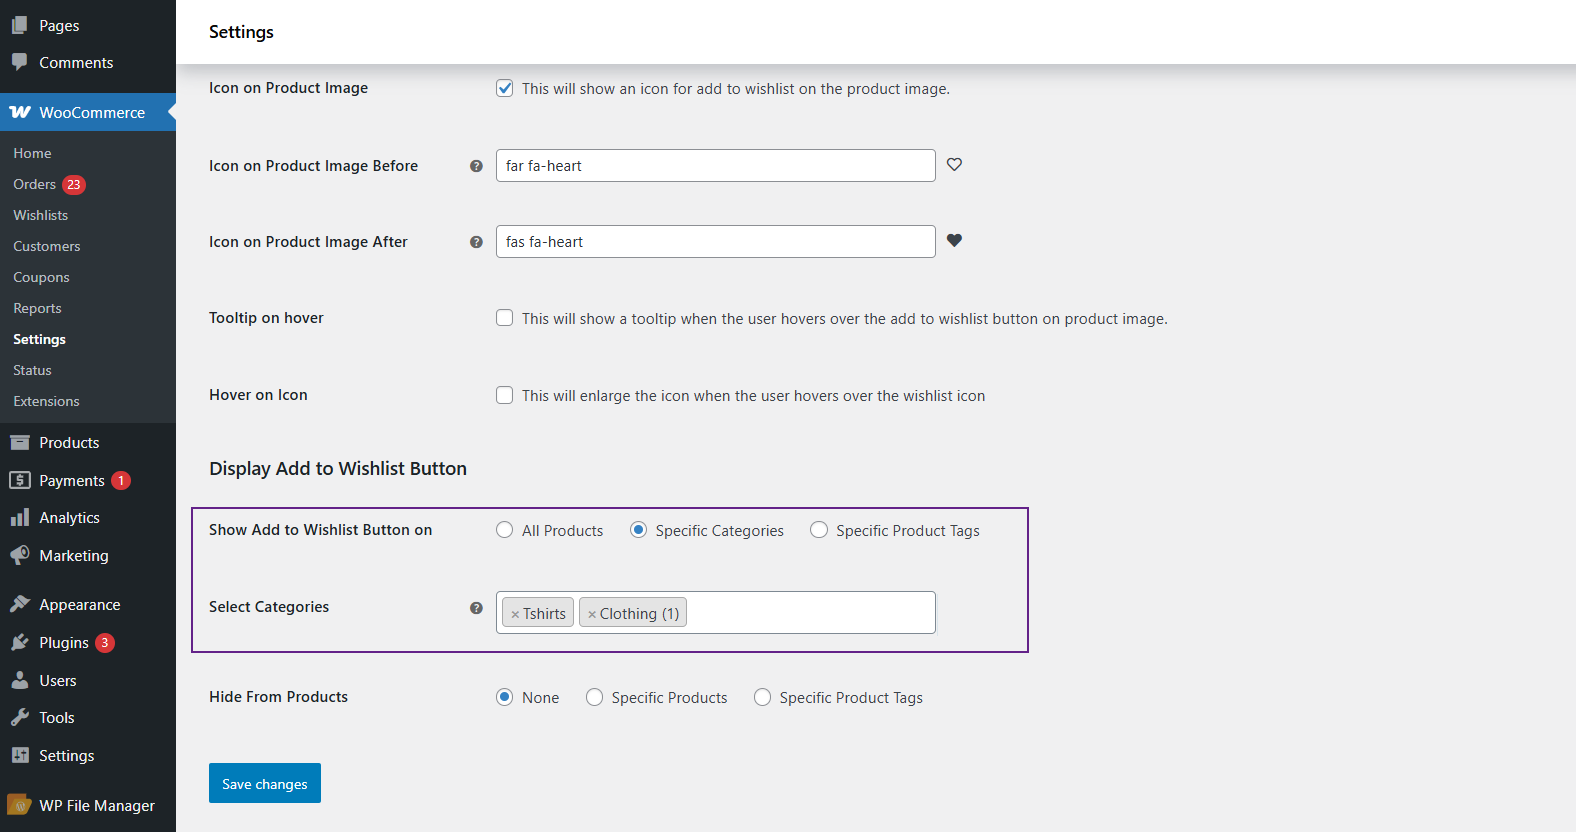
- Specific Categories
- The Add to Wishlist button will only be displayed on products that belong to the selected categories.
- A multi-selector box will appear, allowing you to choose categories.
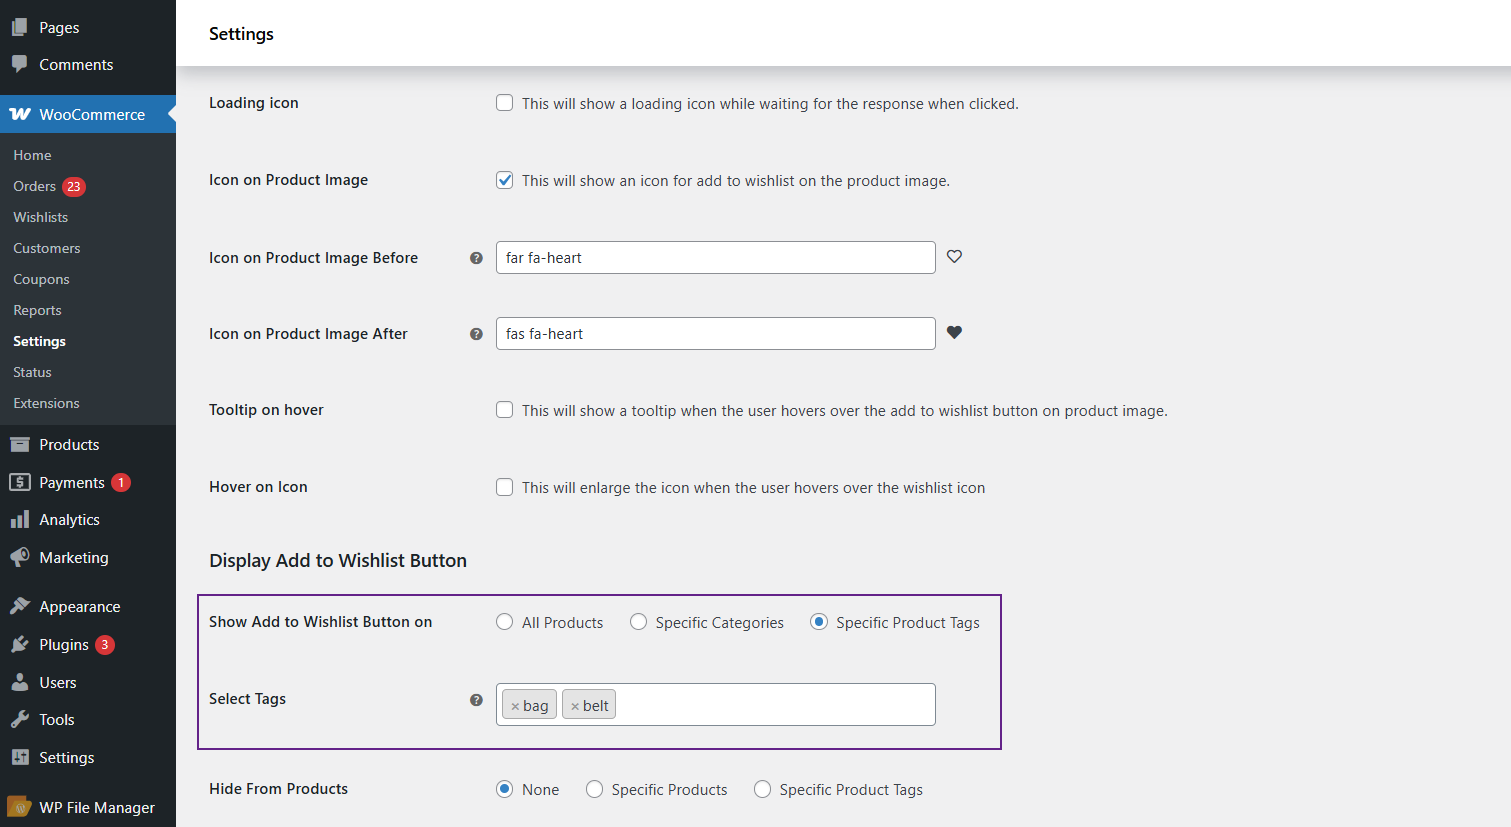
- Specific Product Tags
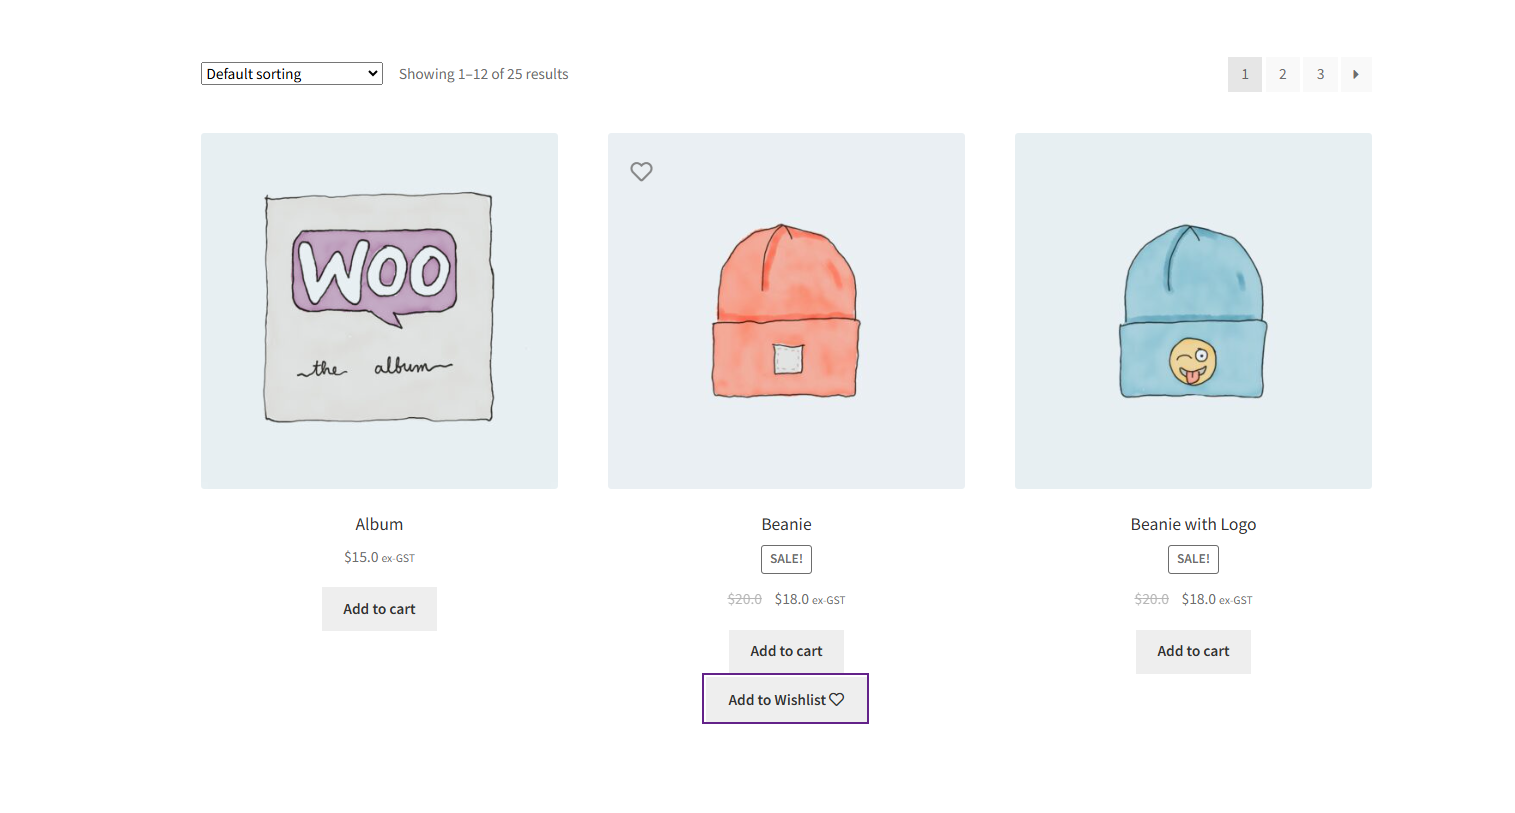
- The Add to Wishlist button will only be displayed on products that belong to the selected product tags.
- A multi-selector box will appear to let you choose tags.
Front-End-Impact
- Navigate to the Shop Page.
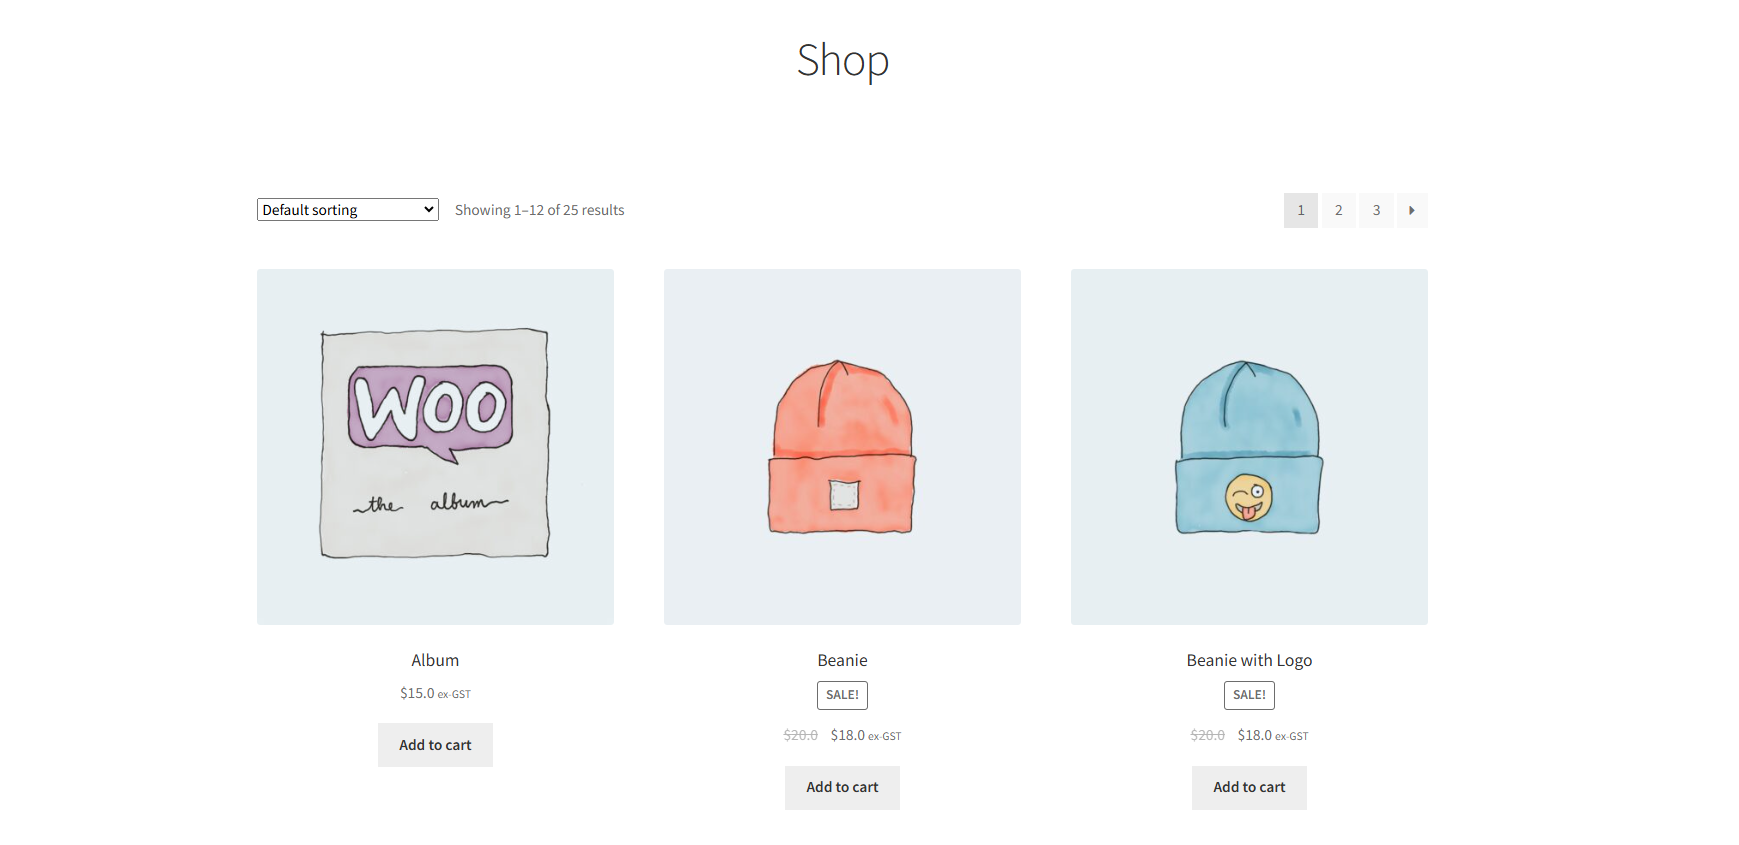
Depending on the backend selection:
- All Products: The “Add to Wishlist” button appears on every product.
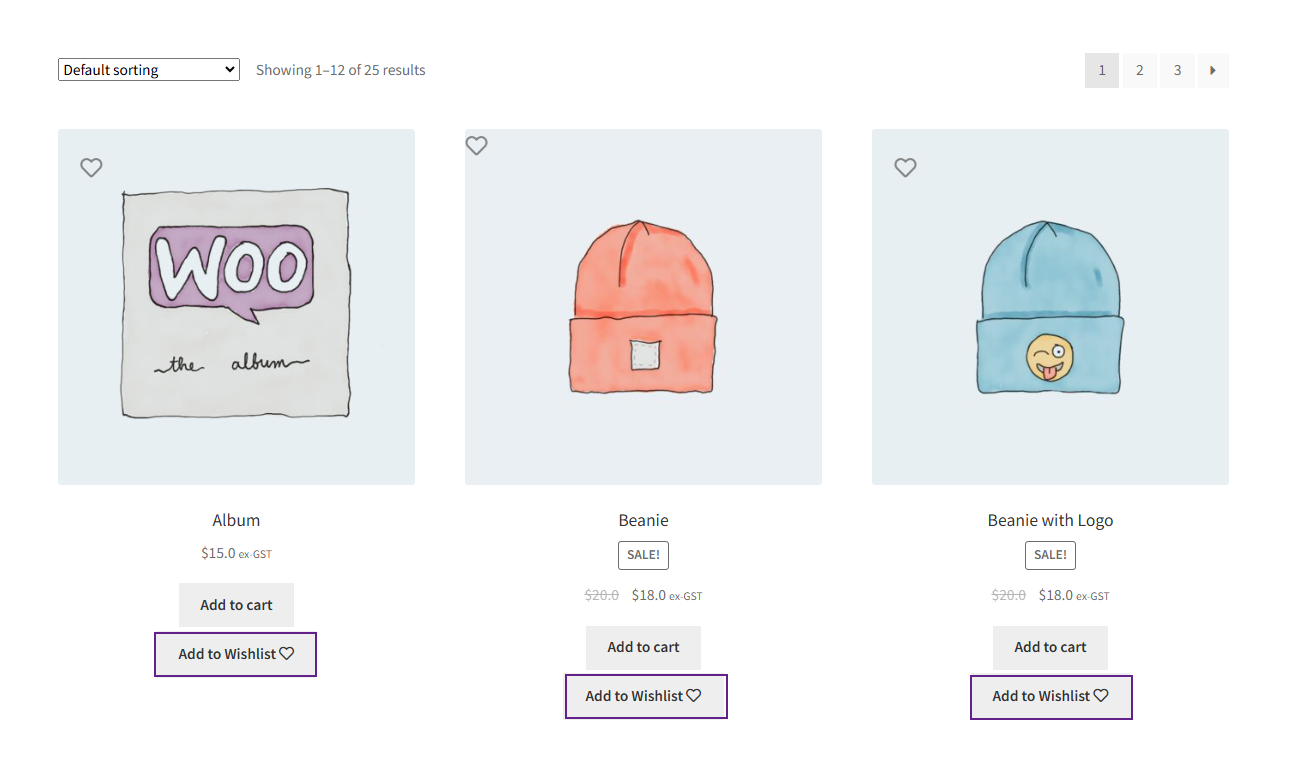
- Specific Categories: The “Add to Wishlist” button appears only on products inside selected categories.
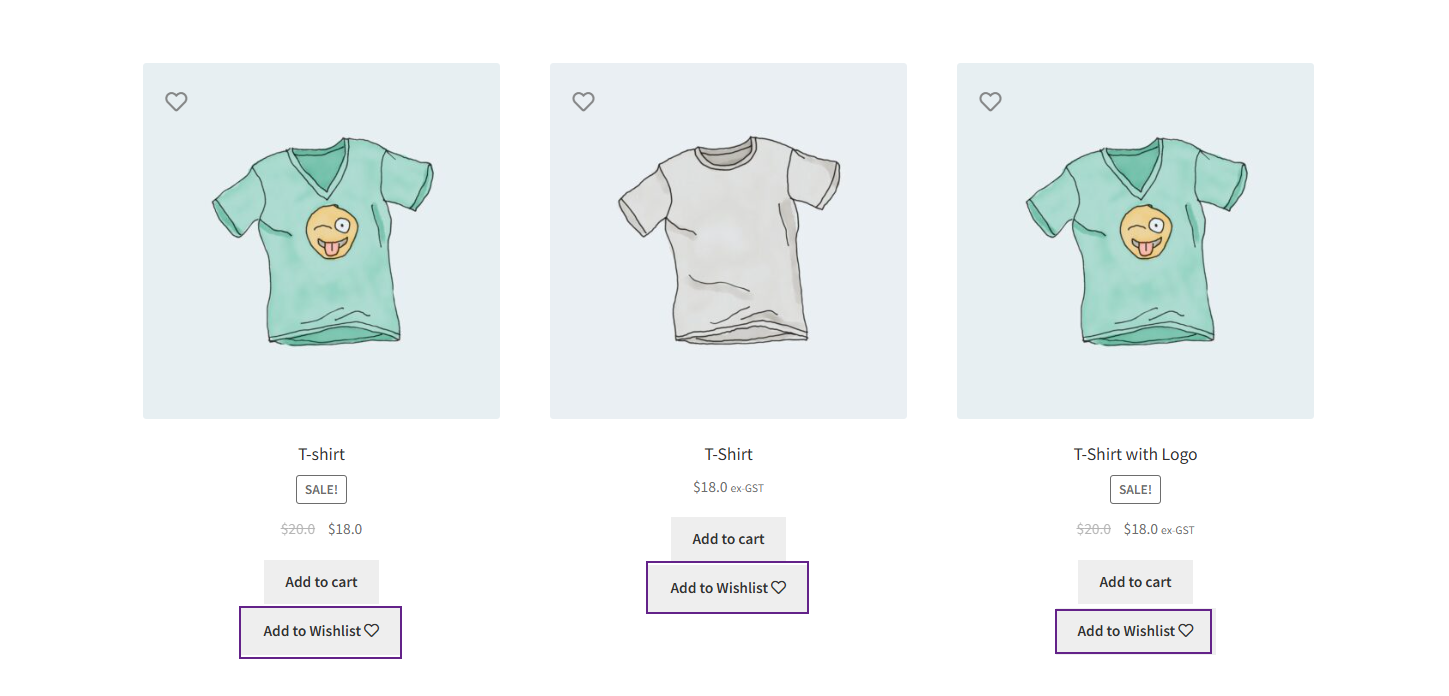
- Specific Product Tags: The Add to Wishlist button appears only on products with selected tags.
Hide From Products
↑ Back to top- None
- Select this if you don’t want to exclude any product.
- The Add to Wishlist button will be displayed everywhere according to your main selection (All Products, Categories, or Tags).

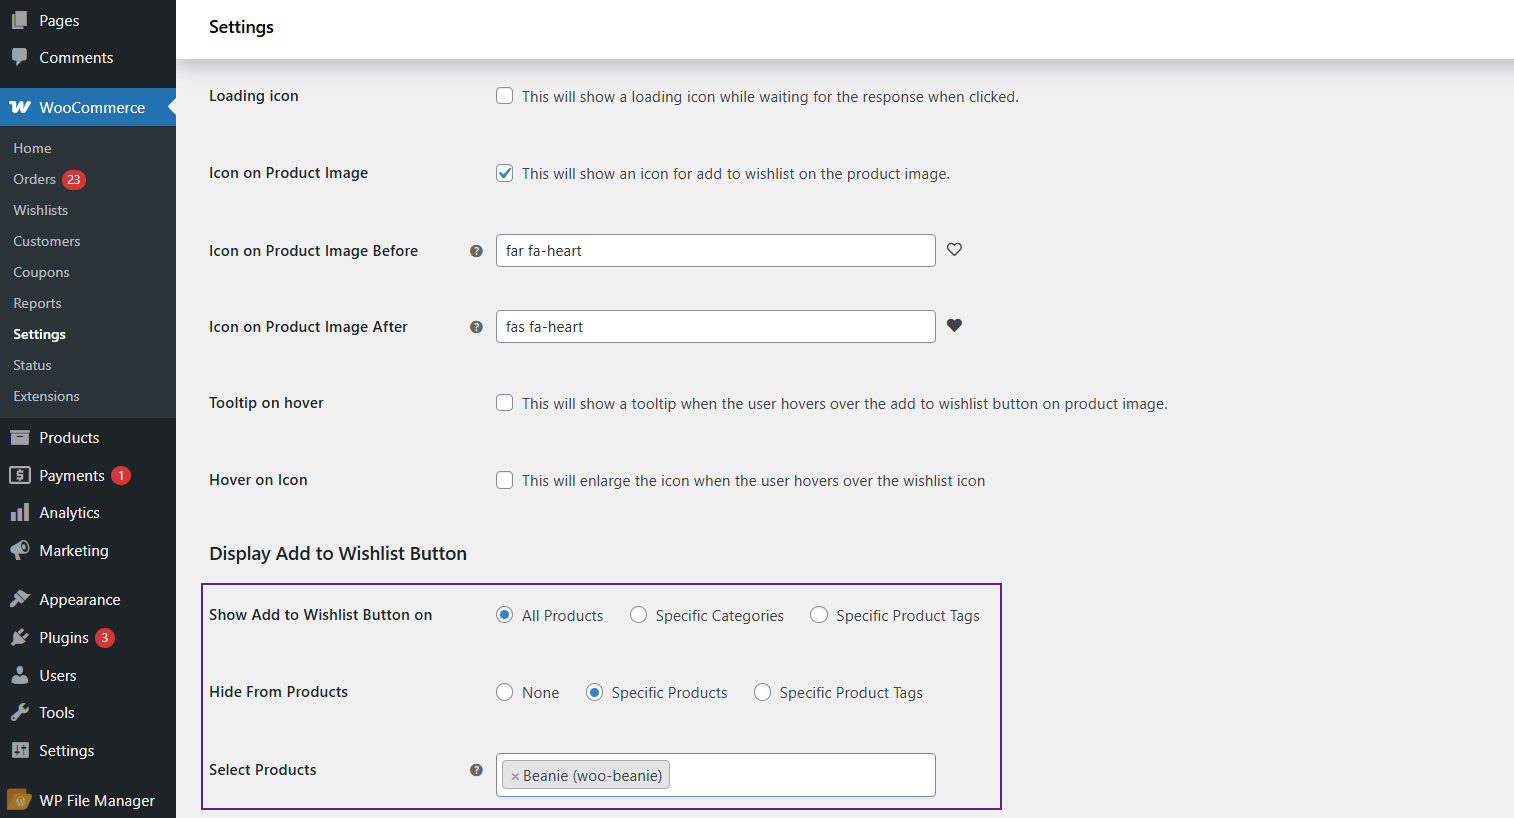
- Specific Products
- Select this if you want to hide the Add to Wishlist button on specific products.
- A multi-selector box will appear to choose products.

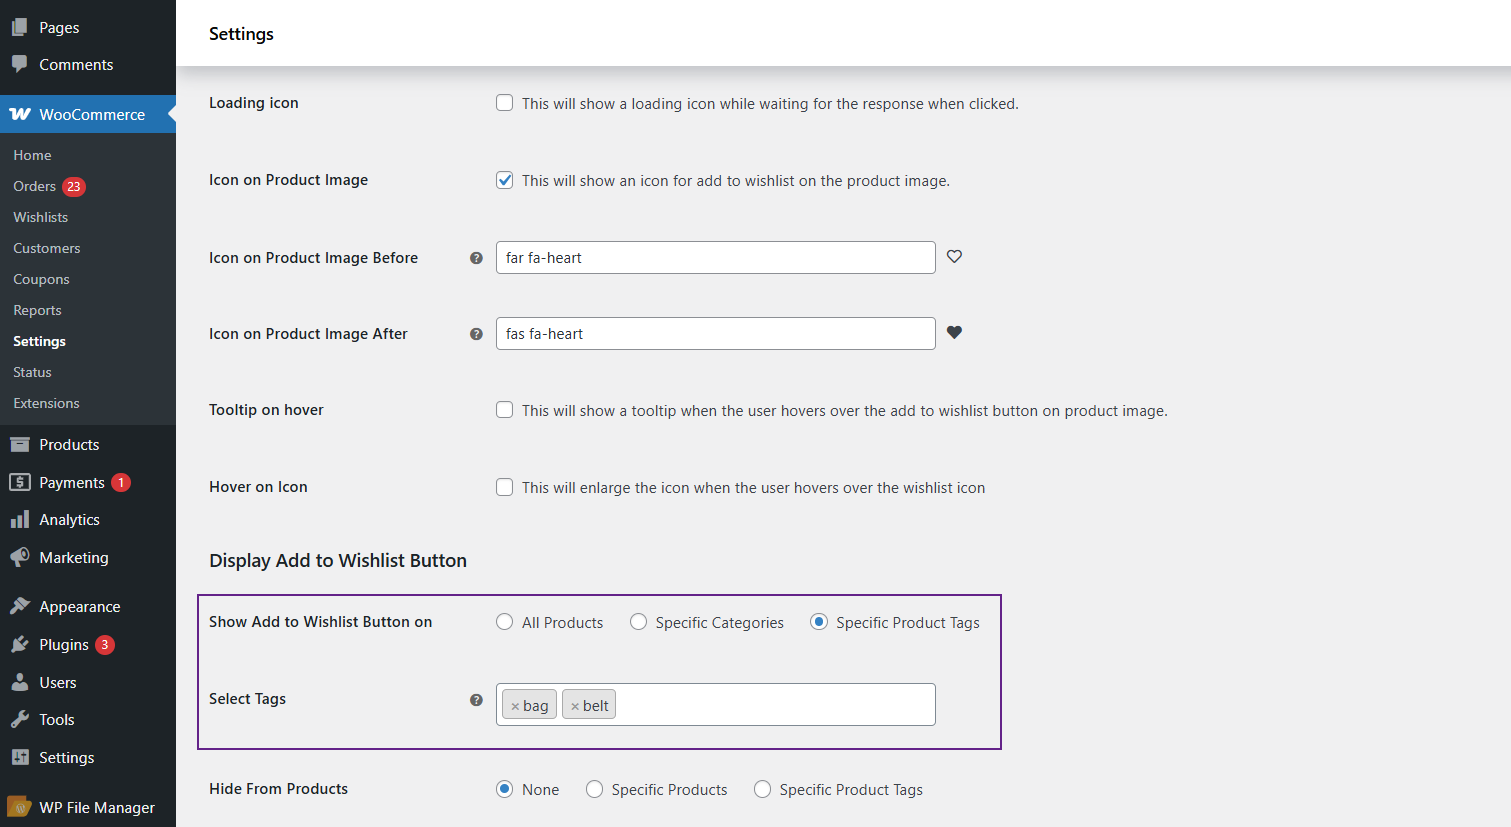
- Specific Product Tags
- Select this if you want to hide the Add to Wishlist button on products belonging to certain tags.
- A multi-selector box will appear to choose product tags.
Front-End-Impact
- Navigate to the Shop Page
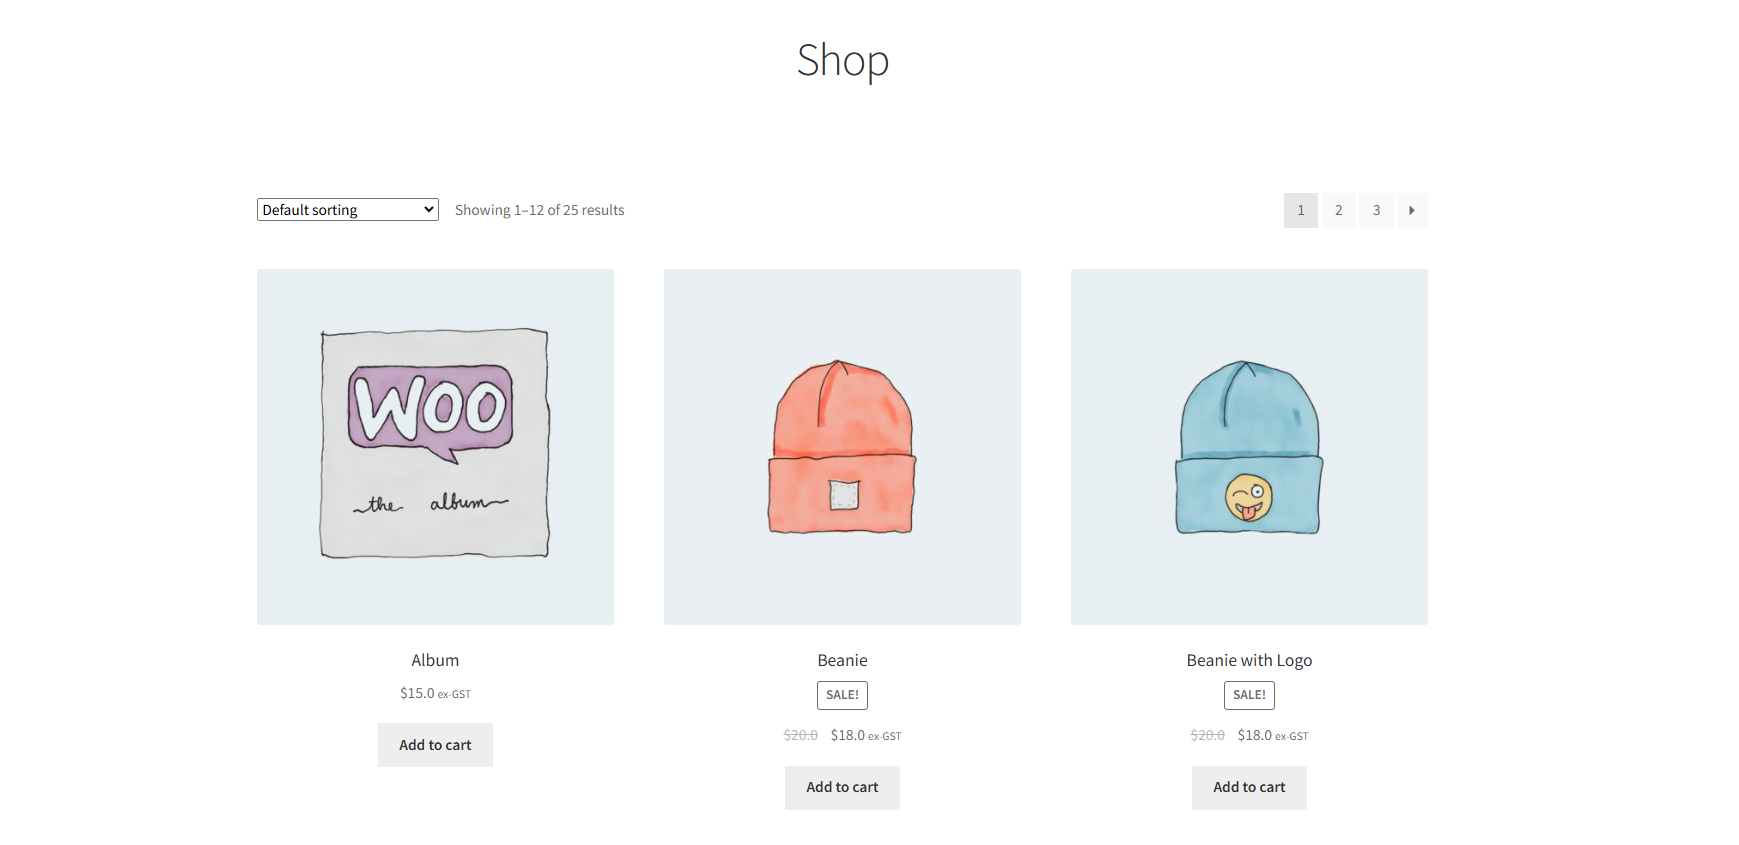
- Depending on the backend selection:
- None: Button shows everywhere.
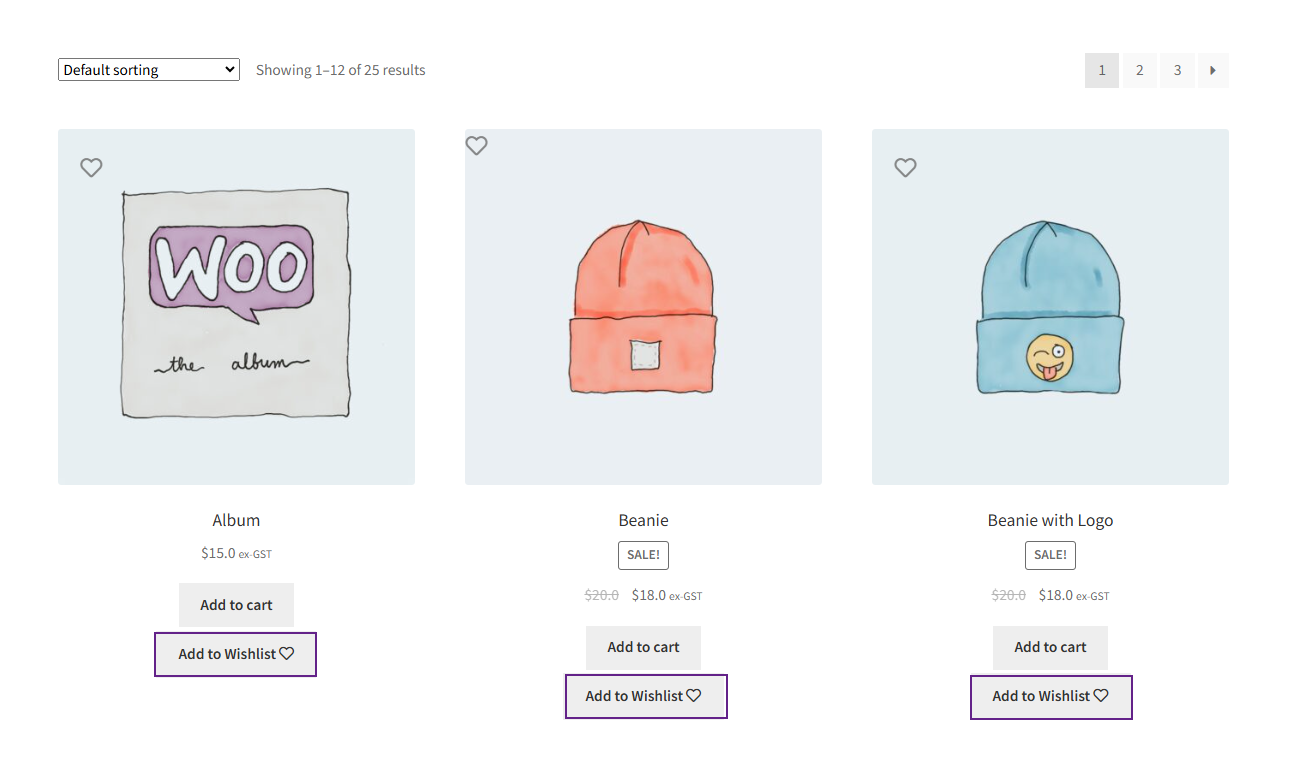
- Specific Products: Button hidden only on selected products.
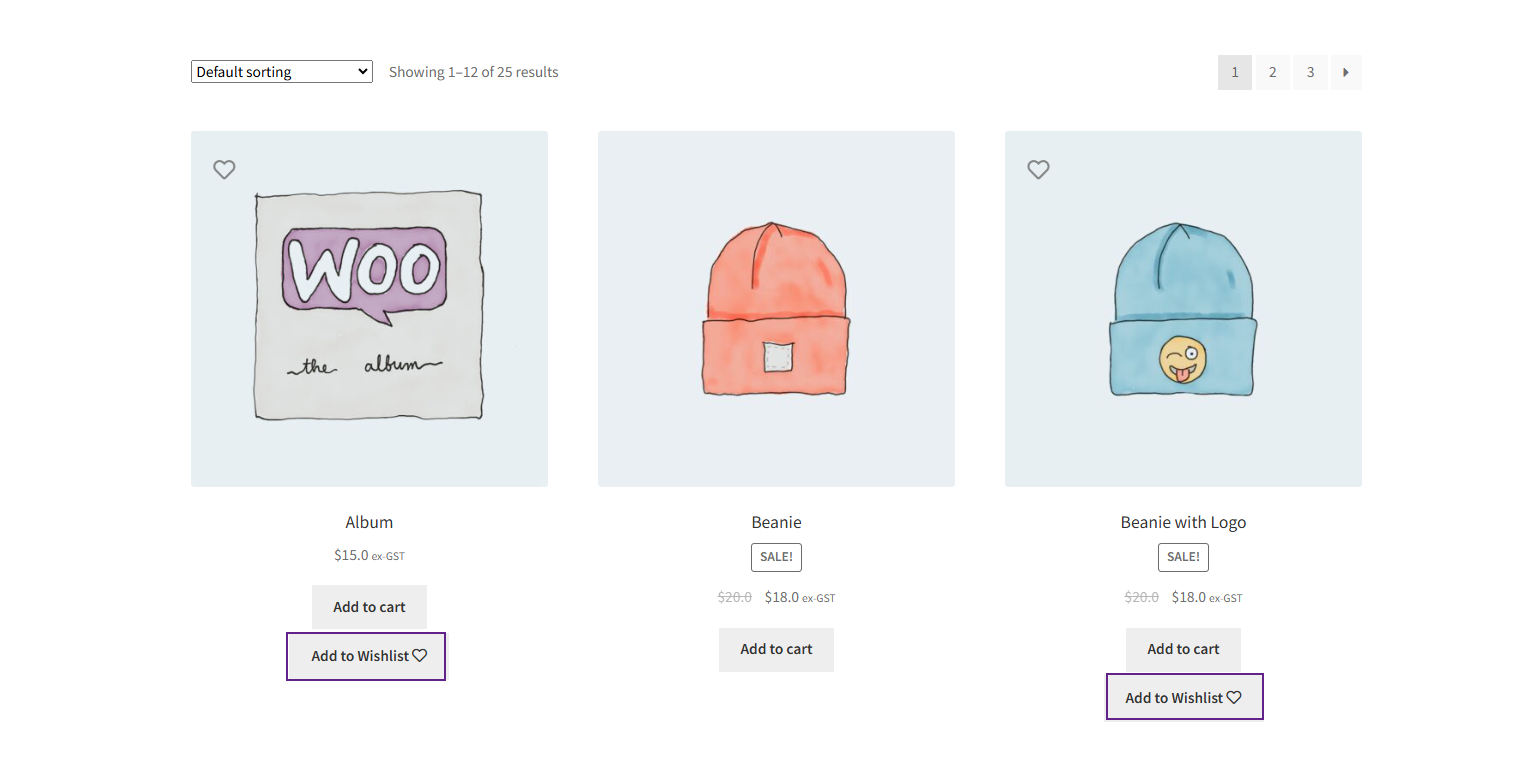
- Specific Product Tags: The button is hidden only on products with those tags.

Style Tab
↑ Back to top- This section enables the admin to style the Add to Wishlist button.
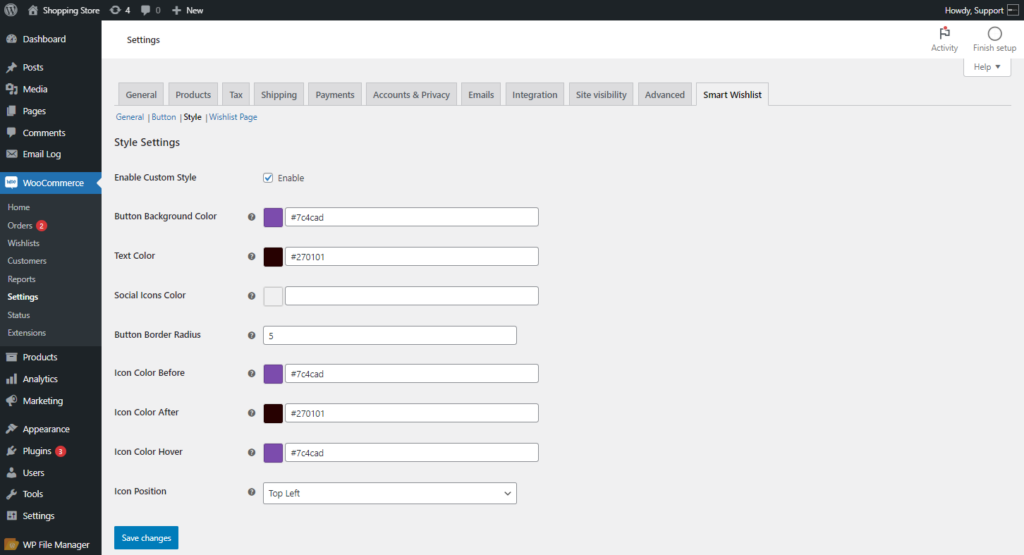
- Enable the Custom style option.
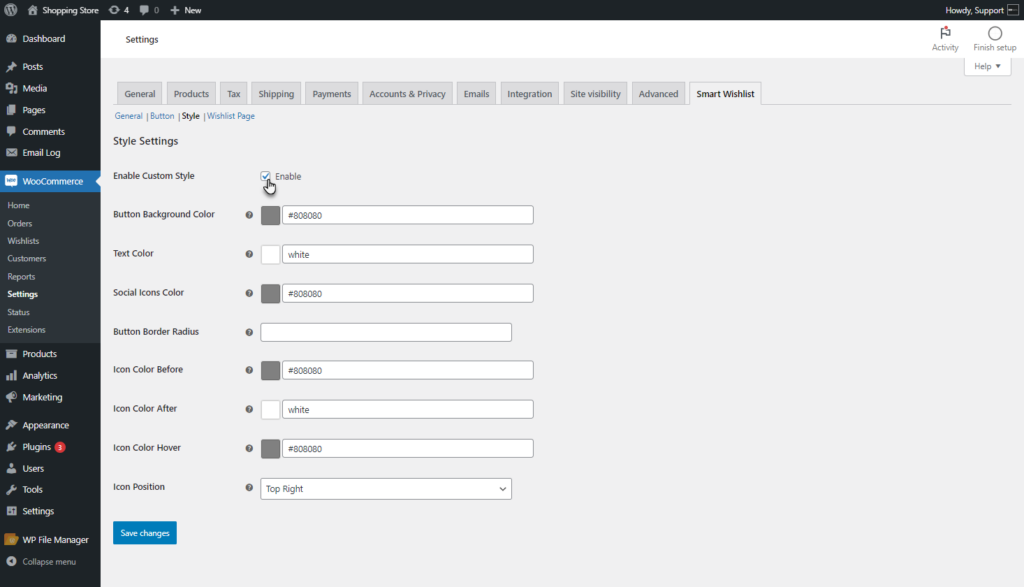
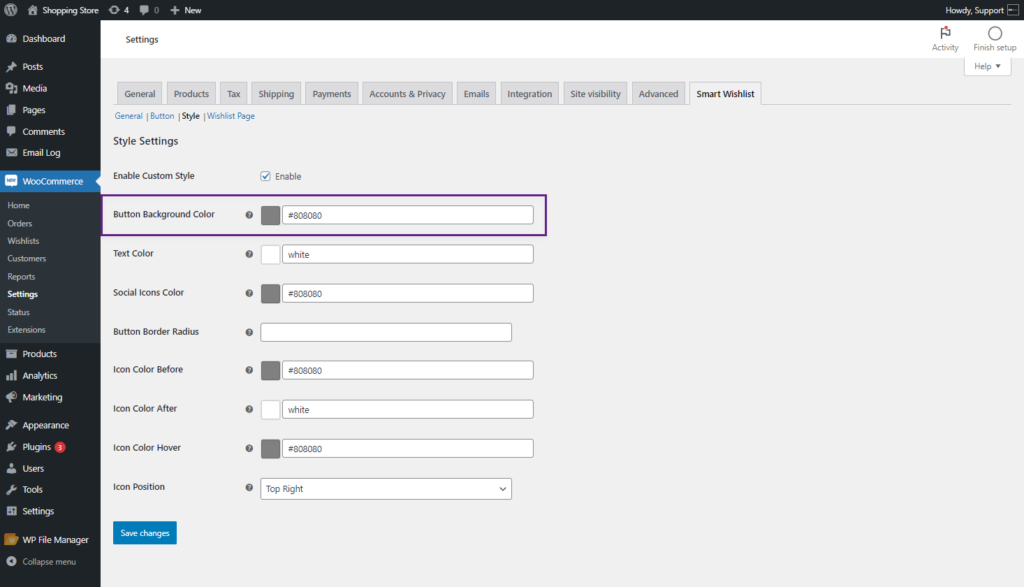
- Button Background Color: The admin can change the background color of the Add to Wishlist button.
- Text Color: The admin can change the text color of the Add to Wishlist button.
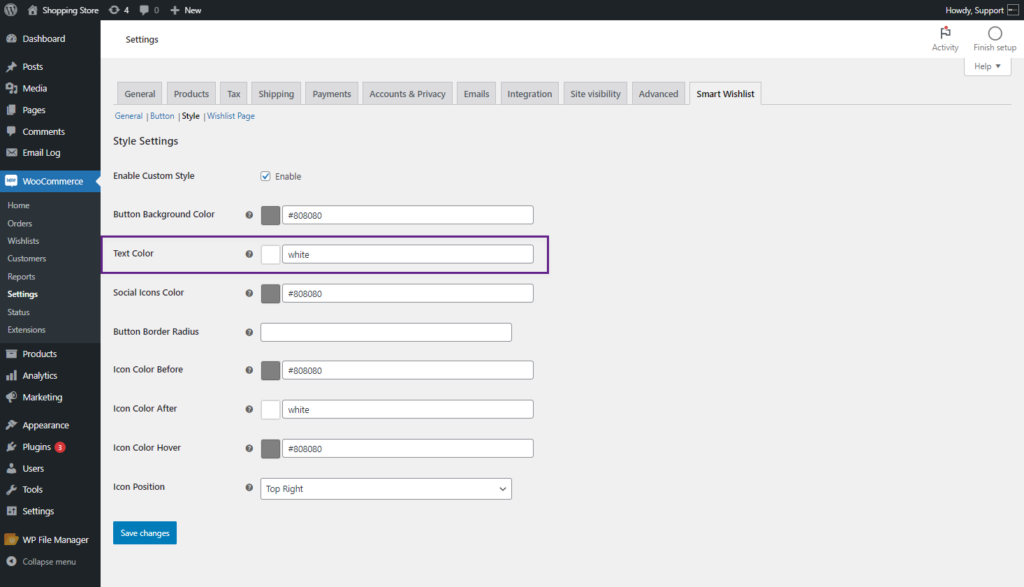
- Social Icon Color: The admin can change the Social icon’s colors.
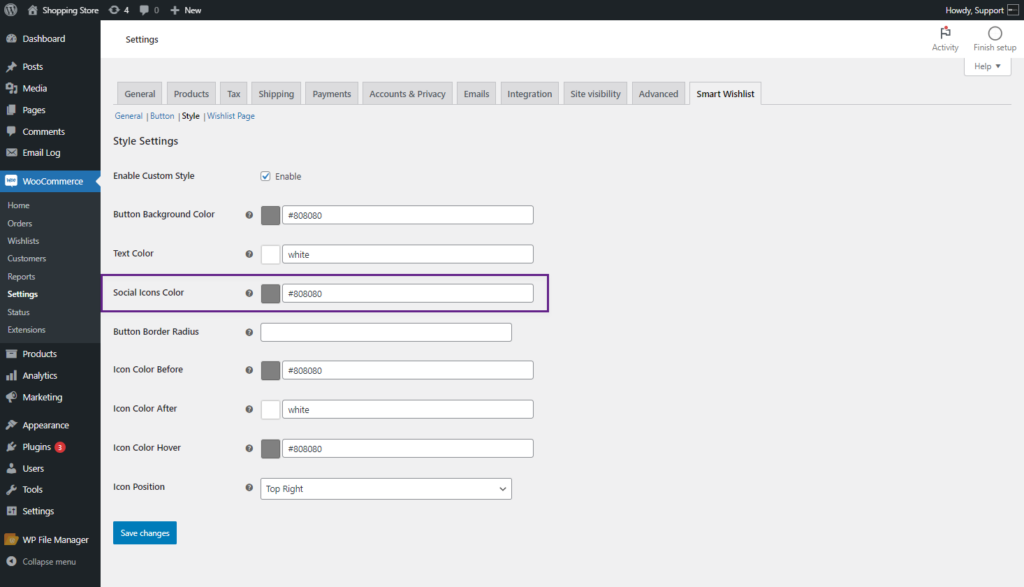
- Button Border Radius: The admin can change the radius of the Add to Wishlist button.
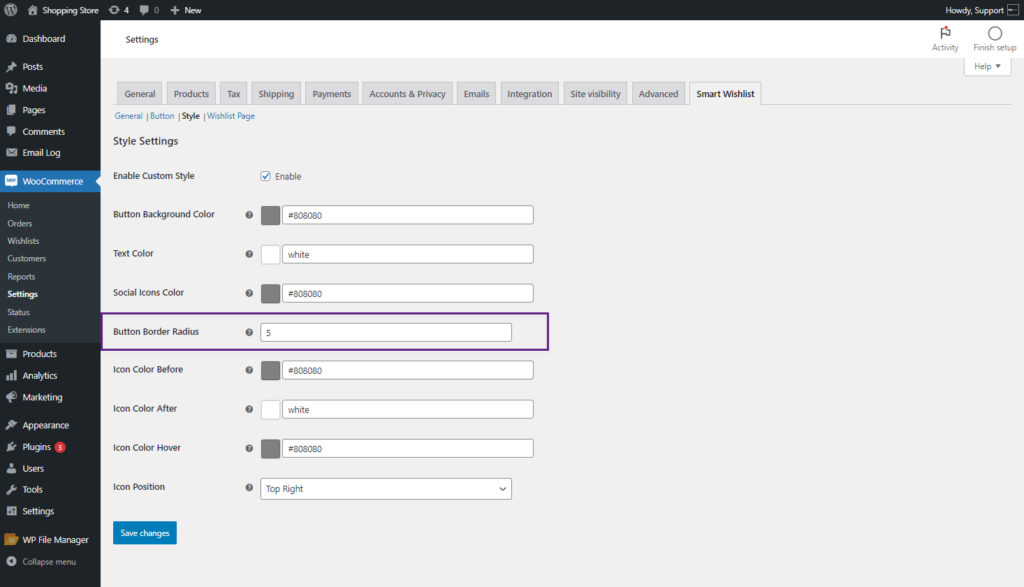
- Icon Color Before: The admin can change the icon color before the product is added to the Wishlist button.
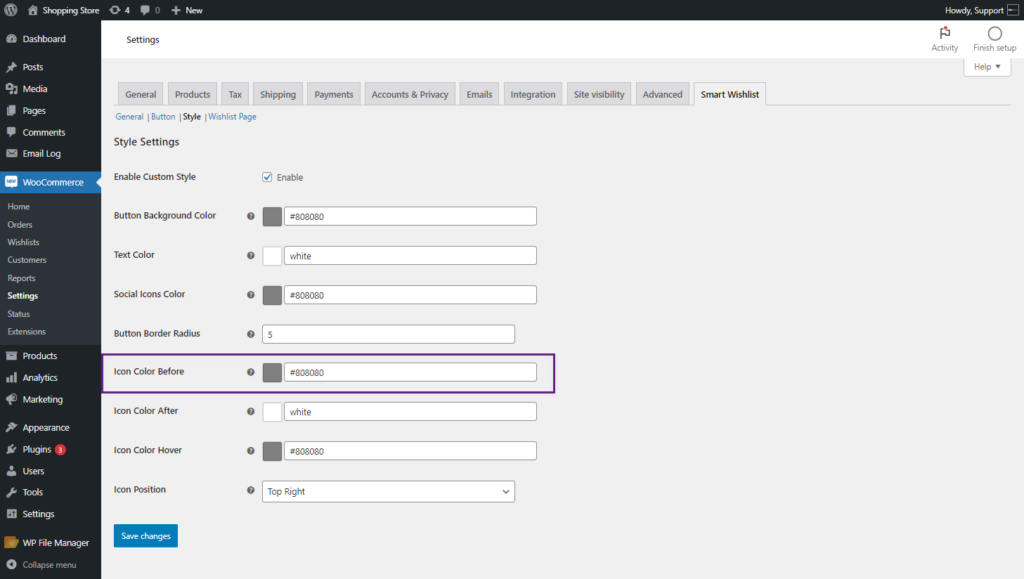
- Icon Color After: The admin can change the icon color After the product is added to the Wishlist button.
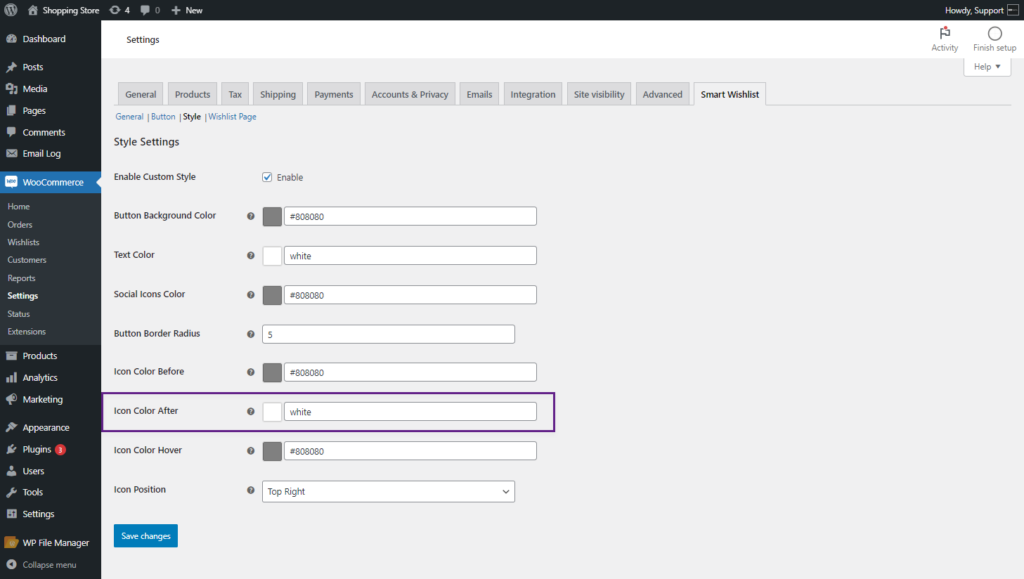
- Icon Color Hover: The admin can change the icon hover color when the user hovers over the icon.

- Icon Position: The admin can change the Icon position on the product image.

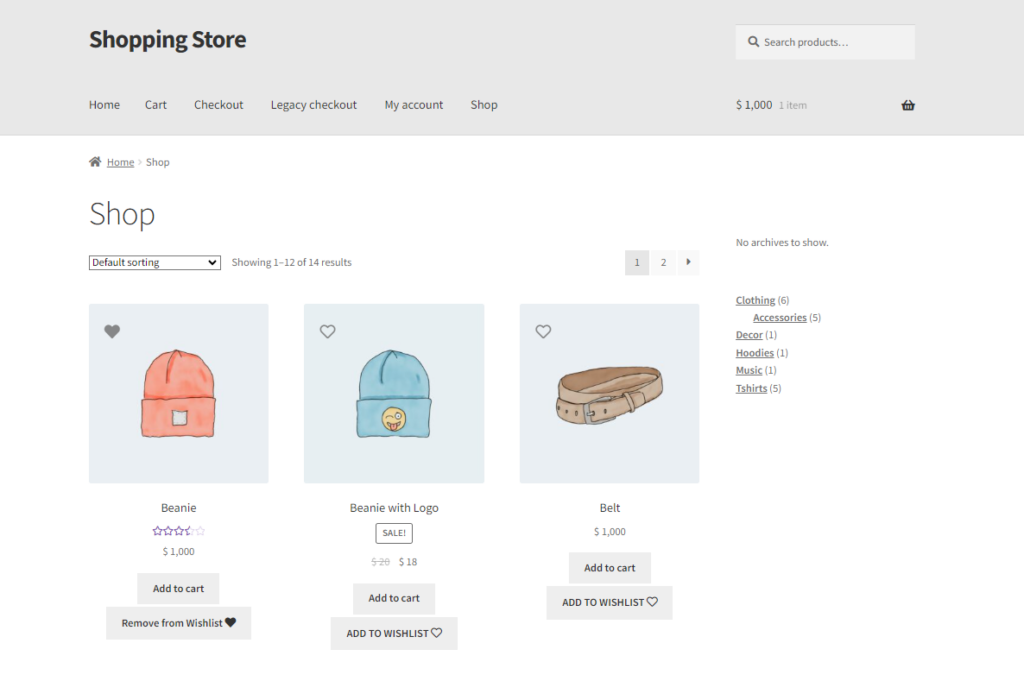
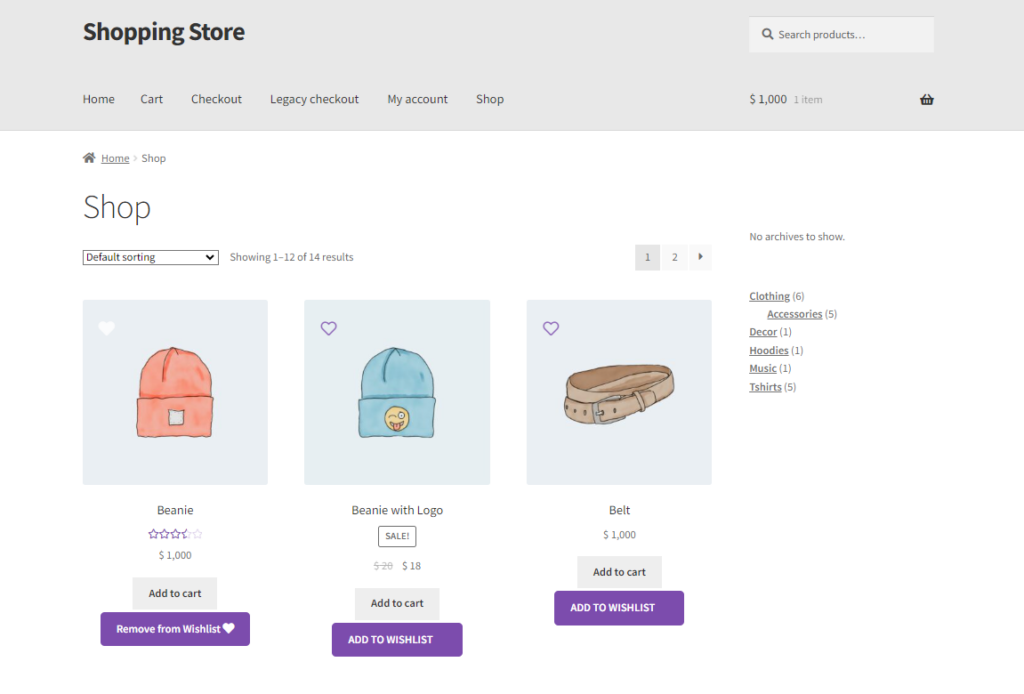
- The style settings of the Add to Wishlist button have been changed for the explanation.
Front End Impact
- Login to your account.
- Go to the Shop page.
Before
After
Wishlist Page
↑ Back to top- This tab enables the admin to configure the Wishlist Page settings.
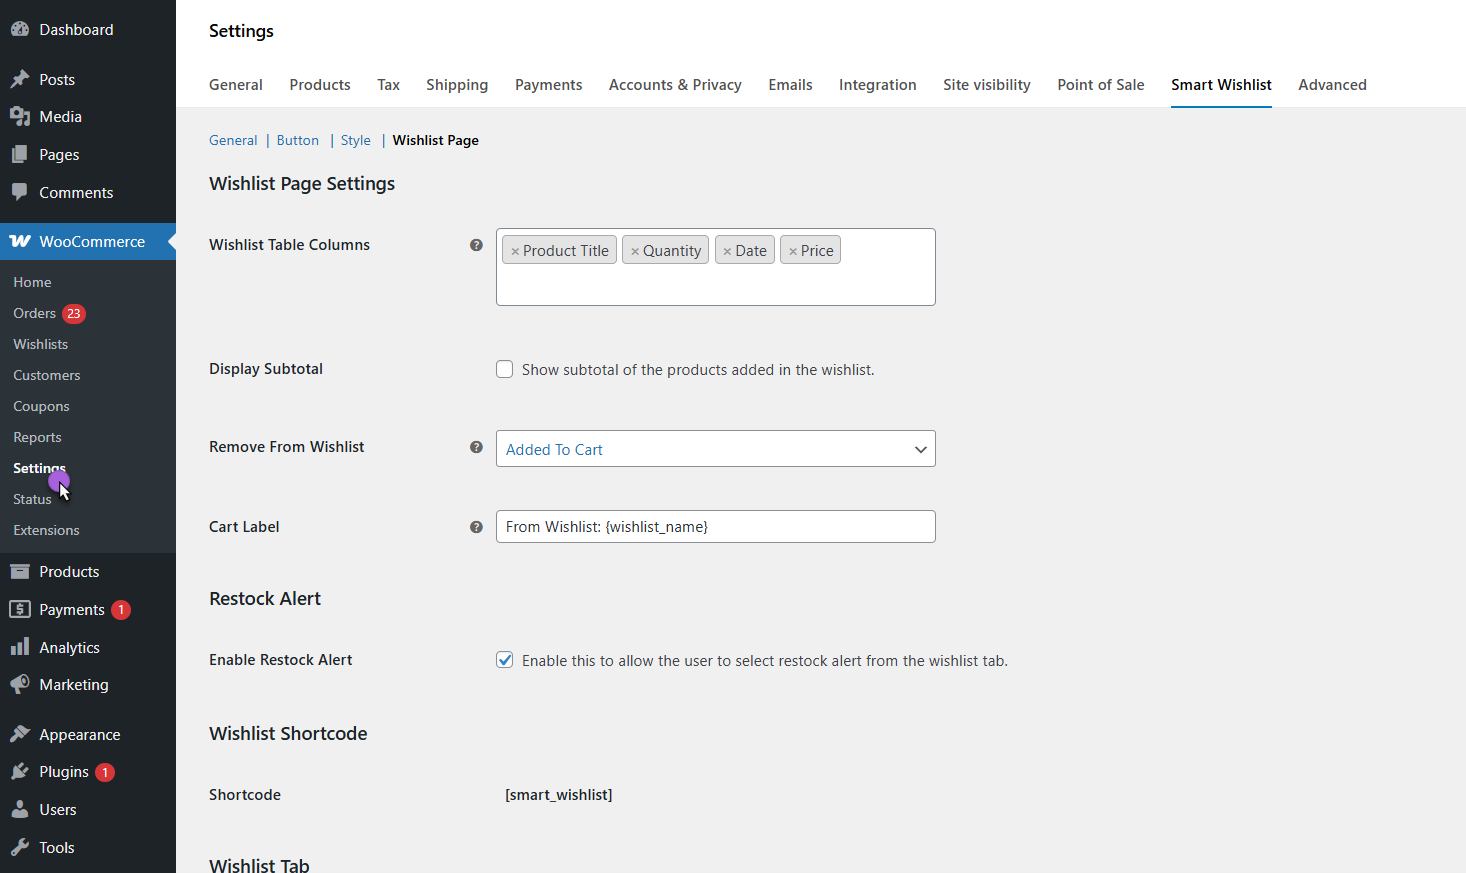
Wishlist Table Columns
- The admin can select the columns to display on the Wishlist on the front end.
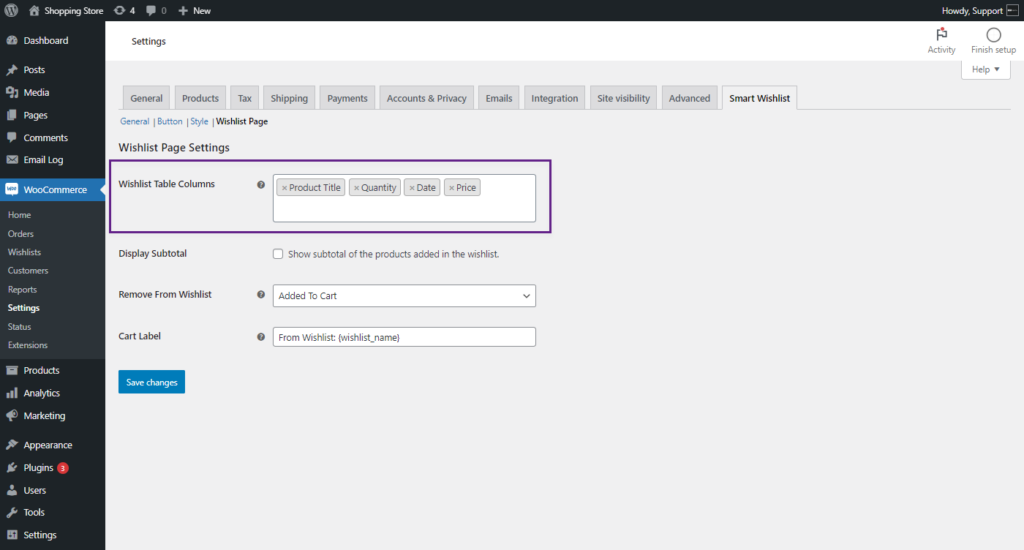
Front End Impact
- Login to your account.
- Go to the My Account page. Navigate to the Wishlist tab.
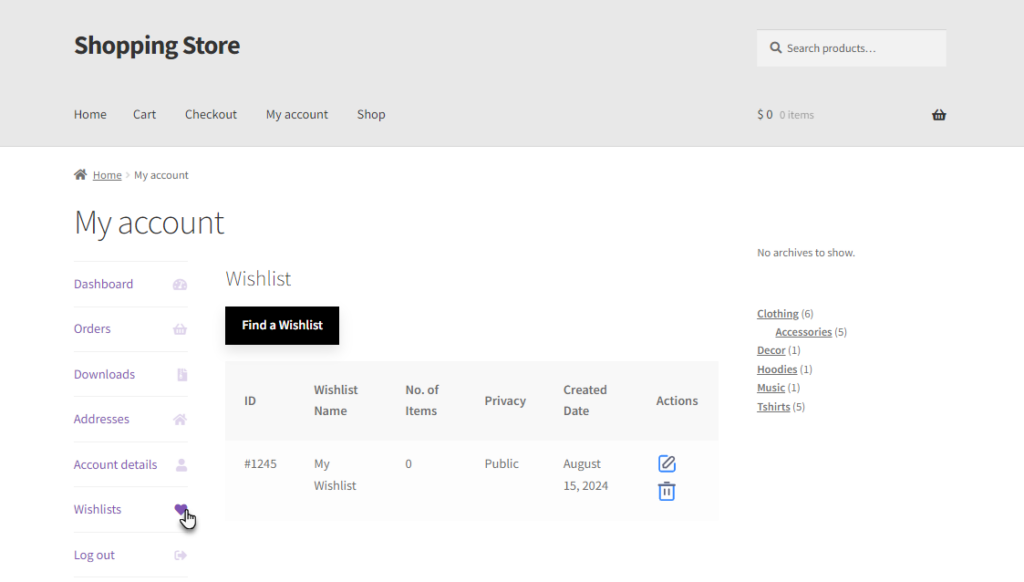
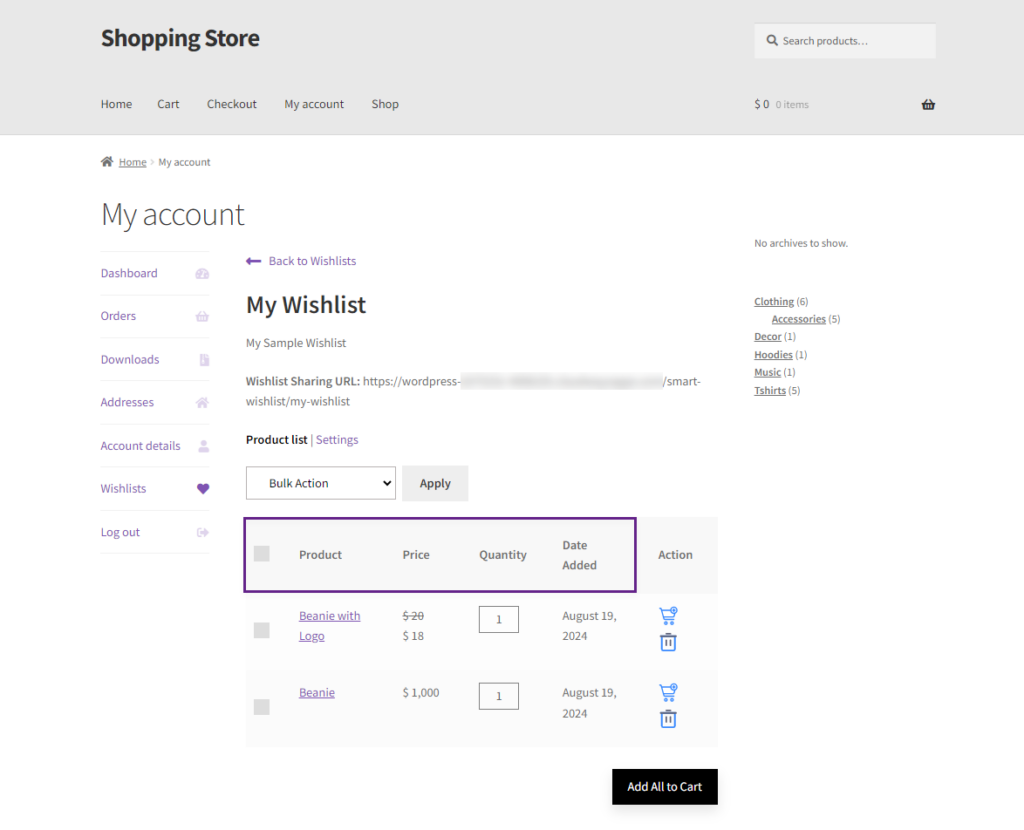
- Click on the edit option in the Actions Column.

- The Wishlist Table will appear with the selected columns.
Display Subtotal
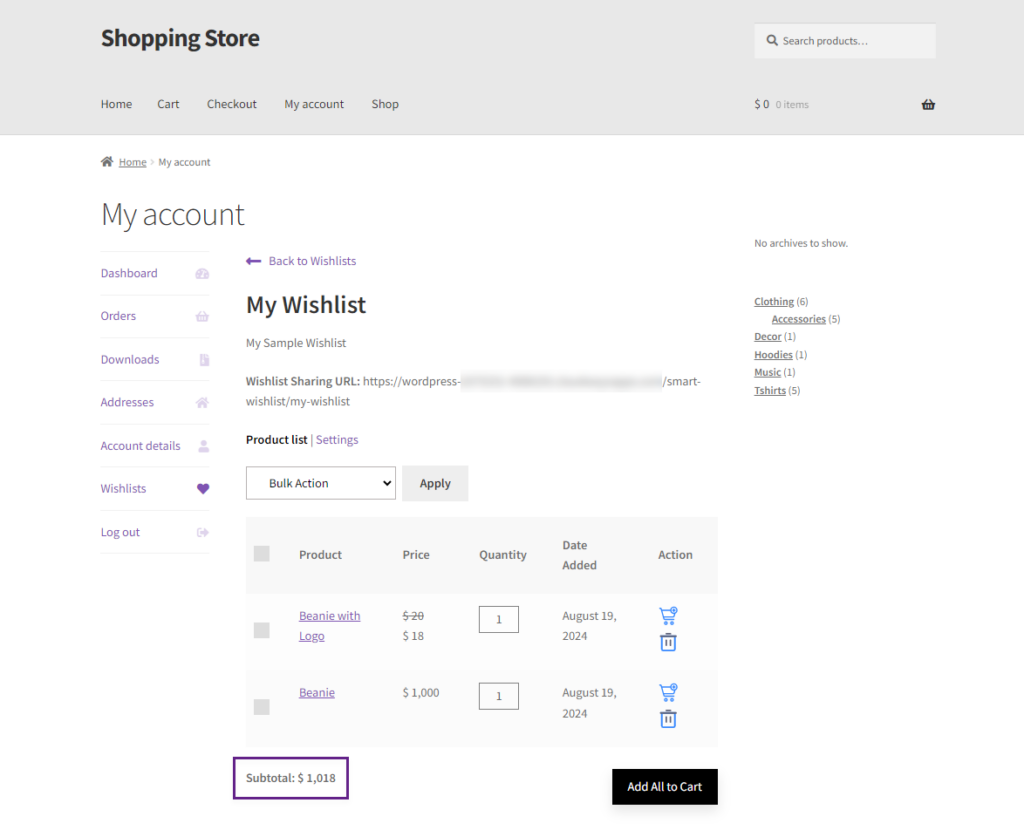
- Enable this option to show the subtotal amount of the products added to the wishlist.
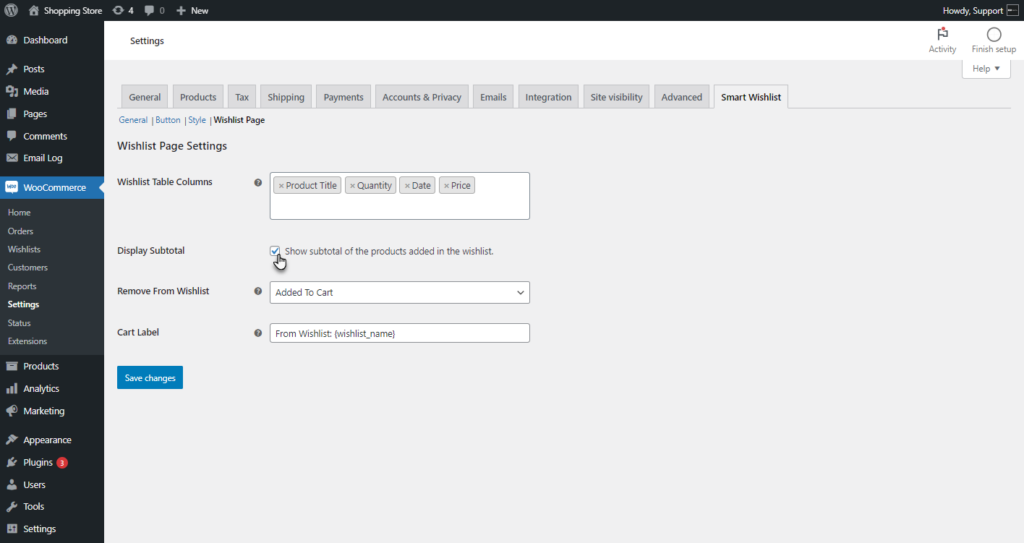
Front End Impact
- Login to your account.
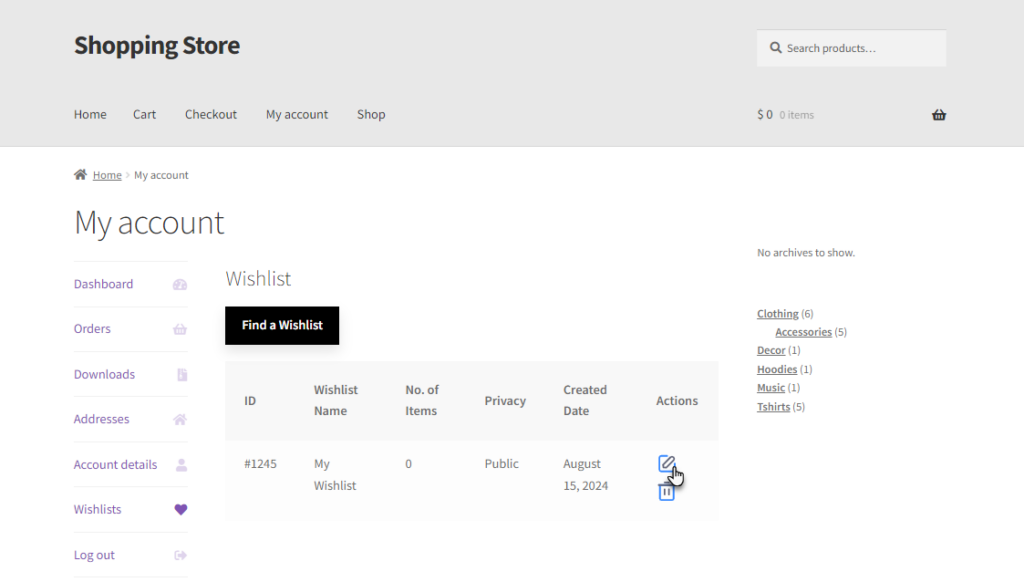
- Go to the My Account page. Navigate to the Wishlist tab.
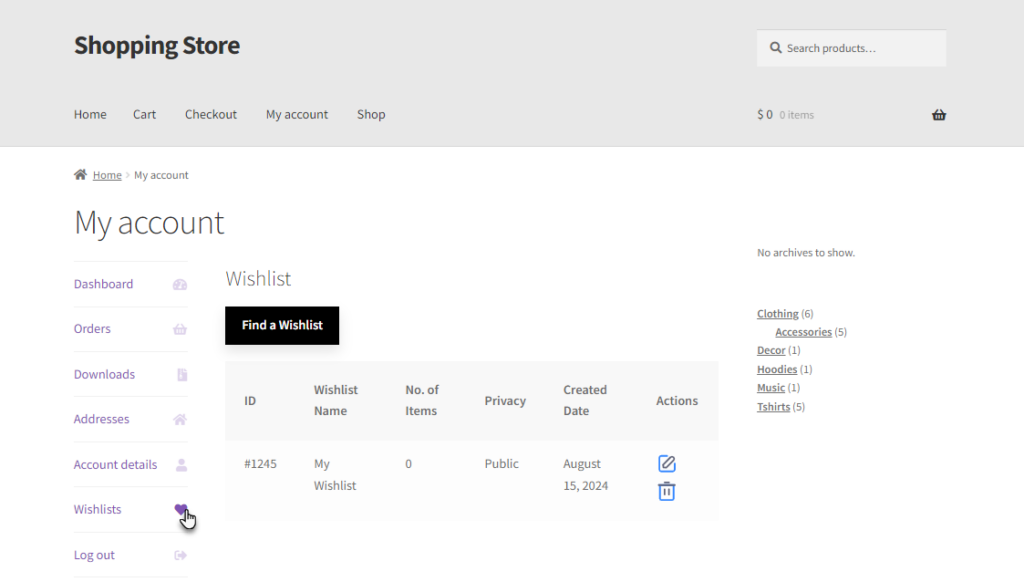
- Click on the edit option in the Actions Column.
- The subtotal will appear under the Wishlist table for the products in the wishlist.
Remove From Wishlist
- The “Remove from Wishlist” option allows the admin to choose the action that will remove a product from the wishlist. It provides two options, Added to cart and On Order Status.
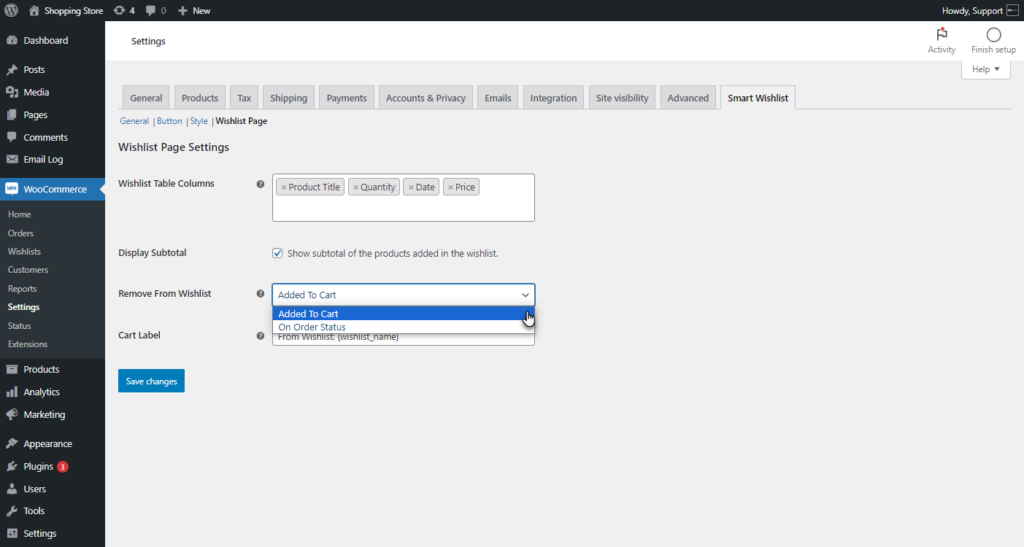
- If the Added To Cart is selected, it will remove the products from the wishlist when the products are added to the cart from the wishlist.
- If the “On Order Status” option is selected, the product will be removed from the wishlist when it is purchased and the order status will be updated.
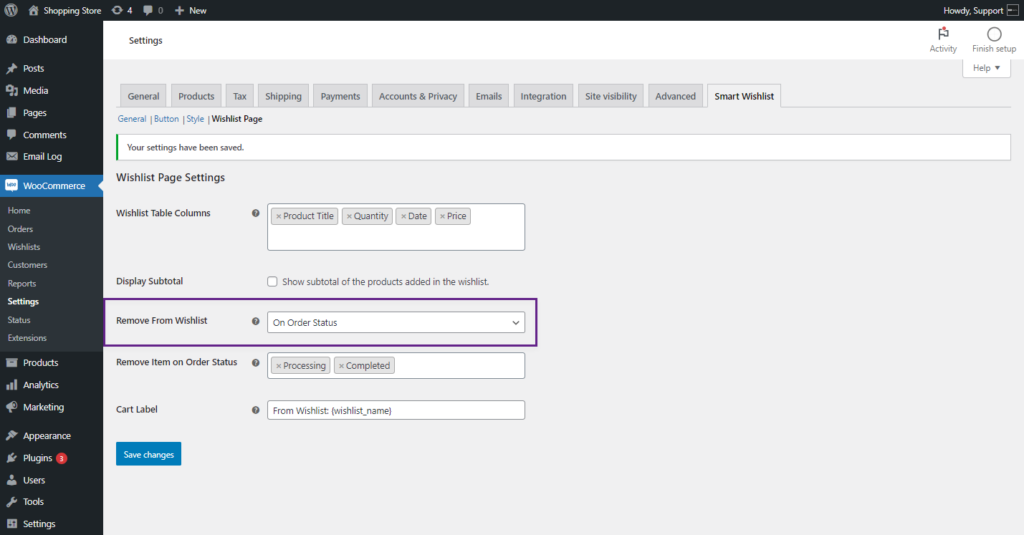
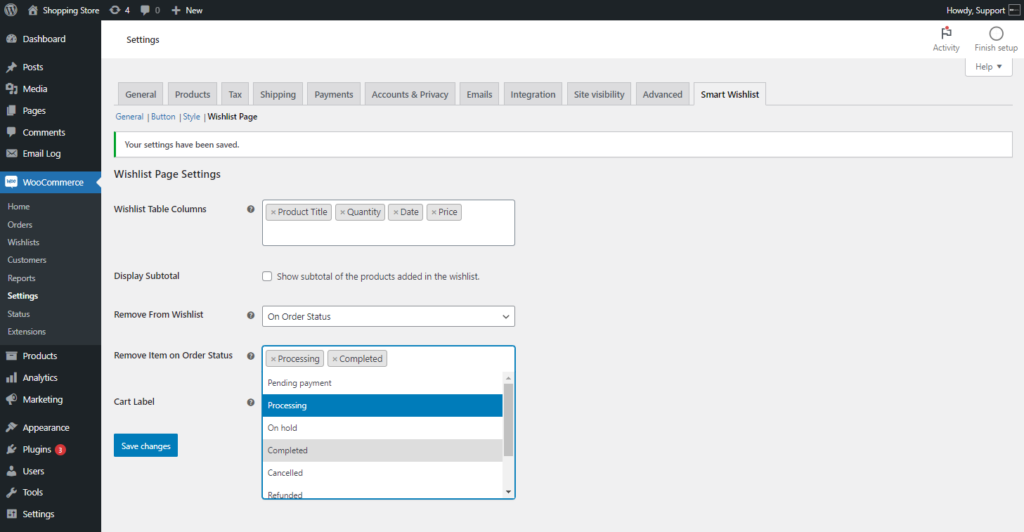
- An additional “Remove Item on Order Status” multi-selector will appear when the On Order Status option is selected. The admin can then choose the desired order status from this box.
Front End Impact
- This front-end impact is for the Added to the Cart option.
- Login to your account.
- Go to the My Account page. Navigate to the Wishlist tab.

- Click on the edit option in the Actions Column.
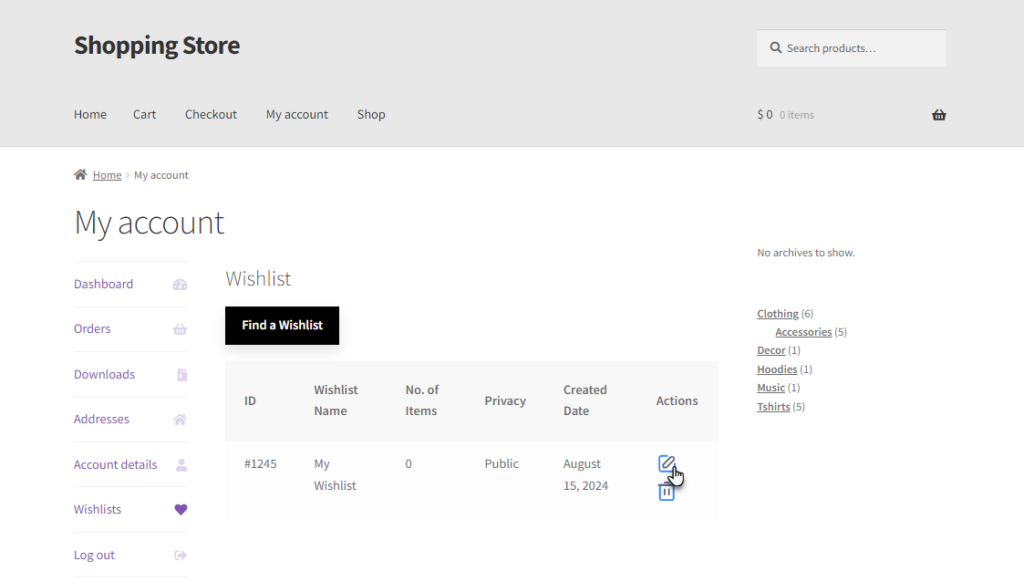
- The Wishlist will appear with the products added to the wishlist. The user can move the product to the cart by clicking on the icon individually or add all items to the cart by the Add All to cart.
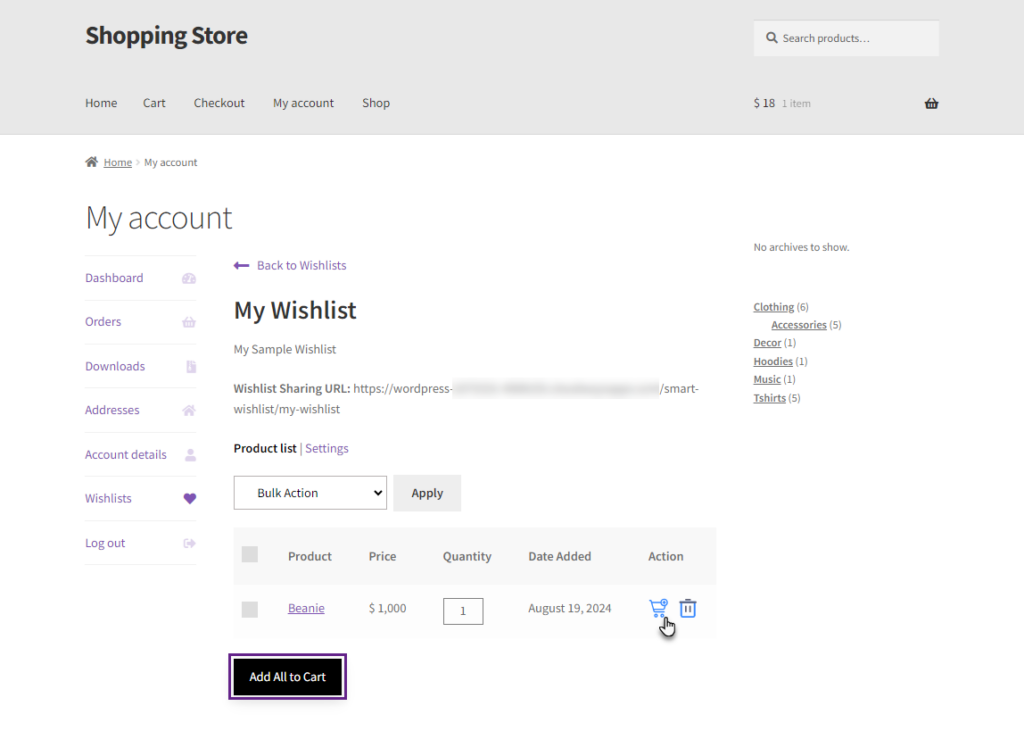
- As the product will move to the cart, the product will be removed from the wishlist.
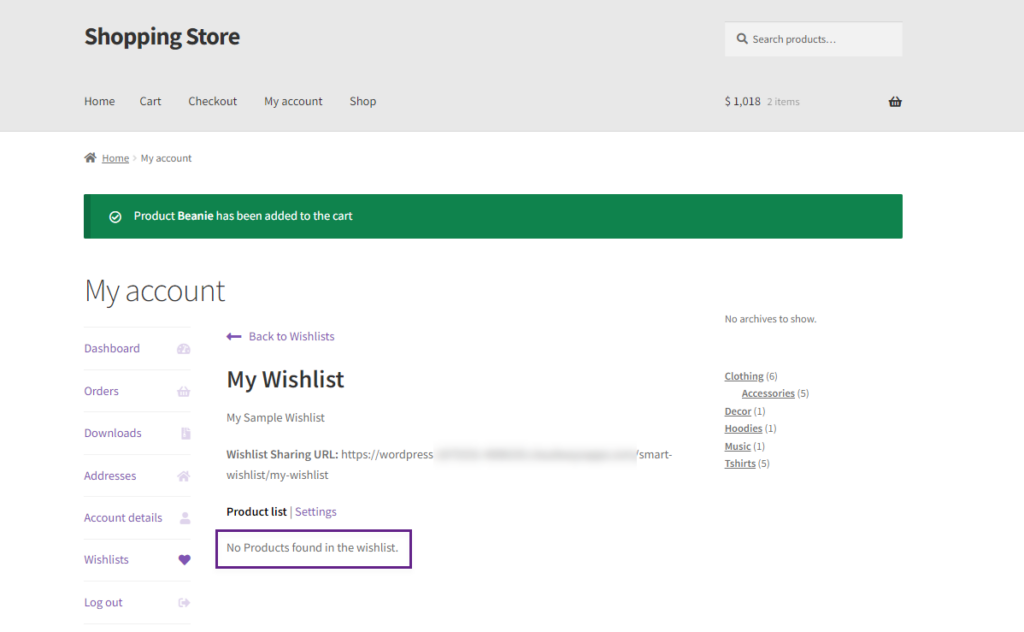
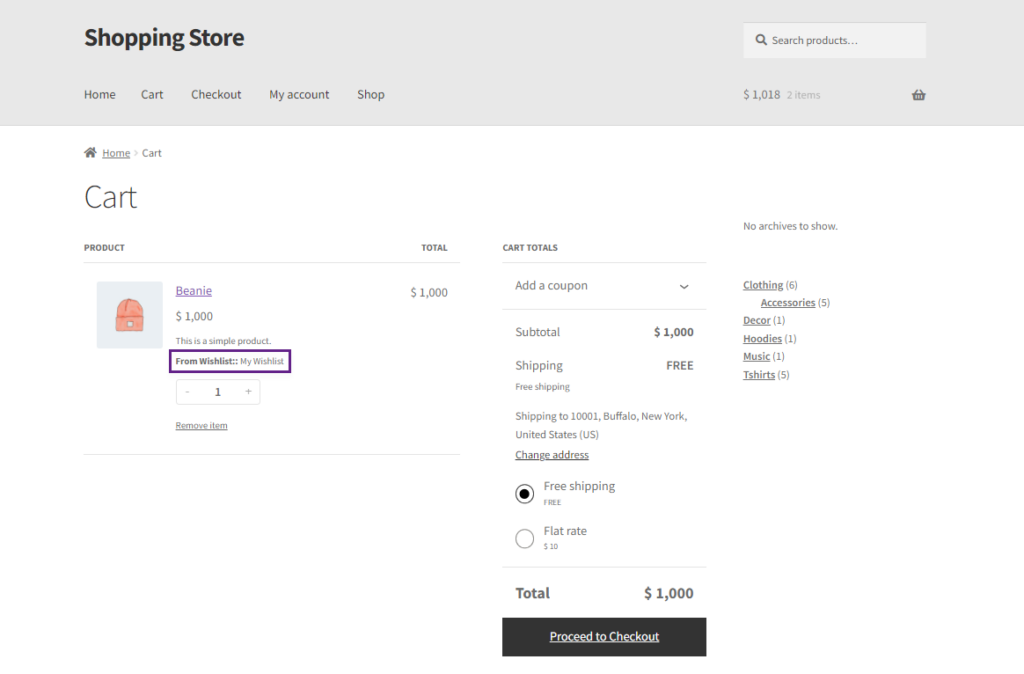
Cart Label
- The cart label will be visible after a product is added to the cart from the wishlist.

Front End Impact
- Login to your account.
- Go to the My Account page. Navigate to the Wishlist tab.
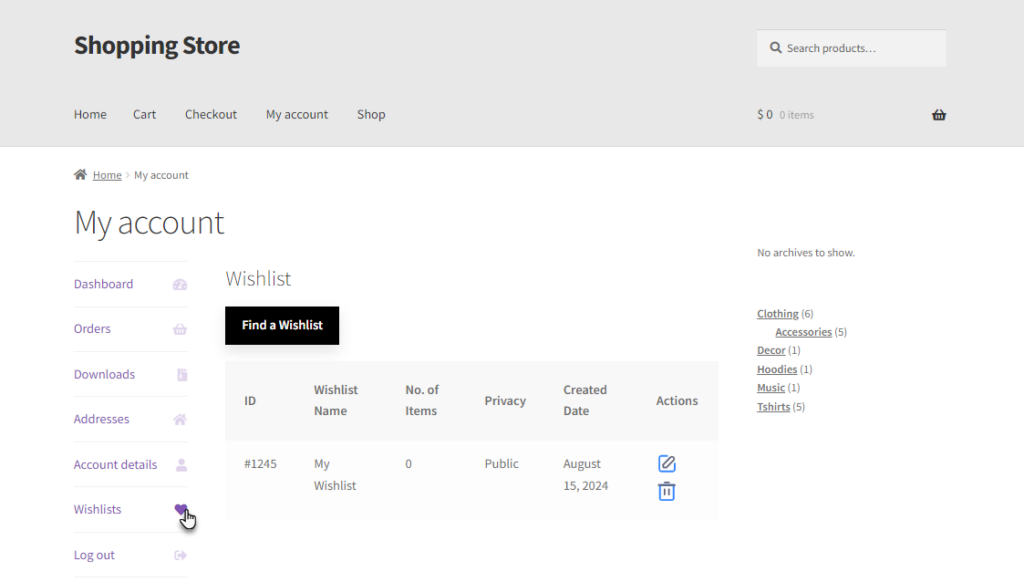
- Click on the edit option in the Actions Column.
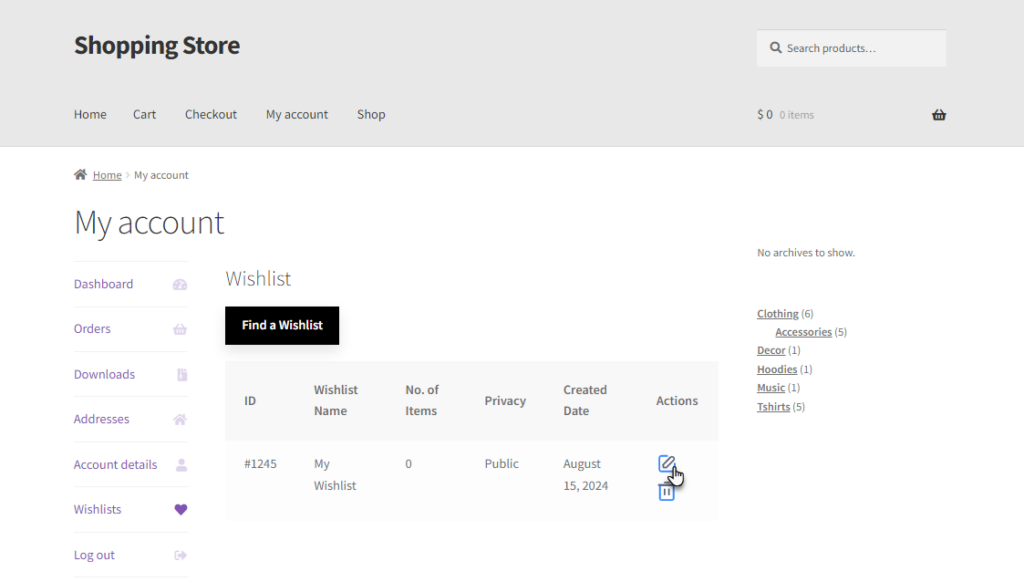
- The Wishlist will appear with the products added to the wishlist. Add the product to the cart.
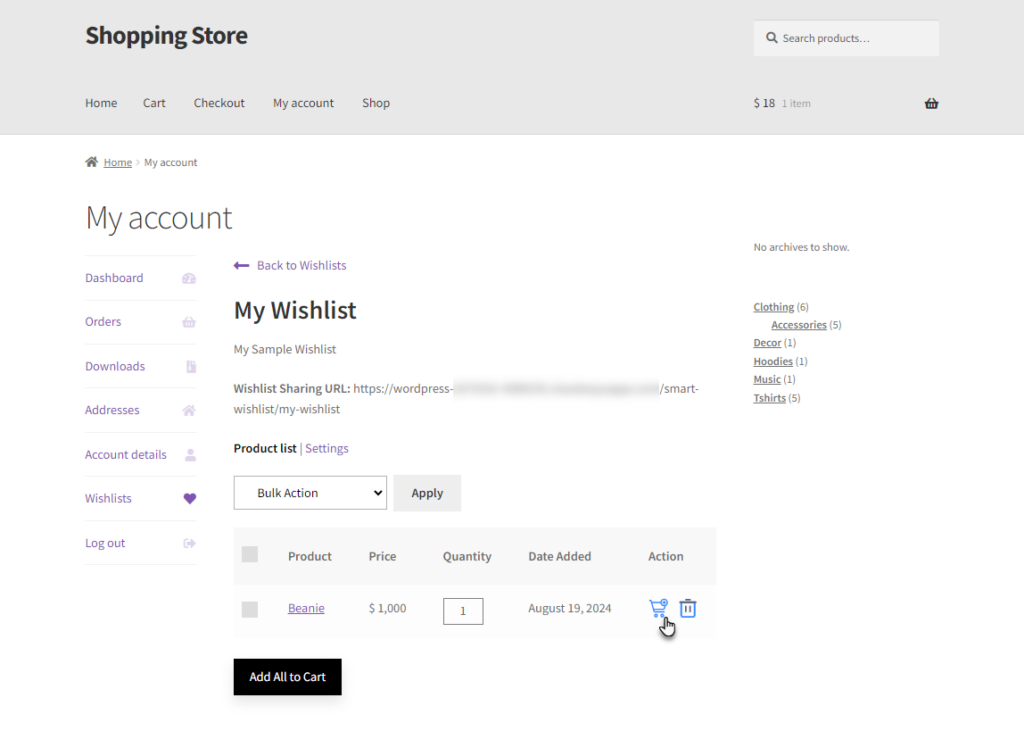
- The wishlist cart label will be visible under the product details on the cart page.
Restock Alert
↑ Back to topThe Restock Alert allows customers to receive email notifications when a product from their wishlist that was previously out of stock becomes available again.
- Navigate to WooCommerce > Settings > Smart Wishlist > Wishlist Page.

- Scroll down to the Restock Alert section.
- Locate the option Enable Restock Alert.

- Tick the checkbox to enable restock alerts.
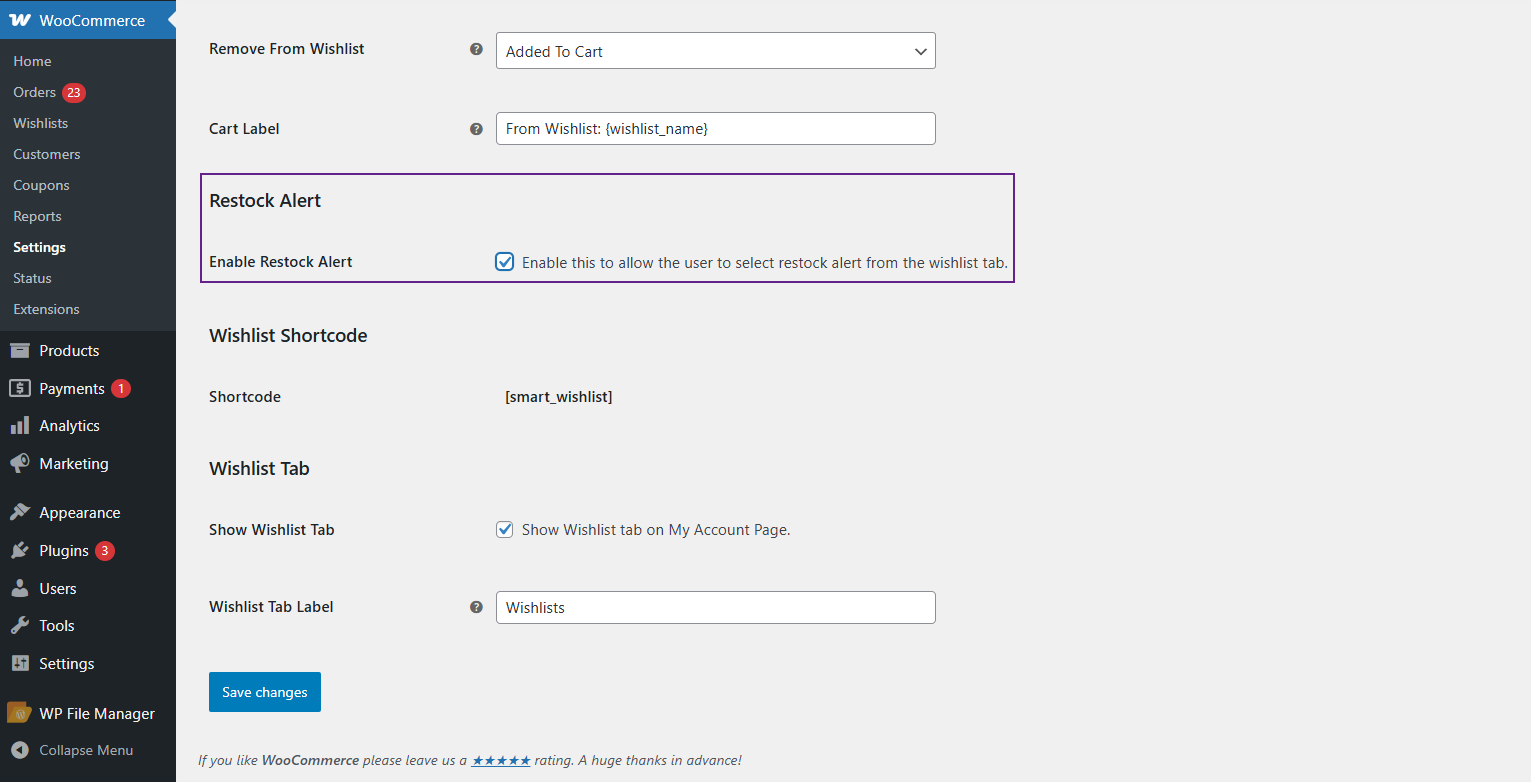
Note: By default, this option is unchecked.
- Click Save changes

Front-End-Impact
- Navigate to the Wishlist Page.

- From the list of wishlists, click on the Edit icon of the wishlist where you want to enable restock alerts.
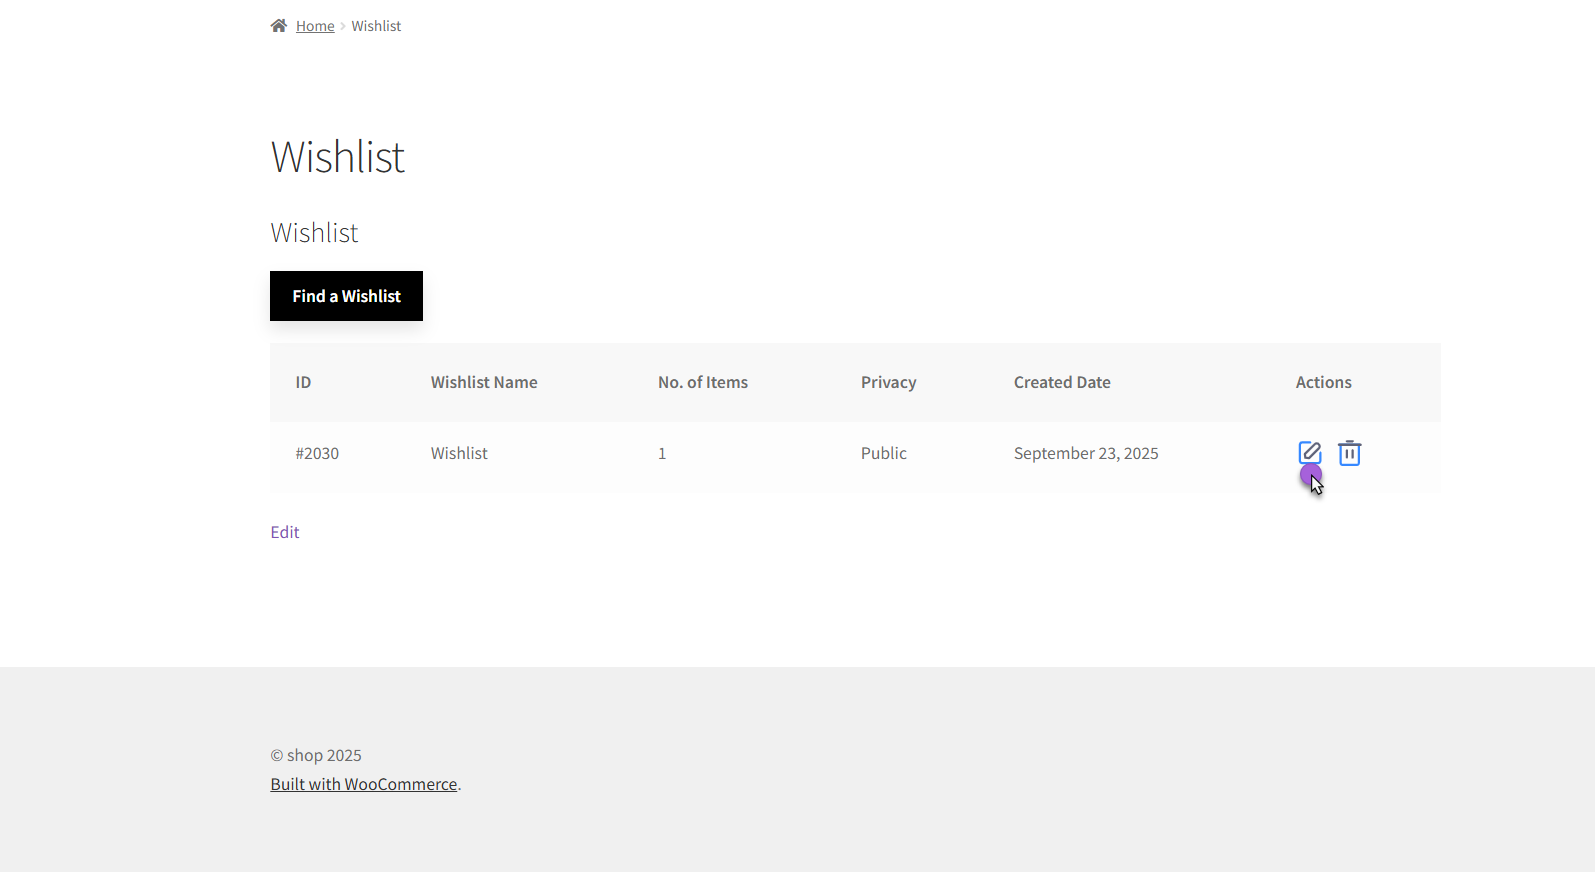
- This will open the Wishlist Details Page.
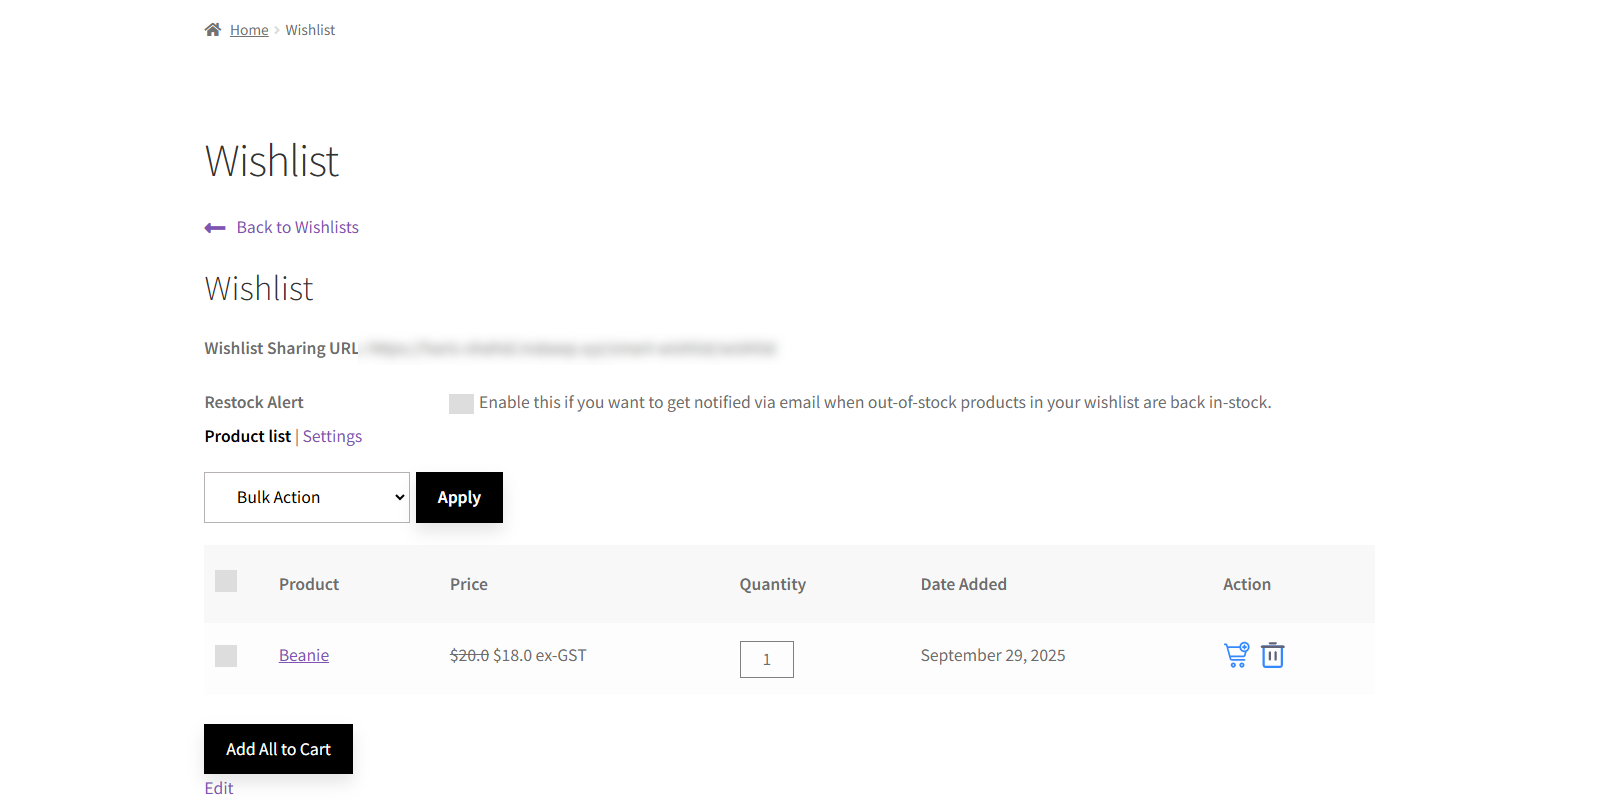
- If Restock Alerts are enabled from the backend, you will see a Restock Alert checkbox on this page.
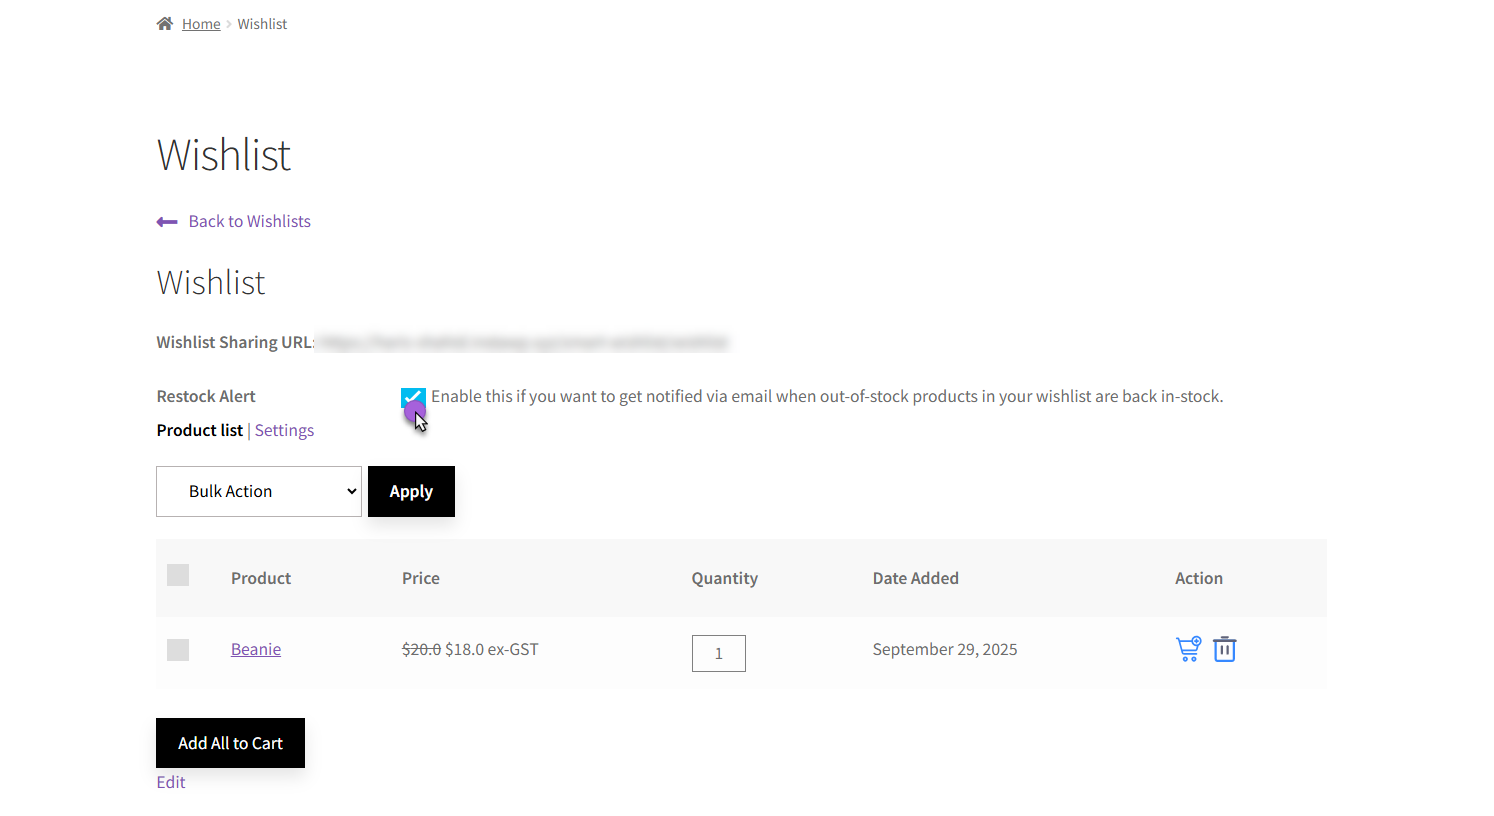
- Tick the checkbox if you want to receive email notifications when a product in this wishlist (currently out of stock) becomes available again.
Wishlist Shortcode & Block
↑ Back to topThe Wishlist Shortcode and Wishlist Block allow the admin to display the wishlist table and section on any page.
Wishlist Shortcode
The admin can use a shortcode to show the wishlist section anywhere on the site.
- Navigate to WooCommerce > Settings > Smart Wishlist > Wishlist Page.

- Copy the Wishlist Shortcode provided.

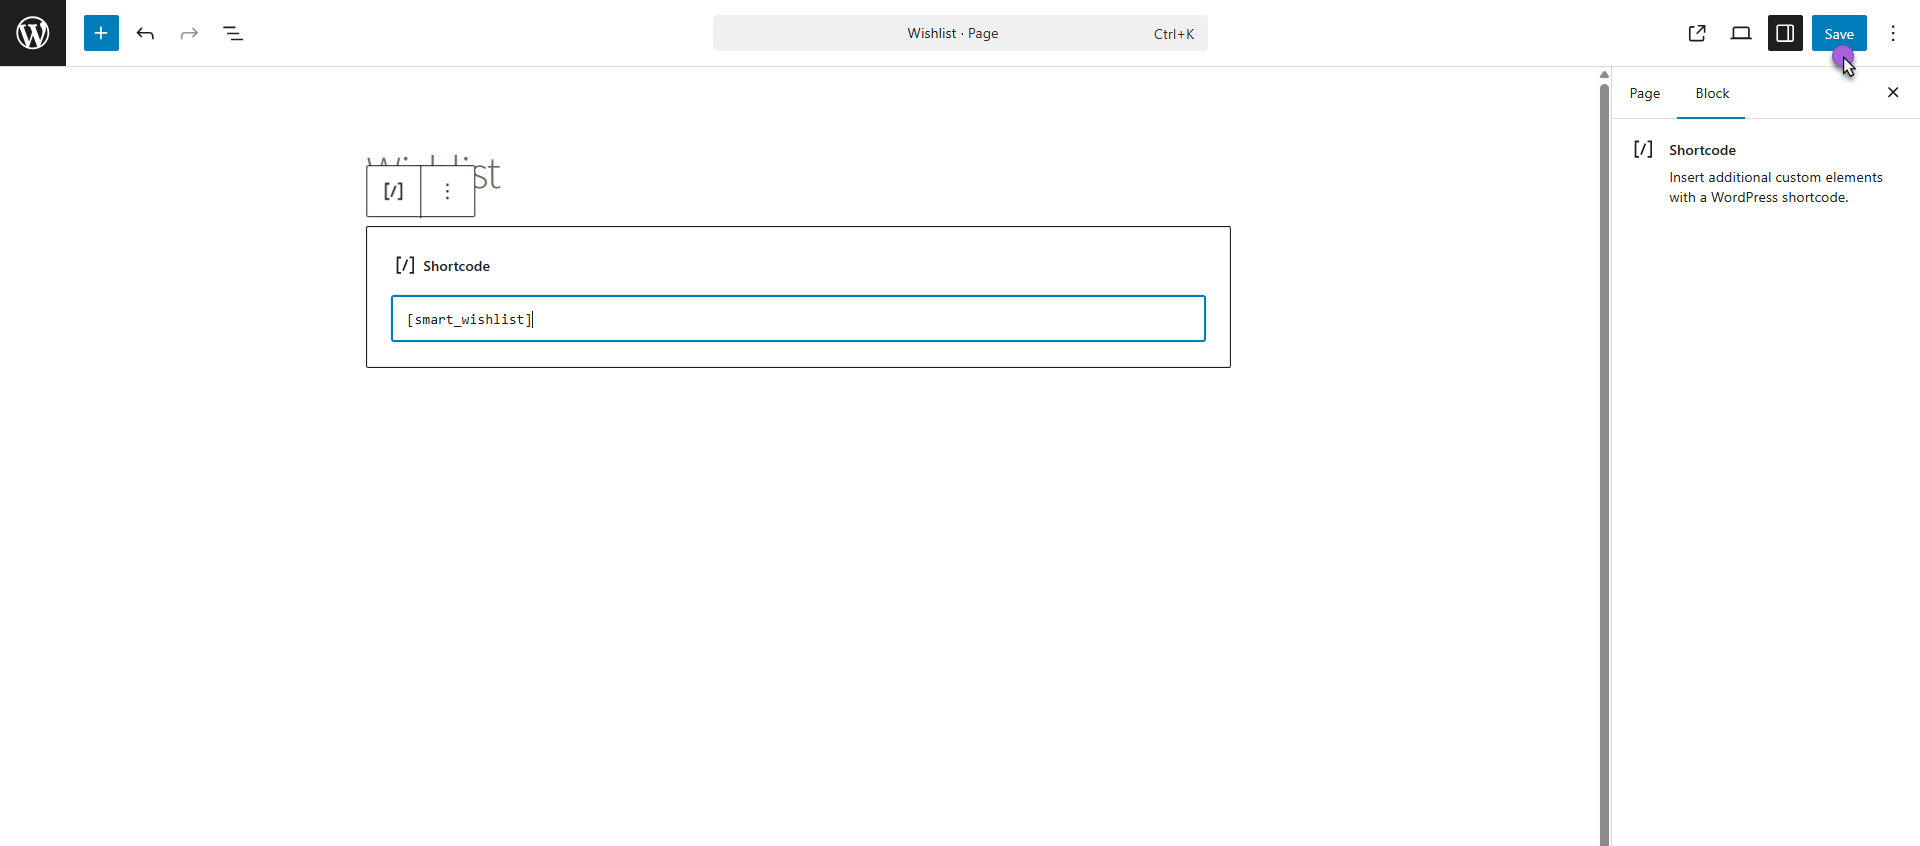
- Paste the shortcode into any page or post where you want the wishlist to appear.
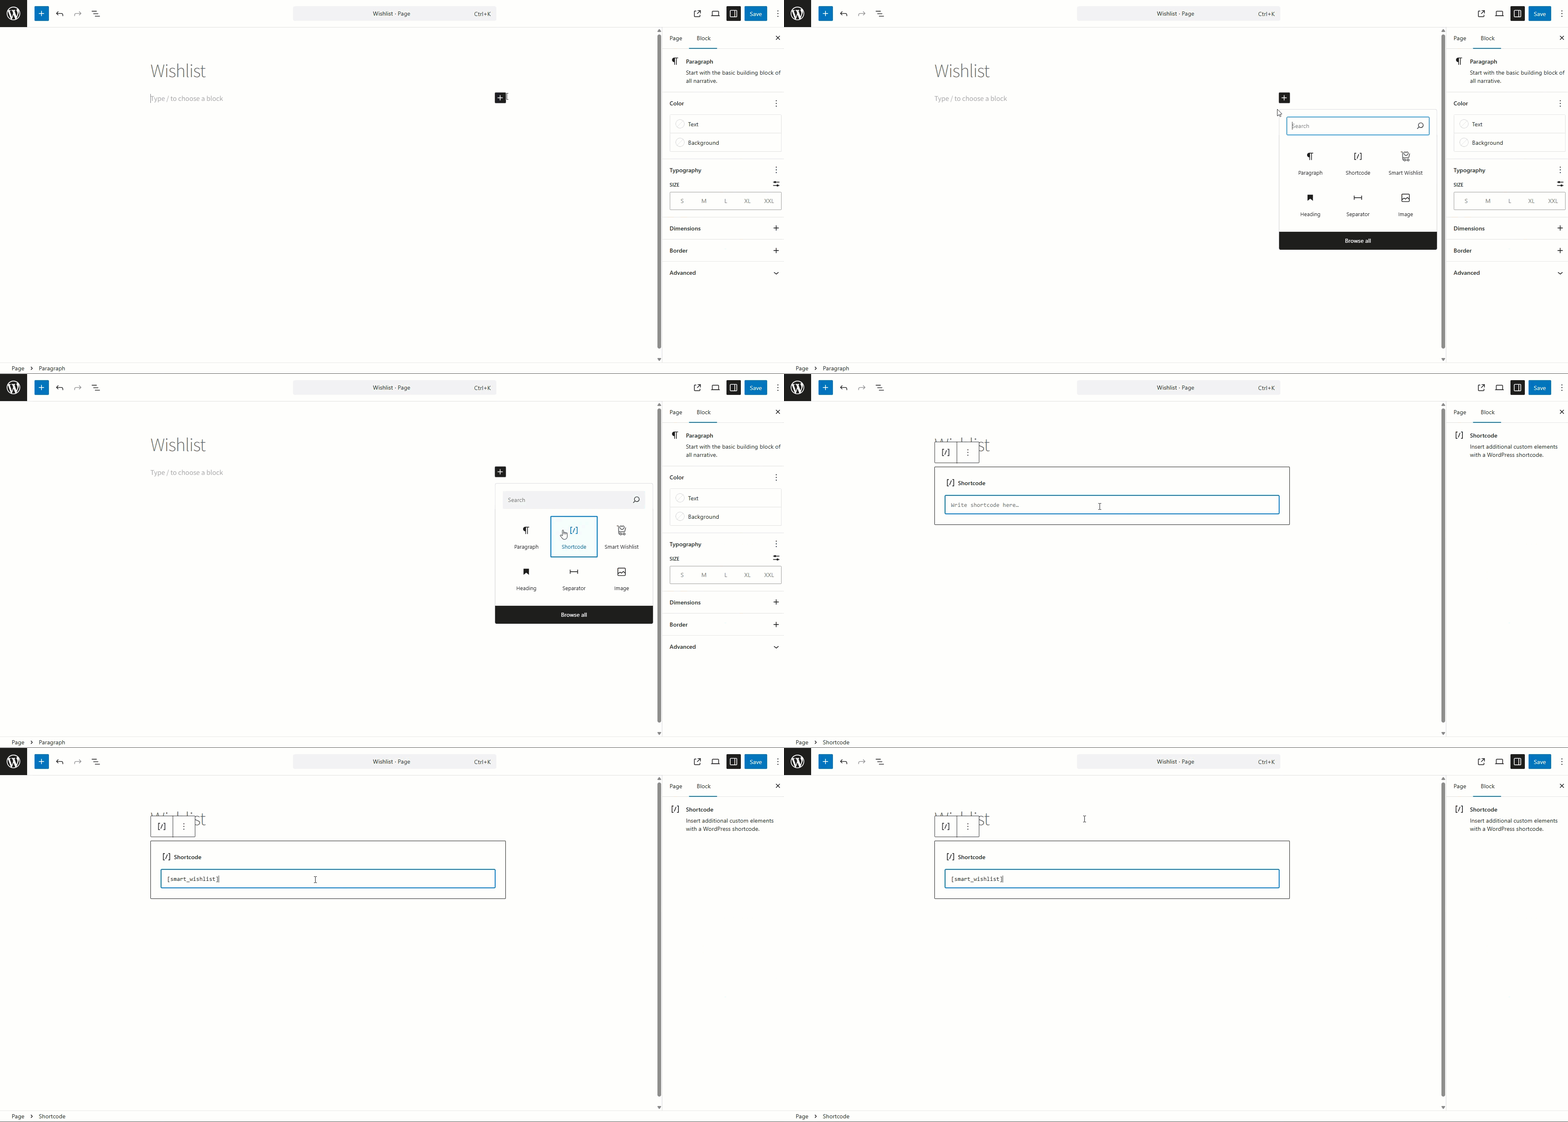
- Click the Save Button.
Wishlist Block
Instead of using a shortcode, the admin can also insert the wishlist using the WordPress Block Editor.
- Navigate to Pages > All Pages in your WordPress Admin panel.
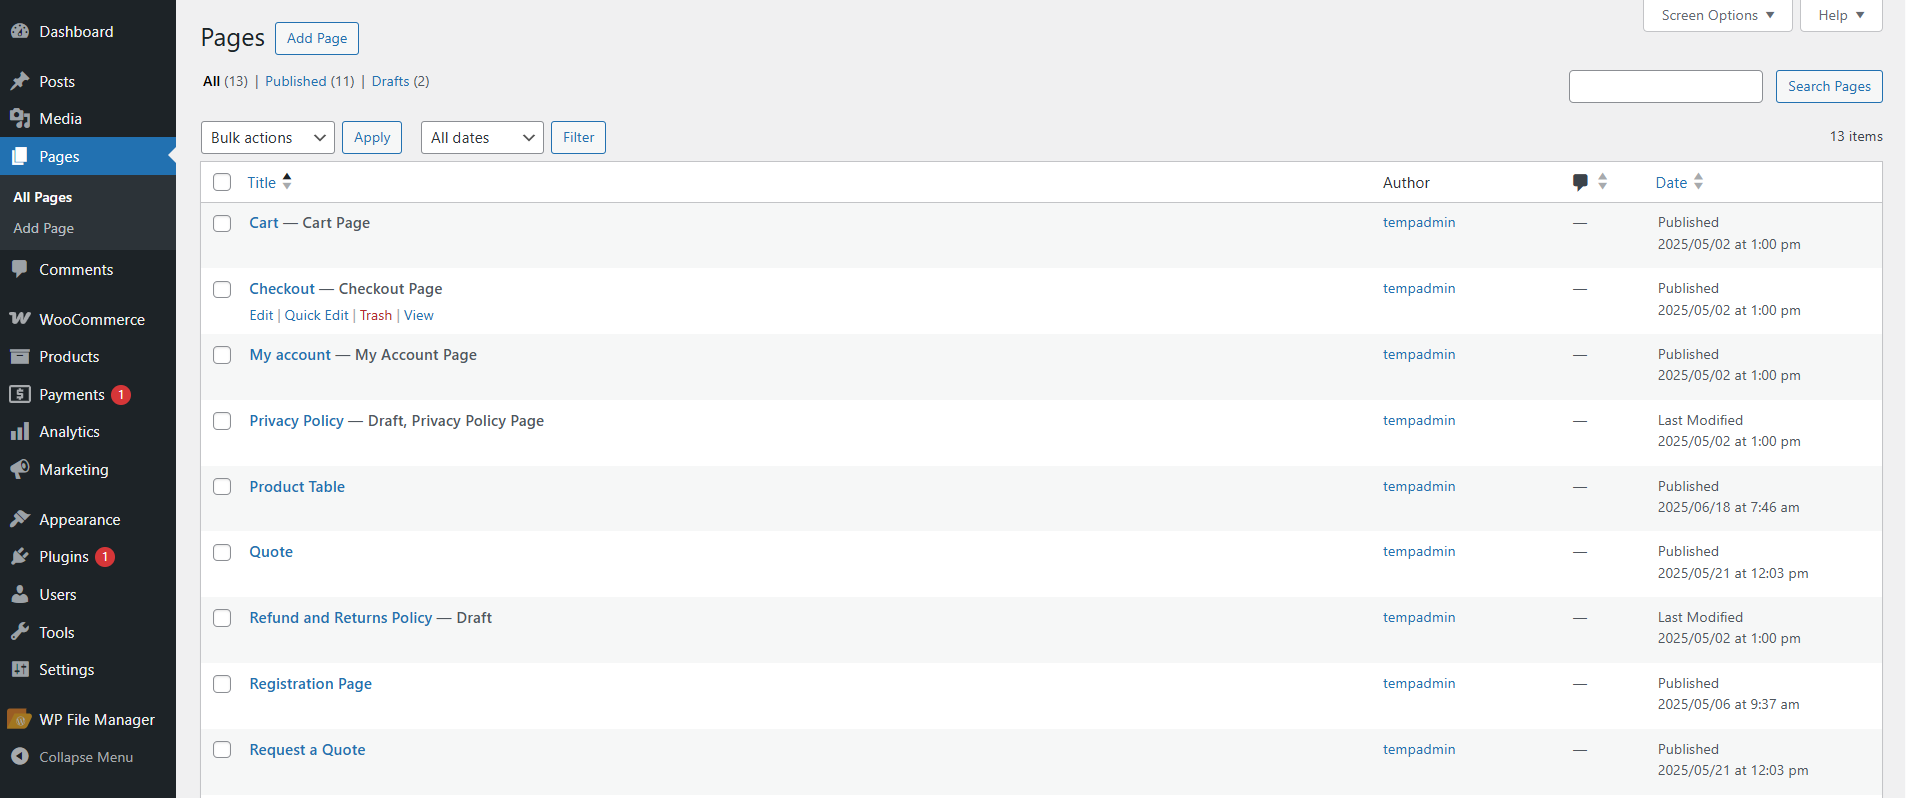
- Edit the page where you want to display the wishlist.

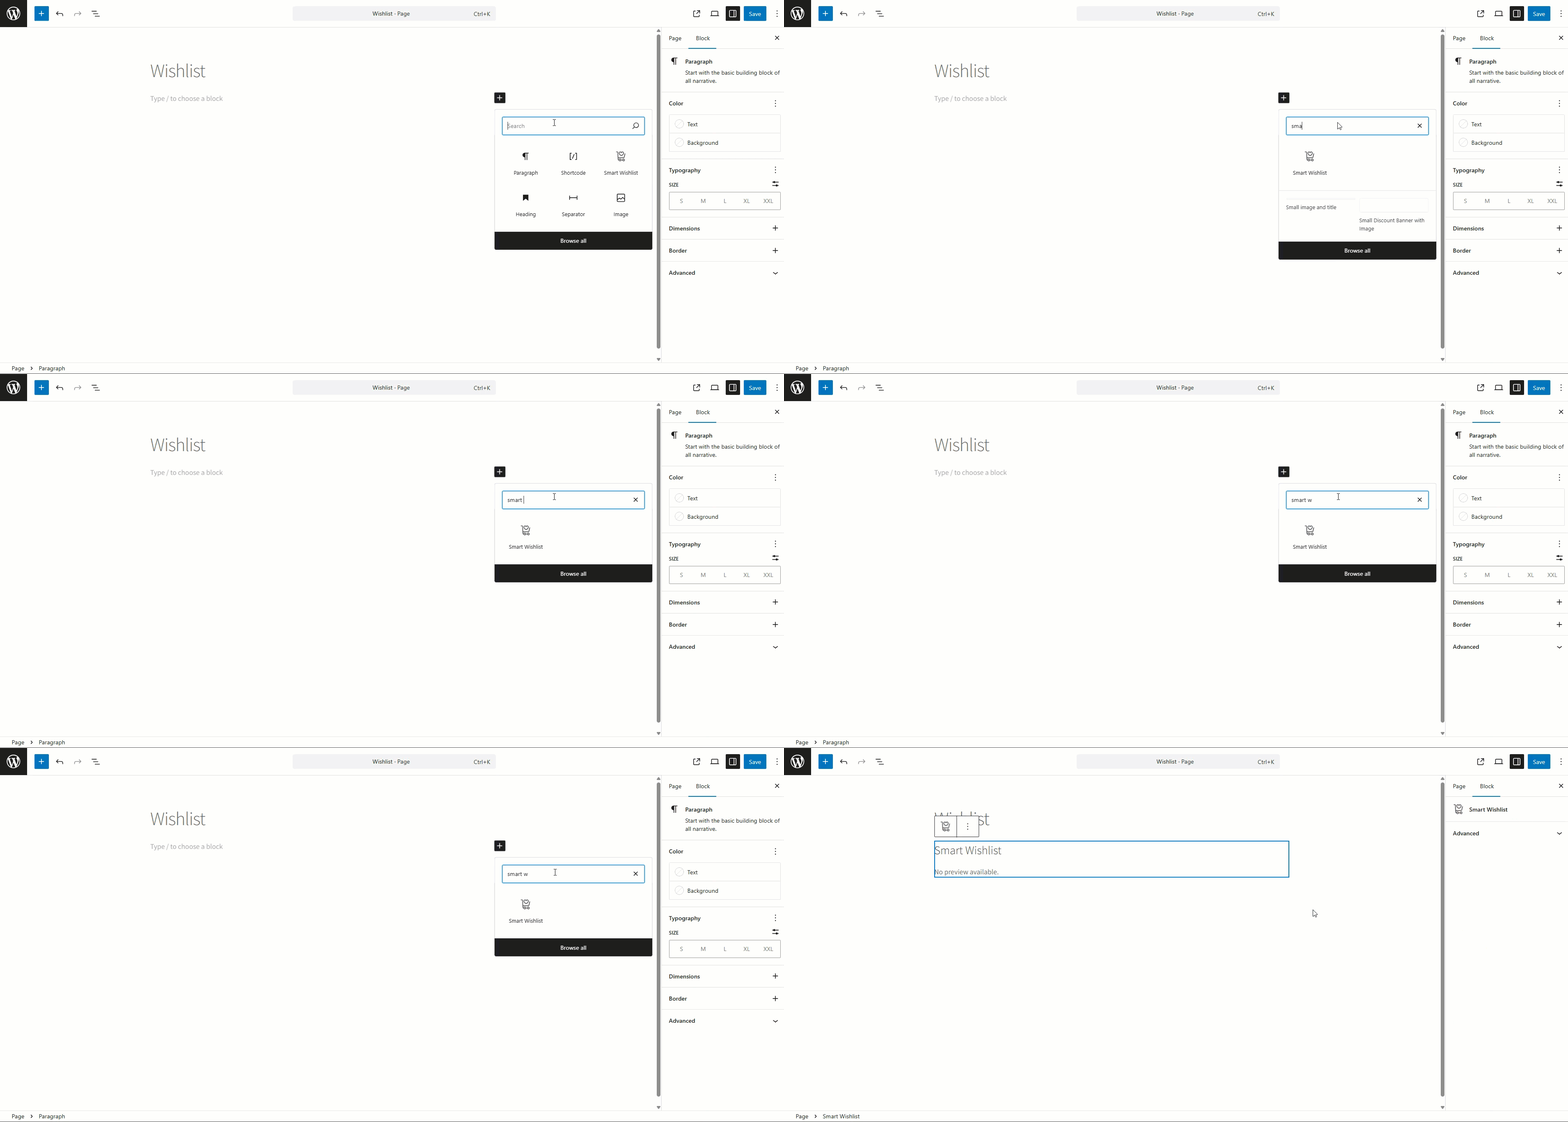
- In the WordPress Block Editor, click on the + (Add Block) button.
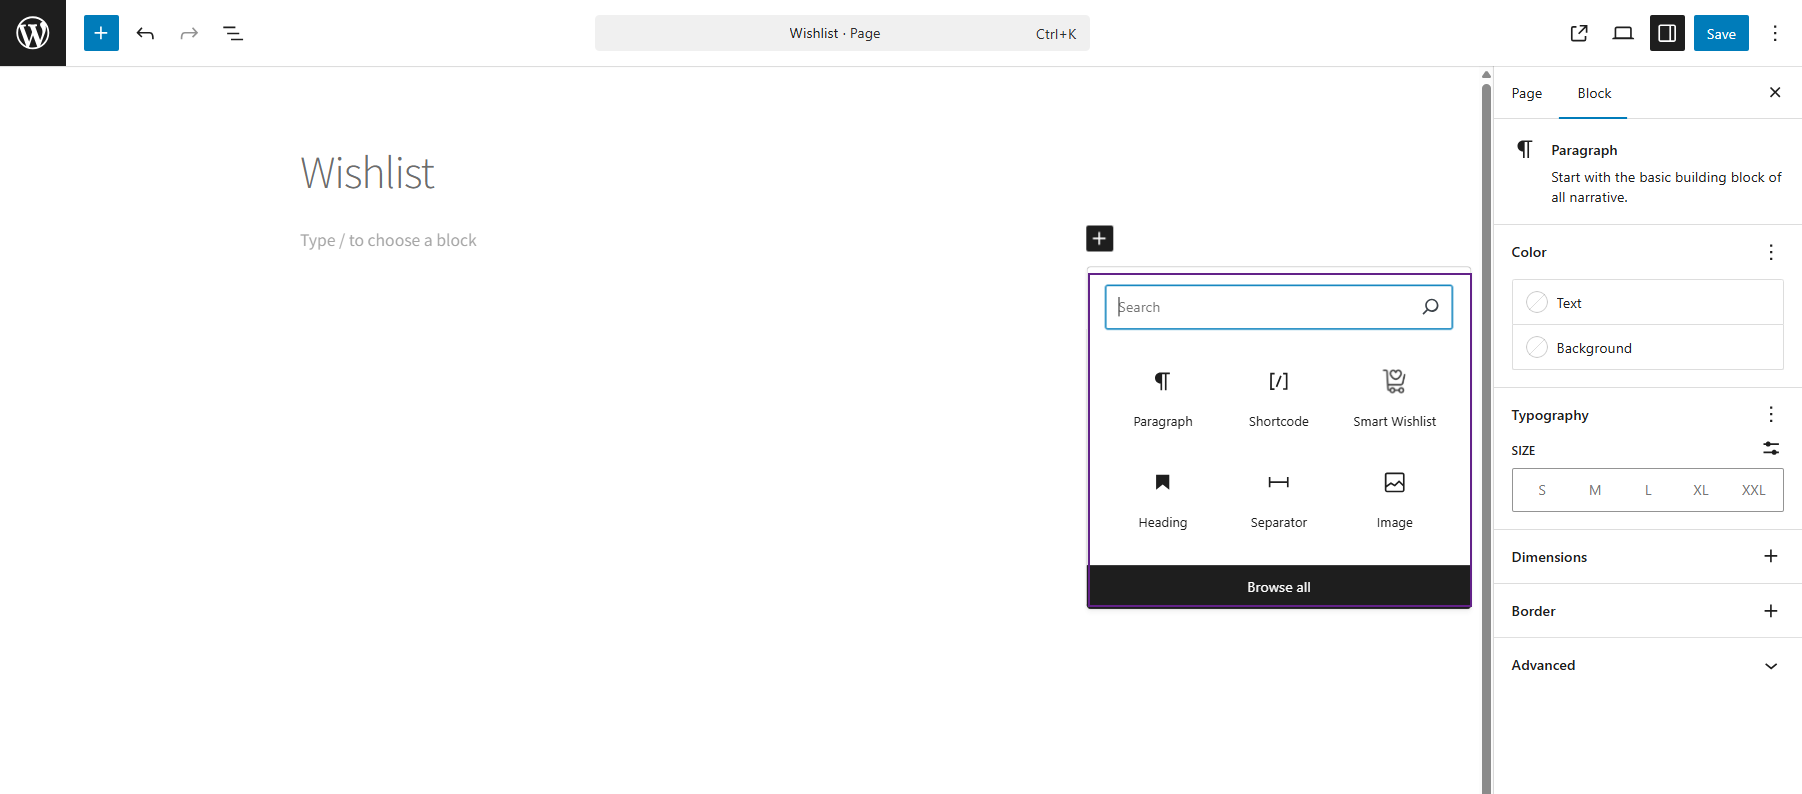
- Search for Smart Wishlist and add it to the page.
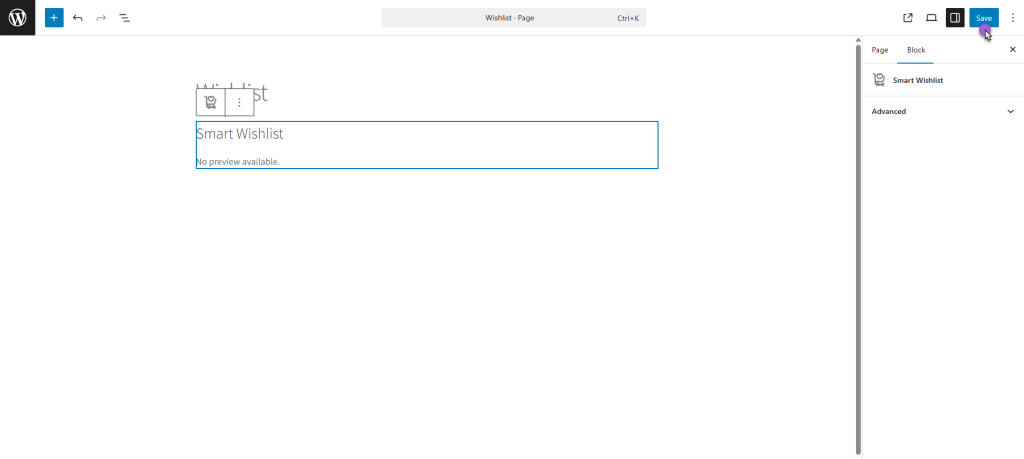
- Click on the Save Button.
Front-End-Impact
- Navigate to the Shop Page

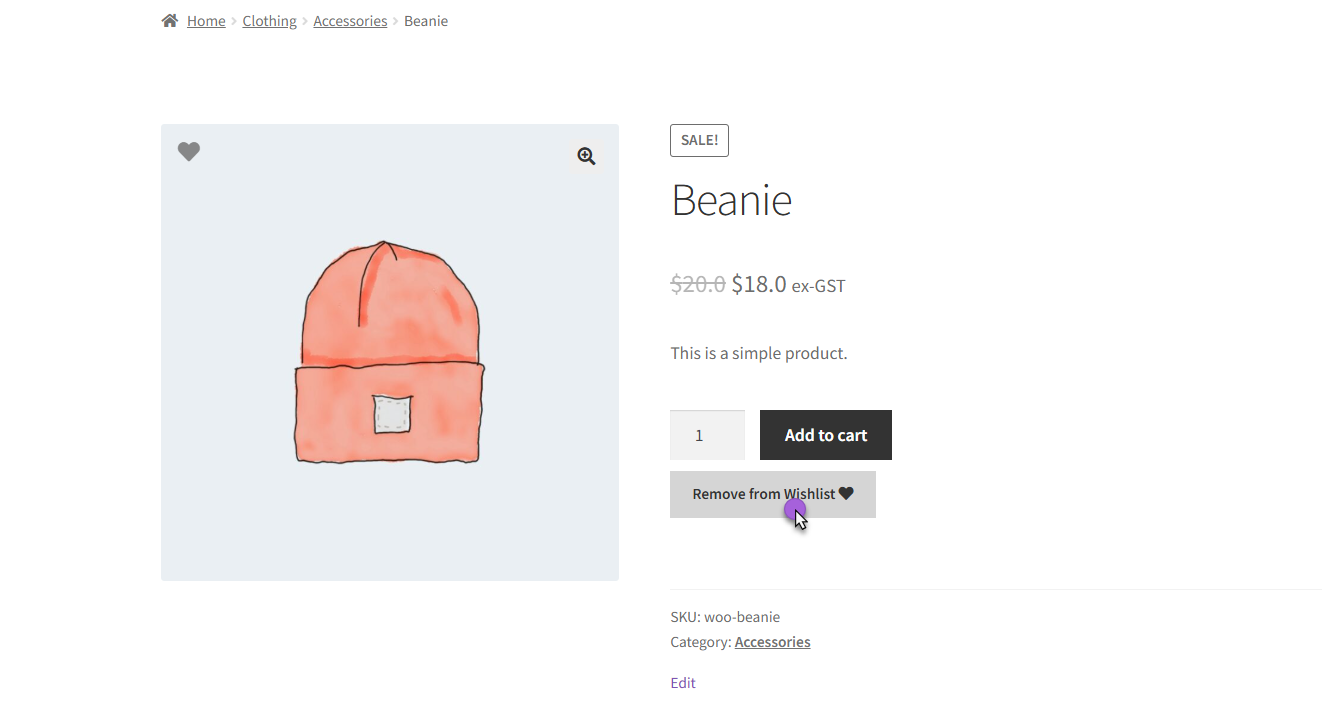
- Add products to the wishlist.
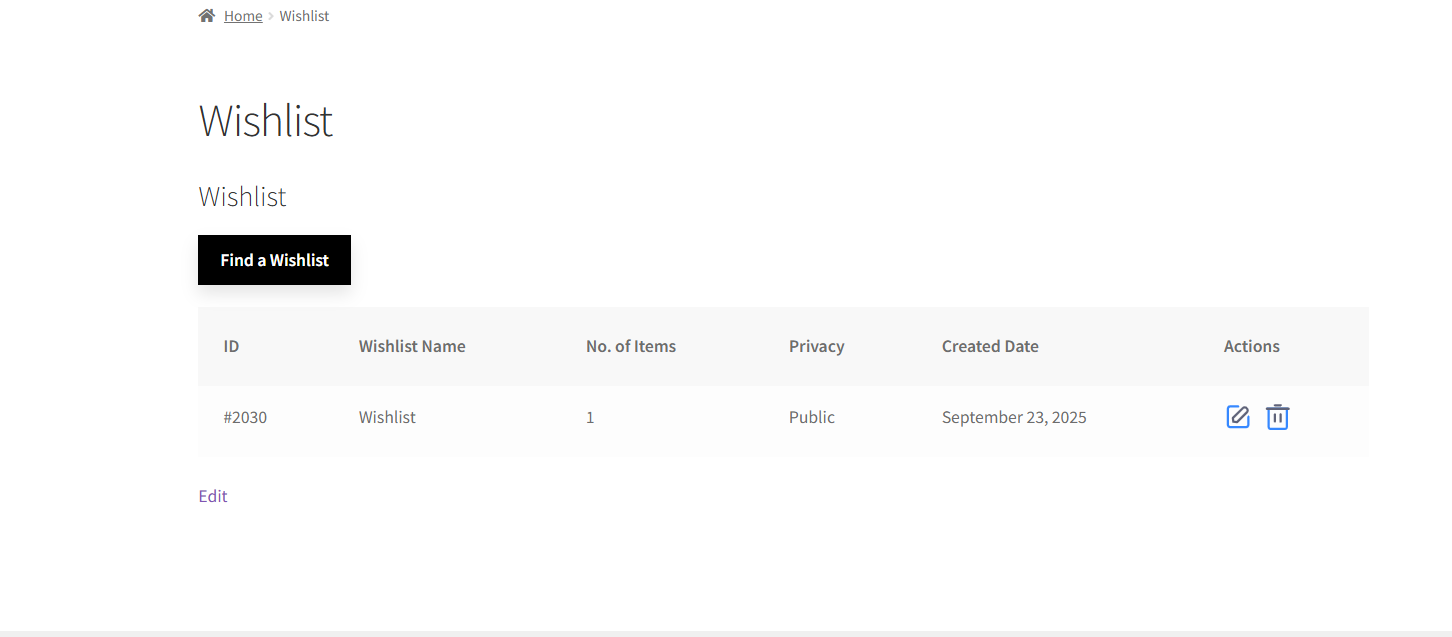
- Navigate to the page where the Wishlist Shortcode/Block is placed.

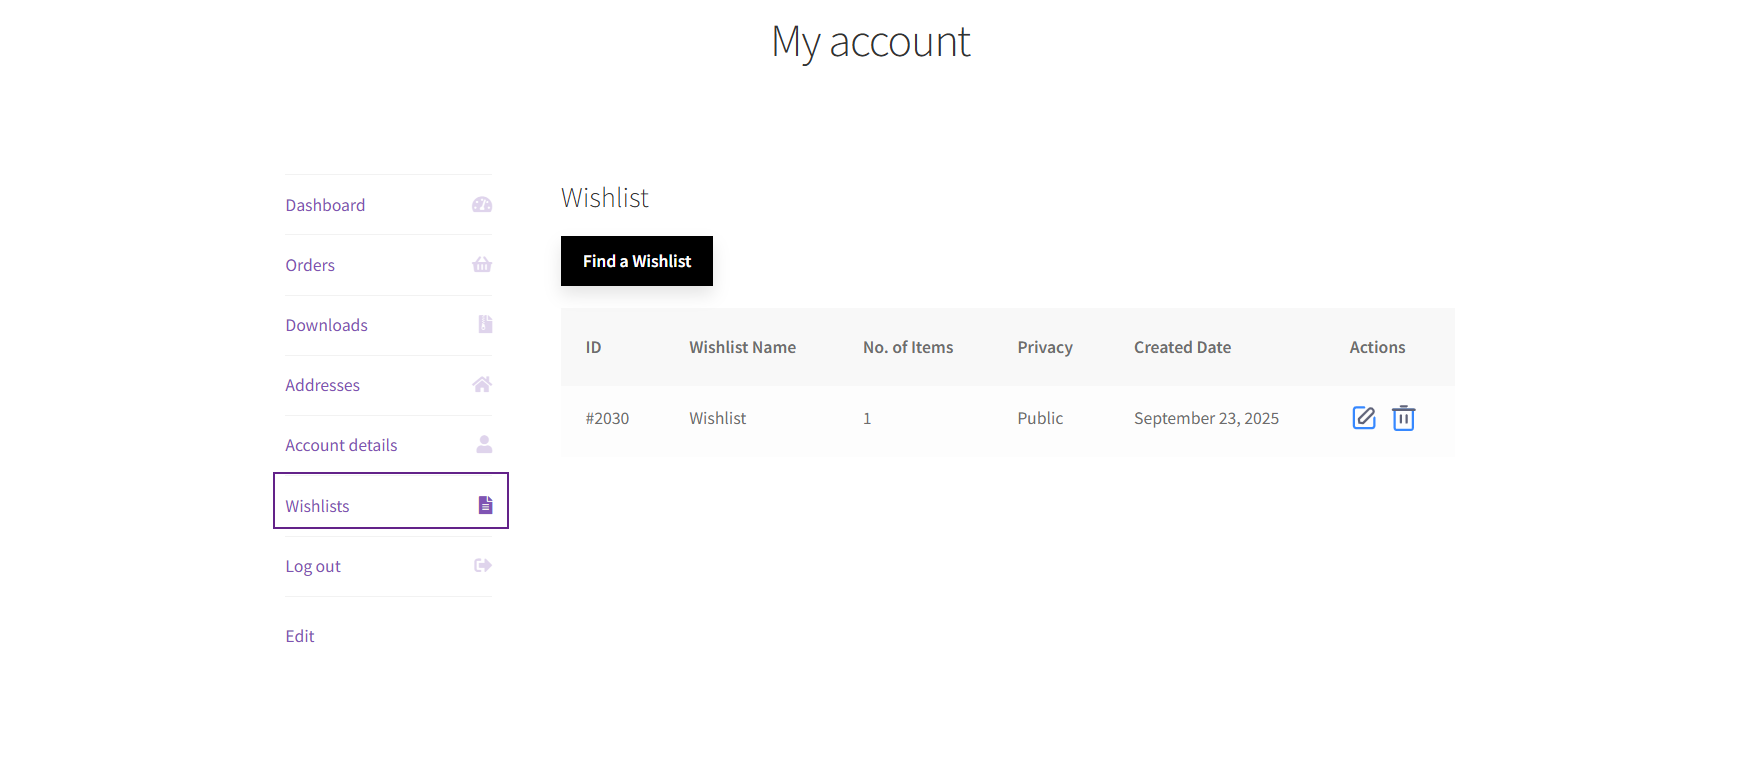
- A Wishlist Table will appear showing the following details:
- ID → Unique wishlist ID number.
- Wishlist Name → Name of the wishlist.
- No. of Items → Total number of products inside the wishlist.
- Privacy → Status of the wishlist (e.g., Public, Private, Shared).
- Created Date → The date when the wishlist was created.
- Actions → Options to view, edit, or manage the wishlist.
Wishlist Tab Label
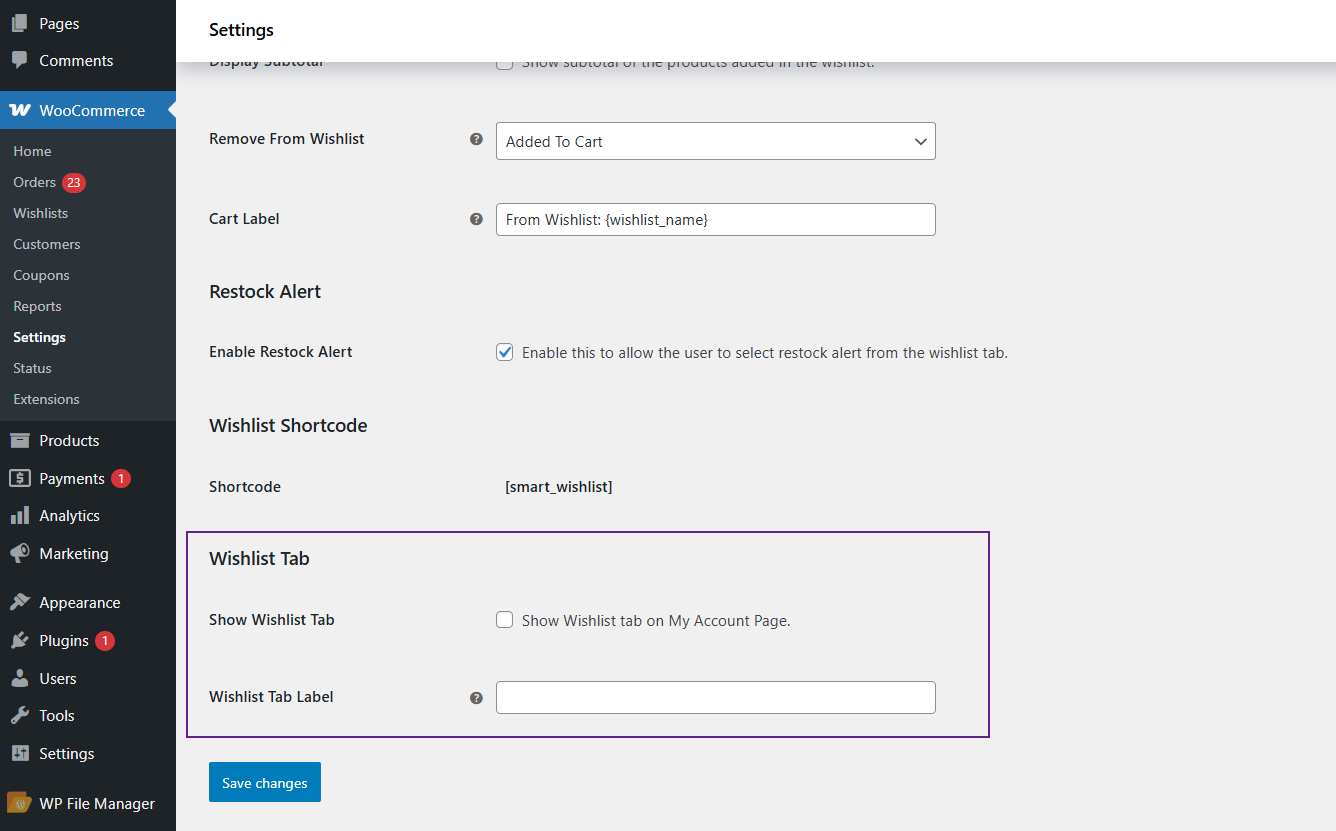
↑ Back to topYou can manage the wishlist tab inside the My Account section.
- Navigate to WooCommerce > Settings > Smart Wishlist > Wishlist Page

Under Wishlist Tab Settings, you will see two options:
- Show Wishlist Tab
- Wishlist Tab Label
Show Wishlist Tab
- Tick this checkbox if you want to show the wishlist tab in My Account.
- By default, this option is checked and the wishlist tab will be visible.

Note: If you uncheck it, the wishlist tab will be hidden. This is useful when you want to make a separate page for the wishlist instead of showing it in My Account.
Wishlist Tab Label
- In this input box, enter the text you want to display as the label of the wishlist tab and section header in My Account.
- By default, the label is Wishlists.

Front-End-Impact
- Navigate to the My Account page
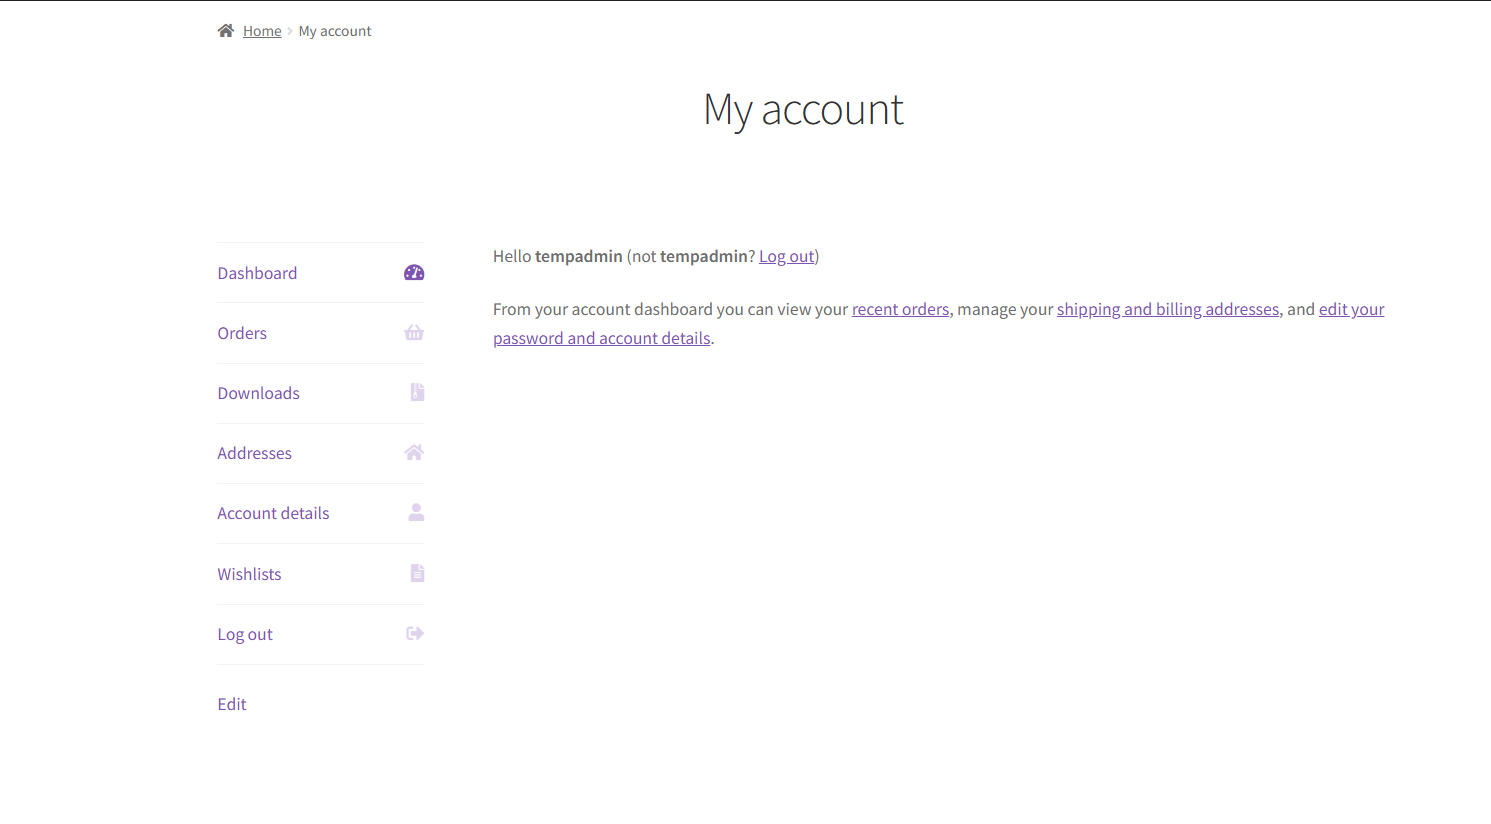
- You will see a Wishlist tab in the My Account menu.
Wishlist Privacy
↑ Back to top- This feature enables the user to set privacy as per preferences. This option provides three options to the user.
- Private – Only you can view this list.
- Shared – Only people with the link can see this link.
- Public – Anyone can view the list, including those with the link.
Private
- Select the Private option from the Wishlist Privacy. This Wishlist will only be visible to the one who created it.

Shared
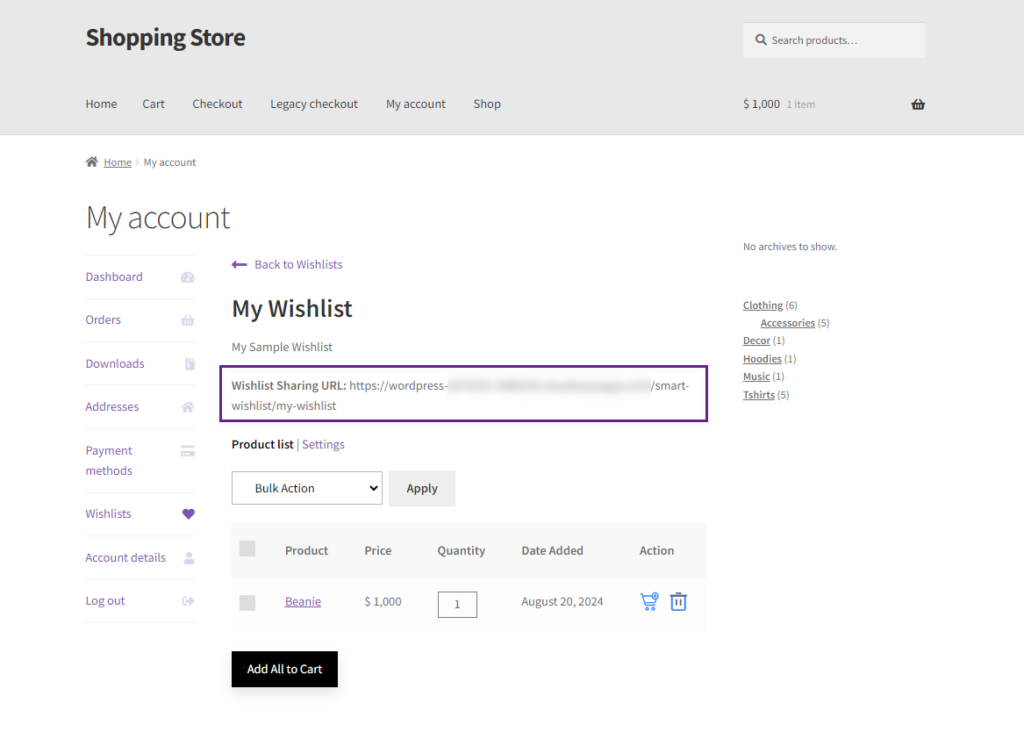
- Select the Shared option from the Wishlist Privacy. A shared URL will be generated and the user with the link can view the wishlist.

Front End Impact
- Login to your account.
- Go to the My Account Page. Navigate to the Wishlists tab.
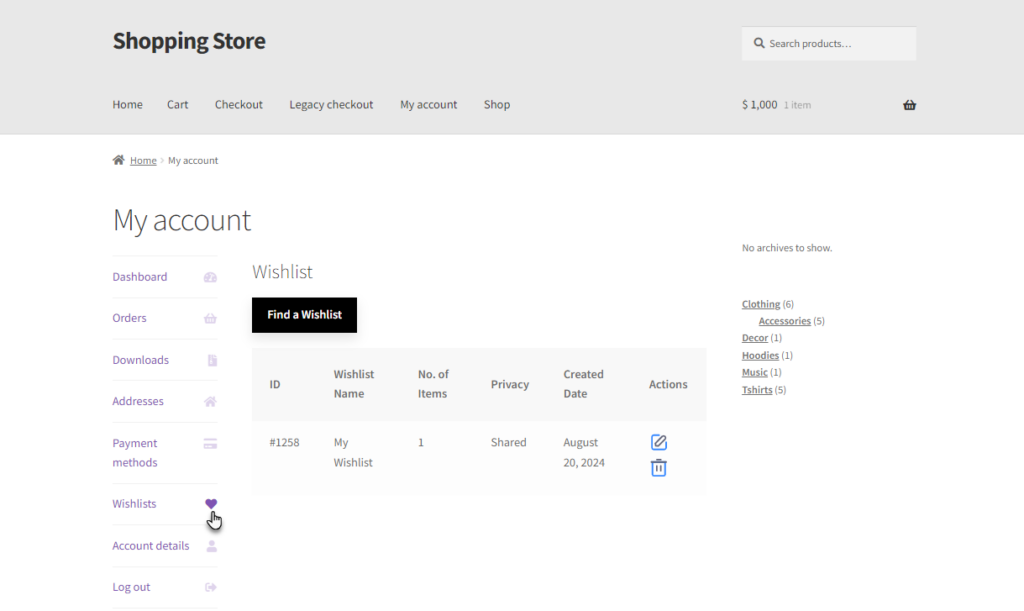
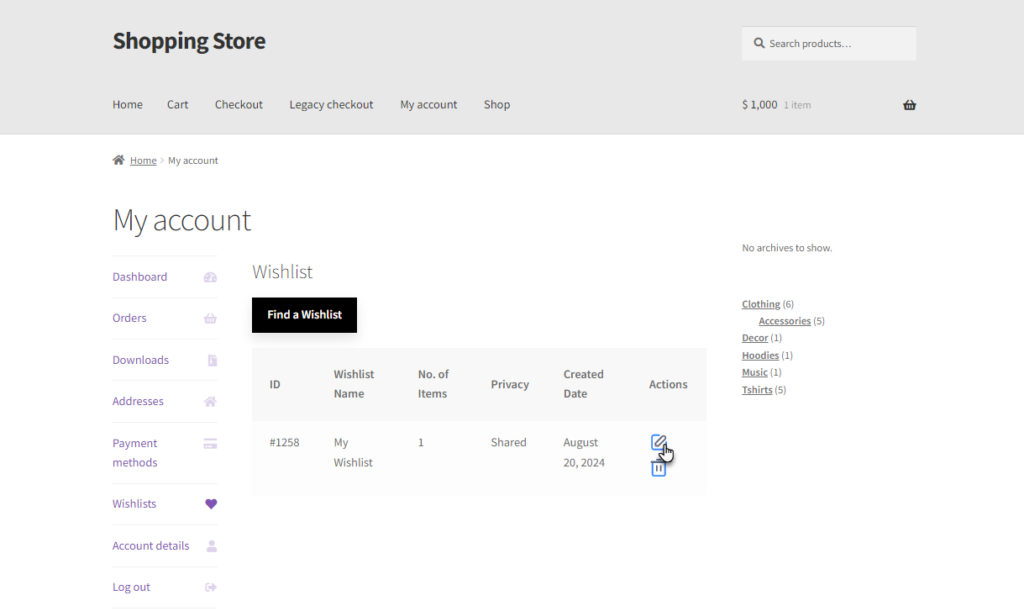
- Click on the Edit option in the Action columns.
- A Shared URL will be available for the user to share the Wishlist.
Public
- Select the Public option from the Wishlist Privacy. The wishlist will be visible to everyone.

Front End Impact
- Login to your account.
- Go to the My Account Page. Navigate to the Wishlists tab.
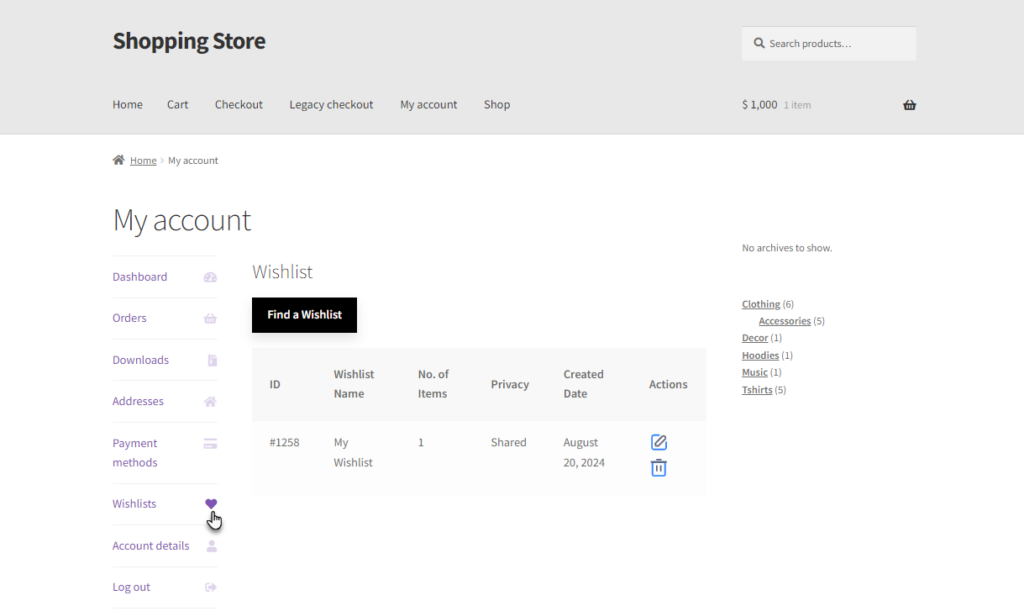
- Click on the Find a Wishlist.
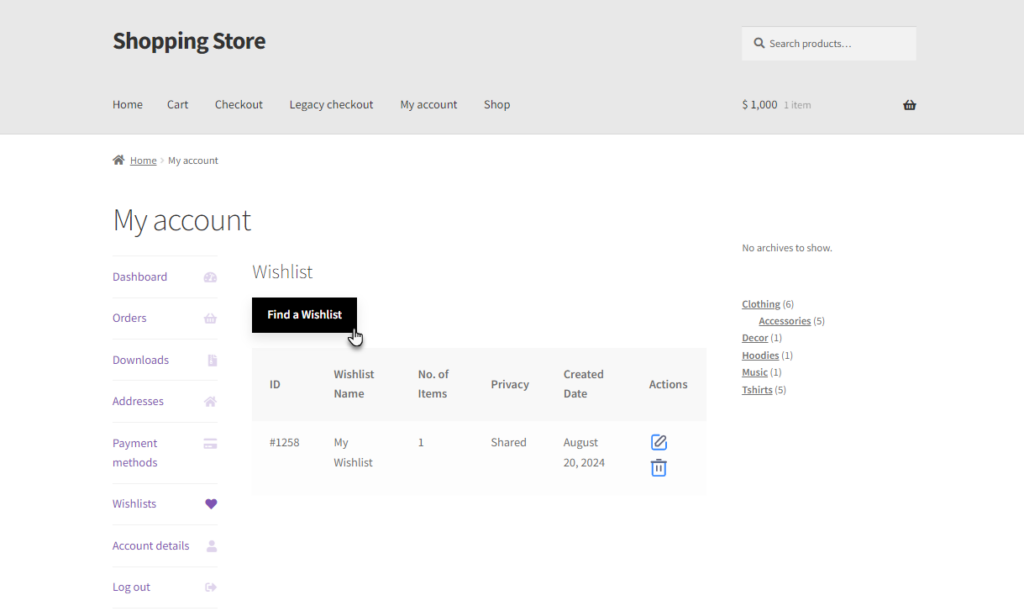
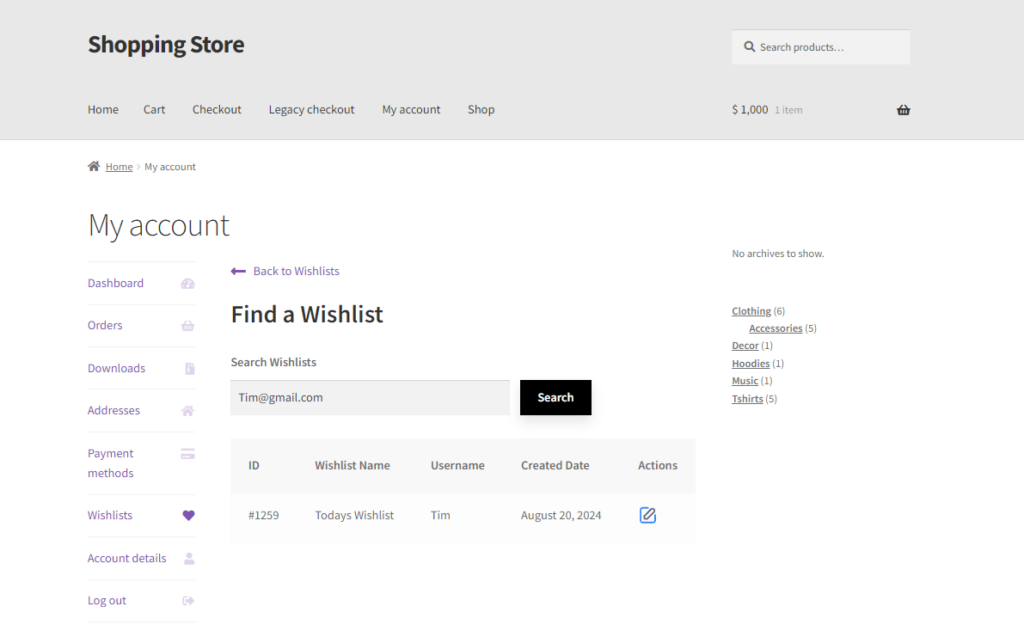
- Users can search for a Public Wishlist by entering the Wishlist name, username, or email to find a specific wishlist. Click on the Search button.

- The wishlist created by the specific user will appear.
Wishlist Admin View
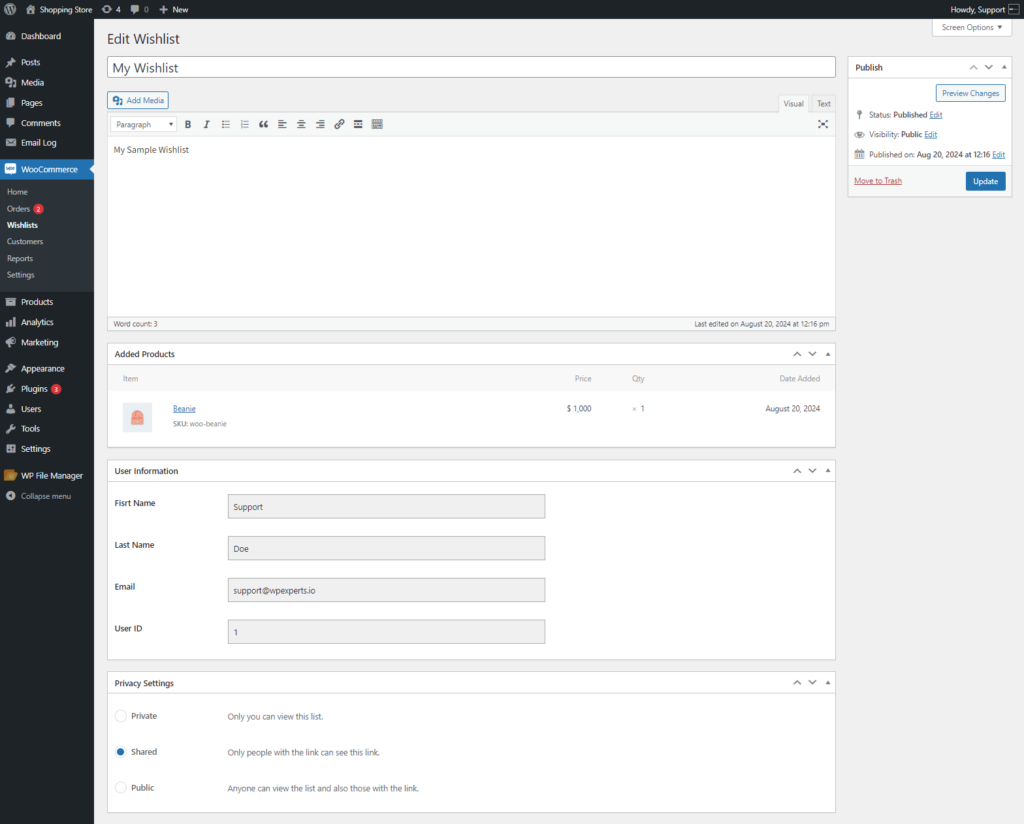
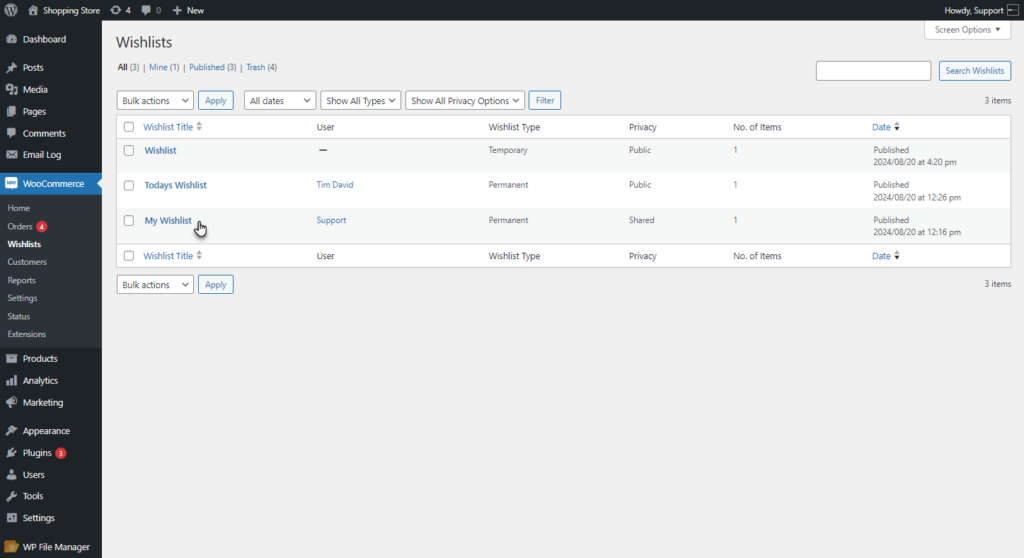
↑ Back to top- The admin can view all the Wishlist created. Go to the WordPress Admin Dashboard > WooCommerce > Wishlists.
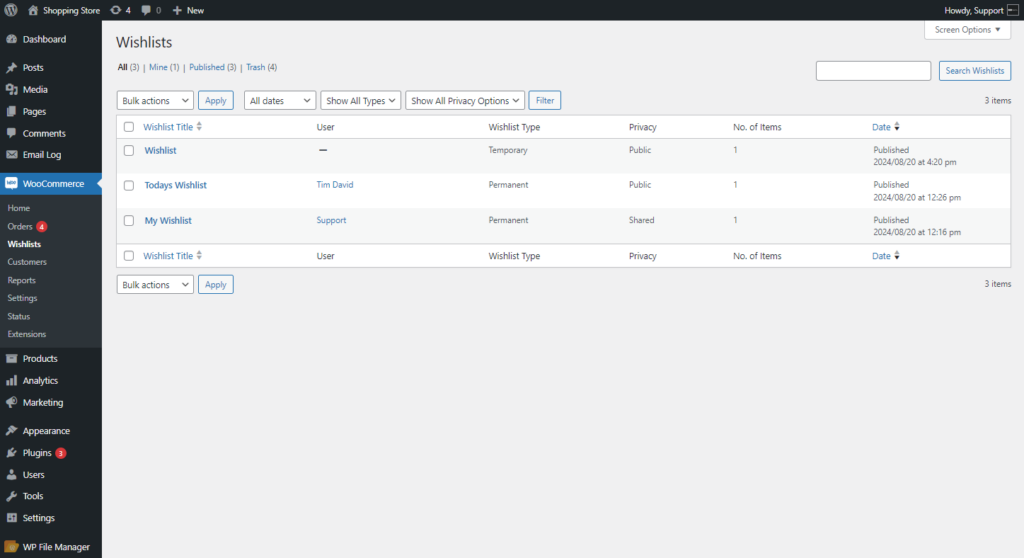
- The Wishlist List page will appear. The Wishlist created by the Guest user will be listed there with Wishlist Type Temporary.
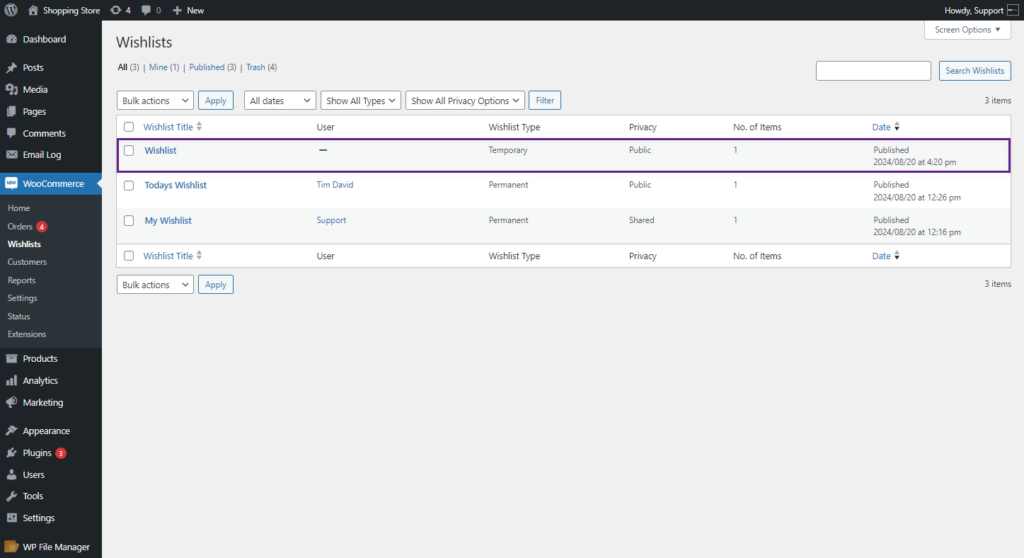
- Click on the Wishlist to edit.
- The admin can:
- Change the Wishlist title and description.
- Check the products in a Wishlist.
- Modify the Wishlist privacy settings.
