Installation
↑ Back to top- Download the .zip file from your WooCommerce account.
- Go to WordPress Admin > Plugins > Add New and Upload Plugin. Choose File (for the file you downloaded in step 1).
- Install Now and Activate Plugin.
More information at Install and Activate Plugins/Extensions.
Configuration
↑ Back to topOnce you have installed the Subscribers & Members Special Pricing extension, you will need to configure the pricing options dedicated to your members and subscribers. If your business operates on a subscription-based model where users sign up for subscriptions with different pricing from regular users, you will also need to install the WooCommerce Subscriptions plugin.
If you are following a membership-tier model, Subscriptions are not required on your store. In this case, you can define pricing based on the purchased product (membership) and the order’s status. Your membership can be any WooCommerce product, whether simple, variable, physical, or virtual. When users purchase this product, they become members. Therefore, when you come across the terms ‘members’ and ‘subscribers’ in this documentation, this is referring to users who have purchased the corresponding subscription or membership product, and their orders or subscriptions are in the appropriate states for pricing rules to function.
General settings (Order status, Subscription state)
↑ Back to topTo access the settings page, navigate to WooCommerce > Settings > Members Based Pricing.
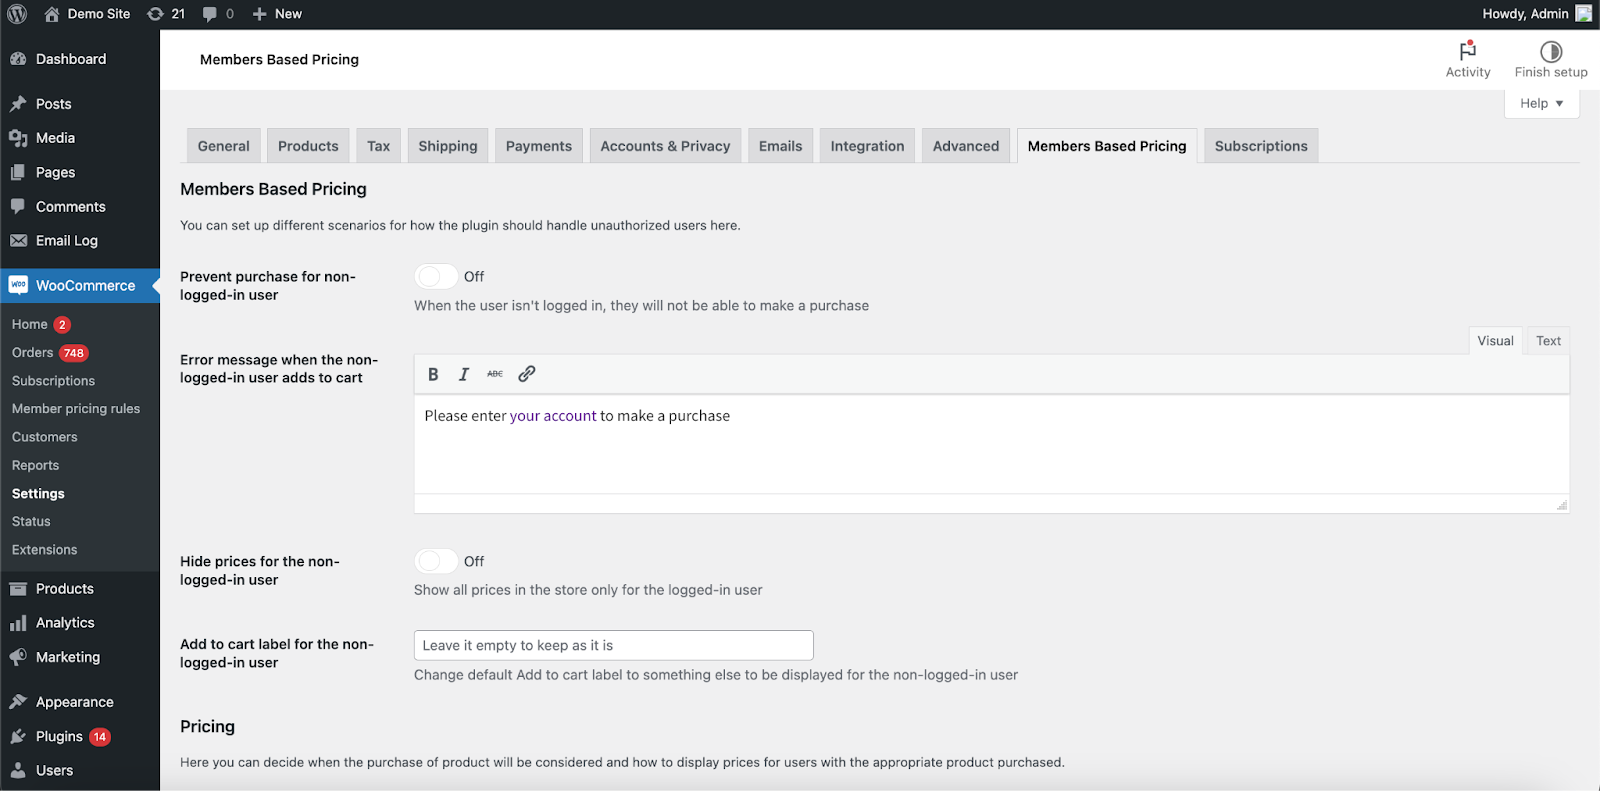
Preventing non-logged users from purchases
↑ Back to topFor users who are not logged in and whose membership status is unknown, you can set up scenarios to restrict their actions until they log in or create an account.
- First, enable the “Prevent purchase for non-logged-in user” option to restrict anonymous users from making purchases.
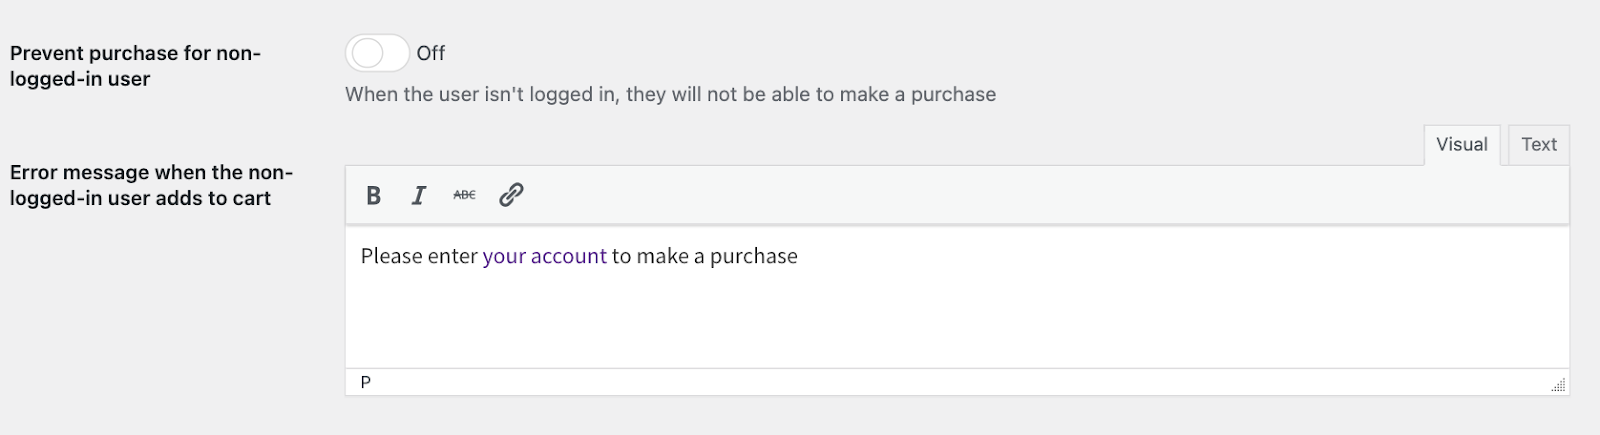
- If this option is enabled, you can customize the message displayed when logged-out users click the “Add to Cart” button in the “Error message when the non-logged-in user adds to cart” section. By default, it’s set to something like, “Please enter your account to make a purchase.” You can include links to help your customers navigate to the sign-in section, registration page, or any other page explaining your membership and how to join.
Hiding product prices and ‘Add to Cart’ button from non-logged users
↑ Back to topThe next thing you can do for those users without being logged in their account is hide prices (any prices – regular woocommerce prices and stock level prices). To hide prices from your store for all the non-logged users enable option called Hide prices for the non-logged-in user. One more thing you can do for that type of users is change the ‘add-to-cart’ label to be something that would clearly indicate and map users to the next steps. You can set your custom label in the Add to Cart label for the non-logged-in user d E.g. you can rename “Add to Cart” button to “Log in to make purchase”.

In case you leave the field empty – the lable will be as it is by default in your theme. (one more thing about this field setup in troubleshooting #1 issue).
Status selector for subscriptions and members to retain special pricing for subscribers
↑ Back to top
This section is important when using percentage (% discount) pricing. You have two options for pricing: flat prices (where you set regular and sale prices) and percentage discounts (which reduce the product cost by a percentage). If you want to clearly showcase the advantages of being a member or subscriber compared to regular users, you can select “Sale price” in the “Display as” dropdown.

The main choices here pertain to subscription and order statuses, which serve two distinct purposes. When your business offers special pricing based on active user subscriptions, you should configure the “Recognize subscription active when its status is setting.” Here, you can select the subscription status that should trigger pricing rules. For instance, choosing only “Active” status means that only users who have purchased a subscription and kept it active can benefit from subscriber-special pricing. It’s essential to review all the subscription statuses to include those relevant to your case. When a subscription transitions to an unselected status (like “Expired”), user pricing reverts to the regular pricing.
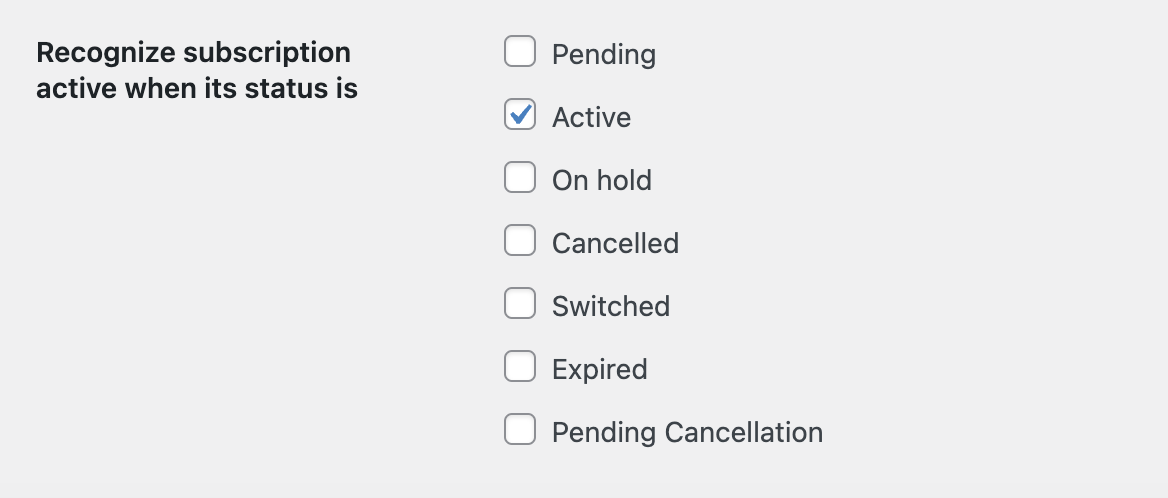
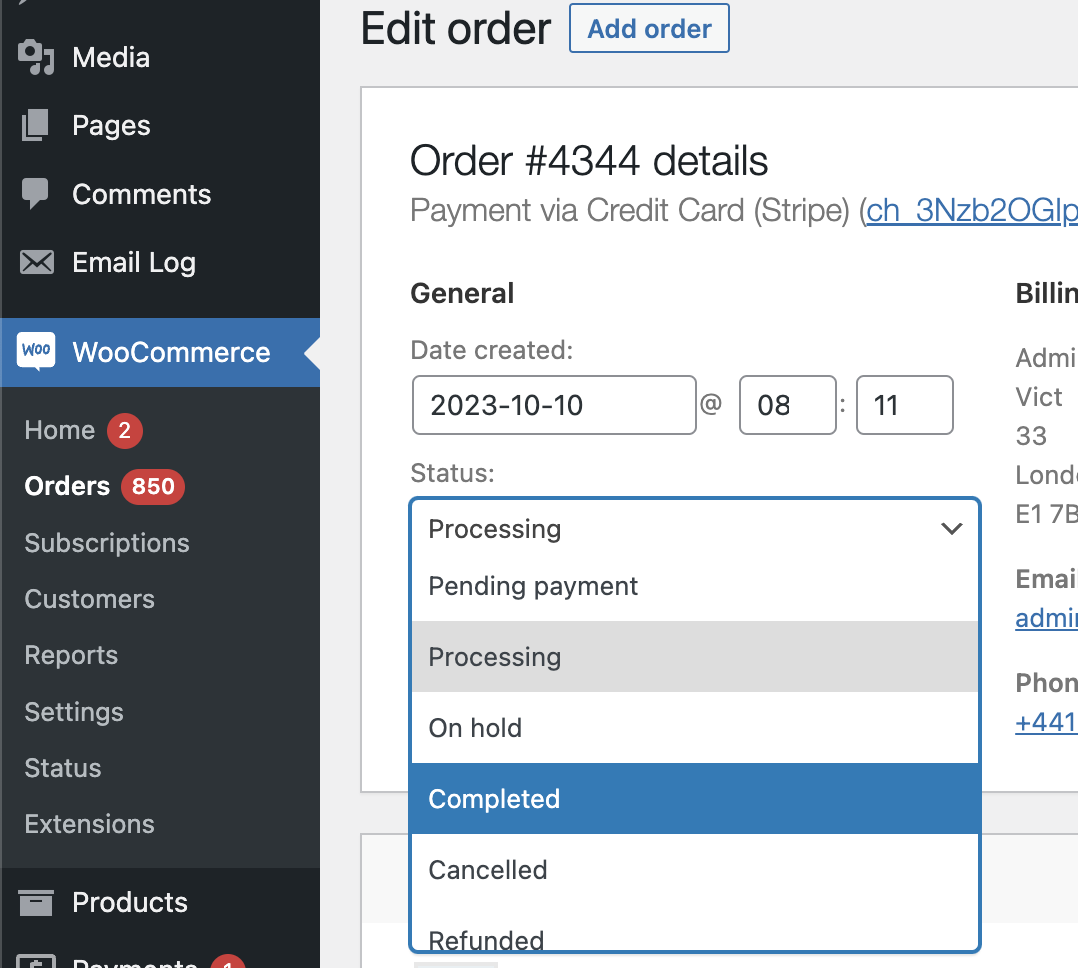
Here you select what status of subscription should be for pricing rules to work. E.g. in case you select only Active status as on screenshot – that means only those users who purchased subscription and keep it in active status are able to benefit from subscribers special pricing. Please carefully review all the subscription statuses to include those that work for your case. When subscription goes into one of unselected statuses (like Expired) – users pricing switches back to the regular basis pricing. Status of subscription can be found and selected on subscription page:

So, if you want to provide special pricing to only those users, who have active subscription you can do so by selecting active type of status, then when subscription will expire or be canceled – users will get regular pricing, you don’t need to do anything more here.
Order status selector for users to have active membership and get special pricing for members
↑ Back to topYou can designate any WooCommerce product as a membership product, and there’s no need to install additional plugins to create special pricing for members. Define which product in your store represents membership, and then establish pricing rules for that membership. You can have as many membership products as you need, allowing for different tiers of membership.
To begin, determine the order status required for the rule to function. For instance, you can choose active statuses like “Processing” and “Completed,” excluding refunded, canceled, or failed payments from counting as purchased memberships. Order statuses are drawn from your WooCommerce settings. If you change the order status to one that isn’t selected in your settings, users won’t receive special pricing, even if they have an order.
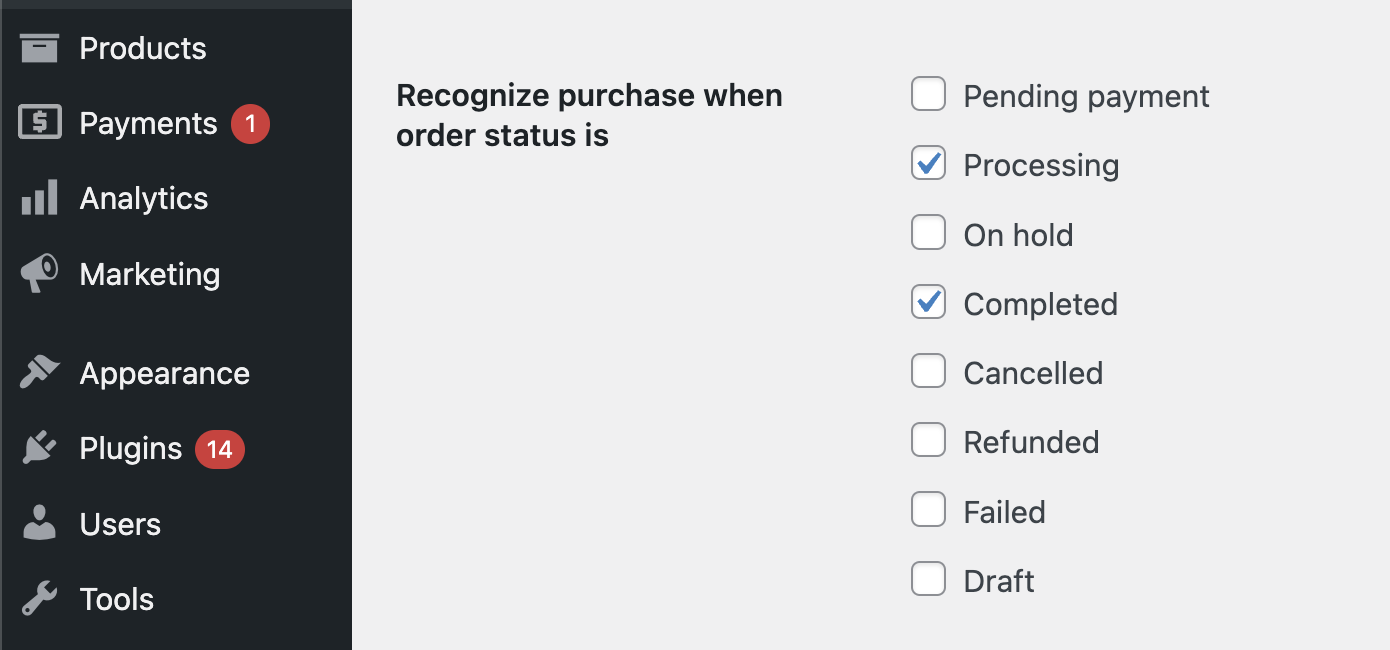
The same as for subscription, order statuses are taken from here:
So if you change order status to some that isn’t selected in your settings – user won’t get the special pricing (even if they have order).
It’s important to note that if a user has multiple orders (perhaps purchasing a membership plan multiple times or switching between membership tiers), the plugin considers the most recent order or subscription with the appropriate status. For example, if a user has two subscriptions, one canceled and one active, the plugin will prioritize the active one when applying pricing rules.
Creating Pricing Rules (Product level)
↑ Back to topYou have two options for creating pricing rules: at the global level (applying to several products and categories) or at the product level, individually for each product.
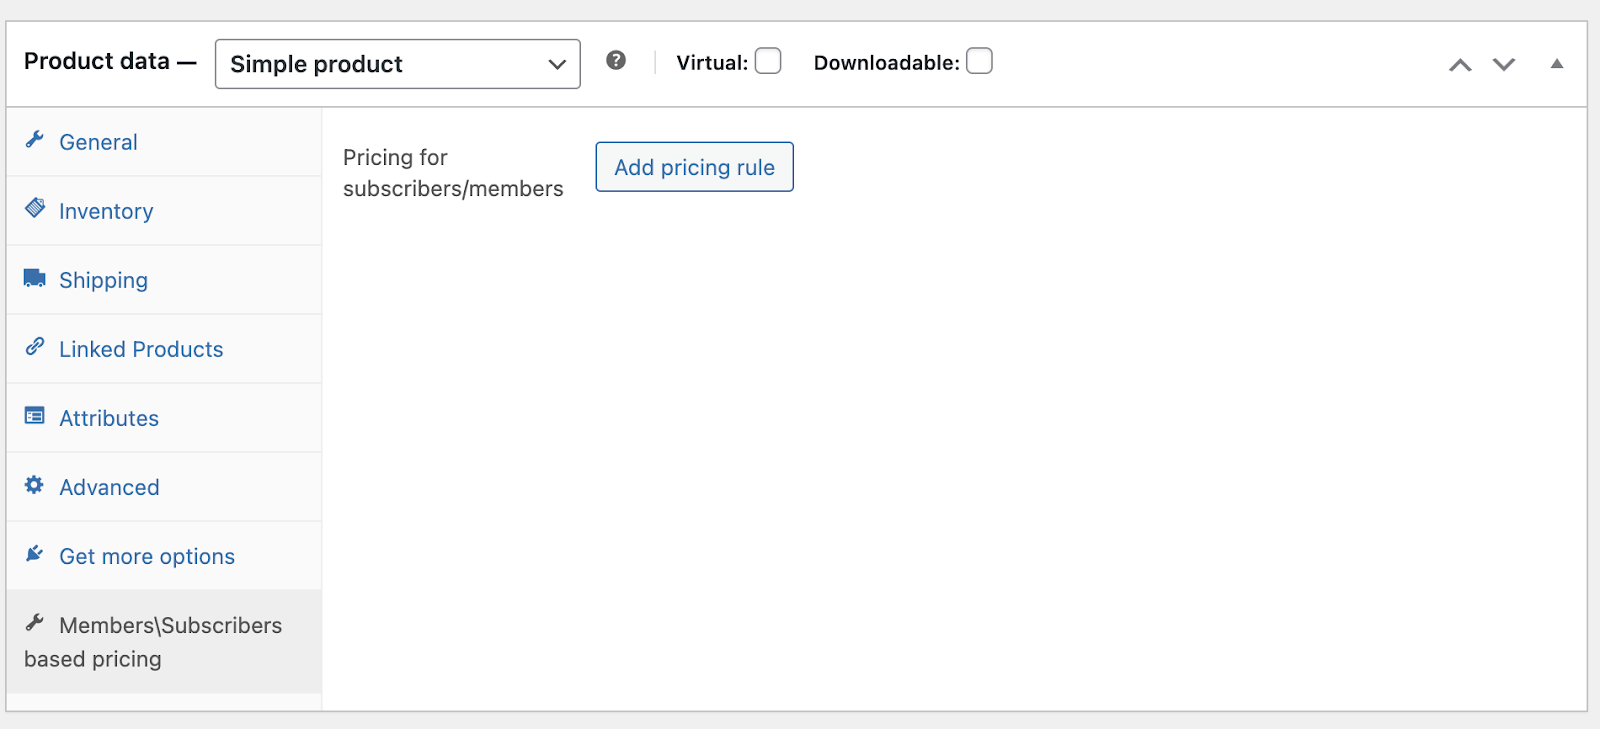
For product-level rules, navigate to the product page in the WordPress admin for the product you want to set special pricing rules for members or subscribers. In the “Product data” section, visit the “Members\Subscribers based pricing” tab and click the “Add pricing rule” button.
You can create as many rules as you need, especially if you have different membership or subscription tiers.
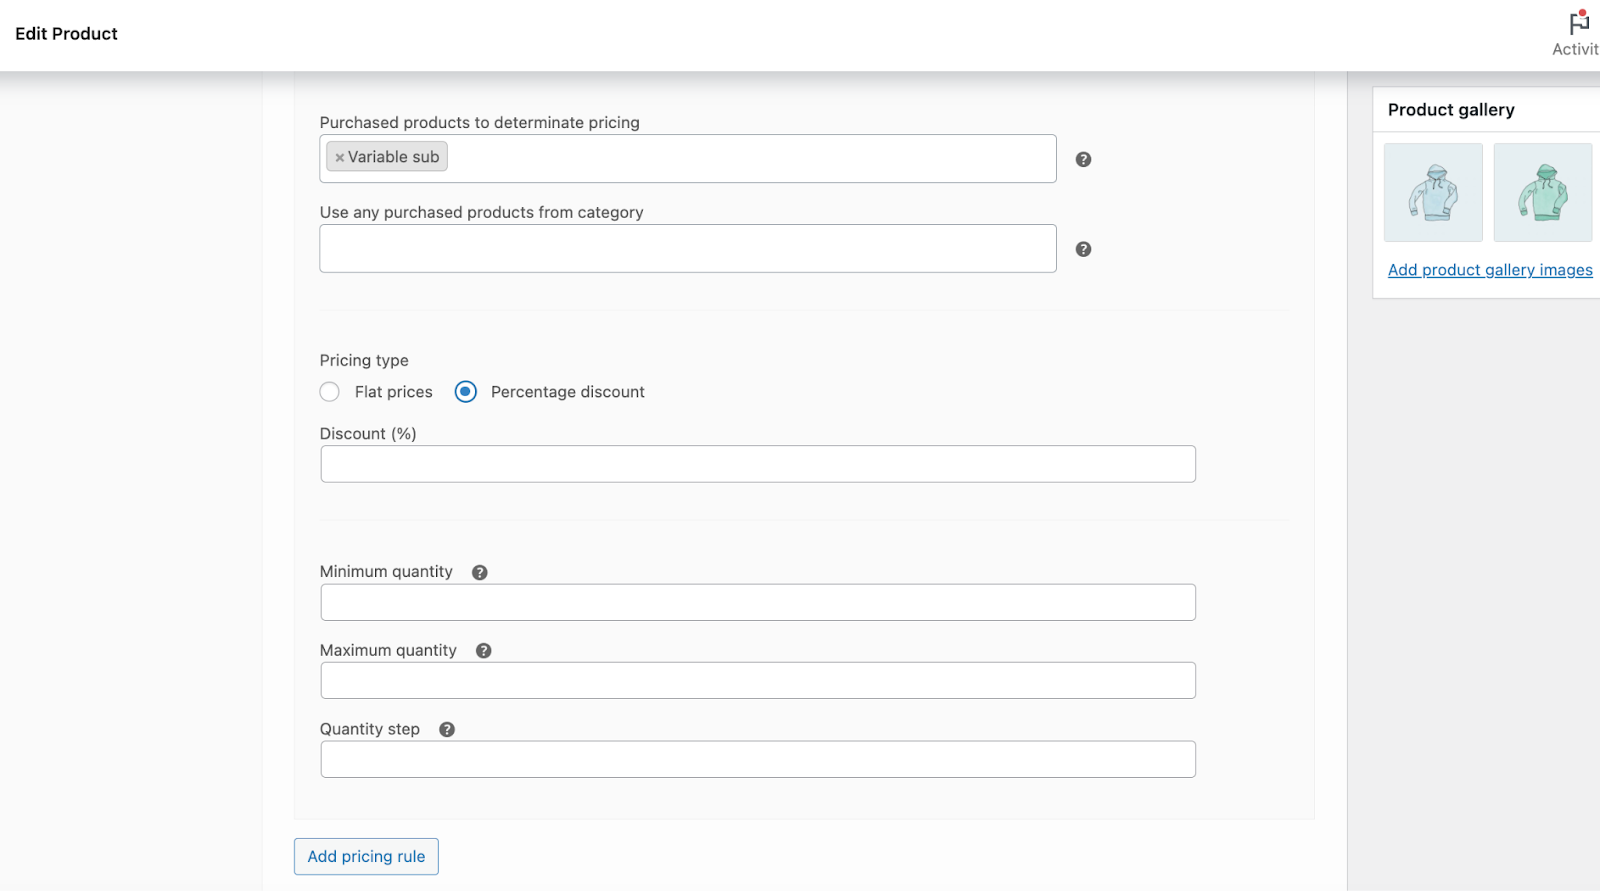
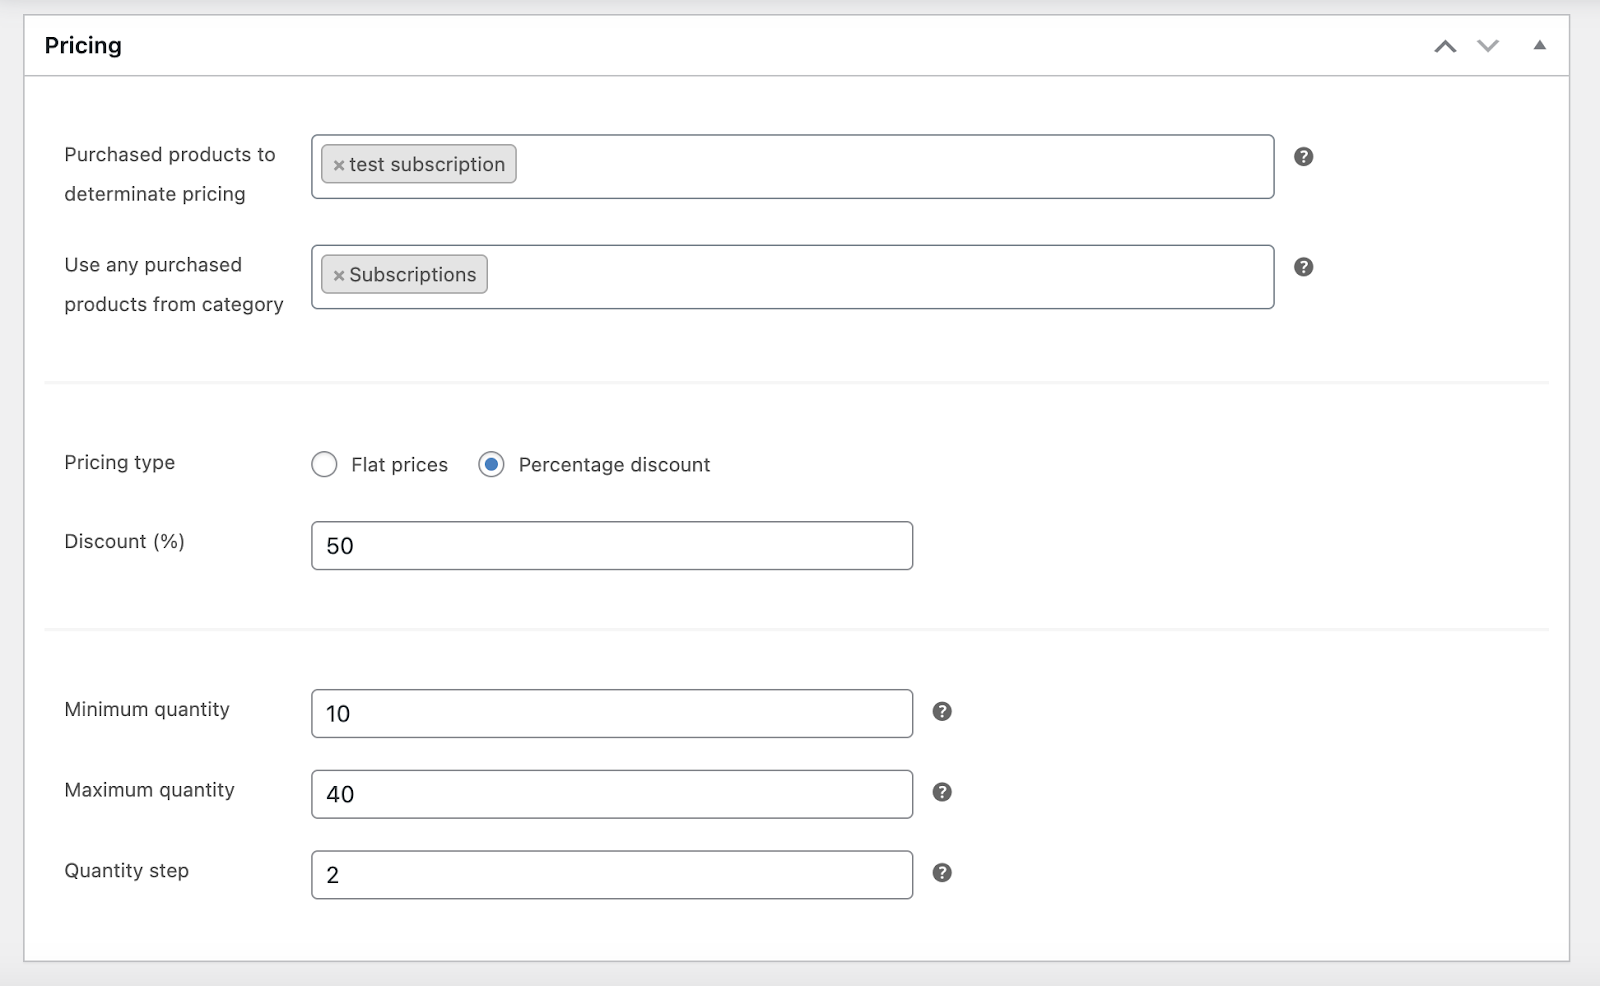
To create a pricing rule for a product, fill in the following fields:
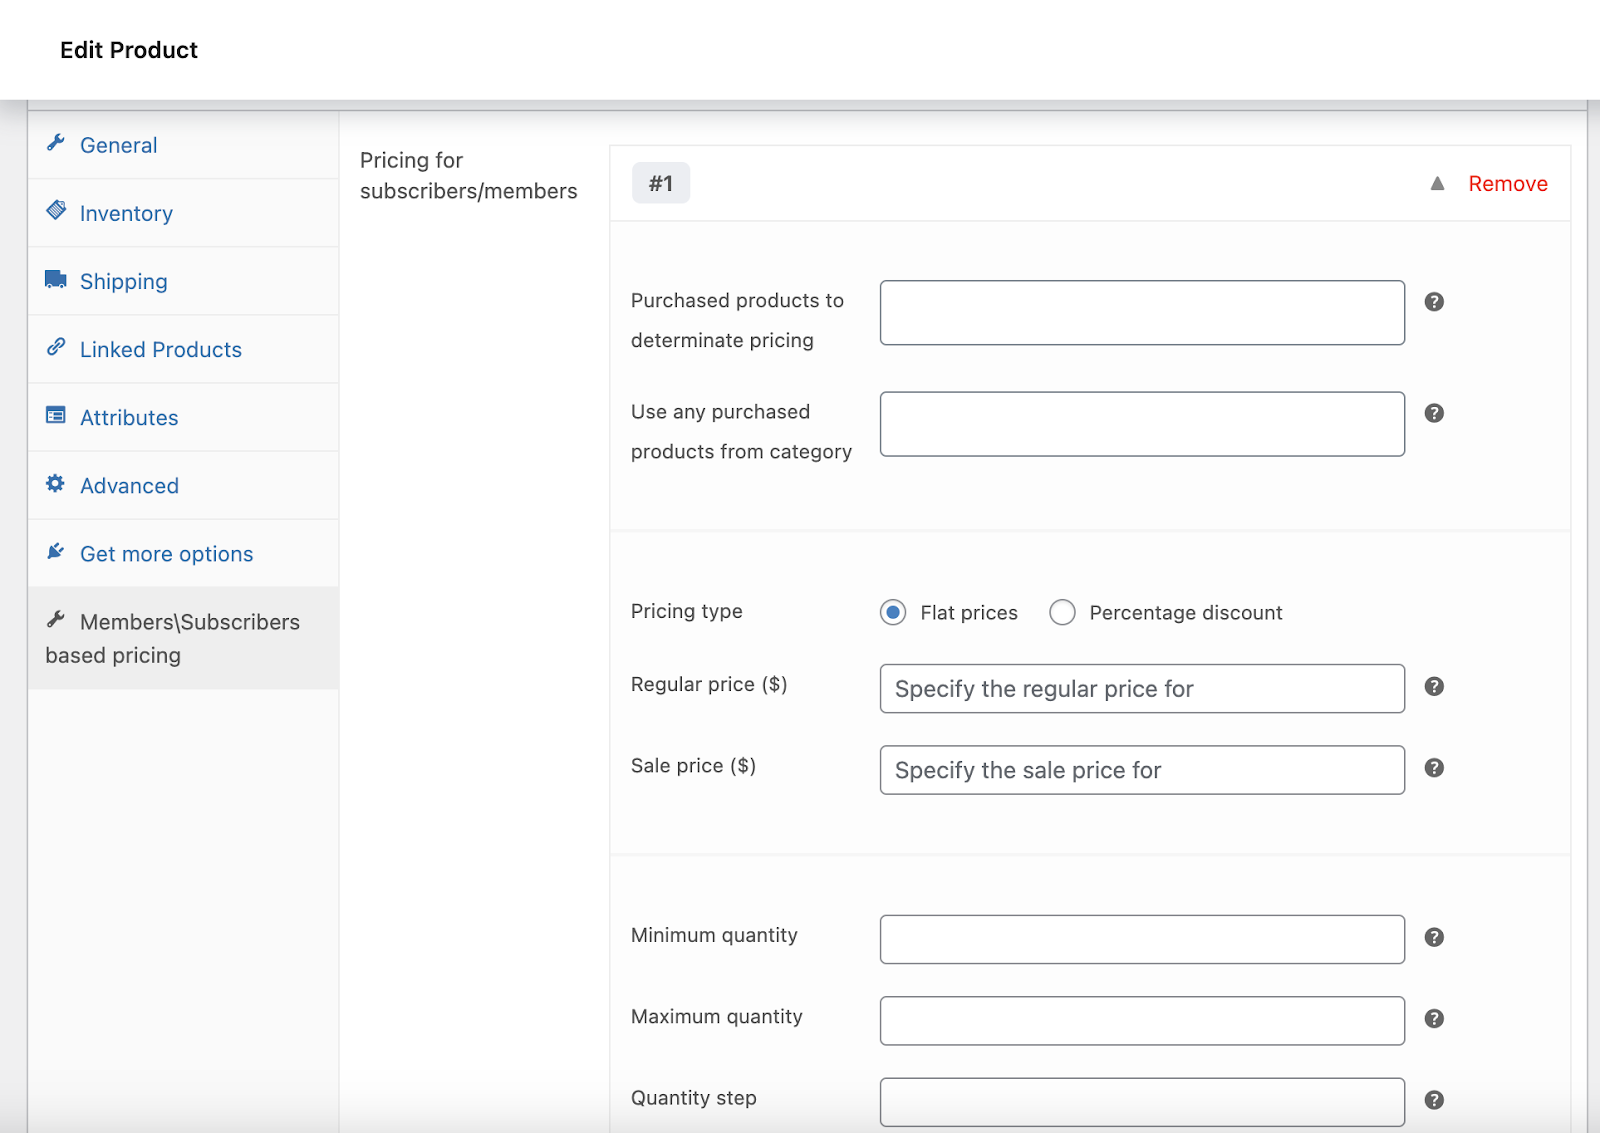
Purchased products to determinate pricing – Choose what product should be purchased by user to obtain special pricing. If you select several products – user can purchase any of those to get this special deals.
Use any purchased products from category – Any purchased product from this category will help user obtain special pricing. The same as for products, any product from selected category purchased by user will make them get special pricing.
Pricing type – Select what type of pricing you want to have in this particular rule.
Flat price – you would have to set regular and sale (or just regular) price of product that will replace current cost for members.
Percentage discount – the product cost will be discounted by % that you set here for members.
Regular price (for flat type) – Set any value here and it will replace the current cost of product for members.
Sale price (for flat type) – This is optional, but if you set this also, the sale and regular price for members will replace the current price of product.
Discount % (for percentage type) – Plugin will take the current product cost (regular – if there is no sale price, or sale price as current product price) and decrease its cost by % value you set here.
Optional fields (you can leave them empty if you don’t need quantity limitations):
Minimum quantity – Specify the minimal amount of products that member or subscriber can purchase in one order. Let’s say – user can purchase not less than 3 products. They will see the min qty set in qty selector on product page (as a rule, but it depends on your theme as well).
Maximum quantity – Works the same as min qty, but simply limits how many pieces of product can be purchased by members in one order.
Quantity step – Specify by how many products quantity will increase or decrease when a customer adds the product to the cart for purchase. Leave blank if products can be added one by one. E.g. if you have value = 2, that means user will have to make quantity increment only by 2, 4, 6 etc from minimum selected quantity.
Creating Pricing Rules (Variable product level)
↑ Back to topWhen setting rules for variable products, you have two options: setting them at the parent level (similar to simple products) or setting them up for each variation separately.In cases where some variations don’t have their own rules, they will follow the rules from the parent level.
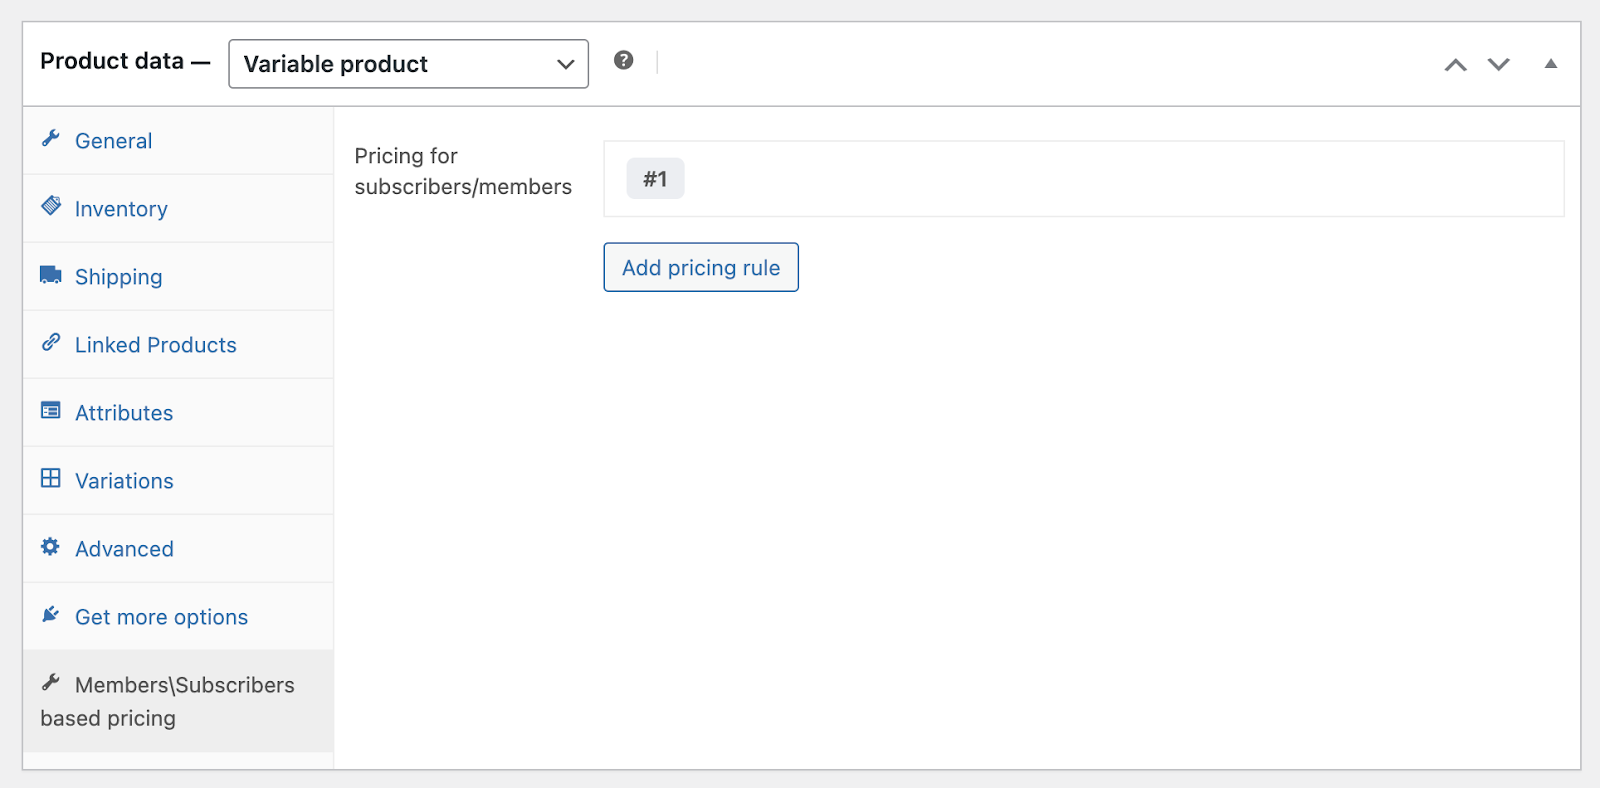
Setting up pricing rules at the parent level is similar to simple products. Therefore, we’ll focus on configuring member-based pricing for individual variations.
The criteria for defining pricing are the same as for simple products. You should fill out these fields to create pricing rules for separate variations:
Purchased products to determine pricing: Select the specific product that a user must purchase to access special pricing. If you choose multiple products, users can buy any of them to unlock these pricing deals.Use any purchased products from category: Special pricing is activated when a user purchases any product within the selected category. Similarly, users can obtain special pricing by purchasing any product from the chosen category.
Pricing type: Decide on the type of pricing you want for this rule.
- Flat price: In this case, you need to specify both the regular and sale (or just the regular) price for the product that will replace the current cost for members.
- Percentage discount: With this option, the product cost is reduced by a percentage you set here for members.
Regular price (for flat type): Enter the desired value, which will replace the current product cost for members.Sale price (for flat type): This is optional. If you set it, the sale and regular prices for members will replace the current product price.Discount % (for percentage type): The plugin will take the current product cost (regular price if there is no sale price, or the sale price as the current product price) and reduce its cost by the percentage value you set here.
Optional fields (you can leave them empty if you don’t need quantity limitations):
- Minimum quantity: Specify the minimum number of products that a member or subscriber can purchase in a single order. For example, you can set it to 3, ensuring that users must buy at least 3 products. The minimum quantity set will appear in the quantity selector on the product page (as a rule), but this might also depend on your theme.
- Maximum quantity: Functions similarly to the minimum quantity but limits how many pieces of the product members can purchase in a single order.
- Quantity step: Define how the product quantity increases or decreases when a customer adds the product to the cart for purchase. Leave it blank if products can be added one by one. For instance, if you set it to 2, users can only increase the quantity by 2, 4, 6, and so on, starting from the minimum selected quantity.
Just like for simple products, you can add as many pricing rules for variations as needed. If you leave the pricing rule section empty for a variation and set a pricing rule on the parent level, that variation will follow the parent rule by default. If a variation has its own pricing rules, those rules take priority. If there’s no pricing rule for a variation, the rules from the parent level apply.
Creating Pricing Rules (Global level)
↑ Back to topWhen you need to establish pricing rules for members or subscribers that apply to all items in your store, specific categories, or a group of products, you should use global pricing rules. To create global rules, go to WooCommerce > Member pricing rules.
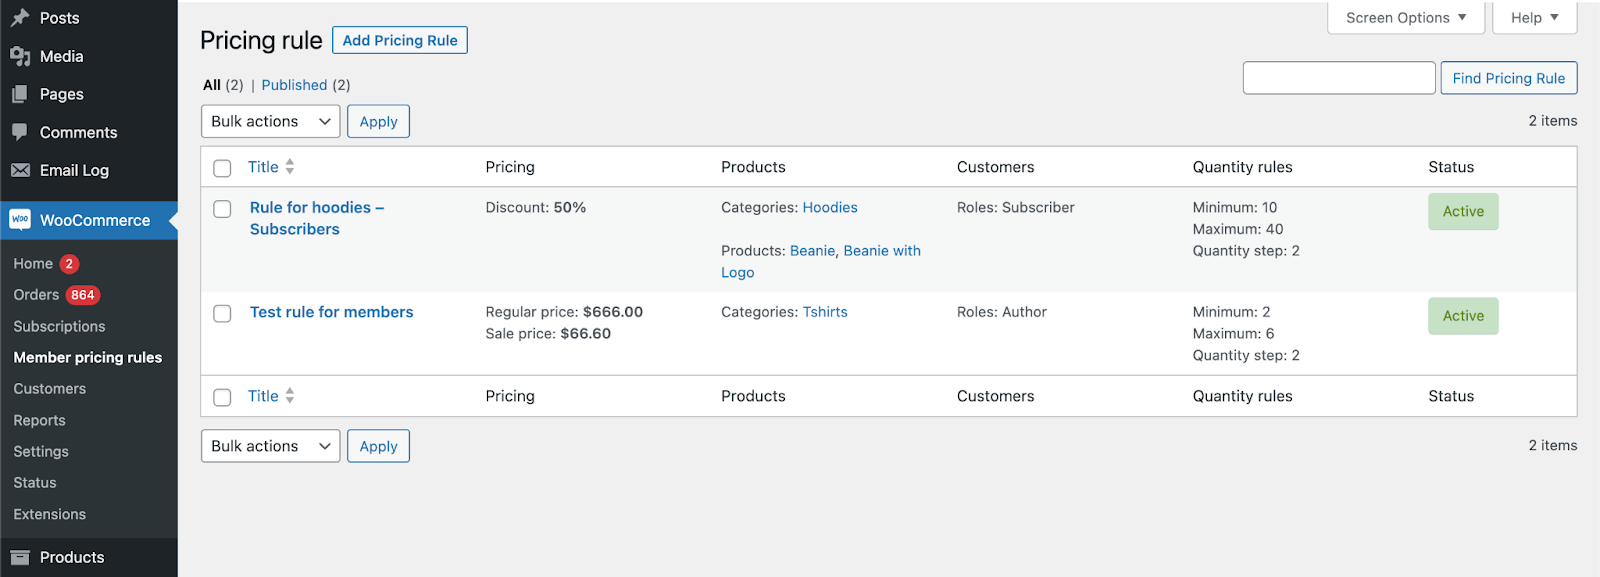
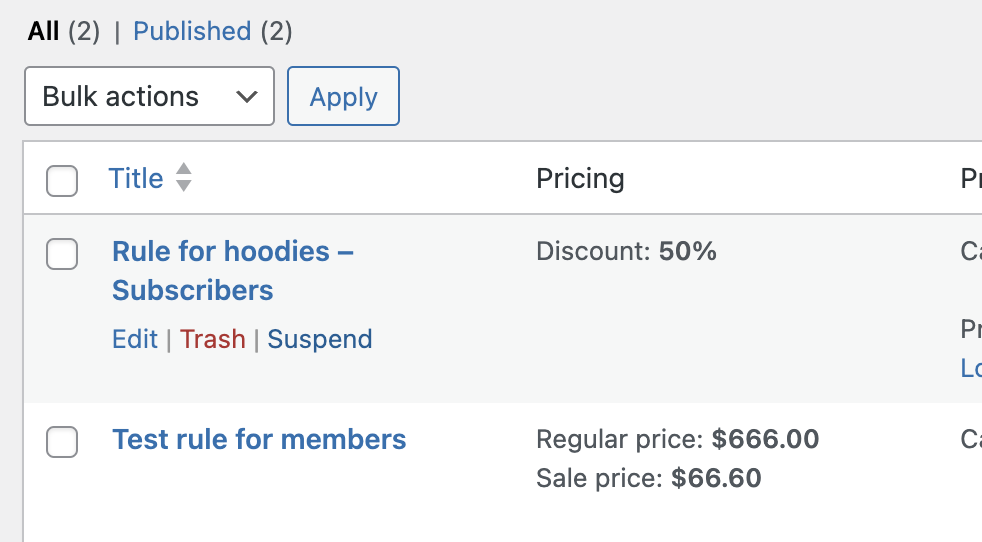
Here, you’ll find a table displaying all the current rules you’ve created. The table provides essential information about each rule and allows for quick actions such as editing, deleting, and suspending.
To add a new rule, click the “Add pricing rule” button at the top of the page. You can then assign a title to the rule and proceed to the “Rules” section.
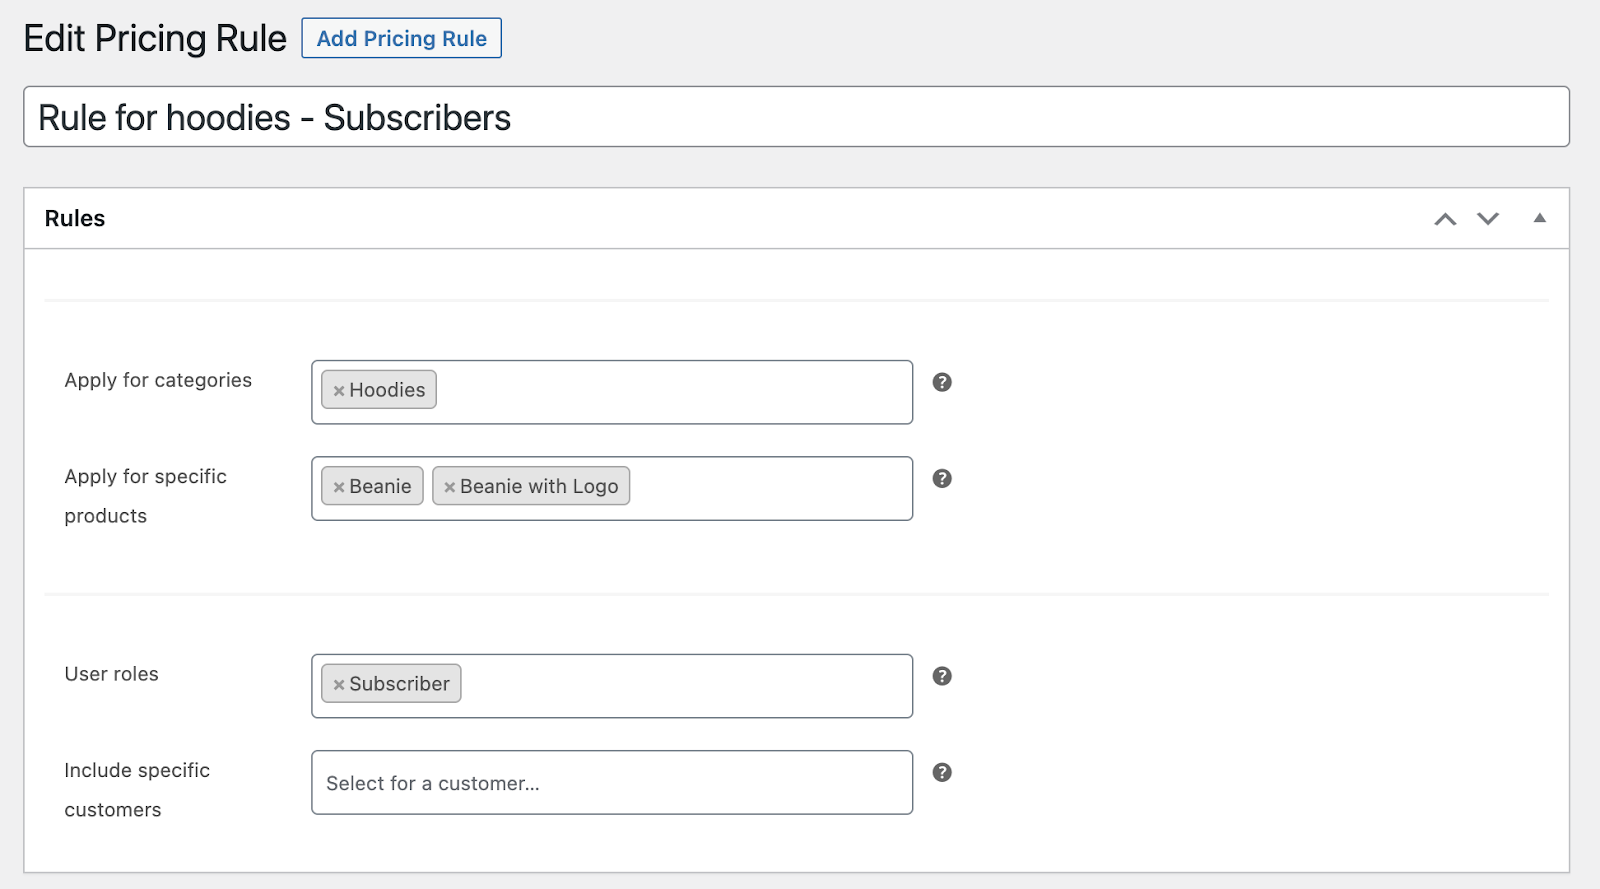
One key difference from creating pricing rules at the product level is that you must define the products or categories for which the rules will apply.
Apply for categories – Select one or more product categories, to change the cost of products that are placed in those categories. Apple for specific products – Define what products pricing rule that you will craft below will have an effect. You can leave any of these fields empty, and the rule will apply only to the selected products or categories. If you leave both fields empty, the created pricing rule for members will affect every product in the store. This is useful if you want to offer a percentage discount to all your current members and subscribers.
Next, there’s an additional condition that can help you define pricing rules. You can specify that the rule only applies when a user has purchased a membership or subscription and their user role matches one of those selected here.
User roles – choose the user roles for which this rule will apply. It applies to all users with those roles. You can choose the custom-created ones (instructions further) as well as default WP user roles. Include specific customers – if the rule should apply only for certain customers, you can search for them in this field. If these users have the role specified above, no need to select them separately.
The following section is “Pricing,” where you define the product prices for members and subscribers. You also specify which product or subscription they should buy to become a member or subscriber.
Fields here are the same as for product-level rules: Purchased products to determine pricing: Choose the specific product that users must purchase to access special pricing. If you select multiple products, any of them will unlock exclusive deals.Use any purchased products from category: Special pricing becomes active when users purchase any product within the selected category. Similarly, special pricing is granted when users buy any product from the chosen category.Pricing type: Decide on the pricing type for this rule.
- Flat price: Specify both the regular and sale (or just the regular) price for the product that replaces the current cost for members.
- Percentage discount: This option reduces the product cost by the percentage you set here for members.
Regular price (for flat type): Enter the desired value to replace the current product cost for members.Sale price (for flat type): This is optional. If set, the sale and regular prices for members will replace the current product price.Discount % (for percentage type): The plugin will take the current product cost (regular price if there is no sale price, or the sale price as the current product price) and reduce its cost by the percentage value you set here.Optional fields (you can leave them empty if you don’t need quantity limitations):
- Minimum quantity: Specify the minimum number of products that a member or subscriber can purchase in a single order. For example, you can set it to 3, ensuring that users must buy at least 3 products. The minimum quantity set will appear in the quantity selector on the product page (as a rule), but this might also depend on your theme.
- Maximum quantity: Functions similarly to the minimum quantity but limits how many pieces of the product members can purchase in a single order.
- Quantity step: Define how the product quantity increases or decreases when a customer adds the product to the cart for purchase. Leave it blank if products can be added one by one. For instance, if you set it to 2, users can only increase the quantity by 2, 4, 6, and so on, starting from the minimum selected quantity.
Please be careful with using “Flat price” type for a group of products or categories since you’re setting an exact cost for a range of products that are typically priced differently. It’s often safer to use a percentage discount across your store and categories.
Prioritization of the rules:
Rules created at the variation level hold the highest priority. If there’s no pricing rule for a member created at the variation level (or the product isn’t variable), the rule created at the parent level of the product takes effect. If neither the parent level nor variation level has rules, the global pricing rule will determine the member’s cost.
Extra feature – create user roles
↑ Back to topIn case you will use extra role-based conditions for global pricing rules you may find helpful feature to create new user roles.
Please note that plugin focuses on replicating existing user role capabilities and doesn’t provide tools for customizing role capabilities from scratch. If you require custom capabilities for a role, consider using an alternative plugin for role creation. Any WordPress role generated using another plugin can still be employed for role-based pricing rules within our plugin.
To craft a new role, navigate to Users > Roles Management.
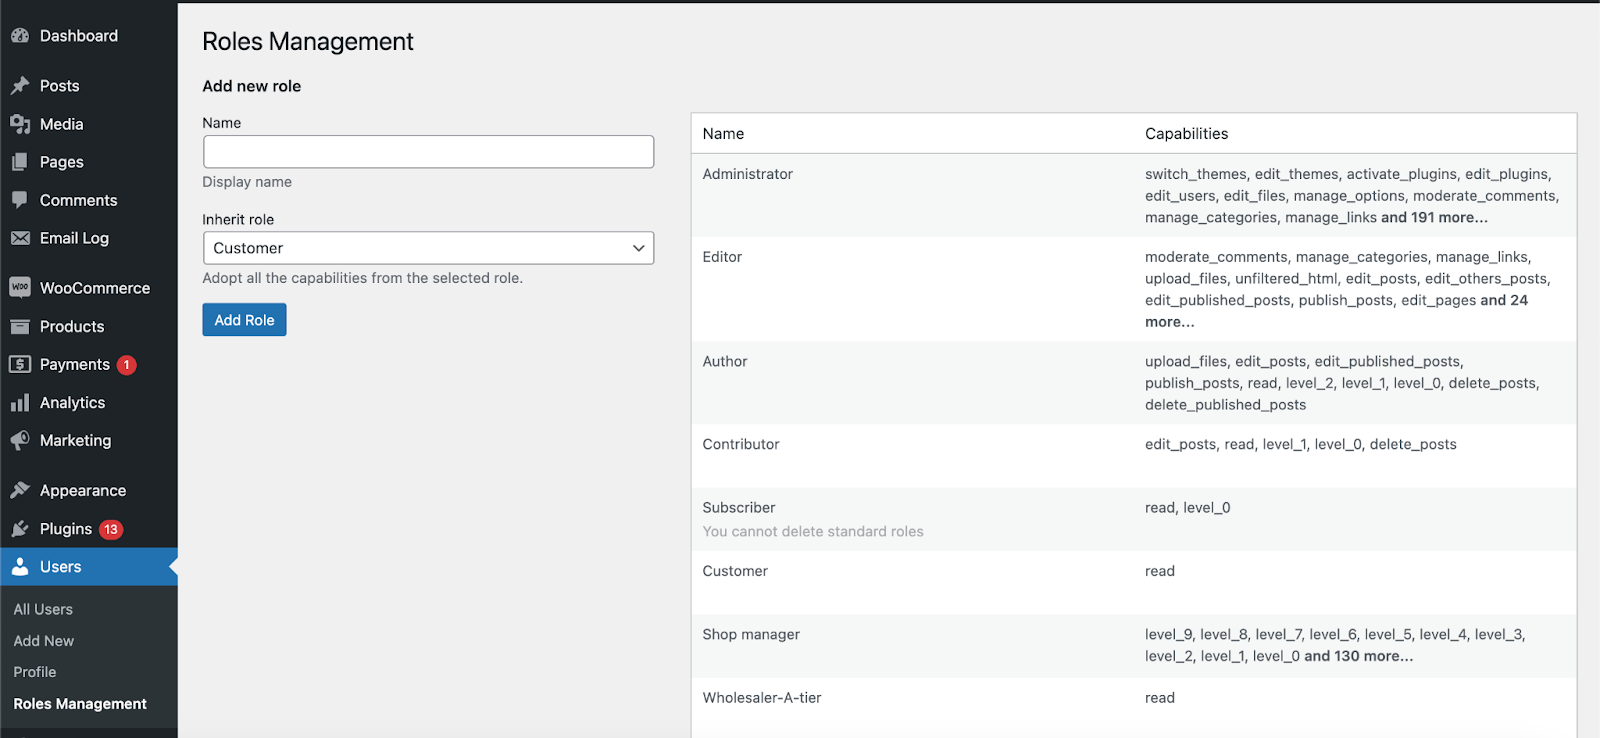
Here, you can define the role’s name and select which capabilities it should inherit.
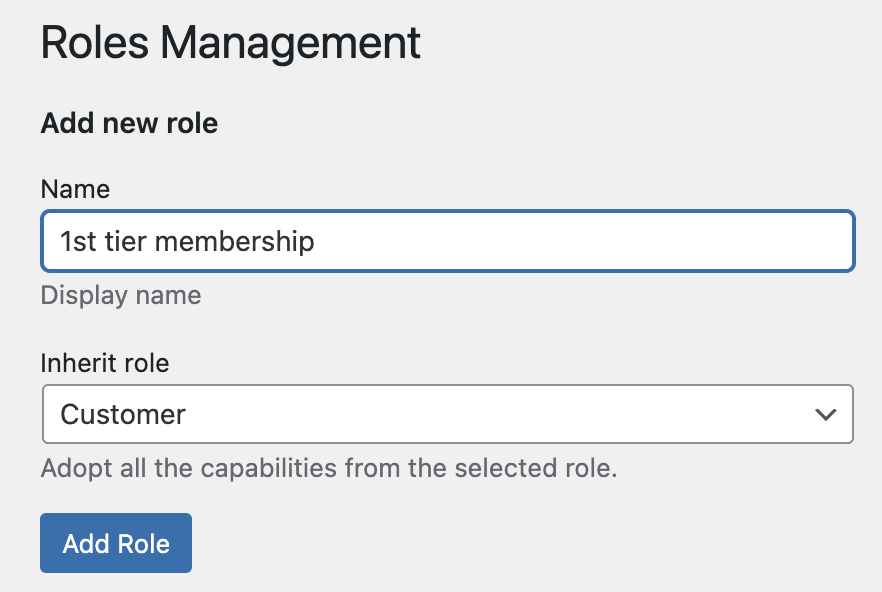
If you’re creating a role that doesn’t require special capabilities (similar to the default roles like administrator, editor, contributor), you can simply choose “Customer” to apply default capabilities.
Detailed information on default and custom role capabilities can be found in the table provided below.
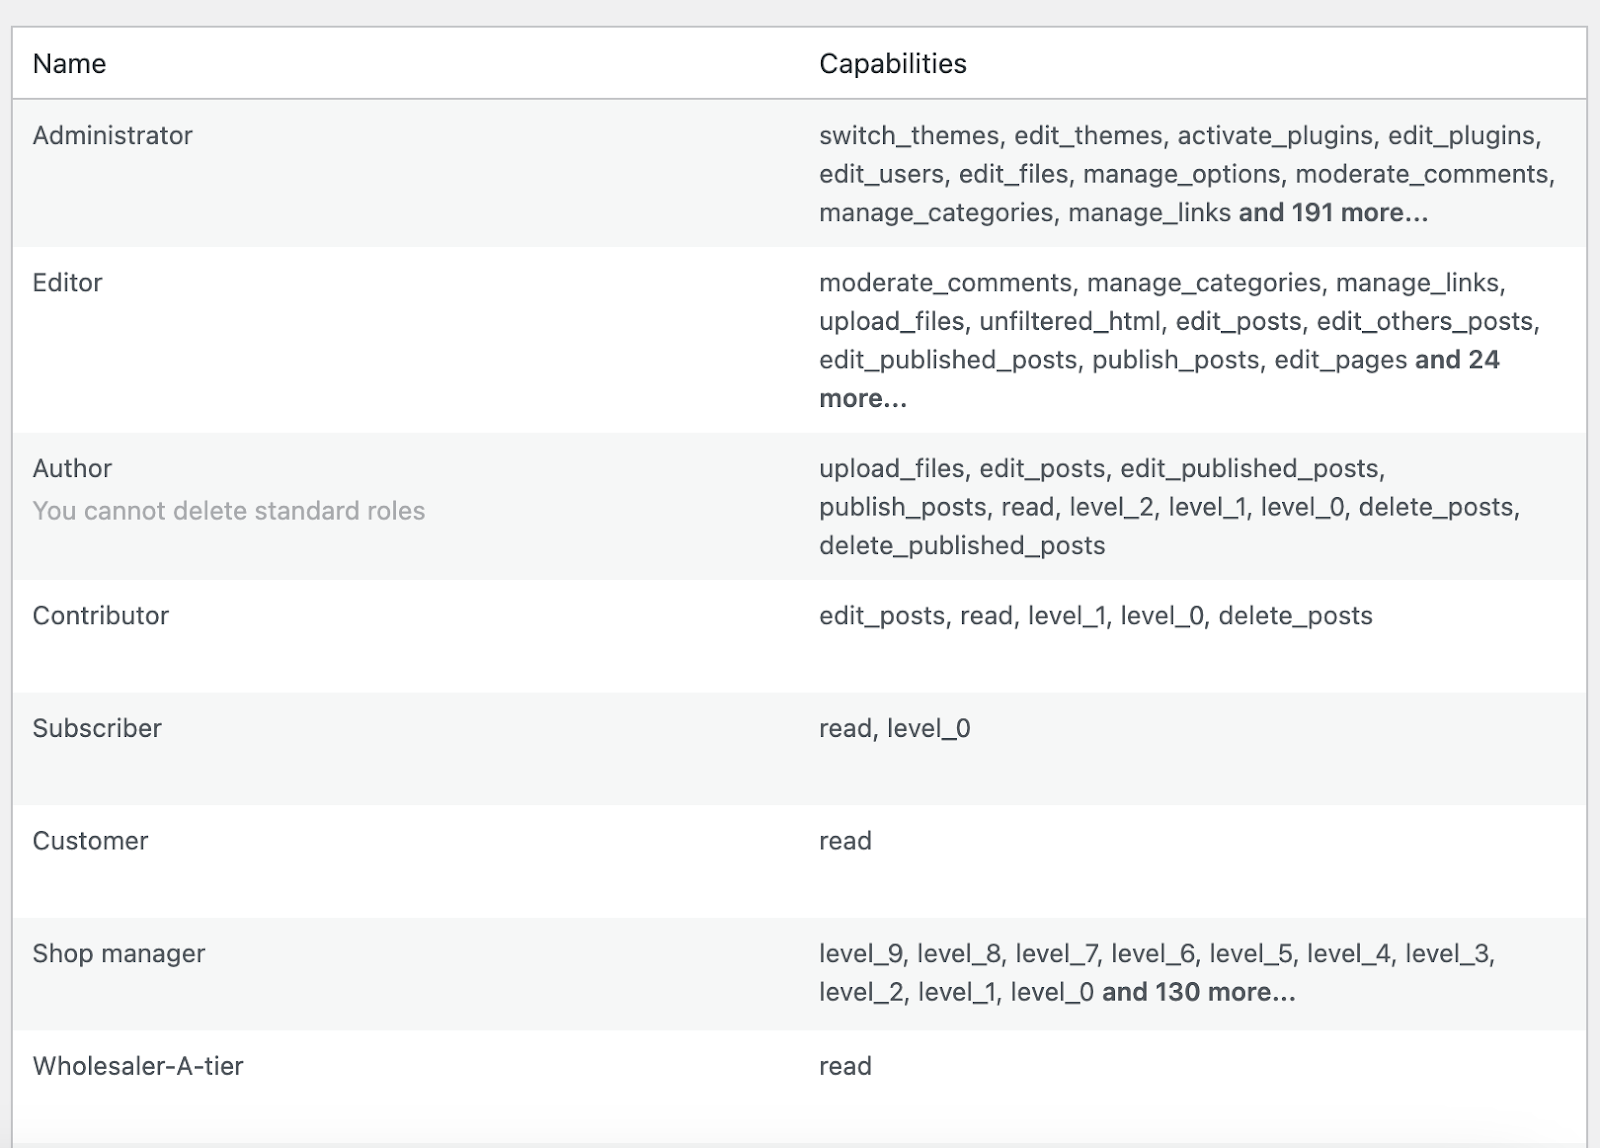
Should you wish to, you can remove custom roles from the list. Please note that WordPress default roles such as administrator, editor, author, contributor, subscriber, and customer cannot be deleted.
Important: If you remove a role that’s currently associated with a pricing rule, the rule will remain active and apply to all users until you update the rule.
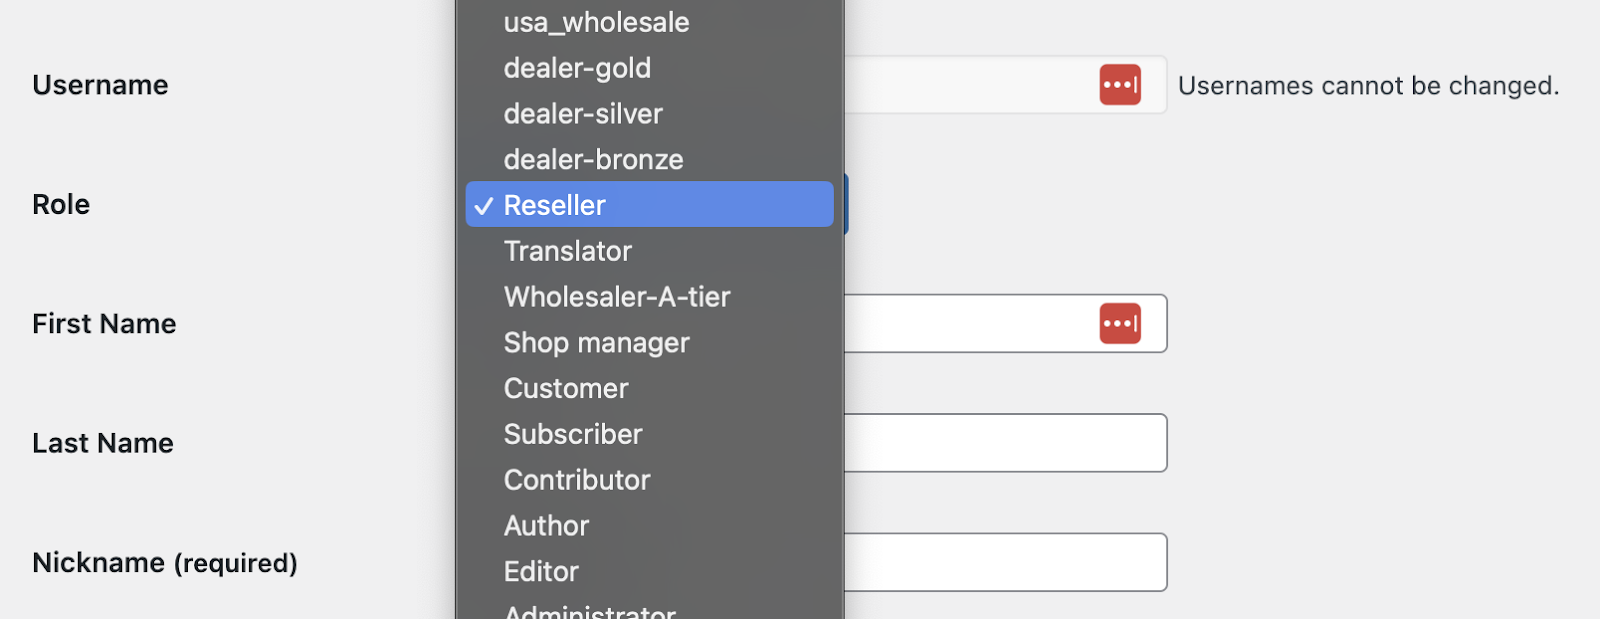
Following role creation, you can proceed to assign the user to the relevant group via Users > All Users > {choose user account}.
Troubleshooting
- In case you noticed your ‘add-to-cart’ label changed but the Add to cart label for the non-logged-in user is empty – try enter something in the setting placeholder – save settings – then remove what you typed in – and re-save settings. This should get your add-to-cart button label to default.
- If pricing fields don’t automatically update after making adjustments, it may be related to caching. To clear the product price cache, go to WooCommerce > Status > Tools > WooCommerce transients > Clear transients. That will clear out the product/shop transients cache.