Westpac PayWay API for WooCommerce is a payment gateway that allows you to use Westpac PayWay API as a credit card processor, to accept Visa and Mastercard by default, and optionally American Express, Diners Club and JCB after further activation by Westpac.
*Note: Another extension is available if you wish to use the NET (Westpac-hosted direct post) integration.
Find out more about Westpac PayWay and the different integration types at: https://www.payway.com.au/core/AboutView
Requirements
↑ Back to top
- An active Westpac account
- An SSL certificate
- AUD set as your store currency
Installation
↑ Back to top- Download the .zip file from your WooCommerce account.
- Go to: WordPress Admin > Plugins > Add New and Upload Plugin with the file you downloaded with Choose File.
- Install Now and Activate the extension.
Setup and Configuration
↑ Back to topWestpac PayWay
↑ Back to top- Enter your Westpac PayWay administration tool (http://payway.com.au) and click on the gear icon at the top left of the page where your client ID is to go to the Settings page.
- Check that you have PayWay Classic API listed under PayWay Modules. If you don’t, then you’ll need to get in touch with PayWay to have them enable the module on your account. Otherwise, click the PayWay Classic API link.
- Click on Security in the menu on the left.
- Note your customer.UserName and customer.Password for later.
- Add your server IP address to the API Security Access List. Your server IP is displayed on the configuration page for the gateway in the WordPress Dashboard. You can also use a wildcard IP address (eg. “123.123.123.0/24” allows all IP addresses from 123.123.123.0 to 123.123.123.255).
- Click on Certificate in the menu on the left.
- Choose PHP from the API Technology dropdown and click Go.
- Click on Download PHP Certificate and make note of the expiry date above it.
Westpac PayWay on your site
↑ Back to top
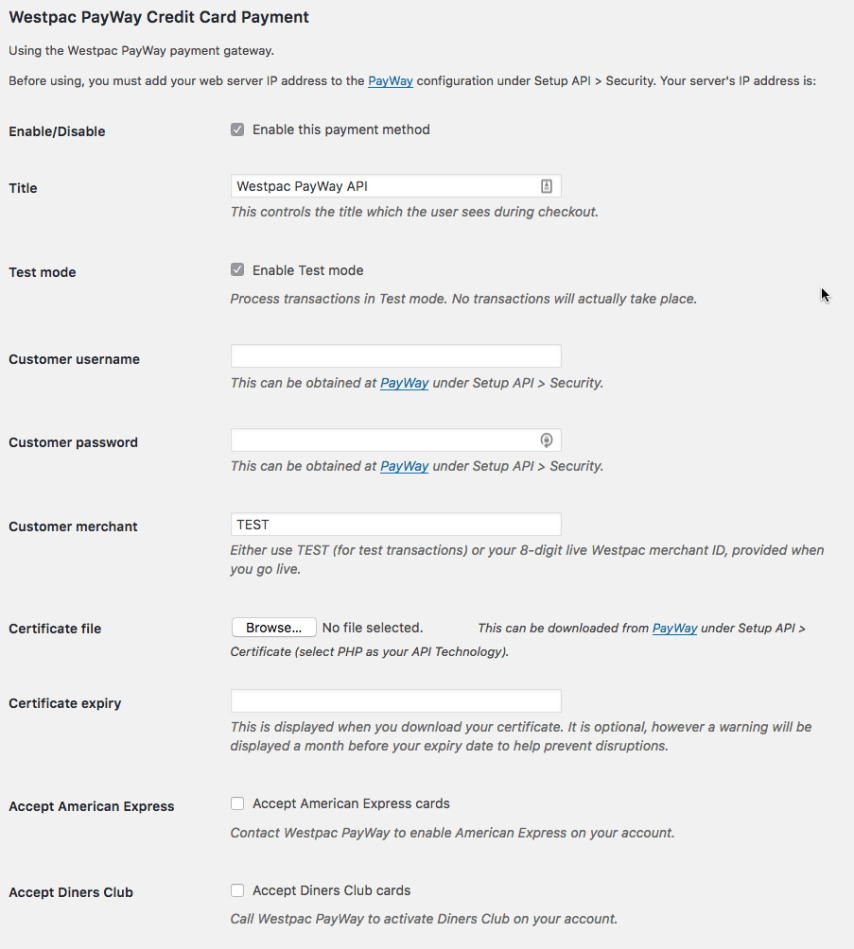
- Go to: WooCommerce > Settings > Checkout > Westpac PayWay API.
- Enter and select your options:
- Tick to “Enable this payment method”.
- The “Title” option allows you to determine what your customers will see this payment option displayed as. You might choose for this to be something like “Westpac PayWay” or “Credit card”.
- The “Enable Test mode” option allows you to test transactions with this payment gateway to ensure your details are correct.
- Enter your “Customer username” and “Customer password” as provided by the Westpac PayWay administration tool.
- Leave the “Customer merchant” field as TEST while testing, and replace it with the value provided by Westpac once you go live.
- Upload the PHP Certificate you downloaded to the “Certificate file” field.
- Optionally (but recommended), add your “Certificate expiry” date in the field provided.
- If you have arranged with PayWay to accept American Express or Diners Club, tick these boxes to advise customers they can use these card types on the payment screen.
- Save changes.
