WooCommerce Order Barcodes generates unique barcodes for every order placed on your site. These barcodes can be used on e-tickets, e-reservations, packing slips or anything else that would benefit from having a scannable barcode attached to it.
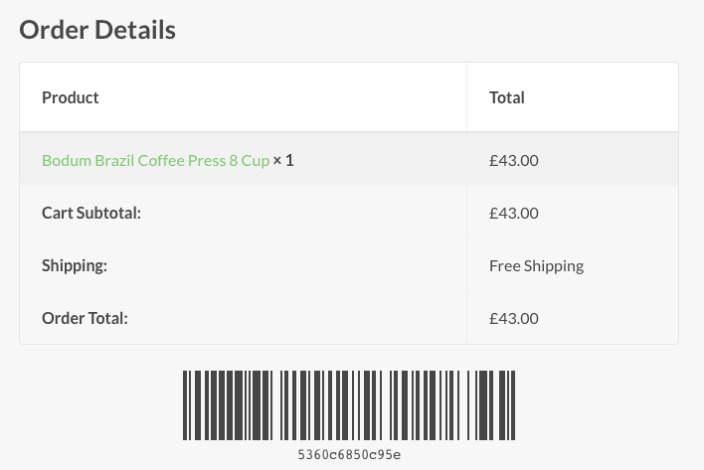
Barcodes are generated for every order as soon as they are placed.
They are also generated for orders that are created manually via the WordPress dashboard. Once an order has been placed, the barcode is included in all order emails as well as the order details page in the customer’s WooCommerce account area. This allows the customer to easily print out the barcode if necessary.
Note: If you’re using WooCommerce Order Barcodes in combination with WooCommerce Box Office individual barcodes are also generated for each ticket. Ticket barcodes are not included on the order confirmation screen, and will not be visible to ticket holders unless configured in the Box Office product’s Ticket Printing and/or Ticket Emails settings.

Installation
↑ Back to topTo start using a product from WooCommerce.com, you can use the “Add to store” functionality on the order confirmation page or the My subscriptions section in your account.
- Navigate to My subscriptions.
- Find the Add to store button next to the product you’re planning to install.
- Follow the instructions on the screen, and the product will be automatically added to your store.
Alternative options and more information at:
Managing WooCommerce.com subscriptions.
More information at: Install and Activate Plugins/Extensions.
Setup and Configuration
↑ Back to top
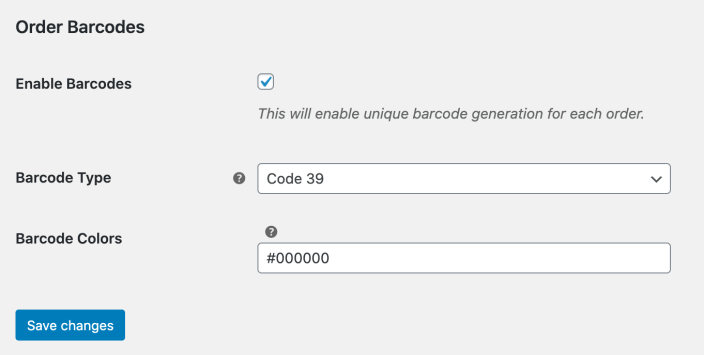
- Go to: WooCommerce > Settings > General.
- Scroll down to Order Barcodes.
- Select Barcode Type (see below for examples)
- Select Barcode Colors
- Save changes.
Changing settings will only affect future barcodes. Barcodes that have already been created are unaffected.
Barcode Types
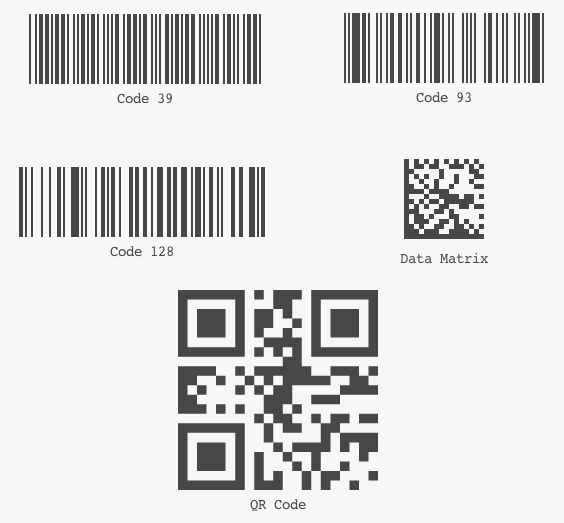
↑ Back to topThere are five barcode types available when using the WooCommerce Order Barcodes extension. Here are examples of each:

Code 39, 93 and 128 barcodes will work with standard USB barcode scanners, while the Data Matrix and QR Code types will work with digital scanners and mobile devices. The barcode type you should use will depend on the best solution for your use case.
Usage
↑ Back to topGenerating barcodes
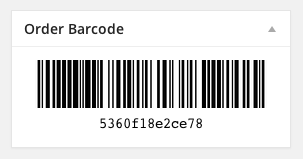
↑ Back to topBarcodes are generated automatically when the extension is active, so you don’t need to do any extra setup to get that side of things working correctly. You can view existing barcodes on the order edit screen in the WordPress dashboard:

Scanning barcodes
↑ Back to topIn order to scan your barcodes, you need to create a page and use the [scan_barcode] shortcode on the page. This will generate a form that looks like this:

This form will only be usable by users with the manage_woocommerce capability. It allows you to scan or enter a barcode and perform one of four actions on the order to which it is linked:
- Look up – This will simply look up the order details and display them on screen.
- Complete order – This will mark the order as complete and then display the order details on screen.
- Check in – This will mark the order as ‘checked in’ and then display the order details on screen.
- Check out – This will mark the order as ‘checked out’ and then display the order details on screen.
You can pre-select one of these options using the action parameter of the shortcode by setting it to one of the following: lookup, complete, checkin or checkout. The shortcode with a pre-set action will look like this: [scan_barcode action="checkin"]. All actions are performed via ajax so the page does not reload after running them – this means you can scan in barcodes rapidly without long wait times between each scan. The order details are displayed using the view-order.php template, so if you have customized that template on your site then they will follow those same customizations.
Note: “Scanning” via Order Barcodes only inputs information into the form field on the shortcode page. It doesn’t perform any other actions, such as opening links based on what’s been scanned.
To clarify further, scanning the code allows you to copy the code from the QR Code and not anything more than that. The copied code can then be copy/pasted into the shortcode page’s form. This process is not automatic.
Using a smartphone or tablet
↑ Back to topThe most common way to scan barcodes for events is by using a smartphone or tablet. This can be easily achieved by using the scanning form along with a third-party app of your choosing on your phone or tablet.
Load up the page with the scanning form in the browser of your smartphone or tablet and then open up one of the many apps available for this purpose. You can then scan your barcodes. Below is an example for scanning a barcode with a smartphone:
Below are a few suggestions for apps we’ve found effective during testing. However, we cannot recommend, guarantee or support the functionality of any third-party apps. Searching Apple’s App Store or in Google Play will reveal similar apps, each of which come with their own instructions and support.
- iOS: ScanKey – QR OCR NFC Keyboard or more search results
- Android: Scanner Keyboard or search results from Google Play
Note: Some apps, like ScanKey mentioned above, have a setting with which to enable Auto-return. When used in conjunction with a pre-set action shortcode (described above) it will allow automatically entering of the scanned result with no need to press the Go button.
Using a USB scanner
↑ Back to topIf you are using a USB scanner to scan in your barcodes, then the scanner will be automatically detected and the action will be performed without you having to click the ‘Go’ button. This will save a lot of time when, for example, scanning e-tickets at the door to a concert.
Manually typing in a barcode
↑ Back to topWhen manually typing in a barcode you must type in the full string of text that appears below the barcode and then hit enter or click the ‘Go’ button.
Generating barcodes for existing orders
Existing orders will not automatically have barcodes added to them. In order to generate barcodes for these orders, you simply need to visit the order page in the WordPress dashboard and a unique barcode will be generated and added to the order as you load the page.
Troubleshooting
↑ Back to topBarcodes not displaying in Gmail (version 1.3.18 and below)
↑ Back to topIf you happen to hear of, or see any, issues with the barcode displaying in Gmail, it may be a setting to change and things will work as expected. Head into your Gmail settings and the General tab. There will be a section for images. Change it to “Always display external images” and the barcode should now work.

Barcodes still not displaying in Gmail – hosting with WPEngine (version 1.3.18 and below)
↑ Back to topImages displayed directly in Gmail are loaded through a proxy in order to protect user security. This means that images are downloaded by a Google Proxy Server before being shown in your email client.
If you’re still not seeing images in Gmail after applying the above Gmail settings and your site is hosted with WP Engine, the GET requests from Google Proxy Servers might be getting redirected, preventing the images from being downloaded. Navigate to the Utilities section within your WP Engine account and look for the Redirect Bots setting.
Disabling it should resolve this issue, but, it’s a good idea to speak with WP Engine support first to see if there are any options for removing the redirect specifically for Google’s Proxy Server requests.

Barcodes not displaying in print preview
↑ Back to topIf the barcode or QR code is not displaying in your print preview, check the settings for the program you are using to preview the barcode or QR code and ensure that background graphics are enabled.
Barcodes display gaps in between or appear distorted
↑ Back to topIf you notice that the barcodes display gaps between the lines, or if they appear unusual, there could be an image optimization plugin active or a conflicting server image setting. The WooCommerce Order Barcodes extension utilizes the Imagick (PHP extension for ImageMagick) library when available, and any optimization settings applied to Imagick may result in distorted barcodes. To troubleshoot this issue, you can disable Imagick module, any image optimization plugins, or server settings done for image optimization.
Code Snippets
↑ Back to topScanning barcodes results in a ‘permission denied’ error
If you are getting a ‘permission denied’ error when you attempt to scan a barcode, as of v1.1 you will see one of the following two error messages:
Security check failed
↑ Back to topIn this case, the security token (also known as a ‘nonce’) is not being checked correctly. This will most likely be due to how your server is set up, so if you get this error then adding the following snippet to your theme’s functions.php file will disable the nonce check:
| /* | |
| * Snippet to prevent security check failed error. | |
| * Code goes in the functions.php file in your theme. | |
| */ | |
| add_filter( 'woocommerce_order_barcodes_do_nonce_check', 'disable_woocommerce_order_barcodes_nonce_check' ); | |
| function disable_woocommerce_order_barcodes_nonce_check( $do_check ) { | |
| // Do any required pressing here | |
| $do_check = false; | |
| return $do_check; | |
| } |
You do not have sufficient permissions to scan barcodes
↑ Back to topIn this case the user you are logged in as does not have permission to scan barcodes. The default permissions required are that the user has the ‘manage_woocommerce’ capability, but you can change this to anything you want (or even make it different per user). If you get this error when you don’t think you should then adding the following snippet to your theme’s functions.php file will enable scanning permissions for all users (but you can edit it to process any requirements you like):
| /* | |
| * Snippet to fix No Sufficient Permission To Scan Barcodes Error. | |
| * Code goes in the functions.php file in your theme. | |
| */ | |
| add_filter( 'woocommerce_order_barcodes_scan_permission', 'modify_woocommerce_order_barcodes_scan_permission' ); | |
| function modify_woocommerce_order_barcodes_scan_permission( $has_permission ) { | |
| // Do any required permission checks here | |
| $has_permission = true; | |
| return $has_permission; | |
| } |
Manual Output / Display of Barcode
↑ Back to topUse the following PHP to output an order’s barcode:
| /* | |
| * Snippet to display Order Barcodes on your site. | |
| * Just copy the PHP Snippet to your template, and it will be displayed over there. | |
| */ | |
| echo WC_Order_Barcodes()->display_barcode($order_id); |
Where $order_id is the order ID that you want the barcode for.
Questions and Feedback
↑ Back to topHave a question before you buy the WooCommerce Order Barcodes extension? Please fill out this pre-sales form.
Already purchased and need some assistance? Get in touch with a Happiness Engineer via the Help Desk.

