Overview
↑ Back to topThe WooCommerce Print Invoices & Packing list plugin allows you to easily print invoices, single order packing lists, and multi-order pick lists for orders right from the WooCommerce > Orders listing page. You can print individual orders, or bulk print invoices, packing, or pick lists with a couple clicks – helping you save time in packing and shipping orders. With this plugin you can also customize the information that’s printed on these documents, to include custom company details like your returns policy, making it easy to share this information with your customers.
Developers: We have a hook and function reference available that you might find handy for customizations!
Requirements
↑ Back to top- WooCommerce 3.5+
- WordPress 5.2+
- PHP 7.0+ (you can view this under WooCommerce > Status)
Installation
↑ Back to top- Ensure your store meets the plugin requirements.
- Download the extension from your WooCommerce dashboard.
- Go to Plugins > Add New > Upload and select the ZIP file you just downloaded.
- Click Install Now and then Activate.
- Click Configure and read the next section to learn how to setup the plugin.
Getting started
↑ Back to topNo setup is required to use this plugin, but you can optionally customize the documents template, determine what information that will appear on each type of document (i.e. invoices, packing lists, and pick lists), and manage email notifications related to these documents.
Note: You can view samples of each document below.
Customize template
↑ Back to topYou can customize the template for your invoices, packing lists, and pick lists by going to WooCommerce > Settings > Invoices/Packing Lists > General and clicking Customize. This will open the visual editor that you can use to customize the documents template and see your changes displayed live in a template preview.
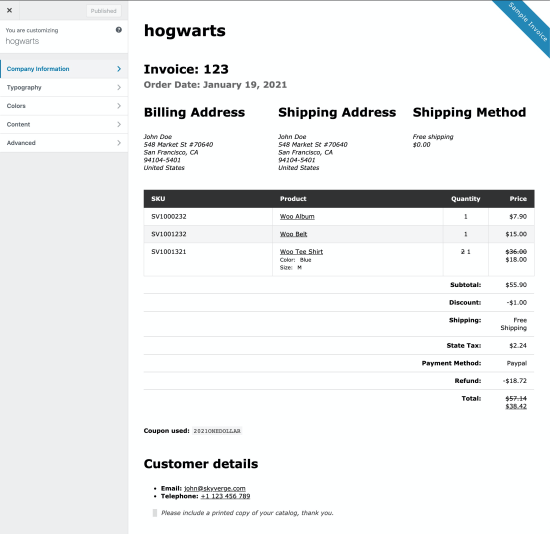
There are several different sections you can update to customize your template appearance:
- Company Information: General document settings like your shop logo, name, address, and VAT number. You can also add extra information that will be displayed at the top of the document, which can be useful for sharing company information, such as a customer service phone number.
- Typography: Select the size of the template’s heading and body fonts.
- Colors: Set the colors of the template’s text and background.
- Content: Enter optional content for the document header / footer and shop policies (e.g., returns policy, terms and conditions, etc.).
- Advanced: Enter additional CSS styles to apply to the document template. If you want your CSS to be document-specific (i.e. different styles for invoices, packing lists, and pick lists), you can use the CSS class that wraps each document:
.woocommerce-pip.invoice { // invoice-specific CSS }.woocommerce-pip.packing-list { // packing list-specific CSS }.woocommerce-pip.pick-list { // pick list-specific CSS }
Document settings
↑ Back to topYou can determine which order and product information are displayed on your invoices, packing lists, and pick lists.
Invoice settings
On WooCommerce > Settings > Invoices/Packing Lists > Invoice, you can modify the following settings to determine which fields appear on the invoice:
- Show shipping method: Select to show the shipping method next to the customer addresses.
- Show customer details: Select to show the customer’s basic WooCommerce account details below the order items table.
- Show customer note: Select to show any customer notes below the order items table.
- Show coupons used in order: Select to show any coupon codes used directly below the order items table.
- Show optional fields: Add optional fields related to the ordered products, including SKU, product thumbnail, line taxes, and/or unit price.
- Show item prices excluding taxes: Select to display item prices exclusive of taxes. This will override the store tax display settings for item prices displayed in the invoice.
On this page, you can also determine how invoice numbers are generated with the following settings:
- Use Order Number as Invoice Number: Select to use the order number as the invoice number on all invoices.
- Invoice Number Start: If Use Order Number as Invoice Number is disabled, select a starting number for your invoice number counter. The first printed invoice will use this as its invoice number, and future invoice numbers will follow sequentially.
- Reset counter: If Use Order Number as Invoice Number is disabled, select this setting to reset the starting invoice number. This may cause duplicate invoice numbers, as existing invoice numbers are never changed.
- Invoice Number Minimum Digits: If Use Order Number as Invoice Number is disabled, enter the minimum number of digits your invoice numbers should have. If your minimum digits are greater than the number of digits in the invoice number, leading zeroes will be used as padding. For example, if the minimum digits is set to
5and the starting invoice number is100, the first invoice number will be printed as00100.
- Invoice Number Prefix: Enter a prefix to add before for the invoice number if desired. You may use merge tags in the prefix. Leave blank to disable prefixes.
- Invoice Number Suffix: Enter a suffix to add after the invoice number if desired. You may use merge tags in the suffix. Leave blank to disable suffixes.
| Merge tag | Expands to |
|---|---|
{D} | Day of the month, without leading zeros (1-2 digits) |
{DD} | Day of the month, with leading zeros (2 digits) |
{M} | Month, without leading zeros (1-2 digits) |
{MM} | Month, with leading zeros (2 digits) |
{YY} | Year (2 digits) |
{YYYY} | Year (4 digits) |
{H} | 24-hour format of an hour, without leading zeros (1-2 digits) |
{HH} | 24-hour format of an hour, with leading zeros (2 digits) |
{N} | Minutes, with leading zeros (2 digits) |
{S} | Seconds, with leading zeros (2 digits) |
Packing list settings
On WooCommerce > Settings > Invoices/Packing Lists > Packing List, you can modify the following settings to determine which fields appear on the packing list:
- Show customer details: Select to show the customer’s basic WooCommerce account details below the order items table in packing lists.
- Show customer note: Select to show any customer notes below the order items table in packing lists.
- Show terms and conditions: Select to show your terms and conditions (as added to the document template) on packing lists.
- Show footer: Select to show the footer text (as added to the document template) on packing lists.
- Show optional fields: Add optional fields related to the ordered products, including SKU, total weight, and/or product thumbnail.
- Exclude virtual items: Select to hide virtual products (i.e. not shippable) from your packing lists.
Pick list settings
On WooCommerce > Settings > Invoices/Packing Lists > Pick List, you can modify the following settings to determine which fields appear on the pick list:
- Pick List Output: Select whether items should be grouped by order or grouped by categories in combined pick lists (i.e. when printing a pick list for more than one order).
- Show optional fields: Add optional fields related to the ordered products, including SKU, product details, total weight, and/or product thumbnail.
- Exclude virtual items: Select to hide virtual products (i.e. not shippable) from your pick lists.
Email settings
↑ Back to topWooCommerce Print Invoices / Packing Lists adds three new emails to your WooCommerce store, which can be accessed under WooCommerce > Settings > Emails:
- Invoice: When enabled, automatically send an HTML invoice to your customers once the order is paid. The content of the email is the same as a printed invoice.
- Packing List: When enabled, automatically send an HTML packing list to the site administrator (by default) once the order is paid. You can update the Recipient(s) list to send this email to multiple recipients using a comma-separated list.
- Pick List: Pick list emails can only be sent manually using the WooCommerce > Orders page bulk actions. If one or more orders are selected before selecting this bulk action, a combined HTML pick list will be sent via email to the recipients.
To edit any of these emails (enable / disable or adjust subject lines and recipients), you can click the email name from this table.
Printing and emailing order documents
↑ Back to topYou can print and email invoices, packing lists, and pick lists with several different order actions.
When viewing the WooCommerce > Orders list, use the “documents” icon in the Actions column to show all possible document actions for that order:
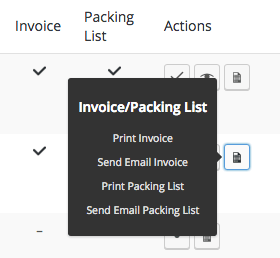
You can also use the Bulk Actions menu to perform the following actions for one or more orders:
Note: Before performing bulk actions, it may be helpful to filter your orders based on whether an invoice or packing list has been printed yet (using a filter added to WooCommerce > Orders by the plugin) or by order status.
- Print Invoice: Generates an HTML invoice for all selected orders (page breaks between each order’s invoice). The invoice can be opened, previewed, and printed.
- Send Email Invoice: Sends an email with the HTML invoice content for all selected orders to the billing email address.
- Print Packing List: Generates an HTML packing list for all selected orders (page breaks between each order’s packing list). Items in the packing list will be sorted by product category. The packing list can be opened, previewed, and printed.
- Send Email Packing List: Sends individual emails with the HTML packing list content for each selected order to the admin recipients configured in your email settings. If 20 orders are selected, you will receive 20 packing list emails.
- Print Pick List: Generates a combined HTML pick list for all selected orders. Items in the pick list will be sorted by product category. The pick list can be opened, previewed, and printed.
- Send Email Pick List: Sends an email with the HTML pick list content for all selected orders to the admin recipients configured in your email settings. If 20 orders are selected, only one email is sent with a combined pick list for all 20 orders.
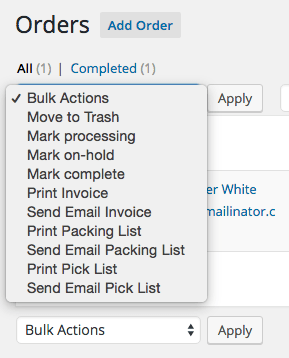
Once you’ve chosen and applied your bulk action, a modal will appear showing the number of documents and the option to Print Documents. If you choose Print Documents, you’ll see a link to open your document(s) in a new window for printing. Click the link to preview and print your document(s).

When viewing or editing an order, you can access document actions within the Order Actions dropdown under the “Print Invoices/Packing Lists” section:
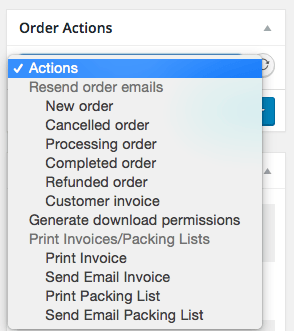
You can view samples of each document below.
Sample documents
↑ Back to topIn this section, you can view samples of invoices, packing lists, and pick lists. Each document will look the same whether it is printed or emailed. You can customize the appearance and the content of these documents to suit your store’s needs.
Sample invoice
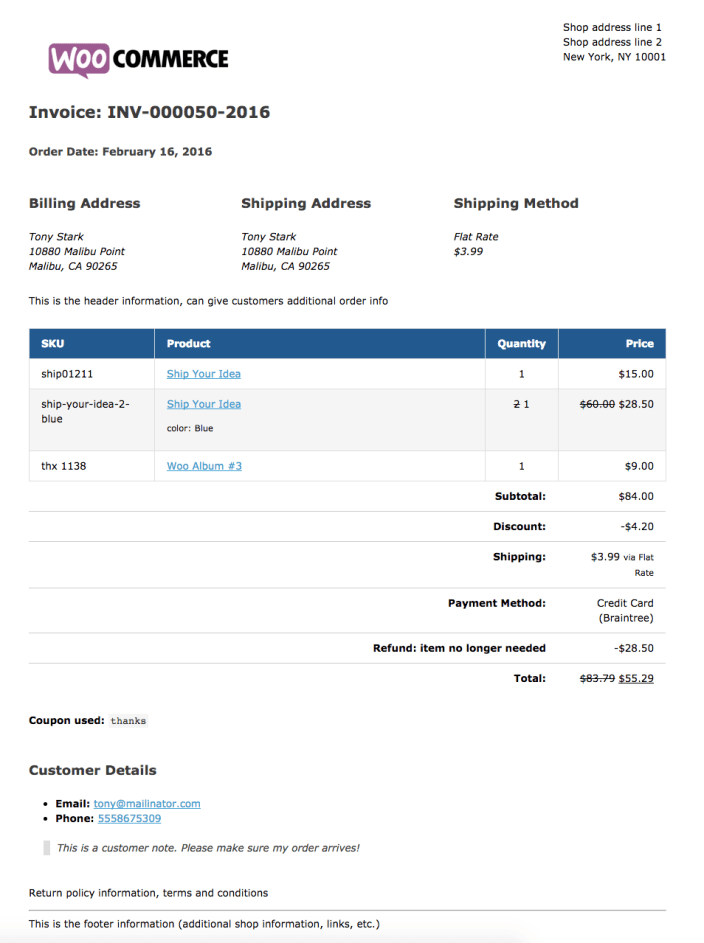
↑ Back to topInvoices will always display invoice numbers, customer details, and all order line items.
If you have taxes, they will be displayed based on your WooCommerce tax settings. If you opt to show taxes as one total at checkout, then taxes will be added as a single cost line after the subtotal. If you show itemized taxes, multiple taxes will appear as individual line costs.
Additional information is shown based on your template and invoice settings.
Sample packing list
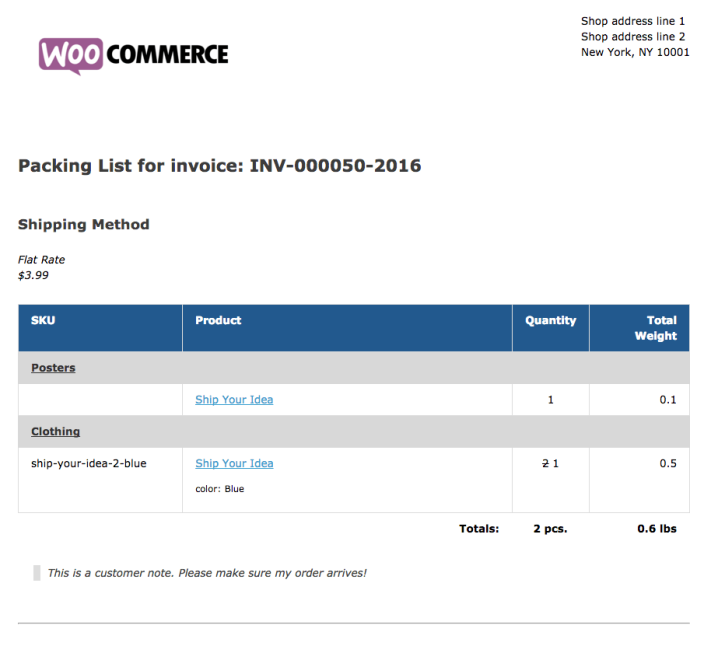
↑ Back to topPacking lists will always group ordered items by the product category to make picking and packaging orders easier. The item details, attributes (e.g., size), and line weight will be shown, along with any additional information based on your template and packing list settings.
If you exclude virtual items from packing lists, they will not appear at all on the list. If the order only contains virtual items, the packing list will state that there are no shipped items in the order.
Sample pick list
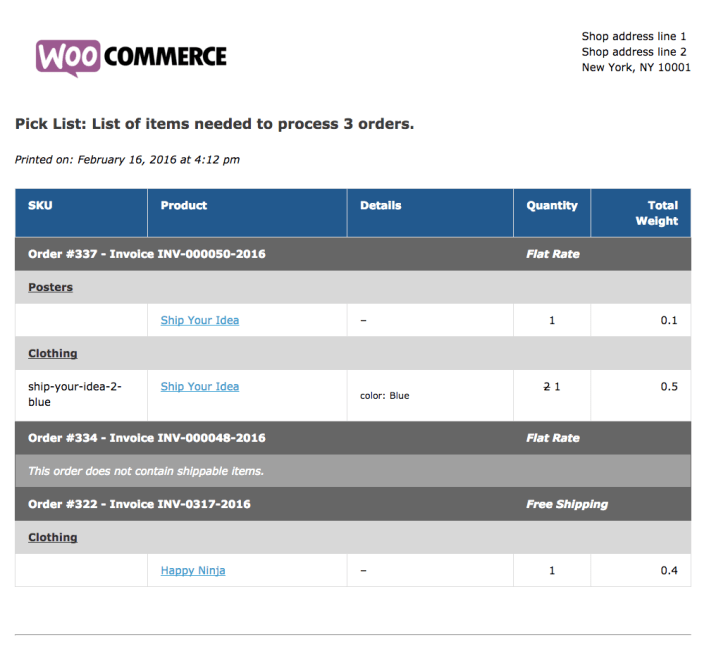
↑ Back to topA pick list is a combined document for one or more orders. This can serve as a “warehouse pick list” to get items for packing. Additional information is shown based on your template and invoice settings.
If you opted to group items by order in the pick list settings, products will be organized by order and product category in the combined list.
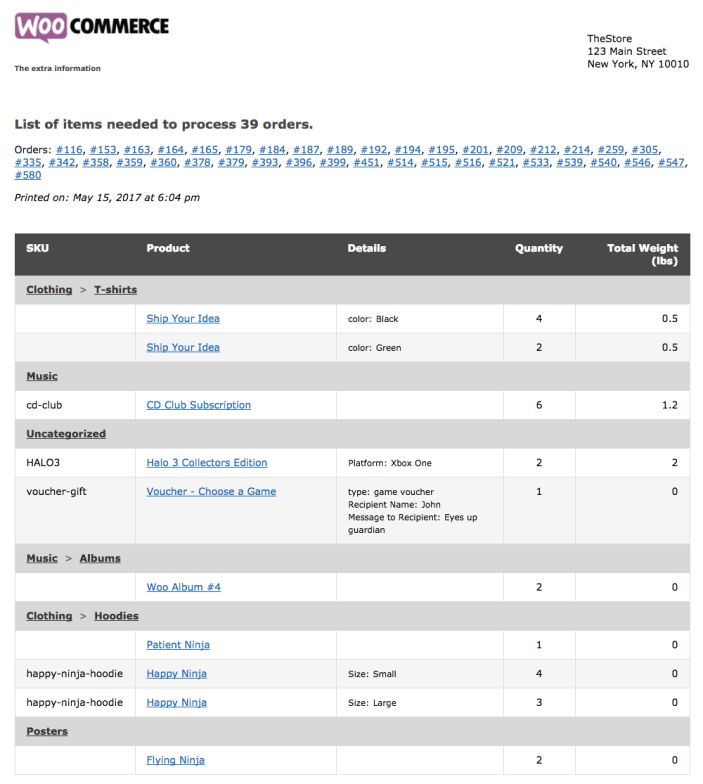
If you opted to group items by category in the pick list settings, products will be organized in an overall list by category with total counts for each item (regardless of which order they belong to).
Frequently Asked Questions
↑ Back to topQ: Why aren’t my invoices sending?
A: If you enable the Invoice email, invoices are only sent once the order has been paid for.
Q: What will my customers see with this plugin?
A: If you have invoice emails enabled, customers will get an email with the invoice as the content when an order is paid for. Customers can also access invoices for paid orders from the My Account > Orders page, where they will be able to click “View Invoice” button:
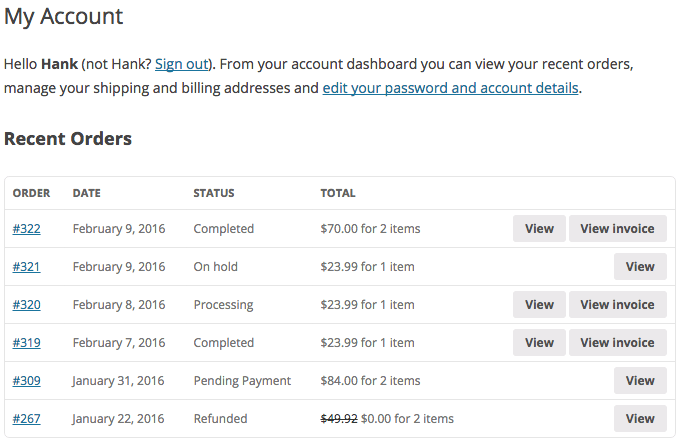
Clicking “View Invoice” will open the invoice in a new window and allow the customer to print the invoice.
Q: Can I get rid of these dates and URLs that appear at the top and bottom of my printouts?
A: Sure thing, these elements are called headers and footers and are not part of the templates associated with Print Invoices and Packing Lists.
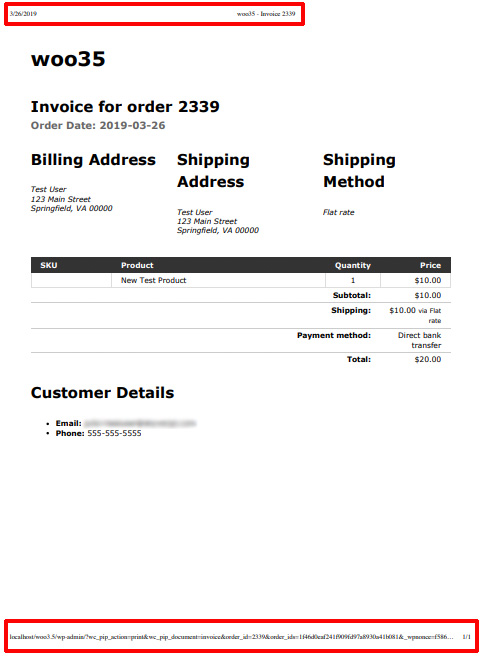
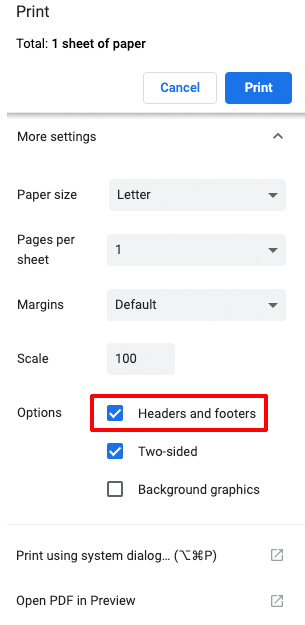
You can turn them off by modifying your Print Settings to turn off Headers and Footers.
Q: Can I save invoices as a PDF file instead?
A: Invoices are HTML documents, but you could save them or print them as a PDF to generate a PDF invoice.
- Using Windows: If you use Windows 10 or newer, you can print to PDF. Select “Print”, and choose “Microsoft Print to PDF” as your printer. For older versions of Windows, we recommend downloading and using CutePDF (free) to add “print to PDF” capability.
- Using Mac OS: Select “Print” and choose “Save as PDF” as your printer.
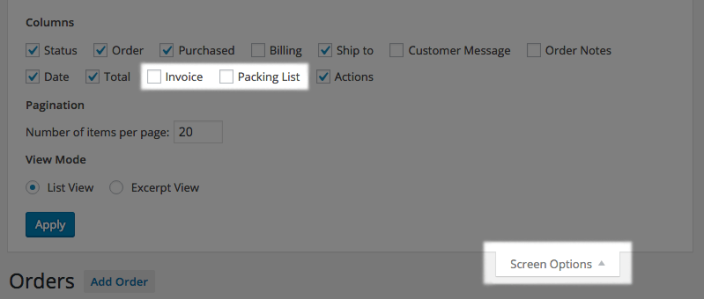
Q: Can I get rid of the “Invoice” and “Packing List” printed columns in the Orders list?
A: You can! This is controlled by the “Screen options” menu in the top right:
Q: Can I stop packing and pick lists from sorting by category?
A: Sure thing! You can use this one-line snippet in your functions.php file or where you keep custom code:
add_filter( 'wc_pip_packing_list_group_items_by_category', '__return_false' );
Q: Can I use this with Sequential Order Numbers Pro?
A: Absolutely. If you opt to use order numbers as invoice numbers, your formatted order number will be used here. We do recommend that, if you use placeholders in your order number, you do not duplicate these in the invoice prefix or suffix, as both will be shown.
Example: If my invoice prefix is INV-, suffix is -{YY}, and my sequential order number format is WC#100-YY, then your invoice number will add the year placeholder twice: INV-WC#100-16-16. Please remove the invoice placeholder in this case.
Q: Why don’t my order delivery dates show up on documents?
A: Print Invoices / Packing Lists is not compatible with Order Delivery Date by default. However, delivery dates can be added to documents with a small code snippet, added where you keep custom code on your site.
This code snippet shows you how to add delivery dates to the “Shipping Method” section of invoices and packing lists.
Troubleshooting
↑ Back to topMissing the “Save” button on settings?
Please remove the Activity Log plugin. When Activity Log is active, it hijacks the $current_section global, which forces the “save settings” button to be hidden in places it should not.
Not receiving emails?
Please ensure that you’ve enabled the emails under WooCommerce > Settings > Emails and that the recipient email is correct.
Seeing the invoice number placeholders duplicated?
We typically see this when using Order Numbers as Invoice Numbers with Sequential Order Numbers Pro — please disable placeholders for invoices in this case.
Having trouble with something else? Follow these steps to make sure everything is setup correctly before posting a support request:
- Please ensure that your site meets the plugin requirements.
- Check the FAQs to see if they address your question.
Questions & Support
↑ Back to topHave a question before you buy? Please fill out this pre-sales form.
Already purchased and need some assistance? Get in touch with support via the help desk.
