Configuring the plugin’s settings
↑ Back to topBy navigating to WooCommerce > Settings and clicking the Anti-Fraud tab. From here you can configure how the plugin reacts to different risk scores, what thresholds are set and who is notified. The Antifraud Settings are separated into the following sub-menus:
This section details the plugin settings.
- General Settings
- Rules Settings
- Blacklist Settings
- Email Alerts Setting
- Rules Settings
- reCAPTCHA Settings
- Paypal Settings
- MinFraud Settings
- MinFraud Settings
- MinFraud Insights Settings
- MinFraud Factors Settings
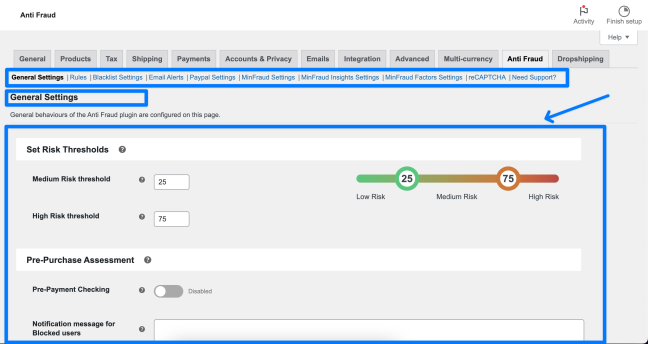
1. General Settings
↑ Back to topThresholds:
- Medium and high-risk thresholds – This field allows you to change what the plugin classifies as a medium-level risk or a high-level risk.
- Enable first-order check – When enabled, the plugin will include a warning if the order placed is a user’s first order. The risk score will also be affected according to the rule’s risk weight.
Pre-Purchase Assessment
- Pre-Payment Checking: By default, the order is checked after it is made in your store. This includes payment. Enable this if you want to check for fraud before allowing the user to pay.
- Add a notification message on the checkout page for customers who are blocked/cancelled/put on hold during pre-payment check due to being marked as high-risk orders.
Change Order Status based on Risk Score
- Update Order Status based on Fraud Score: Use this setting to enable the feature of auto-updating the order status based on the order score.
- Weighting to Cancel Order: Orders with a score equal to or greater than this value will be automatically cancelled.
- Weighting to On-hold Order: Orders with a score equal to or greater than this number will be automatically set on hold.
Whitelist Payment Methods
How to disable Antifraud Whitelisting Features?
How to disable Antifraud Whitelisting Features?
Disable toggle options under Whitelist Payment Methods and User Roles Whitelisting.
Remove all Email Addresses and IP Addresses from the Email Whitelist and IP Whitelist input box.

- Enable Whitelisting of Payment Methods: Setting to enable select and whitelist payment methods.
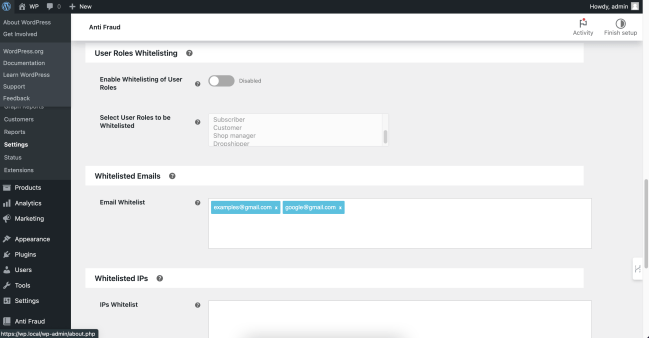
User Roles Whitelisting
- Enable Whitelisting of User Roles: Setting to enable and select and whitelisting of specific user roles.
Whitelisted Emails
- Enable Whitelisting of Emails: Setting to enable and select email to whitelist.
Auto Fraud Check For Existing Orders
- Enable Auto Fraud Check: Enable this setting to check orders that already exist in the store, that is, orders made when the anti-fraud plugin was not installed or deactivated. The period of orders can be configured.
Enable Debug Logging
- Enable Debug Log: This setting is used to enable the debug log for debugging and troubleshooting purposes.
How to enable debugging in the Antifraud Plugin?
FAQ: How to enabled the Antifraud Debug Logs?
The Debug Settings can be found here: WooCommerce > Settings > Antifraud > General Settings > Enable Debug Log
The debugging information and errors will be exported and displayed in the CSV File below. Download this and share this with the support team.
What to do if I have enabled the debug log but there is no CSV file for download?
Once you have enabled the debug log which can be found here: WooCommerce > Settings > Antifraud > General Settings > Enable Debug Log
The debugging information and errors will be exported and displayed in the CSV File below. Download this and share this with the support team.
A new file will be generated when an order is placed. If you have enabled the settings please save the page and wait for an order to be placed.
2. Rule Settings
↑ Back to topFirst-Time Purchase Rules
Update these rules to check for new customers based on the first time placing an order on your site. This can check completed orders, but also orders that did not go through and are processing.
IP, Billing and Shipping Address-based Rules
Rules set for identifying fraudulent orders triggering risks based on IP, billing and shipping addresses.
- IP Address Match: Check if the address provided by the customer and the IP address from where the order is placed are the same.
- Billing and Shipping Address Match: Enable to identify the difference between shipping and billing addresses.
- Geo Location Match: Activate this rule to check if the billing/shipping state matches the geolocation provided by the browser.
- Phone Number and Billing Country Check: Enable this rule to verify if the billing country and phone number provided are the same.
- Customer Behind Proxy or VPN: Check if the customer is using a proxy or behind a VPN.
Multiple Orders Attempts using Different Addresses from Same IP
Rule to check if the buyer is ordering products using different addresses from the same IP over a certain period from your store.
Origin Countries
International orders tend to have a higher fraud risk than orders that originate in your home country. Merchants often find that certain origin countries have a higher potential for fraud. These rule sets help manage such risks.
High-Risk Email Domains
Merchants often find that certain email domains have a higher potential for fraud. These Rule sets will help you manage High-Risk Email Domains. Identify High-Risk Domains by manually adding such email domains to the High-Risk Domain section and/or using QuickEmailVerification.com API key to make this operation automatic.
See how to set up QuickEmail Verification API key
Order Amounts and Attempts
What to do if the plugin is not limiting the number of Orders?
FAQ: What to do if the plugin is not limiting the number of Orders?
If the plugin is not limiting the number of orders correctly please ensure you have enabled Pre-payment Checking.
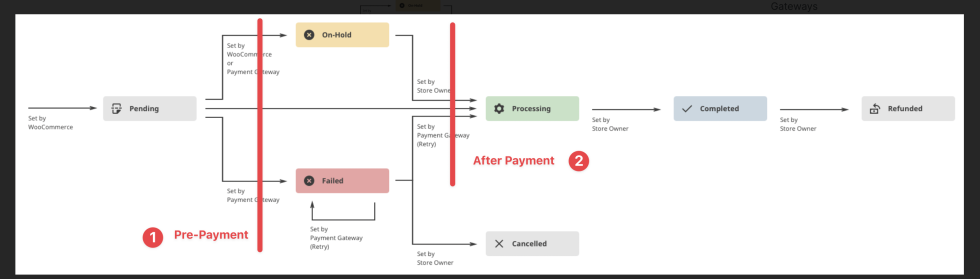
How does Pre-Payment checking work with WooCommerce Order Status?
FAQ: How does Pre-Payment checking work with WooCommerce Order Status?
If pre-payment is enabled, then this will check the order before payment is placed and therefore before the order enters into processing. If this is not enabled, the events prior to processing will be completed before and after the order enters processing this will be checked. You might find the next image helpful, its is adapted from the official WC docs:
Why are the Orders moving back to Processing from On-hold?
The plugin uses various rules that can be configured to work together. This should be checked if your orders are changing status and you are not sure why.
An example of this would occur if your order goes from [Pending payment] to [On hold] and then from [On hold] to [Processing].
If you are using Whitelisting then the the order will always move from [On hold] to [Processing] regardless of the score. This is because the whitelisting should only be enabled for trusted users.
You can check your Order Status’ by reviewing your Order Notes. If you review your Order notes and notice multiple order status changes check your rules and compare these to your whitelisting rules.
Why are the Orders moving back to On-hold to Processing?
The plugin uses various rules that can be configured to work together. This should be checked if your orders are changing status and you are not sure why.
An example of this would occur if your order goes from [Pending payment] to [On hold] and then from [On hold] to [Processing].
If you are using Whitelisting then the the order will always move from [On hold] to [Processing] regardless of the score. This is because the whitelisting should only be enabled for trusted users.
You can check your Order Status’ by reviewing your Order Notes. If you review your Order notes and notice multiple order status changes check your rules and compare these to your whitelisting rules.
The rules in this section are triggered based on defined order amounts and by counting attempted orders. You can also limit orders within a certain time frame. Orders with unusually high values, or customers who make an excessive number of transactions in a short period are more likely to be fraudulent.
- Order Amount is Above Average: Check if the order significantly exceeds the average order amount for your site. Set multiplier value to trigger this rule. When an order is placed is value times greater than an average order.
For example, the average order value in a store is $100 and you want to trigger this rule when an order made exceeds $500. In ‘Average Multiplier’ mention ‘5’ because 5 times $100 is $500. - Order Exceeds Maximum Amount Limit: Limit maximum order value by enabling this rule.
For example, if you don’t want an order to be greater than $5000. Set ‘Amount Limit($)’ to ‘5000’. - Too many order attempts: Enable this rule to limit the number of orders per user for a certain timespan (hours).
- Limit Number of Orders between Time: To limit the number of orders for a certain time duration during the day enable this rule.
3. Blacklist Settings
↑ Back to topEnabling email and IP blacklisting will capture and block all emails and IP addresses that are marked as potential fraud by the WooCommerce Anti-fraud plugin. To remove any email or IP address from the blocked list, click on ‘x’ next to the IP or email address and save changes.
- Email Blacklisting
- IP Blacklisting
Can we block orders based on email addresses?
You can mark orders as high-risk by using the blacklist settings. Emails can be individually entered or using the wildcard character.
By adding an email to your blacklist, their purchases will automatically be detected as high-risk.
How does the blacklist feature work?
By enabling automatic blacklisting, email addresses with a high risk of fraud will be added to this list automatically. You can also block individual email addresses by adding them to the list manually. Use this feature for fraudulent customers whom you’ve had trouble with in the past.
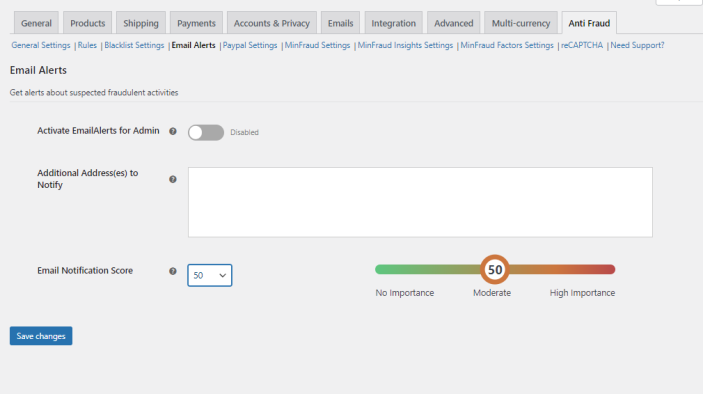
4. Email Notification Settings for Store Admin & Others:
↑ Back to topGet alerts about suspected fraudulent activities on your store directly to the admin email, or any other email by enabling email alerts. Configure multiple email addresses to get notified when any order passes a certain threshold.
Email Notification Score is basically a score when any order meets or exceeds this value and triggers emails to specified emails.

Configure and enable Google reCAPTCHA from this section. Activating reCAPTCHA will enable the service on your Checkout page, which is an effective means of reducing spam orders, particularly from velocity attacks. WooCommerce Anti-fraud supports both v2 and v3 reCAPTCHA.
Please ensure you enter valid API keys for reCAPTCHA to work correctly. This is a two-step process, please enable reCAPTCHA and then enter the API Key Value Pair, then confirm this works by checking for the reCAPTCHA on the checkout page.
Google reCaptcha – Understanding the Google reCaptcha Errors.
If you experience the following errors when using the Google reCaptcha feature, please follow the steps here:
Error – Invalid reCaptcha: indicates that the server declined the server key.
Solution: Please check your Google ReCaptcha Credentials.
Error – You are not a human: Indicates that the server request was valid, however, Google returned a higher-than-expected score.
Solution: If the score returned is higher than 0.5, the error will be displayed.
Error – Could not get a response from reCaptcha server: indicates that the Google server was facing an error.
Solution: Please contact the API Service Provider. In this case Google.
6. Paypal Settings
↑ Back to topIf you are experiencing a card attack, please follow the detailed video and text instructions at the top of this page: https://woocommerce.com/document/woocommerce-anti-fraud/
- Enable PayPal verification – When this setting is active, all PayPal payments will require verification. A verified PayPal email address is linked with more legitimate, low-risk orders. If verification fails, the order is put on hold.
- Prevent downloads if verification fails – For WooCommerce stores that have digital downloads, this setting can be used to restrict access to the downloadable file(s) until the PayPal email is verified.
- Time spent before further attempts – This setting adjusts how many days are allowed to pass before another email is sent.
- Email body – This field allows you to customize the message that is sent to customers who need to verify their PayPal accounts.
7. Rule settings of minFraud®
↑ Back to topBy default, the Minimum MinFraud Risk Score for minFraud® integration is set to 30. It is the threshold value after which the minFraud alert is triggered in the WooCommerce antifraud plugin. Similarly, the default value of MinFraud Rule Weight is also set to 30, which is the weighting in proportion to the total percentage of fraud set for the minFraud.
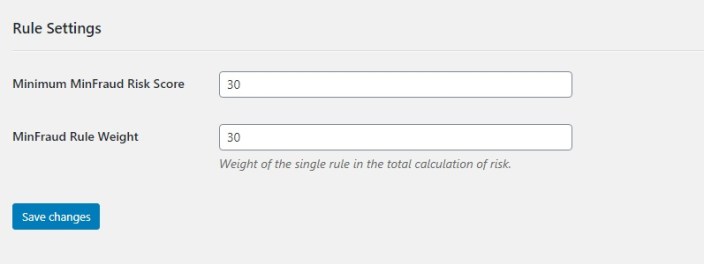
You can also customise your setting how it suits you. For example, if you want minFraud to trigger when you get a score of 50, you have to set the Minimum minFraud Risk Score to 50. Similarly, if you want to give minFraud more weighting, for example, 40 on the Fraud risk graph that is displayed in your order then set MinFraud Rule Weight to 40.
minFraud integration is inactive by default. You have to set it after activating the plugin following the procedure mentioned above.