Top Features
↑ Back to topWhatsApp Integration: Communicate with customers directly through WhatsApp, leveraging its popularity for efficient and real-time interactions.
Abandoned Cart Recovery: Automatically send personalized reminders via WhatsApp to reclaim abandoned carts and drive sales.
Event-Driven Notifications: Stay informed with WhatsApp notifications for key WooCommerce events like new orders, refunds, payments, and more.
Customizable Templates: Personalize messages and create templates tailored to your audience for consistent and effective communication.
Automated Processes: Save time and effort with features like auto-removal of abandoned orders and role-based broadcast campaigns.
Personalized Messaging: Engage customers with personalized messages and tailored responses for a more meaningful interaction.
Campaign Management: Design targeted campaigns, promotions, and announcements to drive conversions and boost customer engagement.
Order Tracking: Keep customers informed about their orders, shipping status, and delivery updates for a seamless purchasing experience.
Setup and Installation
↑ Back to topDownload the .zip file.
Go to: WordPress Admin > Plugins > Add New to upload the file you downloaded.
Activate the extension.
Go to: WordPress Admin > WP & WC WhatsApp Integration > Configure WhatsApp Api.
Go to: Templates submenu from our main menu and set templates for each event.
Go to: Setting for WooCommerce submenu and enable notification for WhatsApp.
Setting Up the WhatsApp Business API via Facebook Business Manager – Configuration
↑ Back to topApp Creation
↑ Back to top1. Visit Facebook for Developers:
Go to the Facebook for Developers website at developers.facebook.com.
2. Log In:
If you already have a personal Facebook account, you can sign in using your credentials.
If you don’t have a personal account, you may need to create one first.
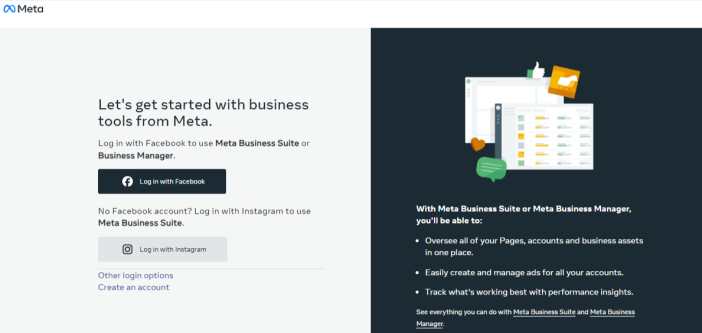
3. Create a Business Profile:
Set up your business profile with relevant information, including a profile picture, business description, and other details.
4. Phone Number Verification:
Verify your business phone number to ensure that it can receive SMS or phone calls.
5. Create a New App:
Click on “Create App” or a similar button to start the app creation process.
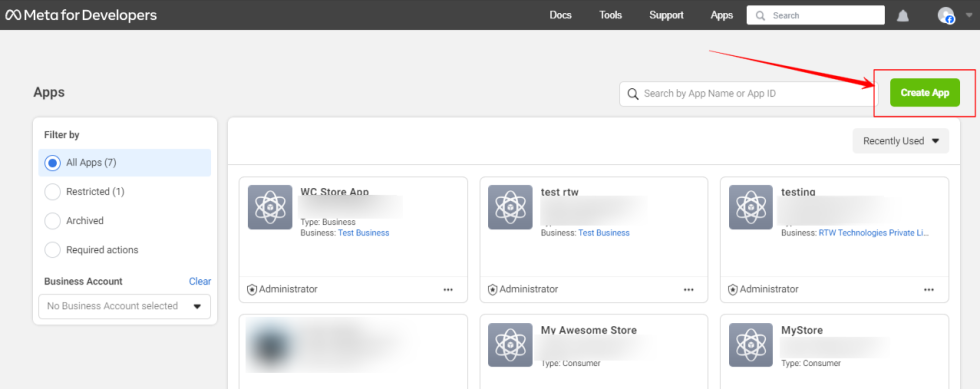
6. Select App Type:
Choose the “For Everything Else” or a relevant category that fits your business needs.
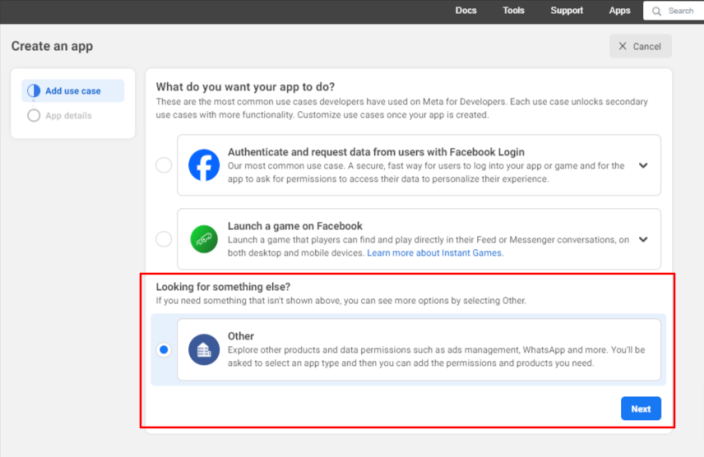
Select the app type of ” Business “.
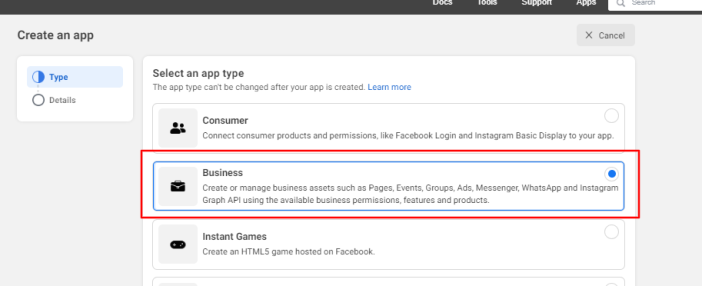
7. Complete App Setup:
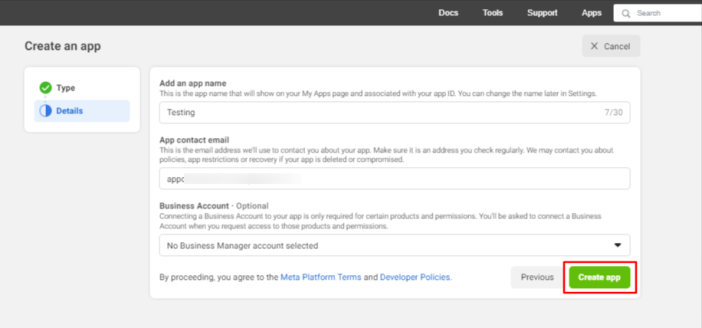
Provide the necessary details for your app, such as the app name, contact email, and select business account.
8. Create App ID and Secret:
After setting up the app, you’ll receive an App ID and App Secret. Keep these credentials secure.

9. Add WhatsApp Business API Product:
In the app dashboard, navigate to the “Add a Product” section.
Find and select the “WhatsApp” product.
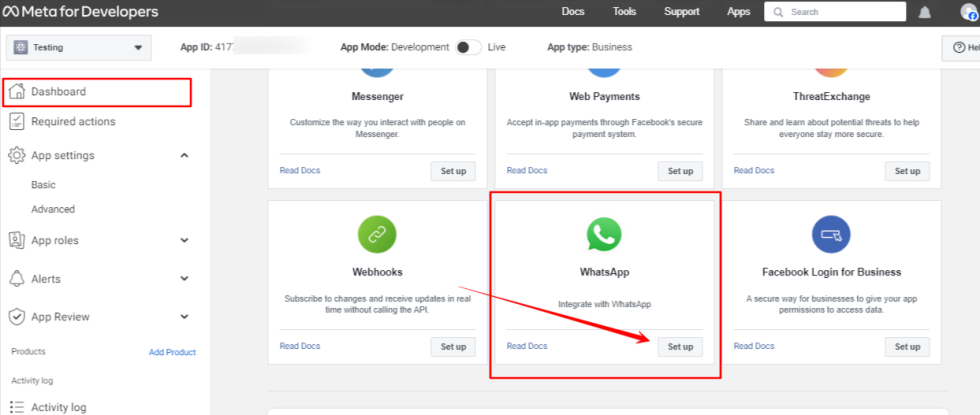
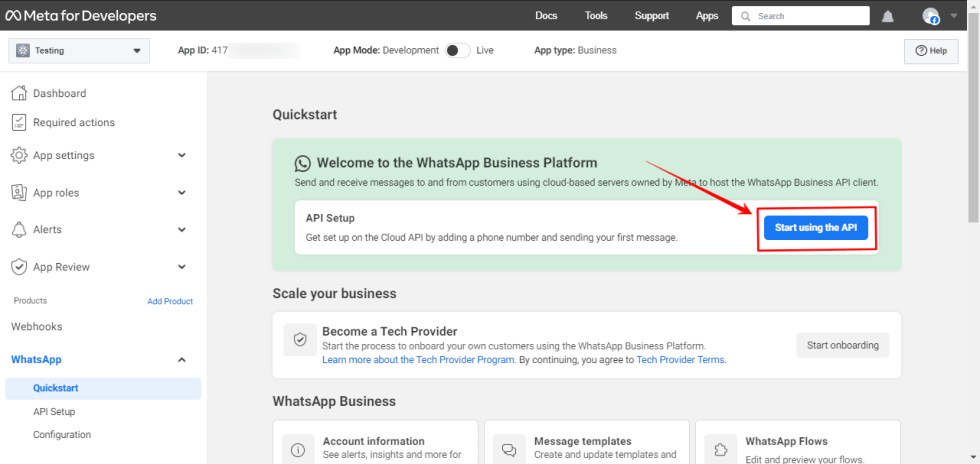
After this click on “Start using the API”.
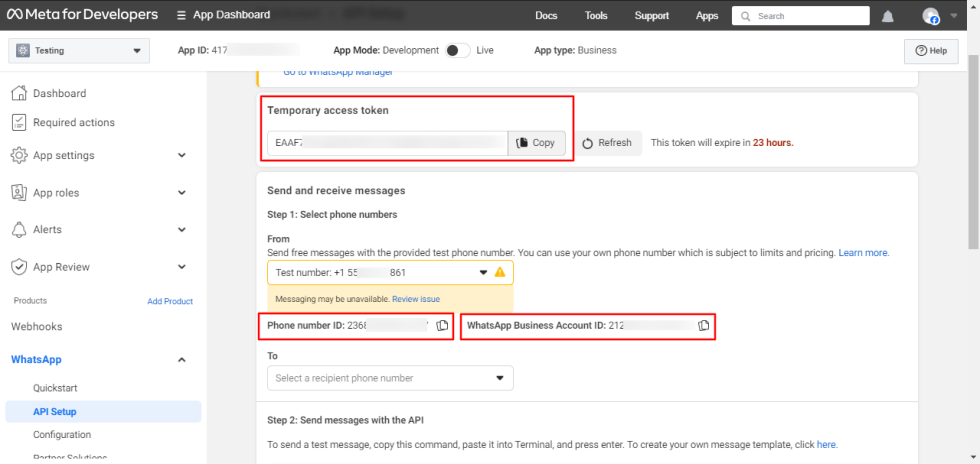
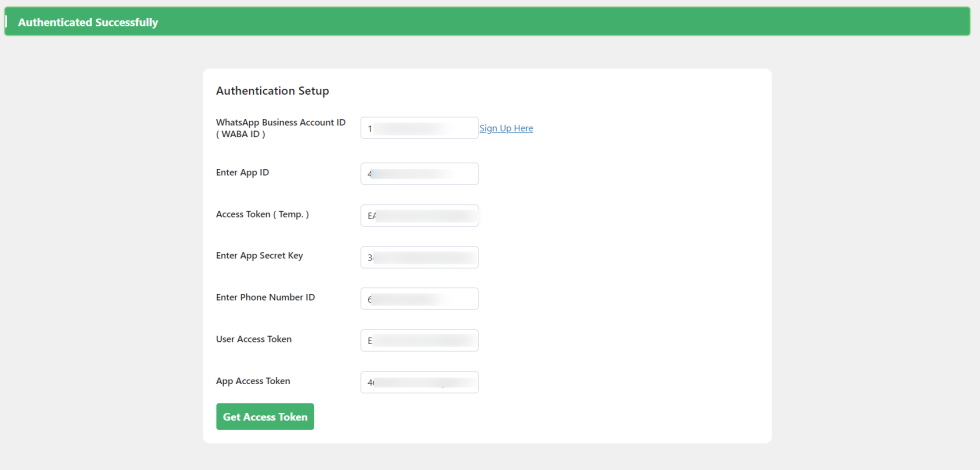
Here you get the “Temporary access token”, ” Phone number ID ” and ” WhatsApp Business Account ID ” which are used to Authenticate the plugin as mentioned below in the image
Authentication
↑ Back to top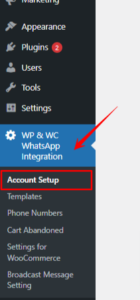
After the initial setup, users can access our plugin’s administrative menu. To complete the authentication process, they should navigate to the ‘Account Setup’ submenu within the admin menu. Within this submenu, users will find the necessary options and fields to authenticate their account. Once the authentication is successfully completed, a visual indicator within the ‘Account Setup’ submenu, which was initially displayed in yellow, will seamlessly transition to a reassuring green color, signifying the successful authentication of the user’s account.
To connect with the WhatsApp Business API plugin, retrieve the following details:
- WhatsApp Business Account ID:
Obtain this identifier associated with your business account on WhatsApp. - Phone Number ID:
Collect the unique identifier for your business phone number registered with WhatsApp. - App ID:
Find this unique identifier for your existing Facebook App in the Facebook Developers portal. - App Secret Key:
Generate this confidential key in the “Settings” tab of your Facebook App on the Developers portal. - Temporary Access Token:
Acquire a temporary access token through the Graph API Explorer in the “Tools” section of your Facebook App. Ensure it has the necessary permissions.
These details, comprising WhatsApp Business Account ID, Phone Number ID, App ID, App Secret Key, and Temporary Access Token, are vital for establishing a successful connection with the WhatsApp Business API plugin. You would typically need to input the collected details into the relevant fields in the plugin configuration. Before Authentication, the Authentication setting looks like this.
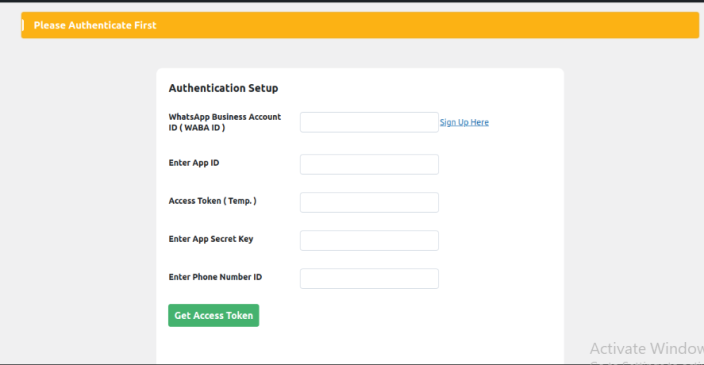
After successfully Authentication the appearance of the above yellow indicator turns to green.

Apply for WhatsApp Business Verification
↑ Back to topVerifying a WhatsApp Business account with a green tick is a process that involves demonstrating your business’s authenticity and compliance with WhatsApp’s guidelines. This type of verification is typically for well-known brands or businesses that are widely recognized and have a significant presence. Remember that verification is at WhatsApp’s discretion, and not all businesses are eligible. Click here for Offical documentation
Set Up Your WhatsApp Business Account Correctly
- Ensure your business has a complete profile with a verified phone number, a business description, address, email, and website.
- Use an official business phone number that’s publicly listed on your website and other official communication channels.
Apply for Business Verification on Facebook:
- To get the green tick, your business must be verified on Facebook. This involves verifying your business’s legal name, address, and other relevant information.
- Visit Facebook Business Manager, go to “Business Settings,” and find “Security Center.” Here, you can start the business verification process.
- Follow the on-screen instructions, which usually involve providing your business name, business address, business phone number, business registration certificate, and more. Facebook may ask for additional documents.
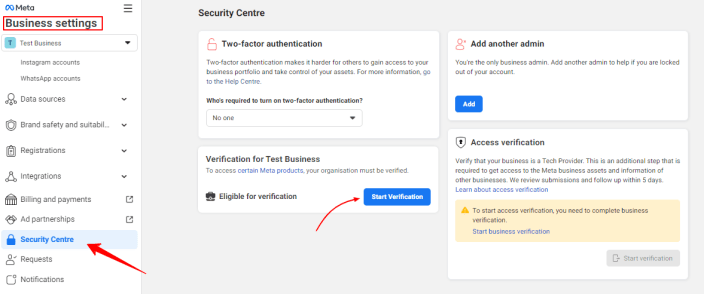
After clicking on the start Verification button the new popup will open like below image.
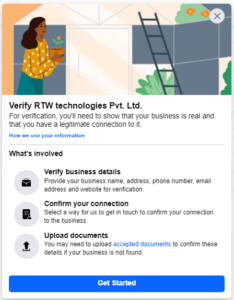
You may be asked in step 3 to provide official documentation of your business’s legal name. Upload an official document that matches the business’s legal name you entered in Step 1, such as a business license, articles of incorporation, or business tax registration.
Upload a document that shows both the legal name of your business and the mailing address or phone number shown on the screen.
Please check here the list of the documents accepted and not accepted before submitting them
After you upload the documents, Meta will review them as quickly as they can. This may take up 10min to 14 business days. You can check the current status of your verification by going to your Security Center.
When your business is verified you will be notified and
you will also see the verified status in your account.
It is mandatory that the Business Manager is owned by the Business who is sending messages. Adding users who do not belong to this company can cause your Business Manager to be blocked.

If the Start Verification button is not available:
1. Check Account Permissions
Ensure you have the correct permissions to initiate business verification. You should be an admin on the Facebook Business Manager account. If you’re not sure, check with someone in your organization who has admin access.
- To Check Permissions:
- Go to Business Settings.
- Click on “People.”
- Select your name and ensure you have the “Admin” role.
2. Ensure Business Information is Complete
Facebook typically requires your business information to be complete and accurate before initiating verification.
- Check Business Information:
- Go to “Business Settings.”
- Under “Business Info,” ensure you have provided a business name, address, business phone number, website, and other required information.
3. Use Facebook’s Security Center
The “Start Verification” button is typically located in the Security Center of Facebook Business Manager. If you can’t find it:
- Navigate to the Security Center:
- Go to “Business Settings.”
- Look for “Security Center” or a similar section.
- If the button still isn’t visible, it could be due to a temporary Facebook issue or a permissions-related problem.
4. Ensure Your Business Meets Verification Criteria
Facebook requires that businesses meet certain criteria for verification. Ensure that your business complies with Facebook’s guidelines.
- Guidelines to Follow:
- Your business should be a legal entity.
- Your business should have a registered business address and contact information.
- You should be able to provide business-related documents, such as business registration certificates.
5. Use the Facebook Help Center
If the problem persists, consider reaching out to Facebook for support.
- Contact Facebook Support:
- Visit the Facebook Help Center.
- Search for business verification-related articles.
- Use the “Contact Support” option if available.
- Alternatively, you can use Facebook’s chat support or other support channels if your business account has access.
Official Business Account or green badge
When a business has an Official Business Account (OBA), the conversations with users will show a green badge or green tick.
Requirements for approval
To receive the OBA status, the company needs to reach a number of notability requirements.
This is why Official Business Account applications rarely get approved. Please apply for an OBA only if you’re sure that your business is widely known and impactful enough for Meta’s requirements.
Understanding Notability
Notability requires a business to represent a well-known, often searched brand or entity. This should not be taken as a signal of the authenticity of the business. A business is considered authentic if they have gone through the Business Verification which verifies the business as a legal entity and its access to the business.
Notability, on the other hand, reflects a substantial presence in online news articles. Notability is assessed based on an account’s presence in news articles from publications with sizable audiences. Meta does not consider paid or promotional content as sources for review, including business or app listings.
Official business accounts are issued at the phone number and display name level. Meta assesses notability for the Display Name of the business account that is requesting OBA status —If the display name is changed after receiving the OBA status, the account will need to go through the approval process again.
Additionally, previous OBA approvals within a WhatsApp Business Account do not guarantee approval for other numbers (with different display names) associated with that account.
Application process:-
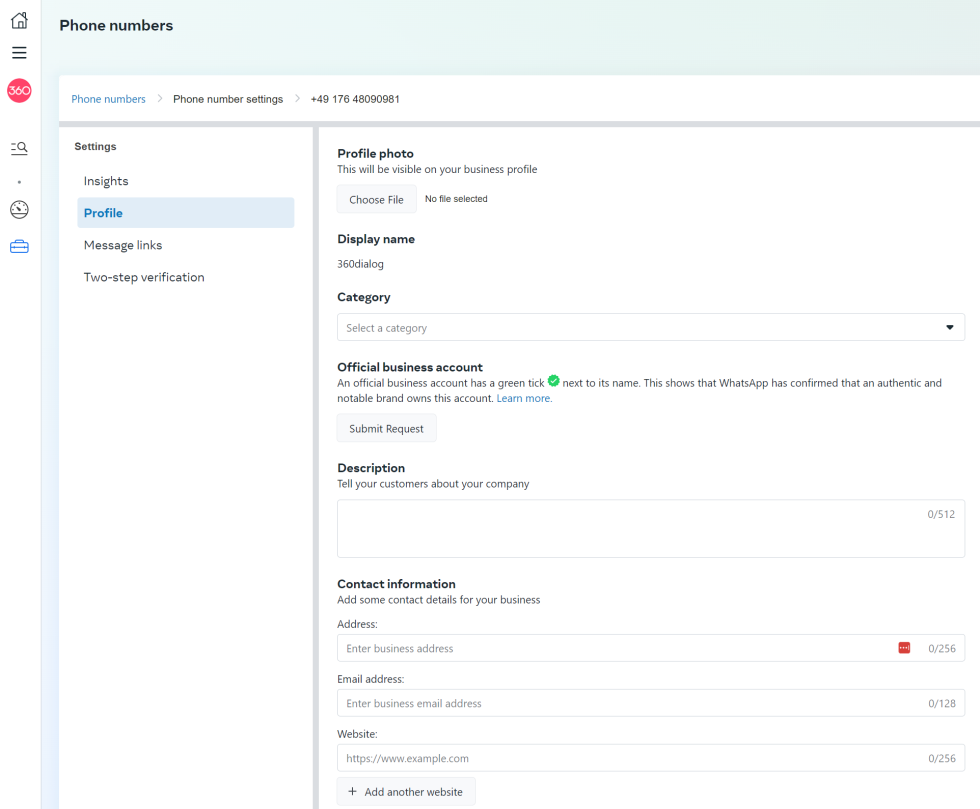
You can apply for an OBA directly from WhatsApp Manager.
Minimum requirements to submit an OBA request
- Verified Business Manager with an approved Display Name that is supported by the client’s external branding (Business Manager cannot belong to another company or agency, and the display name cannot be under review or rejected)
- The number quality must be ‘high’ at the time the application is made and the minimum Messaging Limit is 1k.
- The brand doesn’t violate WhatsApp’s policies, especially its Commerce Policy
- If appealing a decision: number of the initial request with Meta
The review process is conducted by the WhatsApp API Support Team and can take up to 7 days.
Important: When a number receives an OBA status, this status is tied to the current Display Name of the account. If the display name needs to be changed, we recommend it is done before getting the OBA, otherwise a Meta appeal is needed.
WhatsApp Manager > Phone Numbers > Profile
Guide to Setup & Settings
↑ Back to topOnce authentication is completed, users receive both a user access token and an app access token, granting them uninterrupted access to the system’s functionalities, thus facilitating smoother and more secure interactions. The current window reflects a seamless transition, presenting a clear pathway for users to engage with the system’s functionalities. Once successfully admin authenticated then some default message template is created for ready to use or send to customers.
Create Template
↑ Back to topTo create a WhatsApp template, access the “Template” section and choose “Create Template.” Fill in details for header, body, footer, and buttons, keeping in mind character limits. Categorize templates as Authentication, Marketing, or Utility.
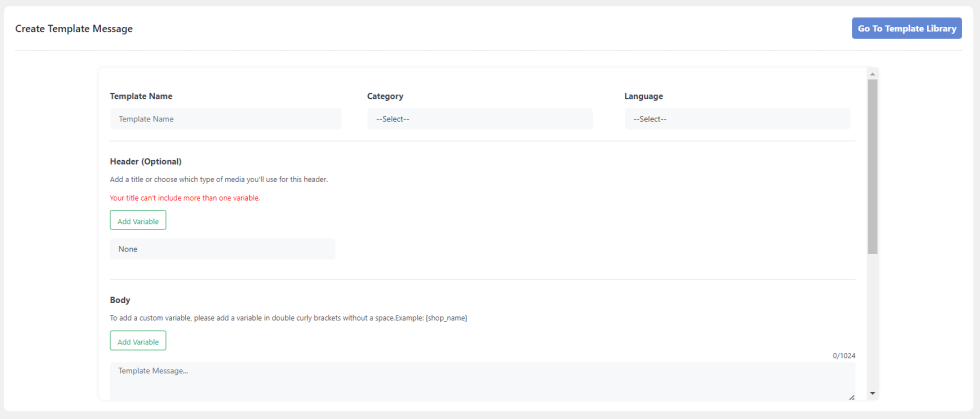
- Input Details: Enter header, body, footer, and button information for your template.
- Components Overview: Templates consist of header, body, footer, and buttons – tailor them based on business needs.
- Naming Constraints: No spaces, limited characters, and use only alphanumeric characters or underscores in template names.
- Categories: Categorize templates as Authentication, Marketing, or Utility, impacting pricing and validation.
- Language Considerations: Include language codes for multilingual templates in the header section.
- Variable Usage: Use only one variable in the header, and strike a balance in the body to avoid rejection.
- Character Limits: Stay within the 1024-character limit for the body, keeping it concise and focused.
- Optional Footer: Keep it brief and relevant; no variables are allowed in the footer section.
- Button Options: Utilize WhatsApp buttons for CTAs or Quick Replies to enhance user engagement.
- Submission Process: Click submit after ensuring compliance with WhatsApp API guidelines for approval.
- Approval Time: Approval typically takes 1 to 3 minutes; Once approved, you can refresh the template table to see the updated status.
- WhatsApp imposes certain limitations on template names to ensure consistency and adherence to their guidelines.
- No Spaces: Template names cannot contain spaces. You should use underscores (_) or camel case to separate words if needed.
- Length Limit: There’s a maximum character limit for template names. Ensure that your template name does not exceed this limit.
- Alphanumeric Characters and Underscores Only: Template names should only consist of alphanumeric characters (letters and numbers) and underscores (_). Special characters, symbols, or emojis are not allowed.
- Descriptive and Relevant: While not a strict limitation, it’s recommended to keep template names descriptive and relevant to the message content they represent. This helps in organizing and managing templates effectively.
- Templates must be categorized as one of the following categories. Categories factor into pricing and the category you designate will be validated at the time of template creation.
- Authentication
- Marketing
- Utility
When you send a template creation request, Meta immediately validates its category using our template categorization guidelines. - Language Code: If your template message is multilingual, include the language code in the header section to indicate the language of the message content. This helps WhatsApp route the message to the appropriate users based on their language preferences.
- In the header section, you have the option to include text, video, PDF, or image content. If you choose to use text, you can incorporate only one variable in the header. This flexibility allows you to customize the header according to your preferences and needs, whether you want to convey information, showcase multimedia content, or enhance visual appeal.
- Ensure that when using multiple variables in your WhatsApp template message body, your content sufficiently fills the space without being too sparse. Facebook may reject templates with excessive variables and minimal content. Strike a balance to avoid rejection. Make sure your WhatsApp template message body doesn’t surpass the 1024-character limit, especially when using variables for personalization. Keep it brief and focused to stay within the boundaries.
- The footer section of a WhatsApp template is optional. If you choose to include text, remember that variables are not allowed in this section. Keep it concise and relevant to your message.
After entering all details correctly and adhering to WhatsApp API guidelines by Facebook, clicking the submit button initiates template approval, typically taking 1 to 3 minutes. Once approved, you can refresh the template table to see the updated status.

Manage Phone Number
↑ Back to topWhatsApp Business supports managing customer interactions across multiple phone numbers, making it easier for businesses to handle communication efficiently. Additionally, phone numbers can be verified directly from the admin panel, streamlining the onboarding and setup process to manage all lines in one place seamlessly.
- Add more business account numbers: Expand your communication channels by adding additional phone numbers to your business.
- Refresh phone numbers: Update the information associated with your existing phone numbers.
- Verify phone numbers: Ensure that your phone numbers are connected to your WhatsApp Business account.
- Manage phone number status: Monitor the connection status and quality rating of each phone number.
- Set default number: Choose the primary phone number that will be used for sending messages.

Webhook Details
↑ Back to topBy configuring a webhook, you can receive real-time notifications from the WhatsApp Business API and trigger actions in your own application or system. To set up, you should copy the URL and token and configure them in the Facebook Graph API to enable webhook support for WhatsApp Business.
- URL:
- This is the web address of your application or server that will receive the webhook notifications.
- It should be a publicly accessible URL that can be reached by the WhatsApp Business API.
- You’ll need to configure this URL in your WhatsApp Business Account or Facebook Graph API settings.
- Token:
- The token is a unique identifier that authenticates your webhook and ensures that only authorized requests are sent to your application.
- It’s essential to keep your token secure to prevent unauthorized access.

Cart Abandoned Settings
↑ Back to top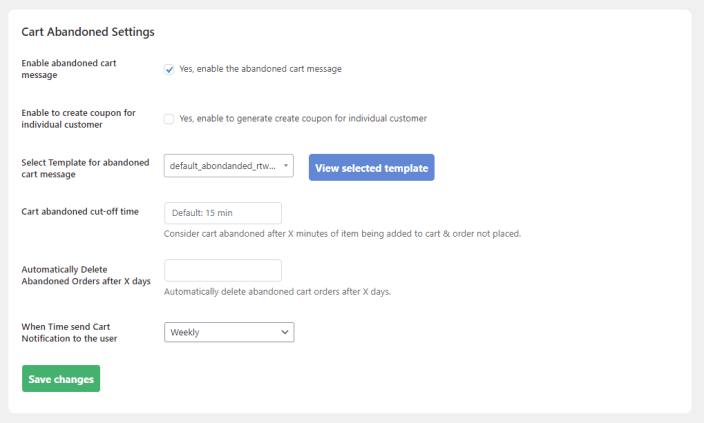
- Enable/Disable Abandoned Message:
Toggle to activate or deactivate the feature of sending abandoned cart messages via WhatsApp to users. - Enable/Disable Coupon Code Message:
Toggle to activate or deactivate the feature of sending coupon codes via WhatsApp to re-engage customers and boost sales. - Select Template:
Choose from a list of approved templates for the abandoned cart message to be sent to users. - Cart Abandoned Cut-off Time:
Admin-defined duration, in minutes, after which a customer’s cart is considered abandoned. - Automatically Delete Abandoned Orders:
Specify the number of days after which abandoned orders should be automatically removed from the system. - Scheduled Send Time:
Set the timing for when the abandoned cart message will be sent to customers, optimizing the likelihood of engagement. Additionally, admins can choose “Set Custom” from the dropdown menu to define a specific time for sending messages.
Automate Template Notifications:
↑ Back to top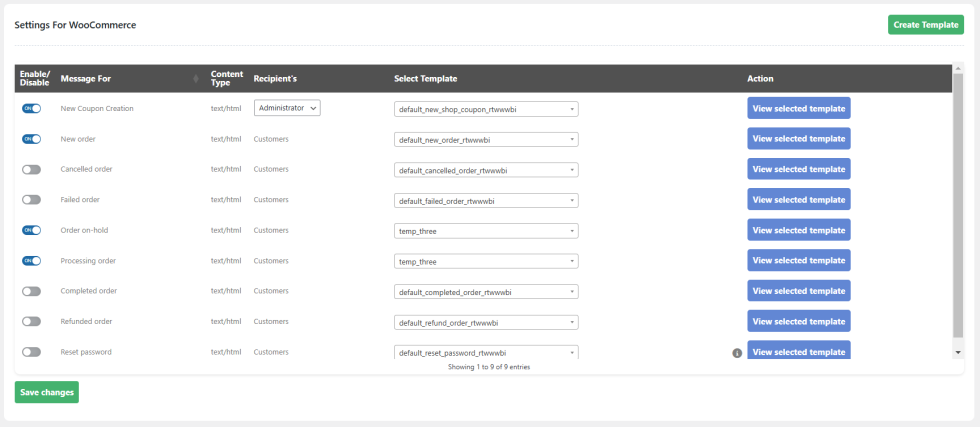
- Enable/Disable Template Messages: Toggle to activate or deactivate the sending of template messages on WooCommerce events such as new coupon creation or order completion.
- Select Template for some Event: Admin can choose a specific template to be sent for each selected event. This allows customization and relevance for different scenarios.
- Preview Template: Click on “View Selected Template” to preview the selected template before final submission, ensuring accuracy and appropriateness.
- Message Template Not Visible: If your message template is approved but not showing in the select box, use the “Refresh Template” button to fetch the latest template details. After refreshing, the template you are looking for will be visible.
NOTE: If certain customers lack dynamic values for variables, the variable is replaced with its name in the message.
Campaign/broadcast Message
↑ Back to top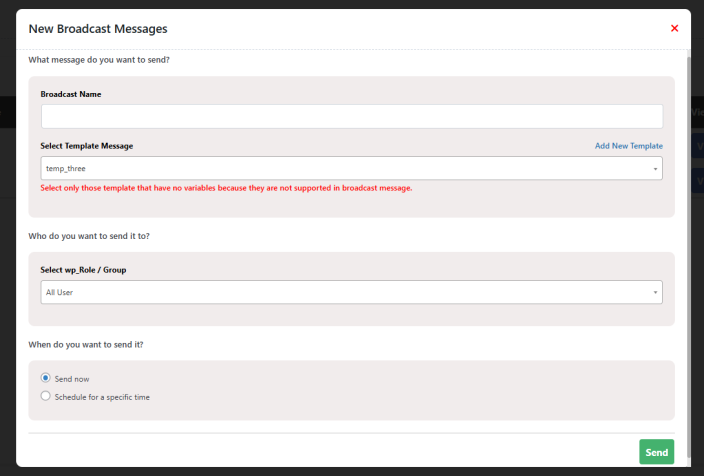
Two Broadcast Options:
- Send Now: Send messages immediately.
- Scheduled Broadcasts: Plan messages for specific times (hourly, daily, or specific date and time).
Benefits of Scheduled Broadcasts:
- Improved time management.
- Consistent communication with users.
Enhanced Targeting:
Create more personalized and targeted messaging, beyond user roles.
Select specific users for broadcasts.
To send messages to selected customers, you need to create groups from the contacts list. In the backend settings (as shown in the image), you can choose specific contacts and assign them to a campaign group. Once grouped, you can use these groups to initiate campaigns.

Group Management Overview
↑ Back to topOnce a group is created, the plugin provides a detailed overview to assist with efficient campaign management:
- Group Details:
- Group Name: The name assigned to the group.
- Number of Contacts: Total contacts included in the group.
- Contact Percentage: The proportion of the total contacts represented by this group.
- Creation Date: The date the group was created.
- Campaign Organization:
- The group overview helps users streamline and organize campaigns effectively.
- Available Actions:
- Users can delete groups if no longer required, keeping their contact lists relevant and organized.

Scheduled Broadcast Management
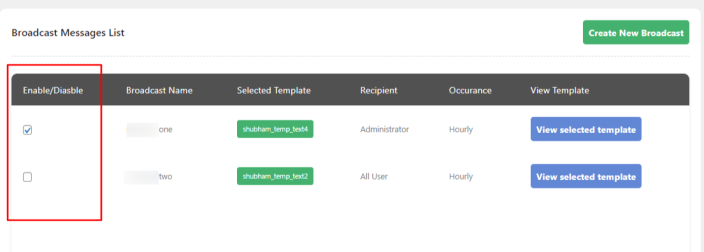
↑ Back to topWhen a broadcast is scheduled for a future time, it is displayed in a table format within the admin interface:
- Broadcast Table Overview:
- Each scheduled message is listed in the table with key details for quick reference.
- A checkbox is available next to each scheduled broadcast.
- Enable/Disable Controls:
- Admins can easily manage scheduled broadcasts by clicking the checkbox.
- Enable or Disable broadcasts with a simple click, providing quick control over upcoming messages.
This setup allows for efficient scheduling management, helping admins oversee and adjust message timing with ease.
Customer Inquiry Management
↑ Back to topThe backend panel provides a comprehensive interface for managing and responding to customer inquiries:
- Direct Response Capability:
- Using the plugin, admins can interact with customers directly through an integrated messaging interface.
- Response capabilities ensure prompt communication with customers.
- WhatsApp Business API Integration:
- Once integrated with Facebook’s Graph API, admins can access and use this panel to manage WhatsApp customer interactions seamlessly.
- Conversation Overview and Updates:
- Admins can view ongoing conversations.
- The AJAX Fetch Interval feature allows setting automatic updates to the conversation feed, ensuring the latest messages appear without manual refreshes.
This panel supports efficient customer service by combining real-time communication with automated update capabilities, streamlining customer query management.

Auto-Replies and Bot Management
↑ Back to topThe admin panel includes settings for automating customer responses through bots and auto-replies:
- Bot Activation:
- Admins can enable a bot to manage common queries, allowing for continuous customer support without manual intervention.
- Auto-Reply Setup:
- Configure auto-replies to address frequently asked questions, delivering instant responses and improving response efficiency.
- Time-Saving Benefits:
- Automated responses minimize the need for direct admin input, ensuring quick replies to standard queries and optimizing support resources.
This feature streamlines customer support by reducing response times and maintaining consistent communication, especially for common questions.

