
New Zealand Post for WooCommerce connects your WooCommerce store with NZ Post to calculate eligible domestic and international shipping rates during cart and checkout.
The extension can also help manage parcel packing, shipping service selection, surcharges, labels, tracking, address validation, collection points, free-shipping offers, role-based shipping, coupon-linked shipping, preferred delivery dates, and shipment reporting.
Installation
↑ Back to topInsert the Woo Marketplace synced pattern titled Docs – Installation here.
After installing and activating New Zealand Post for WooCommerce, configure the main NZ Post connection under WooCommerce > Settings > Shipping > New Zealand Post.
You will also need to add New Zealand Post as a shipping method to each WooCommerce shipping zone where you want NZ Post rates to be available.
Before you begin
↑ Back to topBefore configuring the extension, make sure your store meets the following requirements:
- Your WooCommerce base country/region is set to New Zealand.
- Your WooCommerce currency is set to New Zealand dollar (NZD).
- Your store address and postcode are complete and correct.
- Physical products have a weight and dimensions.
- You have an NZ Post account suitable for the shipping services you want to use.
- You have an NZ Post developer application with access to the required APIs.
- For ShippingOptions v2, you have the Client ID and Client Secret for your NZ Post application.
- You have the NZ Post Account Number and Site Code or Auth Code required for your account.
Additional features can require additional NZ Post API access. For example, labels, tracking, address services, and collection points rely on the corresponding NZ Post services being available to your application.
Get started
↑ Back to topFor a new installation, configure the connection first, then add and test the shipping method.
- Go to WooCommerce > Settings > Shipping > New Zealand Post.
- Set NZ Post API Type to ShippingOption v2 API.
- Enter the Client ID and Client Secret for your NZ Post application.
- Enter your NZ Post Account Number.
- Enter the Site Code or Auth Code required for your NZ Post account.
- Enable Sandbox Mode if you are testing against the NZ Post UAT environment.
- Save the settings.
- Go to WooCommerce > Settings > Shipping and open the shipping zone where NZ Post should be available.
- Add New Zealand Post as a shipping method.
- Open the New Zealand Post method and configure the origin, packing method, rates, and services.
- Save the shipping method.
- Place test orders using representative New Zealand delivery addresses.
- If you ship internationally, test at least one international destination as well.
Start with the basic rate calculation working before enabling optional workflows such as labels, collection points, free-shipping rules, or tracking notifications. This makes configuration problems easier to isolate.
Understand the settings locations
↑ Back to topNew Zealand Post for WooCommerce uses more than one settings area.
Global New Zealand Post settings
↑ Back to topGo to WooCommerce > Settings > Shipping > New Zealand Post.
These settings control the main NZ Post connection and optional functionality used across the extension, including:
- NZ Post API type and credentials.
- Label generation.
- Sandbox and debug modes.
- Coupon-linked shipping.
- Tracking email notifications.
- Domestic and international surcharges.
- Free-shipping eligibility.
- Preferred delivery dates.
- Role-based shipping.
- Address autocomplete.
- The free-shipping progress bar.
Shipping-zone method settings
↑ Back to topGo to WooCommerce > Settings > Shipping, open a shipping zone, and select the New Zealand Post method.
These settings control how rates are calculated and presented for that shipping-zone instance, including:
- Method title.
- Origin postcode.
- GST handling.
- Parcel packing.
- Rate display.
- NZ Post services.
- Postage type.
- Signature requirements.
- Photo requirements.
- Rural surcharge recovery.
NZ Post dashboard
↑ Back to topWordPress administrators can go to NZ Post > Dashboard to review shipment activity recorded by the extension.
Configure ShippingOptions v2
↑ Back to topShippingOptions v2 is the recommended API mode for new configurations.
Get your NZ Post credentials
↑ Back to topCreate or manage your NZ Post application through the NZ Post Developer Resource Centre and request access to the services your store needs.
For ShippingOptions v2, obtain the following information:
- Client ID — identifies your NZ Post application.
- Client Secret — authenticates your NZ Post application.
- NZ Post Account Number — identifies your NZ Post account.
- Site Code or Auth Code — where required for your account or rate arrangement.
Your application may also require access to other NZ Post APIs if you use labels, address functionality, tracking, or collection points.
Add your credentials to WooCommerce
↑ Back to top- Go to WooCommerce > Settings > Shipping > New Zealand Post.
- Set NZ Post API Type to ShippingOption v2 API.
- Enter your Client ID.
- Enter your Client Secret.
- Enter your NZ Post Account Number.
- Enter the required Site Code or Auth Code.
- Choose the appropriate Sandbox setting.
- Select Save changes.
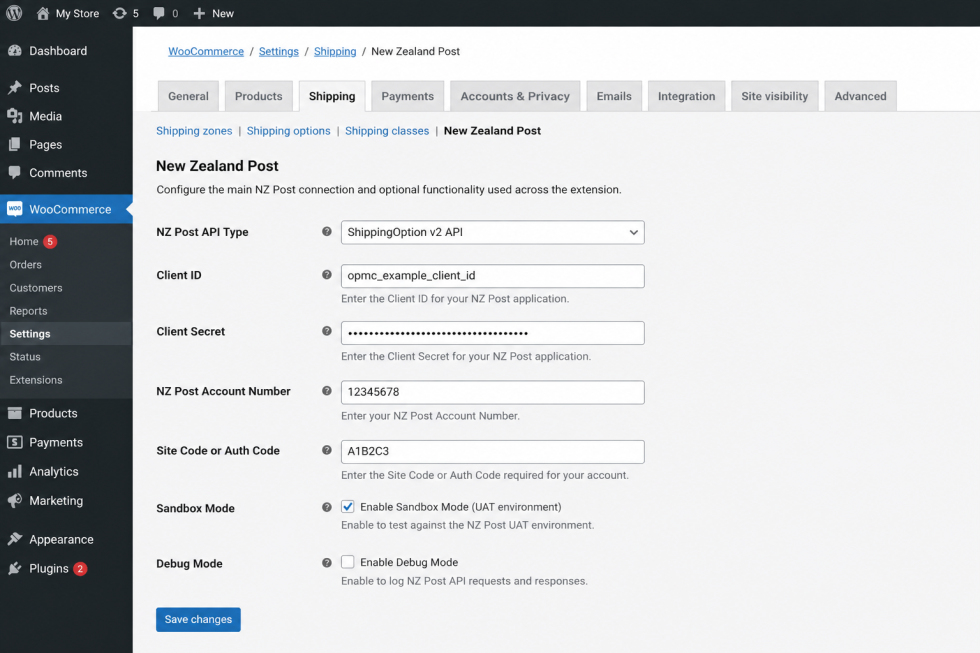
The extension uses these credentials to authenticate with NZ Post and manages OAuth access tokens automatically.
Upgrade from version 5.1.1 or earlier
↑ Back to topThe ShippingOptions v2 compatibility update changes how the extension authenticates with NZ Post.
After updating:
- Go to WooCommerce > Settings > Shipping > New Zealand Post.
- Confirm that ShippingOption v2 API is selected.
- Enter your own NZ Post Client ID and Client Secret.
- Confirm the Account Number and Site Code or Auth Code.
- Confirm whether the store should use UAT or Production.
- Save the settings.
- Test a domestic checkout.
- Test an international checkout if your store ships internationally.
- Test labels, address functionality, collection points, and tracking if you use those features.
If required authentication details are missing, resolve the configuration notice before relying on NZ Post rates in a live checkout.
Add New Zealand Post to a shipping zone
↑ Back to top- Go to WooCommerce > Settings > Shipping.
- Open the shipping zone where you want NZ Post rates to appear.
- Select Add shipping method.
- Select New Zealand Post.
- Add the method.
- Open New Zealand Post to configure it.
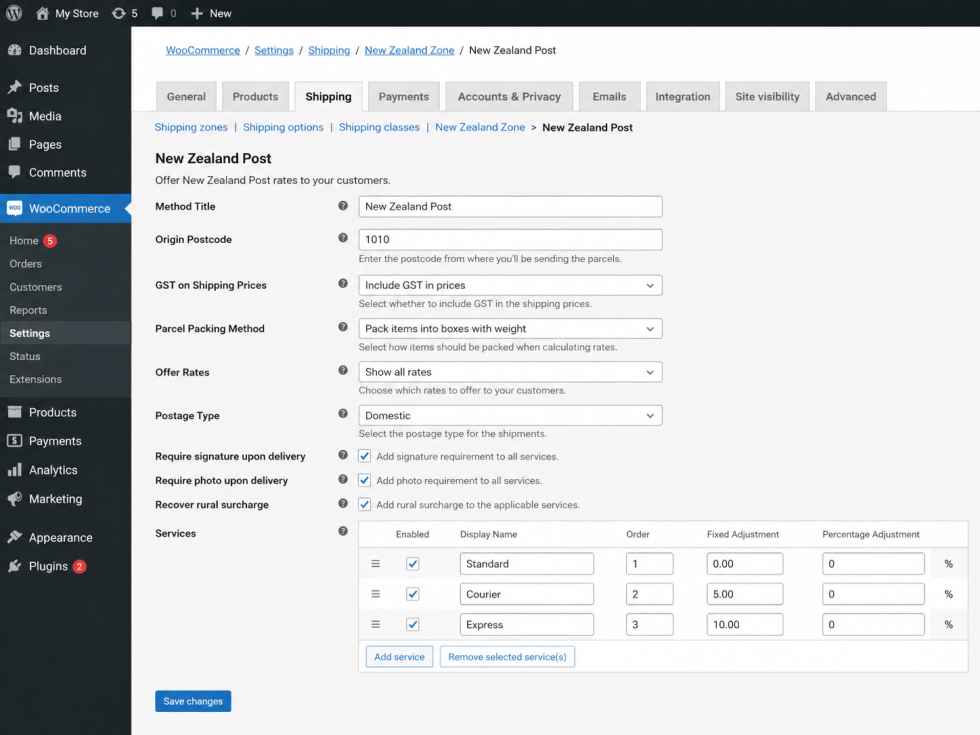
Configure the basic shipping method
↑ Back to topMethod title
↑ Back to topMethod Title controls the name associated with this shipping method.
The default is New Zealand Post.
Origin postcode
↑ Back to topEnter the postcode from which you send parcels.
Use a postcode that matches the physical origin used for your NZ Post shipping activity. Also make sure the main store address under WooCommerce > Settings > General is complete and valid.
Configure rates and services
↑ Back to topGST on shipping prices
↑ Back to topChoose how the NZ Post shipping price should be added to WooCommerce:
- Add shipping prices excluding GST.
- Add shipping prices including GST.
Select the option that matches your WooCommerce tax and shipping-price configuration.
Parcel packing method
↑ Back to topChoose how products are converted into parcels before the extension requests NZ Post rates.
The available methods are:
- Default: Pack items individually.
- Recommended: Pack into boxes with weights and dimensions.
Physical products need valid weights and dimensions for either packing method.
Offer rates
↑ Back to topChoose how many eligible NZ Post rates customers can see:
- Offer the customer all returned rates — shows enabled rates returned for the shipment.
- Offer the customer the cheapest rate only, anonymously — shows only the lowest eligible rate.
Services
↑ Back to topThe Services table lets you control the NZ Post services made available through the shipping method.
For each listed service, you can:
- Change its customer-facing name.
- Enable or disable it.
- Reorder it.
- Apply a fixed price adjustment.
- Apply a percentage price adjustment.
The service must also be available for the account, destination, parcel, and NZ Post configuration. Enabling a service in WooCommerce does not guarantee that NZ Post will return it for every shipment.
Postage type
↑ Back to topChoose which type of returned price should be considered:
- Returns rate without packaging fee.
- Returns rate with packaging fee.
- Any.
Require signature upon delivery
↑ Back to topEnable Require signature upon delivery when eligible NZ Post services should include a supported signature add-on.
Require photo upon delivery
↑ Back to topEnable Require photo upon delivery when eligible services should include supported photo-delivery handling.
Recover rural surcharge
↑ Back to topEnable Require recover rural surcharge upon delivery when rural-delivery costs should be included where applicable.
Accurate customer address information is important for rural-delivery handling.
Configure parcel packing
↑ Back to topPack items individually
↑ Back to topWhen Default: Pack items individually is selected, shippable products are treated as individual parcels for rate calculation.
Virtual products are not included in the parcel calculation.
Pack into boxes with weights and dimensions
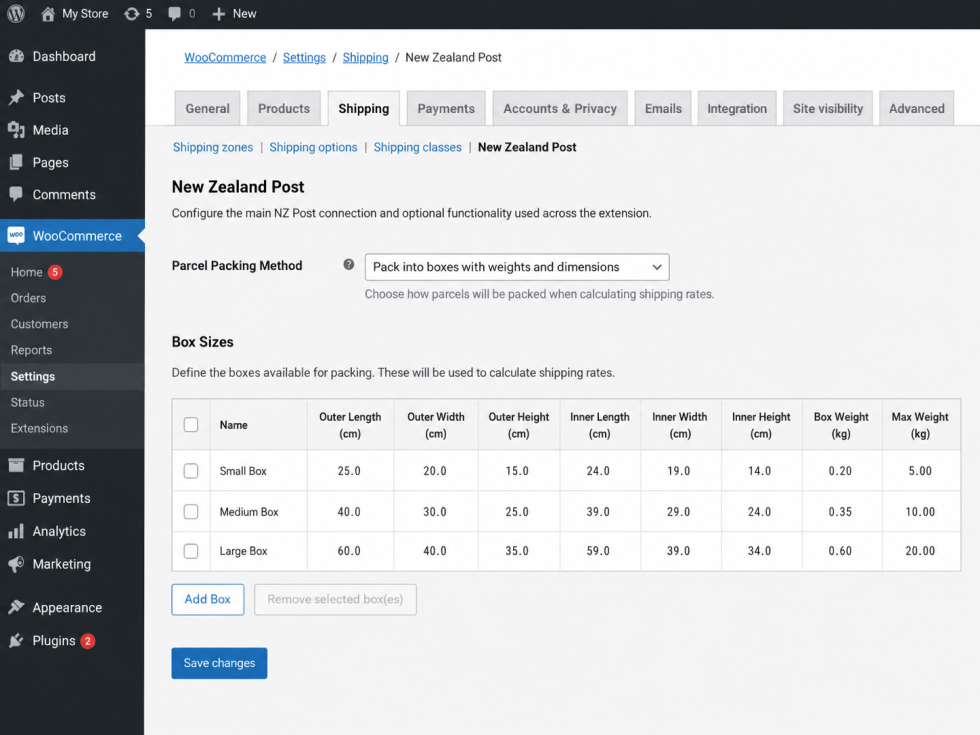
↑ Back to topSelect Recommended: Pack into boxes with weights and dimensions when your fulfillment process combines products into known box sizes.
The Box Sizes table lets you configure:
- Name.
- Outer Length.
- Outer Width.
- Outer Height.
- Inner Length.
- Inner Width.
- Inner Height.
- Box Weight.
- Max Weight.
The box table uses millimeters for dimensions and grams for box weights.
Outer dimensions represent the parcel dimensions supplied for shipping. Inner dimensions determine which products can fit inside the box. Box weight is added to the weight of the contents, and Max Weight limits the total weight the box can contain.
Products that cannot fit into one of the configured boxes can be treated as individual parcels.
Select Add Box to create another box size. Select a box and choose Remove selected box(es) to delete it.
Test common product combinations after configuring the box packer. Automated packing is an estimate and may not exactly reproduce how a person packs every order.
Configure shipping surcharges
↑ Back to topGo to WooCommerce > Settings > Shipping > New Zealand Post and find Shipping Surcharge.
You can configure:
- Domestic shipping surcharge.
- International shipping surcharge.
These amounts are added to the applicable calculated shipping cost.
Use surcharges when your business needs to recover additional shipping-related costs that are not already included in the rate.
Configure free-shipping eligibility
↑ Back to topNew Zealand Post for WooCommerce can control the availability of an existing WooCommerce Free shipping method according to an order threshold.
First, add a standard WooCommerce Free shipping method to the appropriate shipping zone.
Then go to WooCommerce > Settings > Shipping > New Zealand Post.
- Enable Free shipping option based on last order amount.
- Use Enable Free Shipping Based On to choose the basis for eligibility.
- Select Current Order or Last Order.
- Enter the Minimum Order Amount for Free Shipping.
- Save the settings.
Current order
↑ Back to topChoose Current Order when the logged-in customer’s current order should be compared with the configured minimum.
Last order
↑ Back to topChoose Last Order when the customer’s most recent processing or completed order should be compared with the configured minimum.
The extension must be able to identify the customer and retrieve their WooCommerce order history. Customers who are not logged in do not qualify through this plugin-controlled eligibility rule.
Configure the free-shipping progress bar
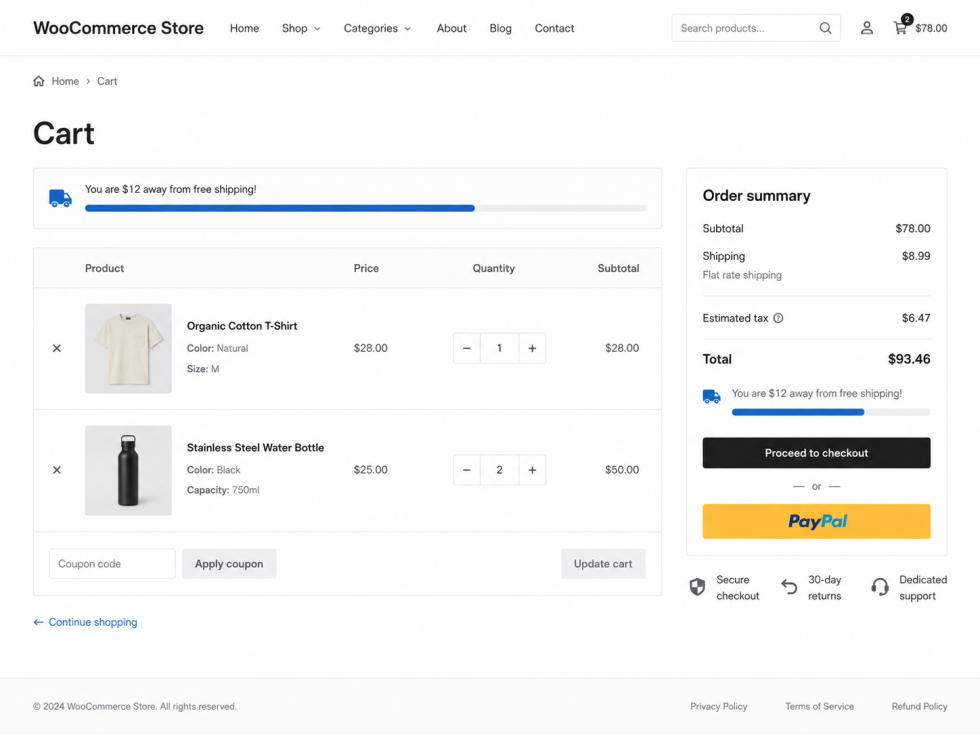
↑ Back to topThe free-shipping progress bar displays on the cart and checkout and shows customers how close the current cart subtotal is to the threshold of a configured WooCommerce Free shipping method.
Go to WooCommerce > Settings > Shipping > New Zealand Post and find Free Shipping Progress Bar.
You can configure:
- Enable Shipping Progress Bar.
- Progress Bar Background Color 1.
- Progress Bar Background Color 2.
- Progress Bar Section Background Color.
- Upload File for the optional progress-bar icon.
The progress bar reads the qualifying amount from a WooCommerce Free shipping method. Make sure the WooCommerce free-shipping threshold and any related New Zealand Post free-shipping rules reflect the offer you intend to show customers.
Configure coupon-linked shipping
↑ Back to topCoupon-linked shipping lets a WooCommerce coupon control the shipping method made available when that coupon is used.
Enable coupon-linked shipping
↑ Back to top- Go to WooCommerce > Settings > Shipping > New Zealand Post.
- Enable Coupon-Linked Shipping.
- Save the settings.
Assign a shipping method to a coupon
↑ Back to top- Go to Marketing > Coupons.
- Create or edit a coupon.
- Find Special Shipping Method.
- Select the shipping method associated with the coupon.
- Save or update the coupon.
When coupon-linked shipping is enabled, methods assigned to coupons can be hidden when the corresponding coupon is not applied. When a customer applies a coupon with a Special Shipping Method, the available shipping rates are filtered according to that coupon configuration.
Test promotional coupons with your other shipping methods before using the promotion on a live store.
Configure role-based shipping
↑ Back to topRole-based shipping provides a separate shipping method with costs based on the logged-in customer’s WordPress user role.
Enable the feature
↑ Back to top- Go to WooCommerce > Settings > Shipping > New Zealand Post.
- Enable Role-Based Shipping.
- Save the settings.
Save the global setting before trying to add the role-based method to a shipping zone.
Add Role Based Shipping to a zone
↑ Back to top- Go to WooCommerce > Settings > Shipping.
- Open the required shipping zone.
- Select Add shipping method.
- Add Role Based Shipping.
- Open the new shipping method.
The Role Based Shipping settings include:
- Enable.
- Method Title.
- A shipping cost for each WordPress user role available on the site.
- Cost for Guests.
Logged-in customers receive the configured amount for their applicable role. Customers who are not logged in receive the guest amount.
Test the shipping method with an account from every role that receives special pricing and also test as a logged-out customer.
Configure preferred delivery dates
↑ Back to topNew Zealand Post for WooCommerce can add an optional delivery-date field to checkout.
Go to WooCommerce > Settings > Shipping > New Zealand Post and find Delivery Date Settings.
Configure:
- Enable/Disable Delivery date picker.
- Available Delivery Days.
- Number of Days to Skip from Today.
- Cutoff Date.
Available delivery days
↑ Back to topSelect the days of the week that customers can choose.
Number of days to skip from today
↑ Back to topEnter the number of days that should be unavailable before customers can select a delivery date.
Cutoff date
↑ Back to topSelect the final date that customers can choose.
The customer’s selection is stored with the WooCommerce order and appears in the order details as Custom Delivery Date.
The selected date records the customer’s preference. It should not be presented as an NZ Post delivery guarantee unless the applicable shipping service provides that guarantee separately.
Configure address autocomplete
↑ Back to topNew Zealand Post for WooCommerce can use NZ Post address data to provide address suggestions during checkout.
- Go to WooCommerce > Settings > Shipping > New Zealand Post.
- Find Additional Features.
- Enable Shipping Address Auto-Complete.
- Save the settings.
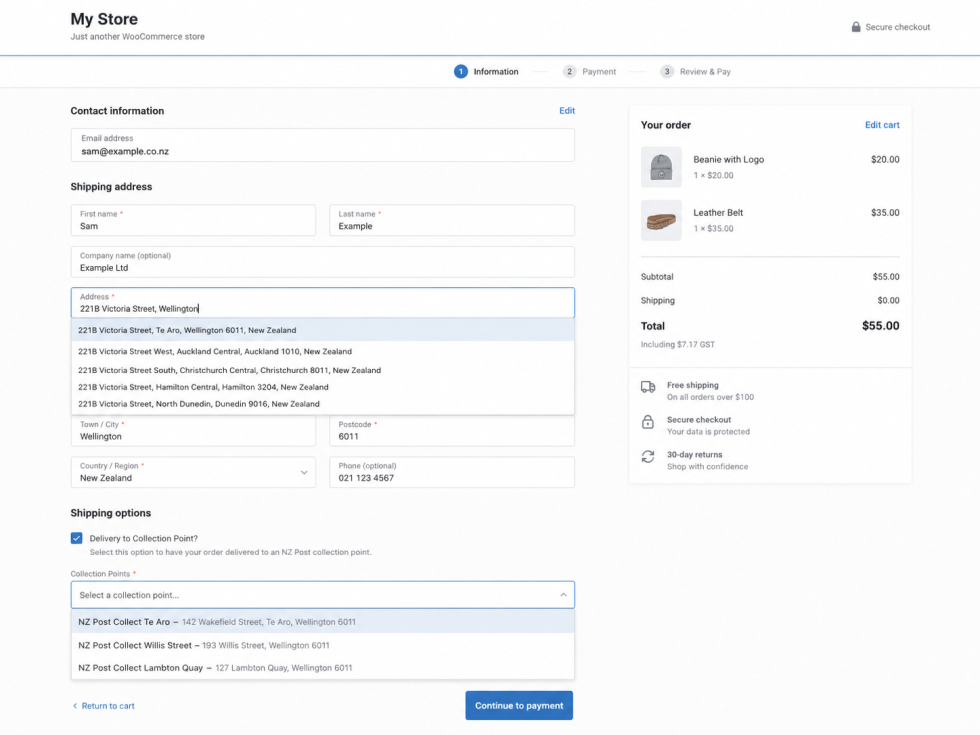
Address autocomplete helps customers select addresses recognized by NZ Post and can reduce problems with shipping rates, rural delivery, collection points, and labels.
The extension also performs NZ Post address validation in supported customer and checkout workflows.
New Zealand place names containing Māori macrons are normalized when required for NZ Post API compatibility.
Use NZ Post collection-point delivery
↑ Back to topNew Zealand Post for WooCommerce supports NZ Post collection points when the merchant’s NZ Post application has access to the required address and collection-point services.
For eligible New Zealand checkout addresses, customers can use the Delivery to Collection Point? option.
When selected, the Collection Points field displays available nearby locations. The options update based on the customer’s address.
The selected collection-point location is stored with the order and can be included in the supported NZ Post collection-label workflow.
Collection-point availability depends on:
- The customer’s New Zealand address.
- Collection points returned by NZ Post.
- The APIs available to the merchant’s NZ Post application.
Configure multiple NZ Post pickup locations
↑ Back to topThe extension also includes a separate shipping method named Local Pickup (Multiple Locations).
This method uses NZ Post collection-point data associated with postcode rules in the WooCommerce shipping zone. It is not a list of arbitrary merchant-entered store addresses.
Add the pickup method
↑ Back to top- Go to WooCommerce > Settings > Shipping.
- Open the required shipping zone.
- Make sure the zone contains the applicable postcode locations.
- Select Add shipping method.
- Add Local Pickup (Multiple Locations).
- Open the shipping method.
Configure:
- Method Title — the title displayed during checkout.
- Pickup Locations — the NZ Post locations that customers can choose.
The available Pickup Locations are built from collection-point information for the postcodes assigned to the shipping zone. If the zone does not contain suitable postcode rules or no locations are returned, the Pickup Locations list may be empty.
At checkout, customers using this method can select from the enabled pickup locations. Their selection is saved with the order.
Generate NZ Post shipping labels
↑ Back to topNew Zealand Post for WooCommerce can automatically request supported NZ Post labels for eligible orders.
Your NZ Post application must have the appropriate Parcel Label API access.
Enable automatic label generation
↑ Back to top- Go to WooCommerce > Settings > Shipping > New Zealand Post.
- Enable auto-generate Shipping Options Label.
- Save the settings.
When an eligible order using the New Zealand Post shipping method is processed through checkout, the extension can create the NZ Post consignment and request its label.
View label information on an order
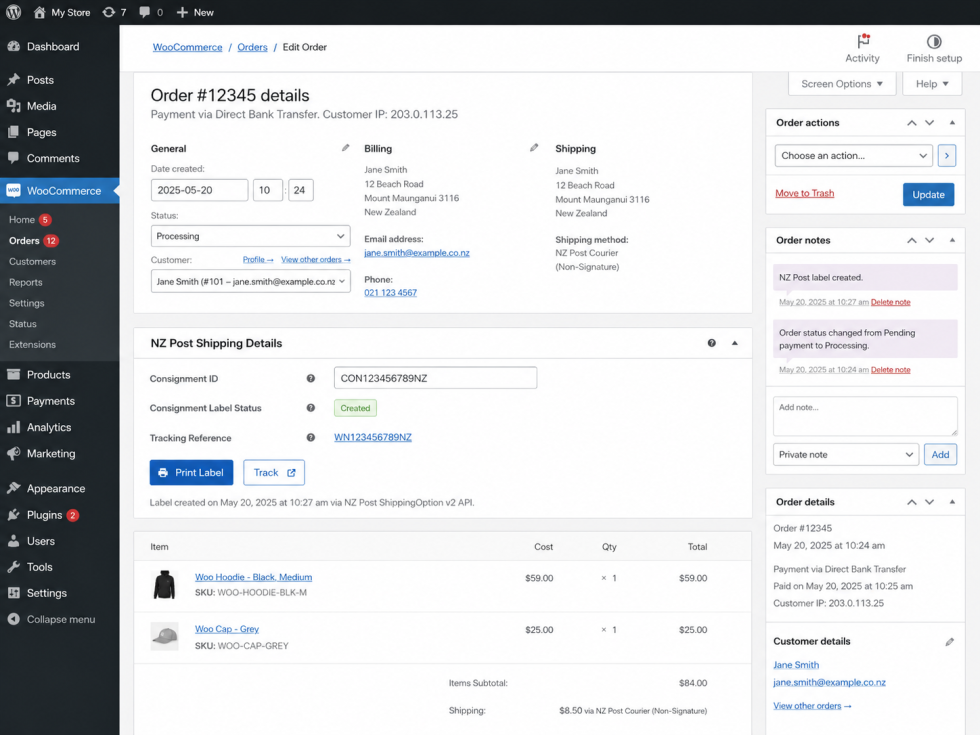
↑ Back to topOpen the WooCommerce order and find NZ Post Shipping Details.
When available, the panel shows:
- Consignment ID.
- Consignment Label Status.
- Tracking Reference.
When the consignment is complete, the order panel can also provide:
- Print Label.
- Track.
A store can successfully retrieve ShippingOptions rates but still be unable to generate a label if the NZ Post application does not have the required label access.
Track NZ Post shipments
↑ Back to topSupported NZ Post orders can include a tracking reference and shipment information.
When label generation has created the required shipment details, customers can see Shipping Details And Status in the WooCommerce order view.
When tracking is available, customers can select Track Order to review NZ Post tracking events.
The tracking reference can also be included in WooCommerce order emails.
Configure tracking email notifications
↑ Back to topEnable automatic tracking notifications when customers should receive selected NZ Post shipment-status updates.
- Go to WooCommerce > Settings > Shipping > New Zealand Post.
- Enable Email Notifications.
- Save the settings.
The extension checks supported tracking information after an order is created and uses WordPress scheduled processing to recheck eligible orders.
Notifications can be sent for supported tracking milestones such as collection, depot processing, courier delivery, and delivered status.
Each supported status is recorded after the notification is sent to help avoid sending the same status email repeatedly.
If tracking notifications stop working, check both the NZ Post configuration and WordPress scheduled tasks.
Use the NZ Post shipment dashboard
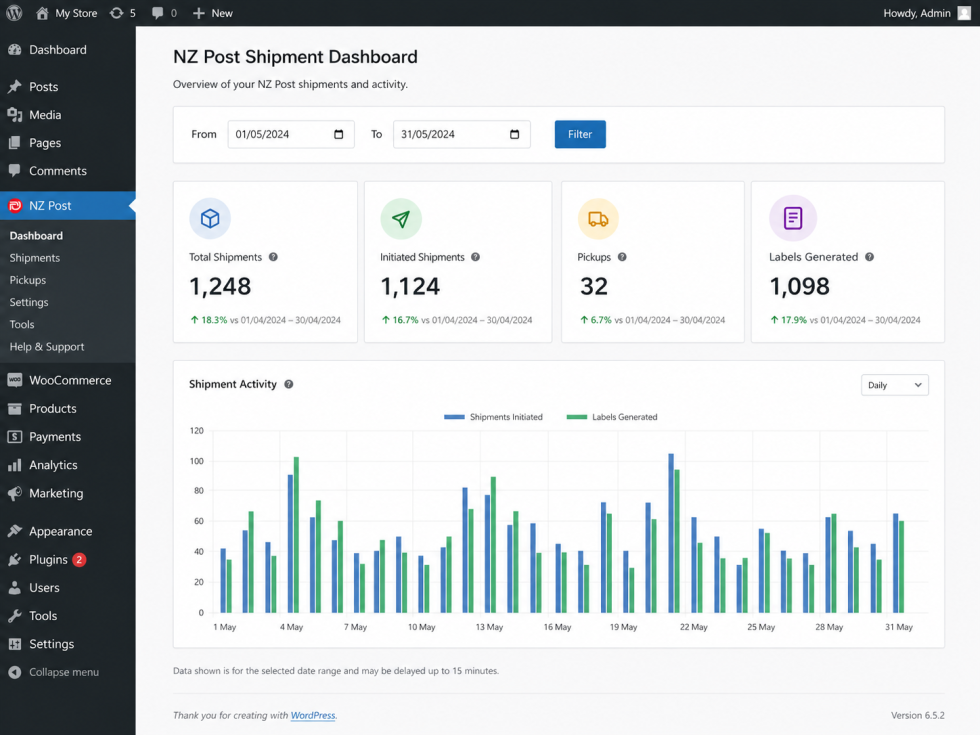
↑ Back to topWordPress administrators can go to NZ Post > Dashboard to review shipment activity recorded by the extension.
The dashboard shows:
- Total Shipments.
- Initiated Shipments.
- Pickups.
- Labels Generated.
Use the From and To date fields and select Filter to review activity for a selected period.
The dashboard is an operational view of activity recorded in WooCommerce. Use the appropriate NZ Post reporting for carrier billing or contractual reporting.
Use Sandbox Mode
↑ Back to topSandbox Mode configures supported NZ Post requests for the UAT environment.
Go to WooCommerce > Settings > Shipping > New Zealand Post and enable Sandbox Mode while testing with NZ Post UAT.
Disable Sandbox Mode when the store is ready to use the NZ Post Production environment.
Before moving a configuration to Production:
- Confirm the configuration works in UAT.
- Confirm the NZ Post application has Production access.
- Confirm the Production account details and credentials.
- Disable Sandbox Mode.
- Save the settings.
- Place a domestic test order.
- Test an international order if international shipping is enabled.
- Generate a label if the store uses labels.
- Test address, collection-point, and tracking features used by the store.
Use Debug Mode
↑ Back to topEnable Debug Mode temporarily when troubleshooting shipping calculations or an NZ Post connection.
- Go to WooCommerce > Settings > Shipping > New Zealand Post.
- Enable Debug Mode.
- Save the settings.
- Reproduce the problem.
- Review the relevant checkout information and WooCommerce logs.
- Disable Debug Mode after troubleshooting.
When contacting support, provide the approximate time of the failed request, the affected order or destination, and relevant error information.
Do not provide Client Secrets or access tokens.
Legacy API modes
↑ Back to topExisting installations can still display older API modes, including:
- RateFinder API.
- ShippingOption API.
- ShippingOption v2 API.
Use ShippingOption v2 API for new configurations.
RateFinder is a legacy NZ Post API. Its configuration uses an API Key rather than the ShippingOptions v2 merchant OAuth configuration.
The older ShippingOption API can also display legacy credential fields such as Client ID, Client Secret, Username, Account Number, and Site Code.
If an existing store still depends on a legacy API mode, test the move to ShippingOptions v2 in a staging or UAT environment before changing the live checkout.
Troubleshooting
↑ Back to topNo NZ Post rates are available
↑ Back to topCheck the following:
- The store currency is NZD.
- The WooCommerce base country/region is New Zealand.
- The store address and origin postcode are correct.
- Every physical product in the cart has a weight and dimensions.
- The correct New Zealand Post shipping method is enabled in the customer’s shipping zone.
- ShippingOptions v2 has the merchant’s Client ID and Client Secret.
- The Account Number and Site Code or Auth Code are correct.
- The NZ Post application has access to Shipping Options.
- Sandbox Mode matches the NZ Post environment for the credentials being used.
- The customer’s address is valid.
- The required service is enabled in the shipping-method settings.
- The parcel is eligible for at least one NZ Post service.
Enable Debug Mode temporarily and reproduce the checkout if the cause is still unclear.
Authentication fails after updating
↑ Back to topIf the store previously used ShippingOptions v2 without merchant-specific Client ID and Client Secret values, enter the credentials belonging to the merchant’s own NZ Post application.
Do not paste an OAuth Bearer token into a plugin setting. The extension obtains and manages access tokens automatically.
Also confirm that the credentials belong to the selected UAT or Production environment and that NZ Post has approved the application for the APIs being used.
UAT works but Production does not
↑ Back to topConfirm that Sandbox Mode is disabled and that the NZ Post application has Production access.
Working UAT credentials or permissions do not automatically confirm Production access.
Domestic rates changed after updating
↑ Back to topThe ShippingOptions v2 compatibility release uses NZ Post’s current Domestic ShippingOptions request flow.
After updating, test representative orders including:
- A single parcel.
- Multiple products.
- Box-packed products.
- Rural addresses.
- Signature or photo requirements where used.
- The store’s normal GST configuration.
If a price still appears incorrect, record the products, destination, packing configuration, service, and calculated amount before contacting support.
International rates are not available
↑ Back to topConfirm that the destination is supported and that the products have valid dimensions and weights.
Also confirm that the relevant international NZ Post services are enabled and available to the account.
Domestic and international ShippingOptions requests use different NZ Post request flows, so a working domestic test does not by itself confirm that international shipping will return rates.
Rates work but labels do not
↑ Back to topShipping Options and Parcel Label are separate NZ Post capabilities.
Confirm that:
- auto-generate Shipping Options Label is enabled.
- The NZ Post application has the required Parcel Label access.
- The order used the New Zealand Post shipping method.
- The NZ Post consignment was created successfully.
For a collection-point order, also confirm that the application has the API access required for the related collection-point and collection-label workflow.
The customer’s address is rejected
↑ Back to topCheck the street, suburb or city, postcode, and country.
If address autocomplete is enabled, select a matching NZ Post address suggestion rather than entering a different version manually.
The address needs to be recognized by the applicable NZ Post address service for supported validation and collection-point workflows.
Collection points are not displayed
↑ Back to topConfirm that:
- The customer has entered a valid New Zealand address.
- The merchant’s NZ Post application has the required address and collection-point access.
- NZ Post returns eligible collection points for the address.
- The checkout being used displays the extension’s collection-point fields correctly.
Local Pickup (Multiple Locations) has no locations
↑ Back to topCheck the shipping zone first.
The method builds its list of available NZ Post pickup locations from postcode locations configured for that shipping zone.
Confirm that:
- The shipping zone includes suitable postcode rules.
- The method has been saved after the zone configuration.
- NZ Post returns collection points for the configured postcode area.
The free-shipping progress bar does not match checkout
↑ Back to topThe progress bar reads the threshold from a WooCommerce Free shipping method.
Review:
- The minimum amount on the WooCommerce Free shipping method.
- The New Zealand Post free-shipping eligibility settings.
- Whether the customer is logged in when using current-order or last-order eligibility.
Keep these settings aligned so the progress message reflects the shipping offer the customer can actually receive.
Role Based Shipping is not available when adding a shipping method
↑ Back to topGo to WooCommerce > Settings > Shipping > New Zealand Post, enable Role-Based Shipping, and save the settings.
Then return to the shipping zone and add Role Based Shipping.
Tracking information is not available
↑ Back to topConfirm that the order has a completed NZ Post consignment and a tracking reference.
If the order does not have a tracking reference, investigate label and consignment generation first.
Tracking emails are not being sent
↑ Back to topConfirm that:
- Email Notifications is enabled.
- The order has an NZ Post tracking reference.
- NZ Post is returning supported tracking events.
- WordPress scheduled tasks are running.
- The site can send normal WordPress email.
Debug information contains sensitive data
↑ Back to topDo not publish or share a log until you have checked it for private information.
Client Secrets and OAuth access tokens should never be included in a support request.
Best practices
↑ Back to top- Use NZ Post application credentials belonging to the merchant’s own integration.
- Keep the Client Secret private.
- Use UAT to test material shipping changes before applying them to Production.
- Maintain accurate product weights and dimensions.
- Keep the store address and origin postcode accurate.
- Use box packing when it reflects the way the business actually fulfills orders.
- Test rural addresses if the store regularly ships to rural destinations.
- Test domestic and international shipping separately.
- After changing NZ Post credentials or API permissions, retest rates, labels, addresses, collection points, and tracking used by the store.
- Enable Debug Mode only while troubleshooting.
- Keep WordPress, WooCommerce, and New Zealand Post for WooCommerce updated.
- Test important checkout workflows on a staging store before a major update where possible.
Questions and support
↑ Back to topIf the issue cannot be resolved using the steps above, submit a support request for New Zealand Post for WooCommerce through WooCommerce.com.
Include:
- A clear description of the problem.
- What you expected to happen.
- What happened instead.
- An example order ID where applicable.
- Whether the problem affects domestic or international shipping.
- Whether Sandbox Mode is enabled.
- The approximate time the problem occurred.
- Relevant WooCommerce logs with sensitive information removed.
- The WooCommerce system status report if requested by support.
For authentication or API-access problems, also state whether NZ Post has approved the merchant application for the affected API and environment.