Extend B2B ECommerce – AIO is an all-in-one wholesale suite for WooCommerce stores, packed with features that allow you to cater to your business buyers and their unique needs.
Core Features of Extend B2B ECommerce – AIO for WooCommerce
↑ Back to top- B2B Quotes
- Price List
- Custom User Roles
- Catalog Price Visibility
- Sign Up Form Generator
- Minimum/Maximum Order Quantity
- Minimum/Maximum Order Value
- B2B Payment Terms on Checkout Page
- Reorder
- Quick Order
- Product Table
- Company Dashboard
Requirements
↑ Back to topB2B eCommerce for WooCommerce requires:
- WooCommerce 3.3+.
Plugin Installation
↑ Back to topInstallation of the Extend B2B Ecommerce – AIO plugin is a straightforward process. Once you have received your plugin file with a valid license. You can proceed with the installation process by following the steps below.
- Log in to the Admin Dashboard of your store and click on the Add Plugin option under the Plugins menu on the left side of the dashboard.
- Once reloaded, the dashboard will give you a new page with the title Add Plugin. Click the link to proceed with the new page.
- Right next to the page title, you will find a button namely Upload Plugin. Upon clicking that button, you will be presented with the option to upload the plugin.
- Simply click the Choose File button to locate and upload the plugin and then click the Install Now button to install the plugin on your store.
- After the upload and installation process is finished. You will be presented with the Activate button option, which you can click to activate the plugin.
Moreover, we have also made a quick video, shared below, to explain the installation process of the B2B Ecommerce for WooCommerce plugin.
Configuration
↑ Back to topThis guide provides a step-by-step walkthrough of the Extend B2B ECommerce – AIO features in WooCommerce, helping store owners configure and manage advanced B2B functionalities with ease. From creating custom sign-up forms and managing user roles to setting price lists, minimum order rules, payment terms, visibility restrictions, quick order forms, and quotes, each section is designed to give you complete control over your store’s B2B operations.
Whether you’re looking to restrict access for guest users, define flexible pricing strategies, or streamline ordering for wholesale customers, this guide will help you set up and manage all rules effectively.
Sign Up Form
↑ Back to top1. Navigate to Sign Up Forms
↑ Back to top- Under Extend B2B, Click on Sign Up Form to open the Manage Sign Up Forms page.
- From here, click on Add New Sign Up Form.

2. Form Editor Screen
↑ Back to topWhen you click Add New Sign Up Form, you will be taken to the form editor screen:
- Left Side (Editor Area):
- Add a title for your form.
- Use the block editor to insert fields (e.g., Text Field, Phone Field, Username, Email, etc.) to build your custom signup form.
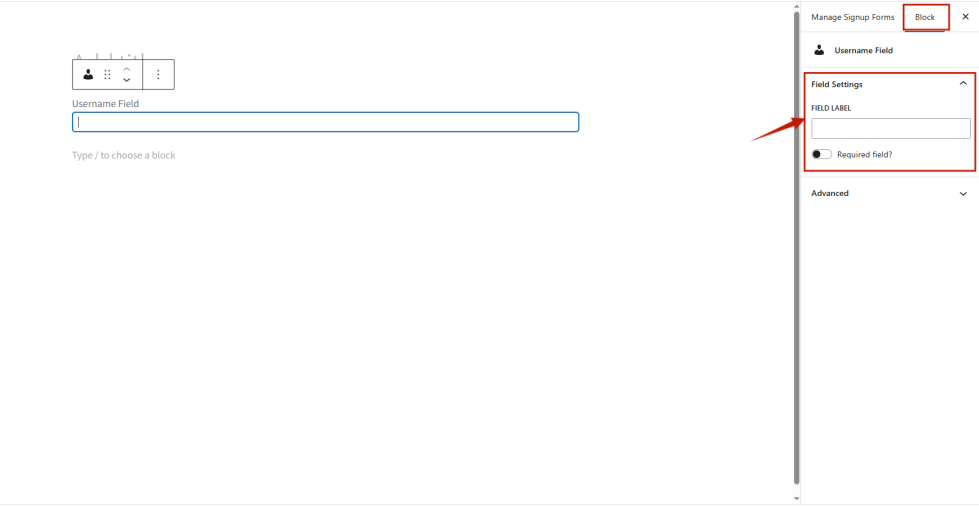
- Right Side (Settings Panel):
- Manage Sign Up Form Section:
- Require Admin Approval – Enable this option if you want all signups to be sent for admin approval before users can log in.
- Manage Sign Up Form Section:

- Block Section:
- Edit field labels.
- Mark fields as Required if necessary.
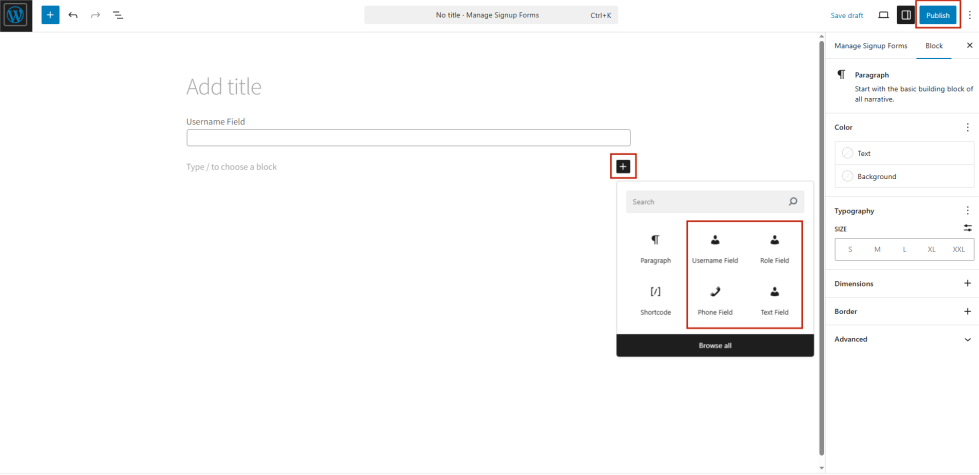
3. Adding Fields
↑ Back to topTo add fields:
- Click on Add Block.
- Select from the available field types, including:
- ZIP Code, Phone, Date, Text, Username, Email, First Name, Last Name, Company, Address Line 1, Address Line 2, City, State, Country, Role, Select (Dropdown), Checkbox
Note: You can add as many fields as needed to create a customized signup form.
4. Publish the Form
↑ Back to top- Once you have added and configured all the required fields, click Publish.
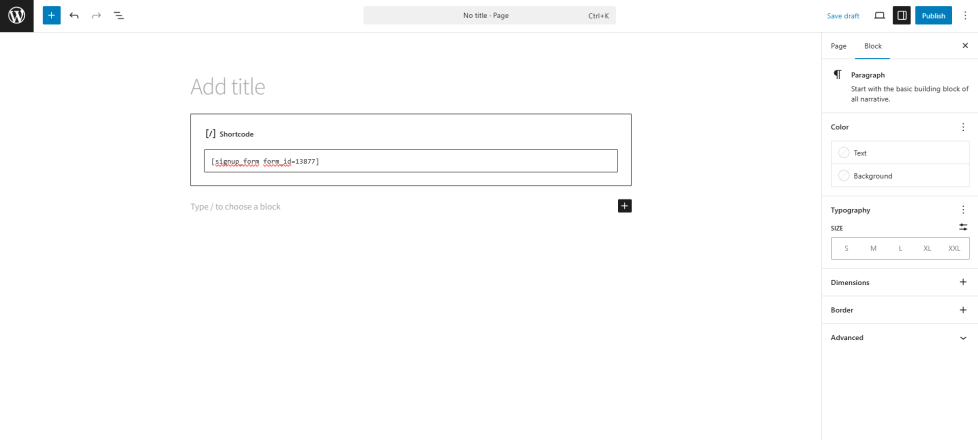
Display Sign Up Form
↑ Back to top- Copy the shortcode present under ‘Manage Sign Up Form’
- Navigate to WooCommerce > Pages.

- Either create a new page or edit an existing page.
- Paste the shortcode into the page editor.
- Save/Publish the page.
Sign Up Entries
↑ Back to topThe Sign Up Entries section allows you to view and manage all user signups submitted through the custom signup form.
1. Viewing Entries
↑ Back to top- This page displays a list of all signups submitted by users.
- You can browse through the list and click on any entry to view more details.
2. Entry Details
↑ Back to topWhen you click on a signup entry, you will be taken to a detailed view with the following options:
- User Profile: Clicking this will redirect you to the WooCommerce Users page, where you can view the complete profile of the user.
- Status Actions
From here, you can manage the user’s signup status:- Pending – Default status assigned to all new signups until reviewed by an admin.
- Approve – Grants the user access to log in.
- Reject – Denies the user access.
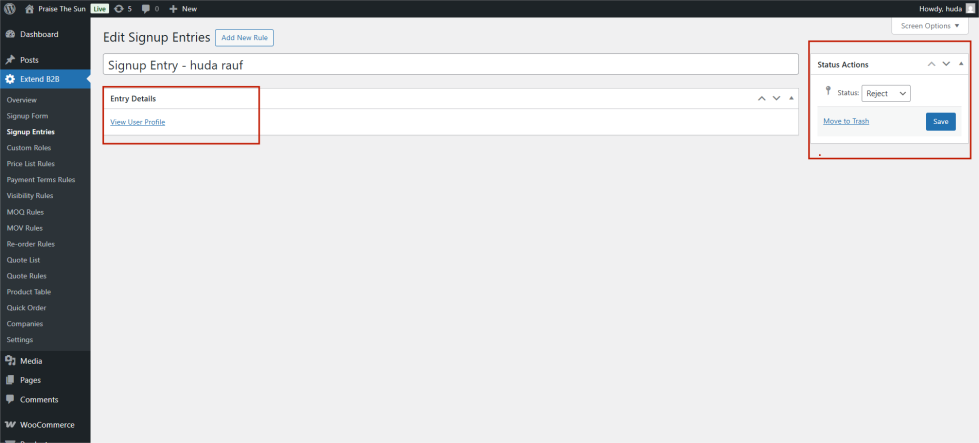
Note: If a user was previously approved but later marked as Rejected, clicking Save will immediately revoke their login access.
Custom Role
↑ Back to topThe Custom Role feature in Extend B2B AIO allows you to create user roles with specific restrictions on payment methods, shipping methods, and tax classes.
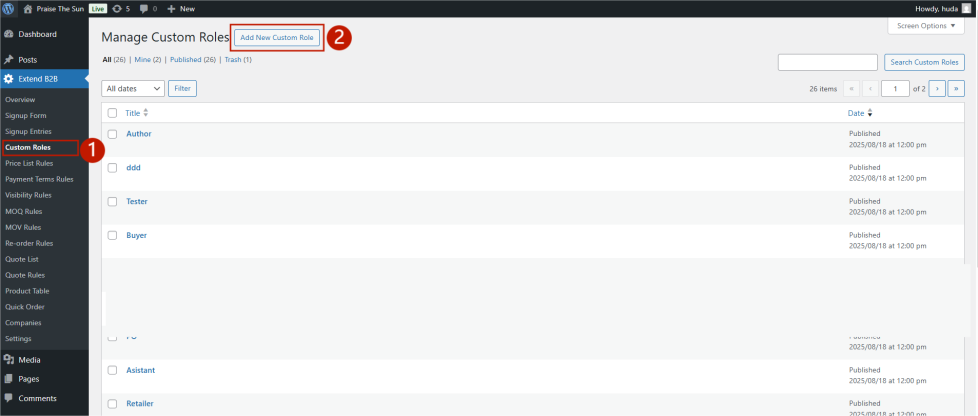
Create a Custom Role
↑ Back to top- From the WordPress admin sidebar, go to Extend B2B → Custom Roles.
- Click on Add New to create a new custom role
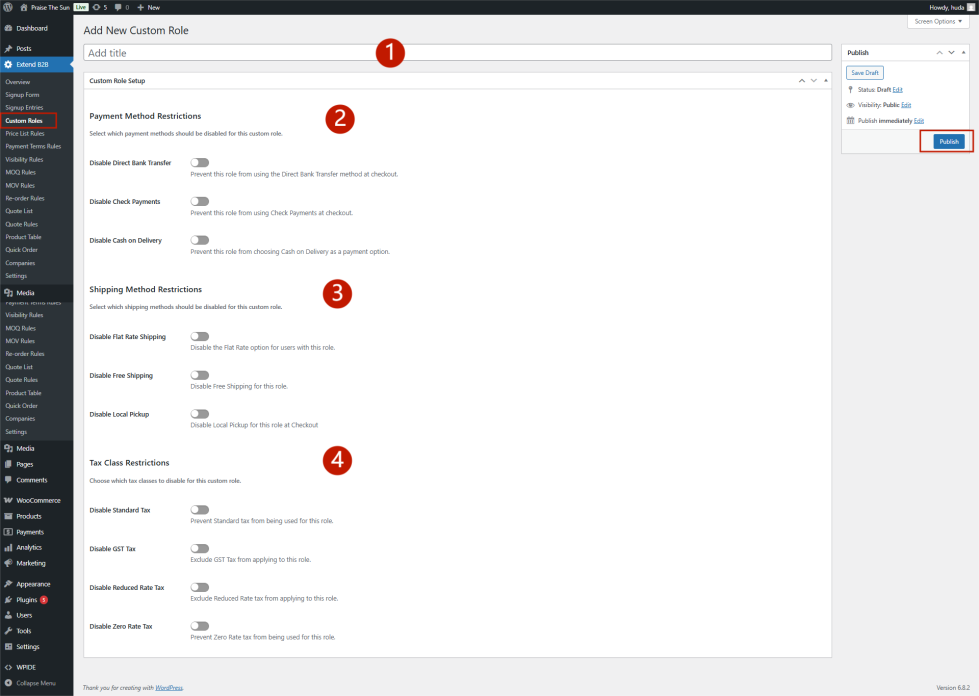
3. Enter a title for your custom role (e.g., Wholesale Customer, Distributor, etc.).
4. Configure Role Restrictions
5. Payment Method Restrictions: Toggle the switches to disable specific payment methods for this role:
- Disable Direct Bank Transfer – Prevents users with this role from using Direct Bank Transfer.
- Disable Check Payments – Prevents users from paying via Check Payments.
- Disable Cash on Delivery – Restricts users from selecting Cash on Delivery at checkout.
6. Shipping Method Restrictions: Choose which shipping methods to disable for this role:
- Disable Flat Rate Shipping – Removes the Flat Rate option.
- Disable Free Shipping – Prevents access to Free Shipping.
- Disable Local Pickup – Hides Local Pickup as a shipping option.
7. Tax Class Restrictions: Select which tax classes should not apply to this role:
- Disable Standard Tax – Excludes the standard tax rate.
- Disable GST Tax – Removes GST tax from applying.
- Disable Reduced Rate Tax – Disables the reduced tax rate.
- Disable Zero Rate Tax – Removes zero rate tax from being used.
8. Once you’ve configured all restrictions, click Publish on the right-hand panel. Your new custom role will now be available and can be assigned to users as needed.
Note: The Custom Role you have created will be listed in the User Roles drop down in Price List, Visibility, MOQ , MOV
Managing Custom Roles
↑ Back to topAfter creating a role, you can manage it from the Manage Custom Role screen, where you can:
- Edit existing roles
- Delete roles
- Search and filter roles
Payment Terms Rules
↑ Back to topThis allows you to create and manage custom payment terms rules for your WooCommerce store. These rules let you control how and when specific customers, roles, or locations can access certain payment methods.
Create Payment Term Rule
↑ Back to top- Navigate to: Extend B2B > Payment Term Rules.
- Click “Add New Rule.”
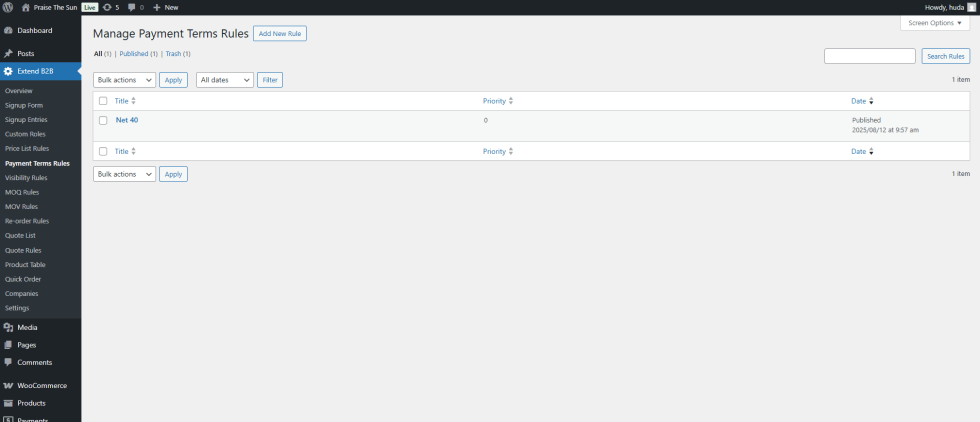
3. Configure the following settings:
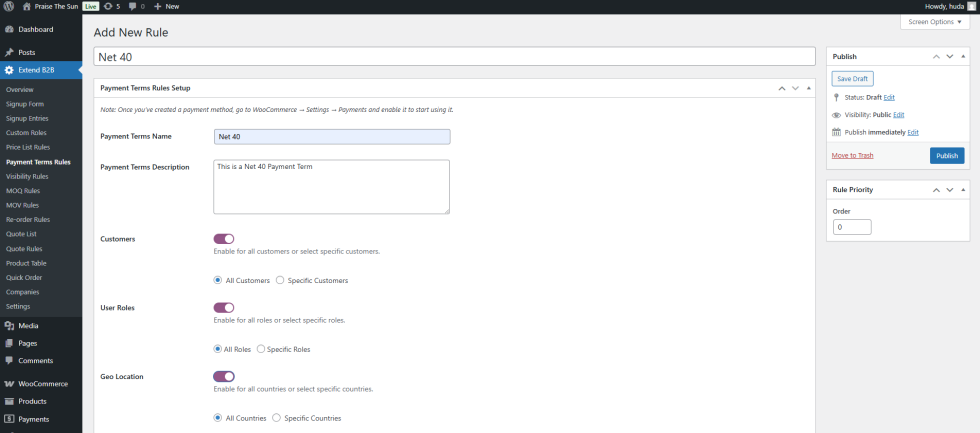
- Enter a title for your rule (e.g., Net 30 Payment for Wholesale Customers)
- Payment Terms Name: Provide the name of the payment term (e.g., Net 15, Cash on Delivery, Bank Transfer). This is displayed in the checkout for customers.
- Payment Terms Description: Add a description to explain the payment terms (e.g., Payment due within 15 days of invoice date).
4. You can restrict payment terms to specific customers, user roles, or geo locations.
- Customers — Toggle ON to enable this rule for all customers or specific customers.
- User Roles – Toggle ON to apply rules based on user roles
- Geo Location — Toggle ON to restrict payment terms by country or region.
- Enter a priority number under Rule Priority → Order. Lower numbers = higher priority.
5. Click “Publish” to activate the rule.
Price List Rules
↑ Back to topCreate a Price List Rule
↑ Back to topTo create a price list rule, follow these steps:
Navigate to: Extend B2B > Price List Rules.
- Click “Add New Rule.”
- Enter a Rule Title for easy identification.
- Define Rule Criteria:
- Customers – Apply the rule to all customers or specific ones.
- User Roles – Apply to all roles or selected ones.
- Geo-Location – Apply globally or restrict to specific countries.
- Select Pricing Adjustment Method:
- Reduce Price by Percentage – Deduct a percentage from the original price.
Formula:
Final Price = Original Price – (Original Price * Percentage ) - Set a New Price – Override the existing price with a fixed amount.
- Reduce Price by Percentage – Deduct a percentage from the original price.
- Configure Product List:
- Manual Entry via UI: Manually update prices and volume pricing breaks directly in the interface.
- Bulk Price List Update via CSV:
- Download the CSV template, which contains the following columns:
- Price List ID
- Product Names
- SKU
- Product ID
- Description
- Original Price
- Updated Price
- Volume Pricing
- Add the updated prices in the Updated Price column and define volume pricing rules.
- Format volume pricing rules as: Quantity | Price (e.g., 5|30, 6|50).
- Upload the completed CSV to update the prices efficiently instead of manual entry.
- Download the CSV template, which contains the following columns:
- Select Price List Scope: Apply the price list to specific user roles, geo-locations, or customers.
- Choose Pricing Adjustment Option: The updated price and volume pricing rules will apply based on your selected pricing method (New Price or Reduce by Percentage).
- Set Default Catalog Price:
- Enable this option to apply a single default price across the entire catalog.
- If you update a price in a specific price list, only that product’s price will change, while the rest will retain the default price.
Note: This feature is interlinked with the “Pricing Adjustment Method” So, if you have selected fixed there then a fixed amount be applied across catalog , if you selected ‘Reduce by Percentage’ then a percentage of the number will applied across the catalog
- Set Rule Priority: Lower values apply first when multiple rules exist.
- Click “Publish” to activate the rule.

Managing Price List Rules
↑ Back to top- View and manage rules under the Manage Price List Rules section.
- Edit, delete, search, and filter rules as needed.

Bulk Price List Update via CSV
↑ Back to top- Click “Upload CSV” to access the settings screen.

2. Download the CSV file, which includes all created price lists along with their products. Adjust product prices and add volume pricing rules in the following format:
- Quantity Break | New Price (e.g., 5|20, 10|30 where 5 is the quantity break and 20 is the new price).
3. The prices will update automatically based on the selected Pricing Adjustment Method.
4. Re-upload the modified CSV to apply changes across all price lists.

Note: The bulk CSV upload option updates all price lists, whereas the CSV upload in the specific price list rule section updates only that particular price list.
MoQ (Minimum Order Quantity) Rules
↑ Back to topAdding a New MOQ Rule
↑ Back to top- Navigate to: Extend B2B > MoQ Rules.
- Click “Add New Rule.”
- Configure the following settings:
- Apply to Entire Catalog – Enable to apply MOQ settings to all products; if disabled, select specific products or categories on which MOQ will be applied.
- Next, Set a minimum and/or maximum quantity. You can leave either field empty.
- Quantity Multiplier – Set a multiplier value for quantity increments. How this works is you can set a minimum/quantity and then set an increment if you add a min value of 3 and increment of 2 then the quantity will work in the multiples of 2. None of these three fields are mandatory; you can add min and not max and not increment.
- Customers – Apply to all or selected customers.
- User Roles – Apply to all or specific roles.
- Geo-Location – Apply globally or restrict to selected countries.
- Click “Publish” to apply the rule.

Managing MOQ Rules
↑ Back to top- View, edit, delete, search, and filter MOQ rules under the Manage MoQ Rules screen.

MOV (Minimum Order Volume) Rules
↑ Back to topAdding a New MOV Rule
↑ Back to top- Navigate to: Extend B2B > MoV Rules.
- Click “Add New Rule.”
- Configure the following settings:
- Order Volume Range – Set the minimum and maximum volume required per order.
- Customers – Apply to all or selected customers.
- User Roles – Apply to all or specific roles.
- Geo-Location – Apply globally or restrict to selected countries.
- Click “Publish” to activate the rule.

Managing MOV Rules
↑ Back to top- View, edit, delete, search, and filter MOV rules under the Manage MoV Rules screen.

Visibility Rules
↑ Back to topCreate Visibility Rule
↑ Back to top- Navigate to Extend B2B > Visibility Rules
- Click “Add New Rule”

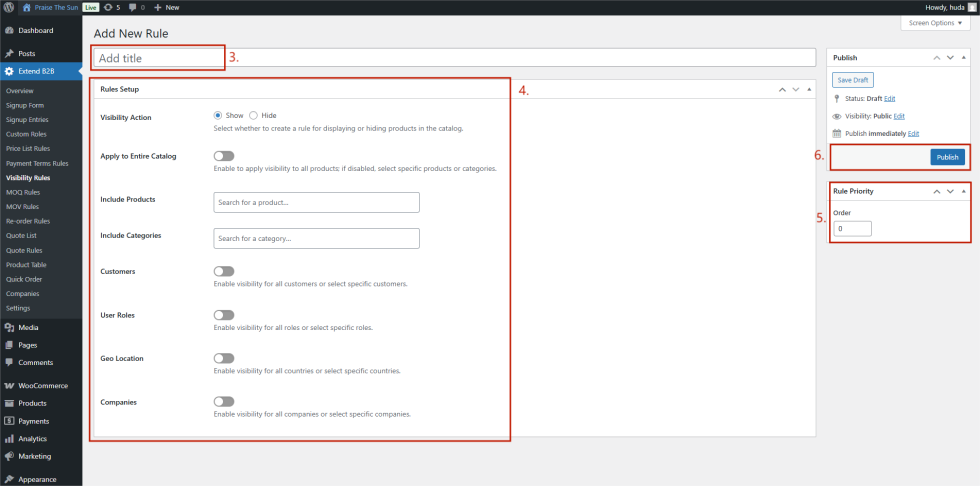
3. Enter Title for Price List Rule: Enter the title for the Price List Rule. This title will help you easily identify and manage the rule later on the Manage Price List Rules screen.
4. Define the Rule Criteria
- Rule Title – A unique name for reference.
- Visibility Action – Choose whether to show or hide selected products in the catalog.
- Apply to Entire Catalog – Enable to apply the rule store-wide, or disable to target specific products/categories.
- Customers – Apply to all customers or select specific ones.
- User Roles – Apply to all user roles or specific ones.
- Geo-Location – Apply globally or restrict to selected countries.
5. Set Rule Priority – Define execution order (lower values run first).
6. Click “Publish” to activate the rule.
Restrict Product prices, catalog, and pages for guest (non-logged-in) users.
↑ Back to top- Navigate to Extend B2B > Settings > Catalog Visibility.
- Configure the following settings:
- Hide Catalog Prices for Non-Logged-in Users: Enable to hide prices for guests.
- Hide Entire Catalog: If enabled, choose to hide prices for all products, if not then select specific products/categories.
- Hide Products for Non-Logged-in Users: Enable to restrict product visibility for guests.
- Hide Entire Catalog: If enabled, choose to hide: Entire Catalog (All products). If not then select specific Products or Categories.
- Hide Pages for Non-Logged-in Users: Enable this toggle to Disable page access for users who are not logged in.
- Hide Entire Catalog: Enable this toggle to hide the entire store from non-logged-in users
- If you choose not to hide the entire store, you can select specific pages to restrict access.
- Set a redirection page to control where users are redirected when they try to access a hidden page.

Re-Order Rules
Create Re-Order Rule
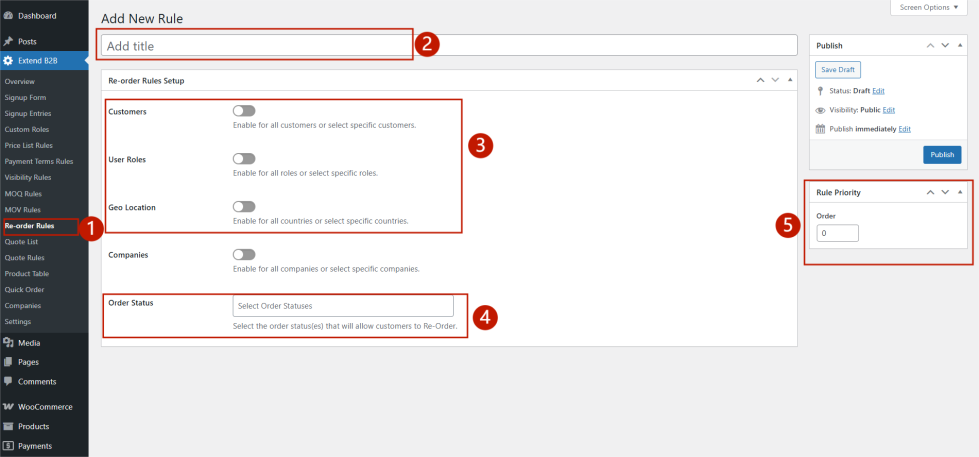
↑ Back to top- Navigate to: Extend B2B > ReOrder Rules.
- Click “Add New Rule.”
- Configure the following settings:
- Customers – Apply to all or selected customers.
- User Roles – Apply to all or specific roles.
- Geo-Location – Apply globally or restrict to selected countries.
- Order Status — Select the order status(es) that will allow customers to Re-Order.
- Click “Publish” to activate the rule.
Once saved, on the site, My Account -> Orders -> User will be able to see the Re-Order on the order that fulfill the Re-Order Rule
Quick Order
↑ Back to topCreate Quick Order Form
↑ Back to top- Navigate to: Extend B2B > Quick Order
- Click “Add New Quick Order”
- Add a title for your form.
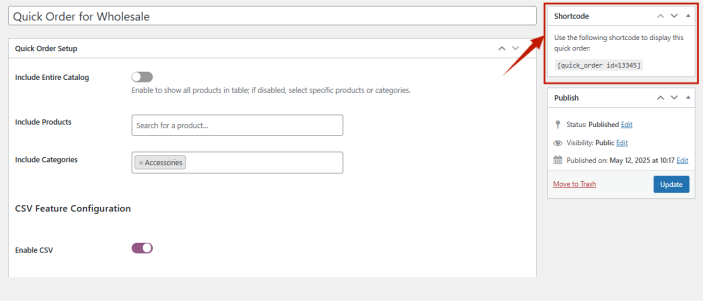
- Choose product scope:
- Include Entire Catalog —Enable the option to include all products in the quick order.
- If disabled, only selected products or categories will be available.
- Enable CSV Upload: Toggle on the CSV feature if you want users to upload product orders via CSV.
- Configure Table Field Labels:
Define the labels that will appear in the Quick Order table (e.g., Product Name, Price, Quantity). - Set Product Search Behavior:
Choose how product variants appear in search results:- Treat each variation as an individual product: Each variation (e.g., size, color) appears individually.
- Select main product, then choose variation: The main product appears once; variants are selected afterward
8. Copy the generated shortcode.
9. Click “Publish” to save your form.

Displaying a Quick Order
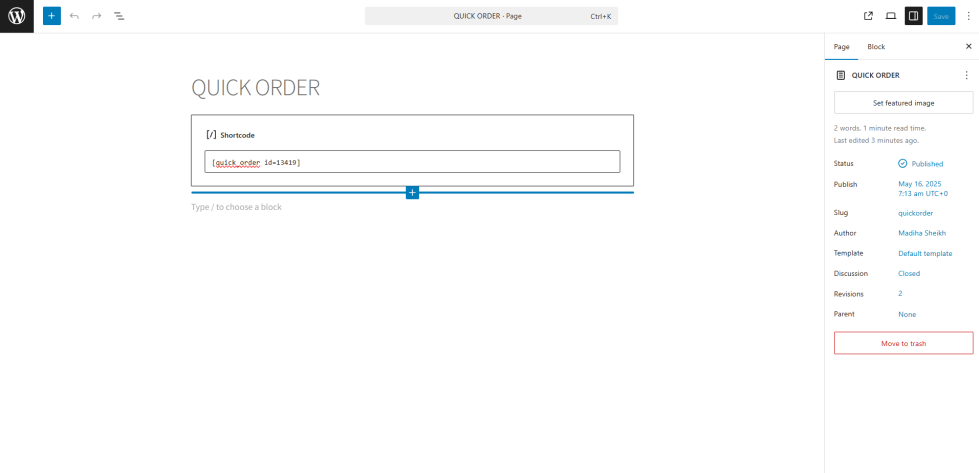
↑ Back to topTo show the form on a page:
- Go to Pages > Add New or edit an existing page.
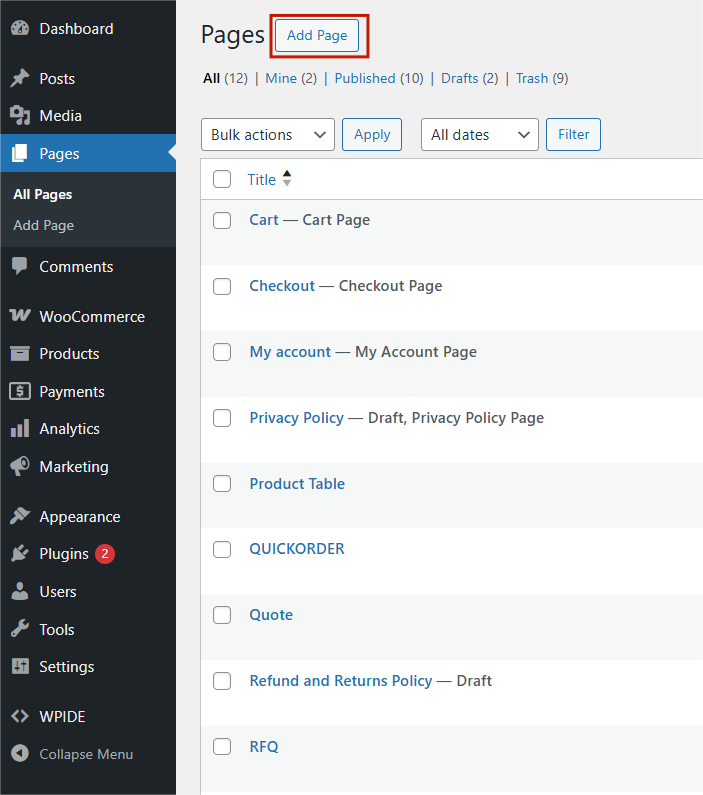
- Copy and Paste the copied shortcode into the content area.
- Publish or update the page
Companies
↑ Back to topThe Companies module allows merchants to create and manage B2B companies, assign users with specific roles and permissions, control purchasing behavior, and track orders, carts, and credit usage at a company level.
1. Creating a Company
↑ Back to topSteps
↑ Back to top- In the WordPress Admin, go to:
Extend B2B → Companies - You will be redirected to the Manage Companies screen.
- Click Add New Company.
- Fill in the following fields:
| Field | Description |
|---|---|
| Company Name | The company’s display name (required). |
| Credit | Initial credit assigned to the company (optional). |
| Note | Internal note for admins (optional). |
| Company Owner | Must be an existing WordPress user. This user becomes the primary contact. |
5. Click Publish to save the company.
After Publishing
↑ Back to top- The company will appear in the Companies list.
- The Credit History section will show the primary credit assigned.
- Under Company Setup, you will see the list of users — initially only the Company Owner.
- On the storefront, go to My Account → the newly created company will be visible there.
2. Roles & Permissions
↑ Back to topRoles define what actions company users are allowed to perform.
Creating a Role
↑ Back to top- Go to Extend B2B → [Selected Company] → Roles & Permissions.
- Enter a role name.
- Click Add Role.
- Select the permissions for the role.
- Save the role.
Available Permissions
↑ Back to top| Permission | Description |
|---|---|
| Add Users | Allows adding new users to the company. |
| Manage Roles | Allows creating and managing roles and permissions. |
| View Company Orders | Allows viewing all company orders and order history. |
| View Shared Cart | Allows viewing the shared company cart. |
| Complete Checkout | Allows placing orders and completing checkout. |
| Share Cart | Allows sharing cart items with other team members. |
| Approve or Reject Cart | Allows approving or rejecting shared carts before checkout. |
| Remove Users | Allows removing users from the company. |
| Use Company Credit | Allows using company credit at checkout. |
| View Credit Log | Allows viewing the company’s credit transaction history. |
| Manage Purchase Limits | Allows managing spending limits for company users. |
Once a role is created, any user assigned to that role will only be able to perform actions allowed by its permissions.
3. Adding Users to a Company
↑ Back to topSteps
- Go to Extend B2B → Companies → [Select Company] → Users.
- Click Add User.
- Fill in the required user details.
- Assign a role.
- Click Add User.
Behavior
↑ Back to topOn the storefront, their access and behavior will be controlled entirely by the assigned Company Role and permissions.
The user will be created in WordPress with the role Customer.
4. Company Orders
↑ Back to topIf the user has the View Company Orders permission:
- Order history is visible under My Account → [Select Company] → Company Orders.
- They can view all orders placed by users within the same company.
5. Company Carts
↑ Back to topIf the user has the View Shared Cart permission:
- They can view all carts shared by company users.
- Users with Share Cart permission will see a Share Cart button on the Cart page.
- Shared carts can be approved or rejected if the role includes that permission.
My Carts
↑ Back to topUsers can view carts shared with them under My Account → [Select Company ] -> My Carts.
6. Company Credit
↑ Back to topViewing Credit
Users with View Credit Log permission can:
- View all credit transactions under My Account → [Select Company ] → Credit Limit
- See credits added by admins and credits used by users.
Enabling Credit at Checkout
To allow users to use company credit:
- Only users with Use Company Credit permission will be able to select it at checkout.
- Go to Payments → Company Credit
- Enable Company Credit
7. Purchase Limits
↑ Back to topUsers with the Manage Purchase Limits permission can:
- Go to My Account → [Select Company] → Purchase Limit
- Set spending limits for each user.
- Select a renewal cycle (e.g., monthly).
Behavior
↑ Back to top- Users cannot place orders exceeding their assigned purchase limit
- Limits reset based on the selected cycle.
- Only orders placed within the current cycle count toward the limit.
Product Table
↑ Back to topCreate Product Table
↑ Back to top- Navigate to: Extend B2B > Product Table
- Click “Add New Table”
- Add a title for your table.
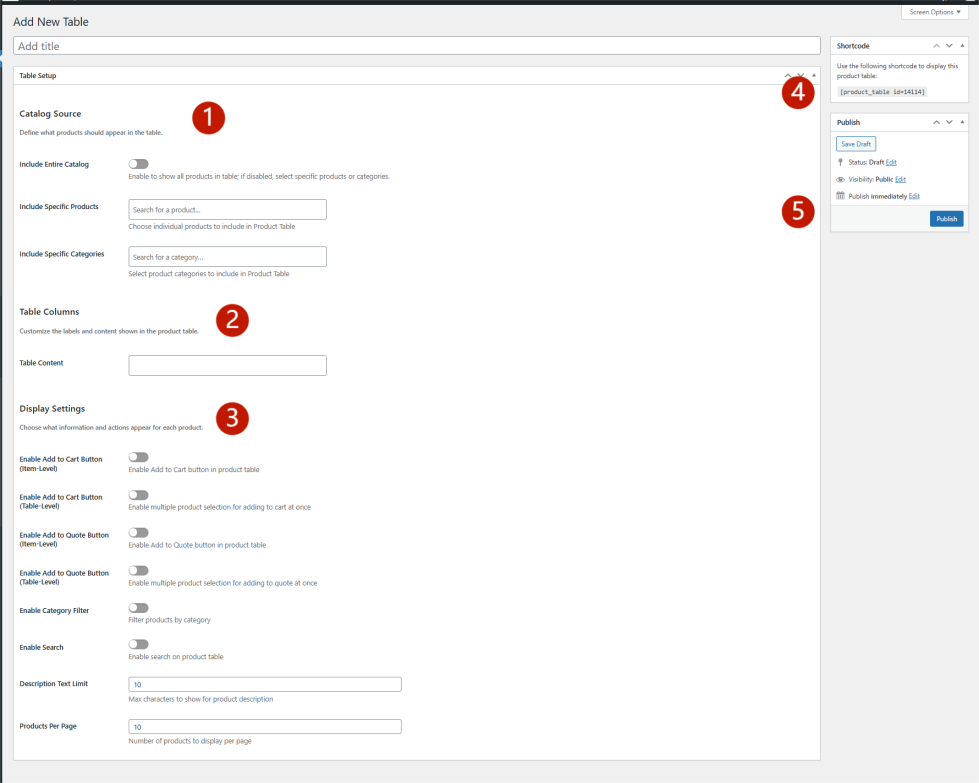
- Configure the following settings:
- Include Entire Catalog – Enable to show all products in table; if disabled, select specific products or categories.
- Table Columns – Choose columns to appear on the Product table from the dropdown
- Display Settings — Choose what information and actions appear for each product.
- Enable Add to Cart Button (Item-Level) — Enable Add to Cart button in product table on the item level
- Enable Add to Cart Button (Table-Level) — Enabling this will add ‘Add to Cart’ button and the top and bottom on the table.
- Enable Add to Quote Button (Item-Level) — Enable Add to Quote button in product table at item level
- Enable Add to Quote Button (Table-Level) — Enable multiple product selection for adding to quote at once.
- Enable Category — Filter products by category
- Enable Search — Enable search on product table
- Description Text Limit – Max characters to show for product description on the product table
- Products Per Page – Number of products to display per page of the table
- Copy the generated shortcode.
- Click “Publish” to save your form.
Displaying a Product Table
↑ Back to topTo show the Product table on a page:
- Go to Pages > Add New or edit an existing page.
- Copy and Paste the copied shortcode into the content area.
- Publish or update the page.
Quotes Rule
↑ Back to topCreate Quote Rule
↑ Back to top- Navigate to: Extend B2B > Quote Rules
- Click Add New Quote Rule.
- Configure the following:
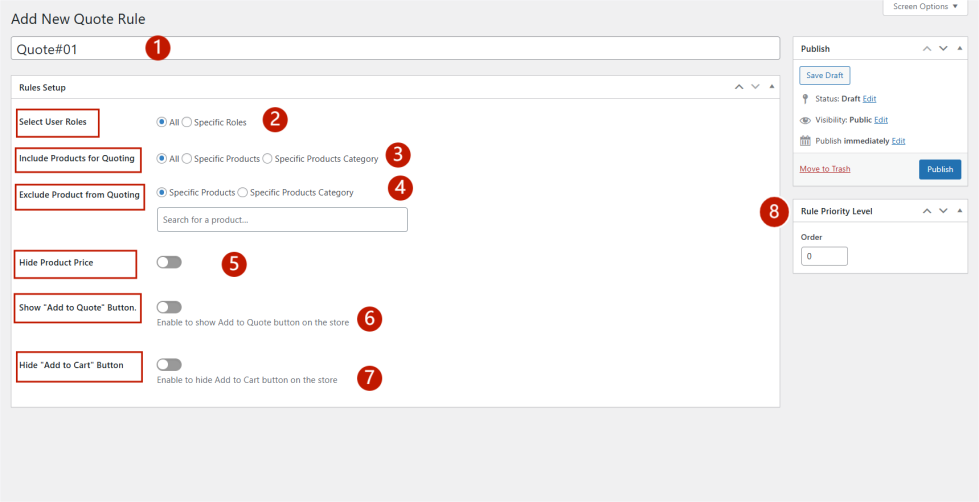
- Rule Title: A unique name for reference.
- Select User Roles: Choose whether the rule applies to all users or specific user roles.
- Include Products for Quoting: Choose specific products, all products, or product categories where the “Add to Quote” button will appear.
- Exclude Products for Quoting: Specify products or categories where the “Add to Quote” button should be hidden.
- Hide Product Prices: Toggle this option and set a custom message for hidden prices.
- Show “Add to Quote” Button: Enable the quote button on selected products.
- Hide “Add to Cart” Button: Replace the cart button with the quote button.
- Set Rule Priority: Define execution order (lower numbers run first).
- Click Publish to activate the rule.
- Confirm that the rule appears in Manage Quote Rules.
Quote Settings
Navigate to Extend B2B > Settings > Quotes to customize the following quote features:
- Enable Email Notifications:
- Quote Conversation Email: Notifies customers/admins of new messages when sent through Quote Conversation
- Quote Status Email: Alerts users when a quote status changes.
- Customize Button Labels:
- “Add to Quote”
- “Accept Quote”
- “Reject Quote”
- “Request Revision Quote”
- “View Quote”
- Click Save Changes to apply settings.

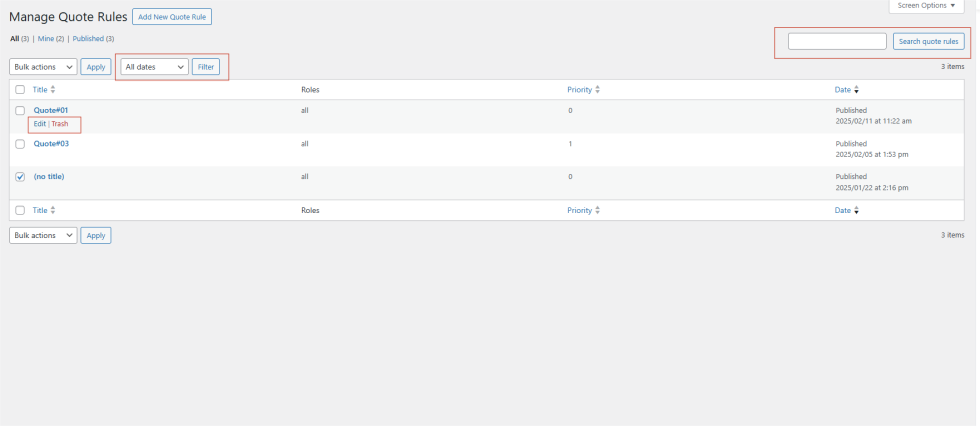
Manage Quote Rules
↑ Back to top- View all active rules in a grid format.
- Edit, delete, search, and filter rules by date.
Quote List
↑ Back to topThe Quote List section displays all submitted quotes. You can:
- View, edit, delete, and filter quotes by date.
- Click a quote to see details.

Viewing Quote Details
↑ Back to topClicking on a quote opens the Quote Details page, where you can review:
Customer Information
- Requestor Email: Email address of the intended recipient of the quote.
- Quote ID: Unique identifier for the quote.
- User Email: The email address associated with the logged-in user.
- Requestor Name: Name of the person requesting the quote.
Quoted Products
Below this section, you will find the products included in the quote. You can modify prices, add new products, or remove existing ones as needed.
- Modify prices
- Add/remove products

Updating Quote Status
Next is the Quote Actions section, where you can update the quote status. There are five available actions:
- New – The quote has been submitted by the customer and is awaiting review
- Quoted – The admin has responded with a proposed price and updated details.
- Accepted – The customer/admin has approved the quote and can proceed to checkout.
- Rejected – The customer/admin has declined the quote, and no further action is required.
- Request for Revision – The customer has requested modifications, such as price adjustments or quantity changes.
Click Save to notify the customer of the status update.

Quote Conversations
- Exchange messages with customers.
- Enter a message and click Send.
- Both you and the customer will receive an email notification whenever a new message is added.

Creating a Quote for a Customer
↑ Back to topAdmins can create quotes on behalf of customers:
- Click Add New Quote.
- Then, Enter Customer Information (Name & Email).
- Click Add Product(s)

- Select products, and enter quantities.

- Set a Proposed Price.
- Click Save to finalize the quote.