Customer Email Verification helps you to reduce registration spam and fake orders by requiring customers to verify their email address when they register an account or before they can place an order on your store.
It adds a crucial layer of security to your WooCommerce store by integrating an email verification step into the registration process. This ensures that only valid email addresses can be used to create accounts, reducing spam registrations, and increasing customer confidence.
Installation
↑ Back to topTo start using a product from WooCommerce.com, you can use the “Add to store” functionality on the order confirmation page or the My subscriptions section in your account.
- Navigate to My subscriptions.
- Find the Add to store button next to the product you’re planning to install.
- Follow the instructions on the screen, and the product will be automatically added to your store.
Alternative options and more information at:
Managing WooCommerce.com subscriptions.

Setup and configuration
↑ Back to top- From your store’s WP Admin dashboard, navigate to WooCommerce and click the Email Verification tab.
- Configure the following settings:
- OTP Length: Define the length of the OTP to be sent to users (e.g. 4, 6 digits).
- Email Template: Customize the email template used to send the OTP to match your store’s branding.
- OTP Expiry Time: Set the duration for which the OTP remains valid.
- Resend OTP: Configure options for users to request a new OTP if they do not receive the first one.
- Verification on Registration or Checkout: Choose whether the verification step should be required during registration, checkout, or both.
- After configuring the settings, click Save changes to apply them.

How it works
↑ Back to topYou can choose between two verification flows: Registration and Checkout. Depending on your business needs, you can activate one of the workflows or both.
1. Email verification flow: Registration
↑ Back to topOnce the extension is activated, it automatically integrates the email verification process into your WooCommerce registration. Here’s how it works for users:
Account registration:
- When a user fills out the registration form, they will be prompted to verify their email address by entering a one-time password (OTP).
- The OTP is immediately sent to the email address provided.
OTP verification:
- The user will receive an email with the OTP.
- They must enter this OTP in the popup that appears on the registration page.
Account creation and login:
- Upon entering the correct OTP, the email address is verified.
- The user’s account is created, they are logged in automatically, and redirected to their account page.
Managing unverified users:
Admins can remove unverified users automatically after a set number of days, helping to maintain a clean user database.
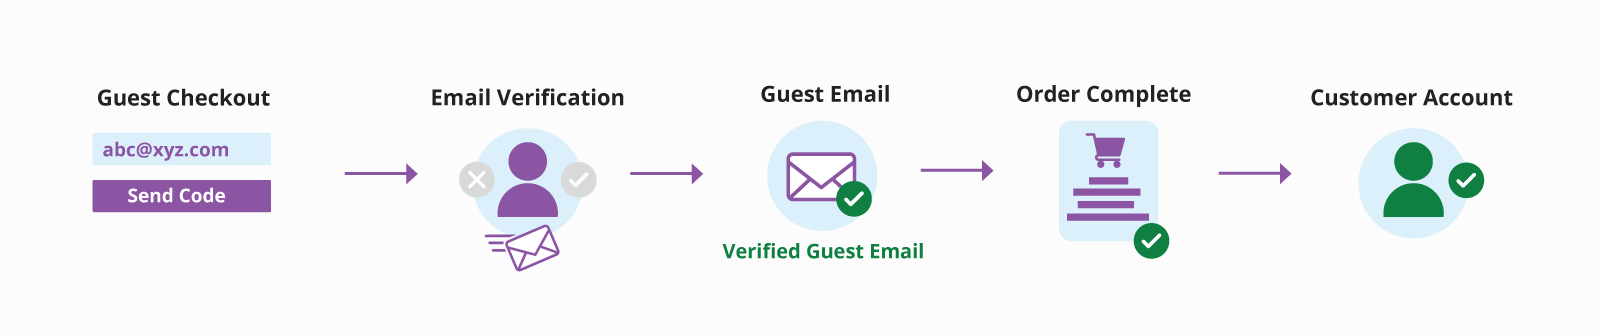
2. Email verification flow: Checkout
↑ Back to topThis option requires guest customers to verify their email address before they can proceed to checkout or before they can place an order. You can choose:
- A popup overlay verification before the customer enters checkout, or
- Inline verification that lets the customer proceed to checkout,disabling the option to complete the order until the customer’s email is verified.
Here’s how this works:
- Guest customer proceeds to checkout on your store.
- The verification popup overlay will allow the customer to enter his email address and the verification code and a verification link are sent to the new customer email address.
- Customers can verify their email by entering this code in the verification popup or by clicking on the verification link in the email.
- The customer is directed to checkout to complete their order.
- The customer created an account during checkout, the customer account will be flagged as Verified Email.
Customer experience
↑ Back to topVerification popup
↑ Back to topThe verification popup overlay will display when:
- The customer is not restricted to continue without verification.
- When a customer tries to log in to their account or to proceed to checkout.
The popup will display the verification message and the option to enter the verification code to confirm the email address. If the email was not received, the customer can request the verification email be resent.

Verification works after the customer enters the email address during checkout; the verification code and link will be sent to the customer and they will have the option to enter thisn code to verify their email address. If the email was not received, the customer can request the verification email be resent.

Verification email
↑ Back to top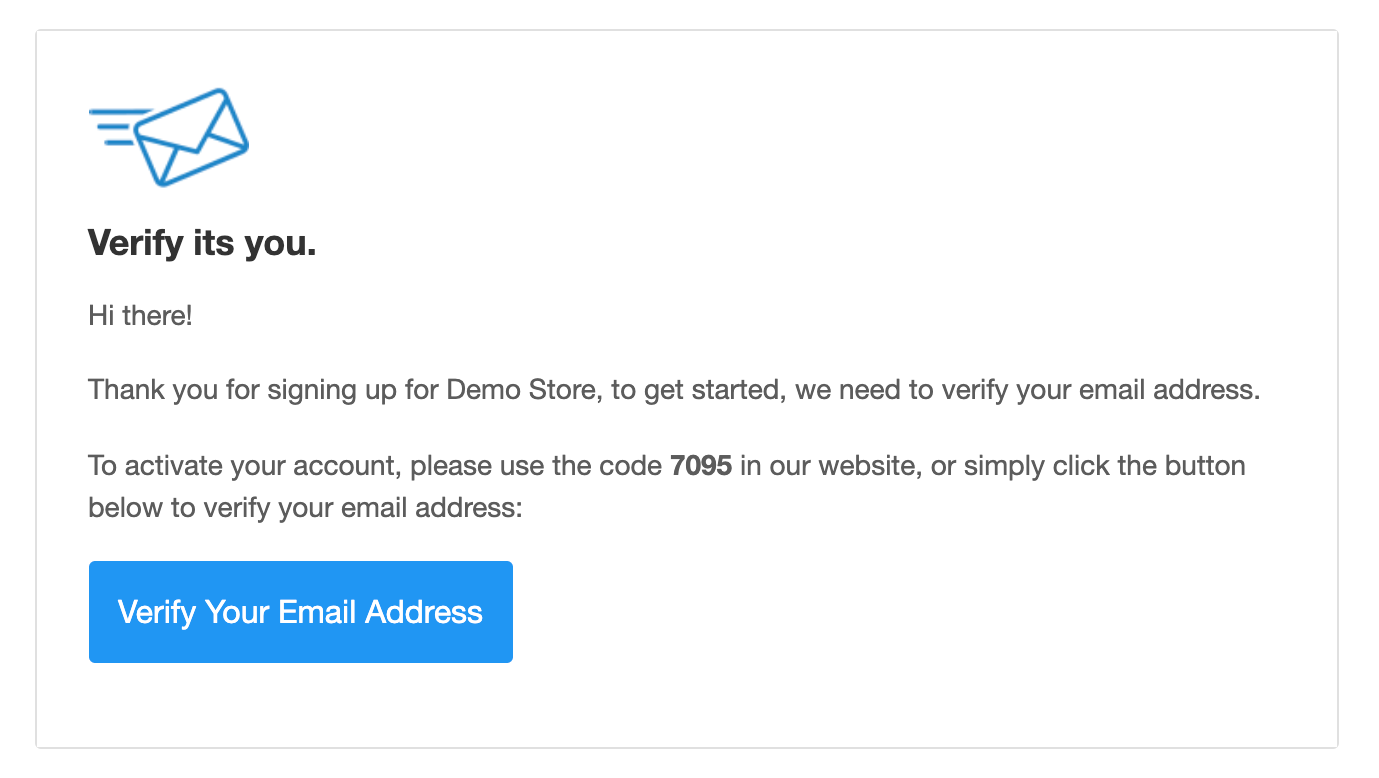
Email verification before checkout
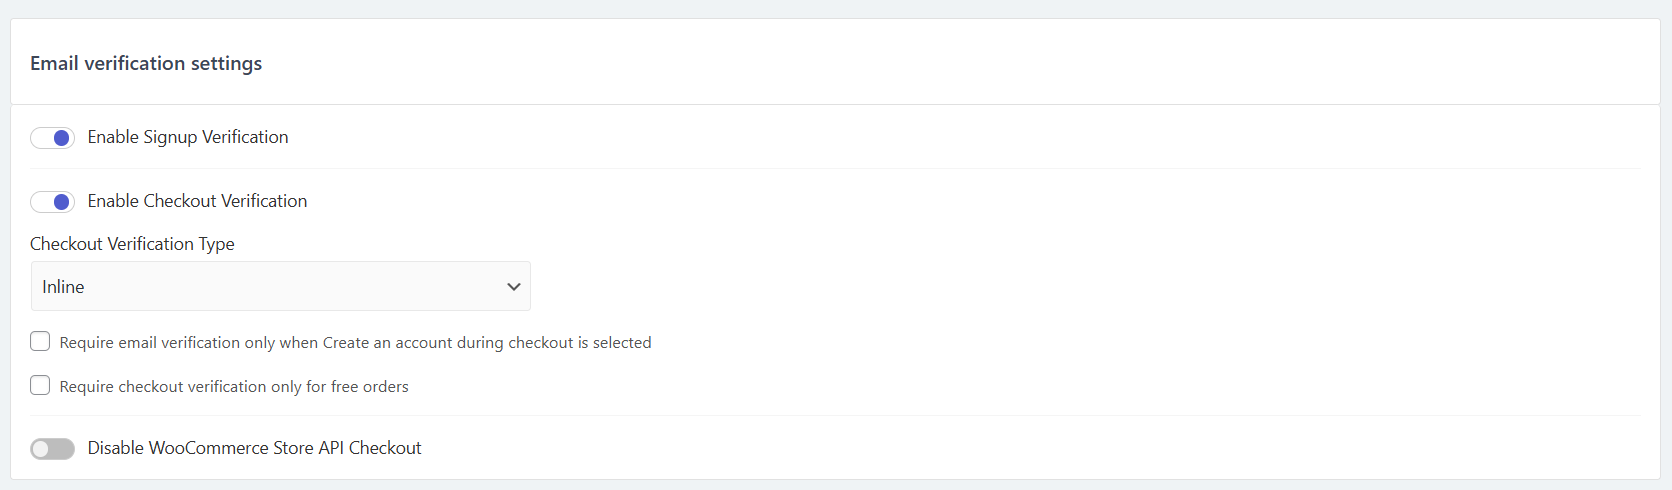
↑ Back to topIf you select the Enable Email verification before checkout option, registered customers that are flagged as Unverified Email — or guest customers — will not be able to checkout without verifying their email address. The extension adds a popup on the Checkout page that requires email verification before proceeding to checkout. The verification email will be sent to the customer and once they enter the verification code or click on the verification link, they will be redirected to checkout.
- Enable the email verification on cart page – enable the email verification before checkout.
- Require email verification only for Free Orders – this will require customers to verify their email address before checkout only when there is no payment (free products)
- Require email verification only when Create an account during checkout is selected
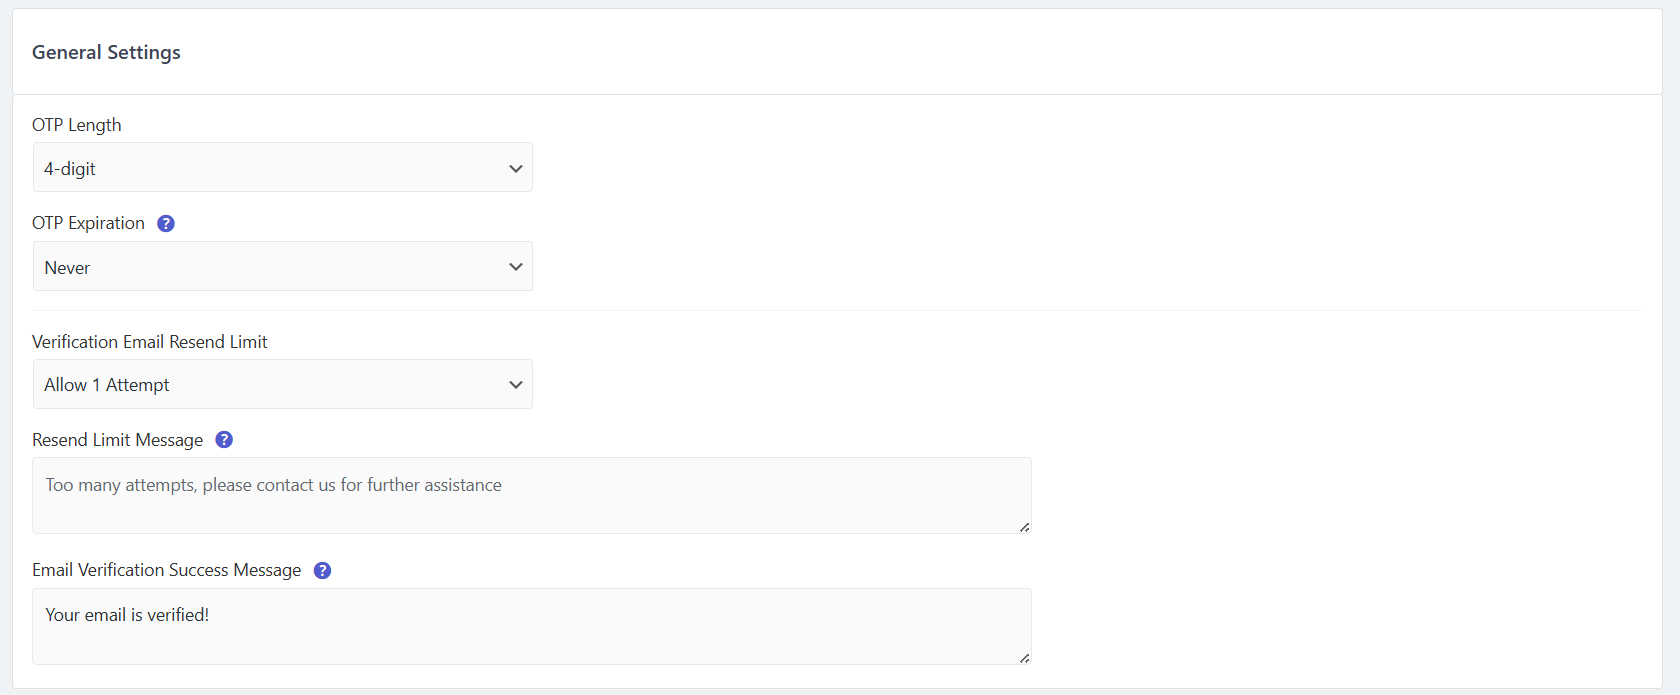
Email verification options
↑ Back to top- Verification success message – the message that will appear on the top of the my-account or checkout page after successful email verification.
- Verification code length – available options are 4 digits and 6-digits (defaults to 4 digits)
- Verification code expiration – choose if you wish to set expiry time to the verification code/link (defaults to Never):
- Never
- 10 min
- 30 min
- 1 hour
- 24 hours
- 72 hours
- Limit Resend – limit the amount of times the user can resend the verification email. Choose between once, three times, or never.
- Limit Resend Message – defaults to “Too many attempts.” You can use HTML to add a link to your contact page.
Customization
↑ Back to topYou can fully personalize and edit the content of the verification workflows and customize the verification popup overlay and emails design using a customizer with a live preview.
To customize the verification popup and email, go to WooCommerce > Email Verification via your store’s WP Admin dashboard, and click on the Customize option on the settings menu.
Customizer panels
↑ Back to top- Verification Popup
- Popup Style
- Popup Content – Registration/Checkout
- Verification Email
- Email Style
- Email Content – Registration/Checkout
Customize the popup design
↑ Back to top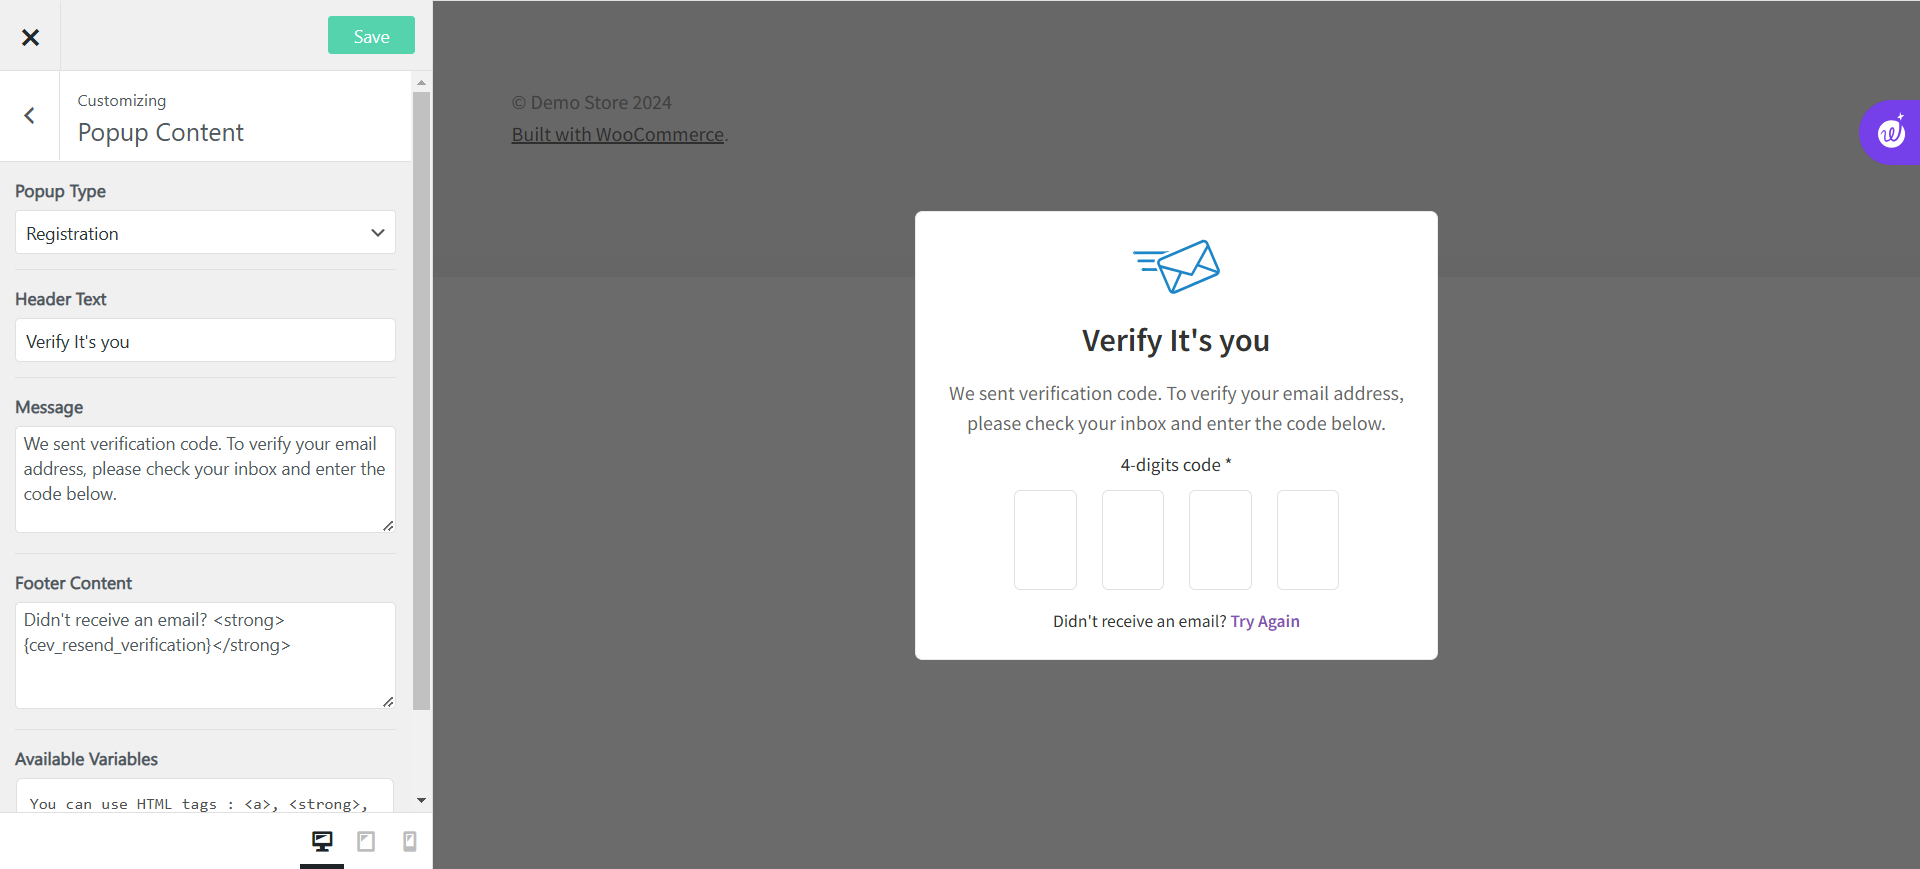
- Popup Background Color – select the widget background
- Overlay Background Color – select the lightbox overlay background color
- Content width – The popup widget width
- Content Padding – The popup widget padding
- Content Alignment – Center, Left
Popup header
- Header Image – choose image to display on the widget header
- Header image width – select the header image width
- Header font size
Verification button
- Button color
- Button font color
- Button font size
- Button Padding
- Expand Button – option to expand the button to full content width.
Customize the popup’s content
↑ Back to top
- Widget Type – navigate between the registration widget and the Checkout widget to customize the widget content
- Header text – Select the title for the Widget. Defaults to: “Verify it’s you.”
- Content message – defaults to “We sent verification code to
{customer_email}. To verify your email address, please check your inbox and enter the code below.” - Additional Footer text – Select the title for the Widget. Defaults to: “Didn’t receive an email?
{cev-resend-verification}” - Button Text – the verification button text (verify code).
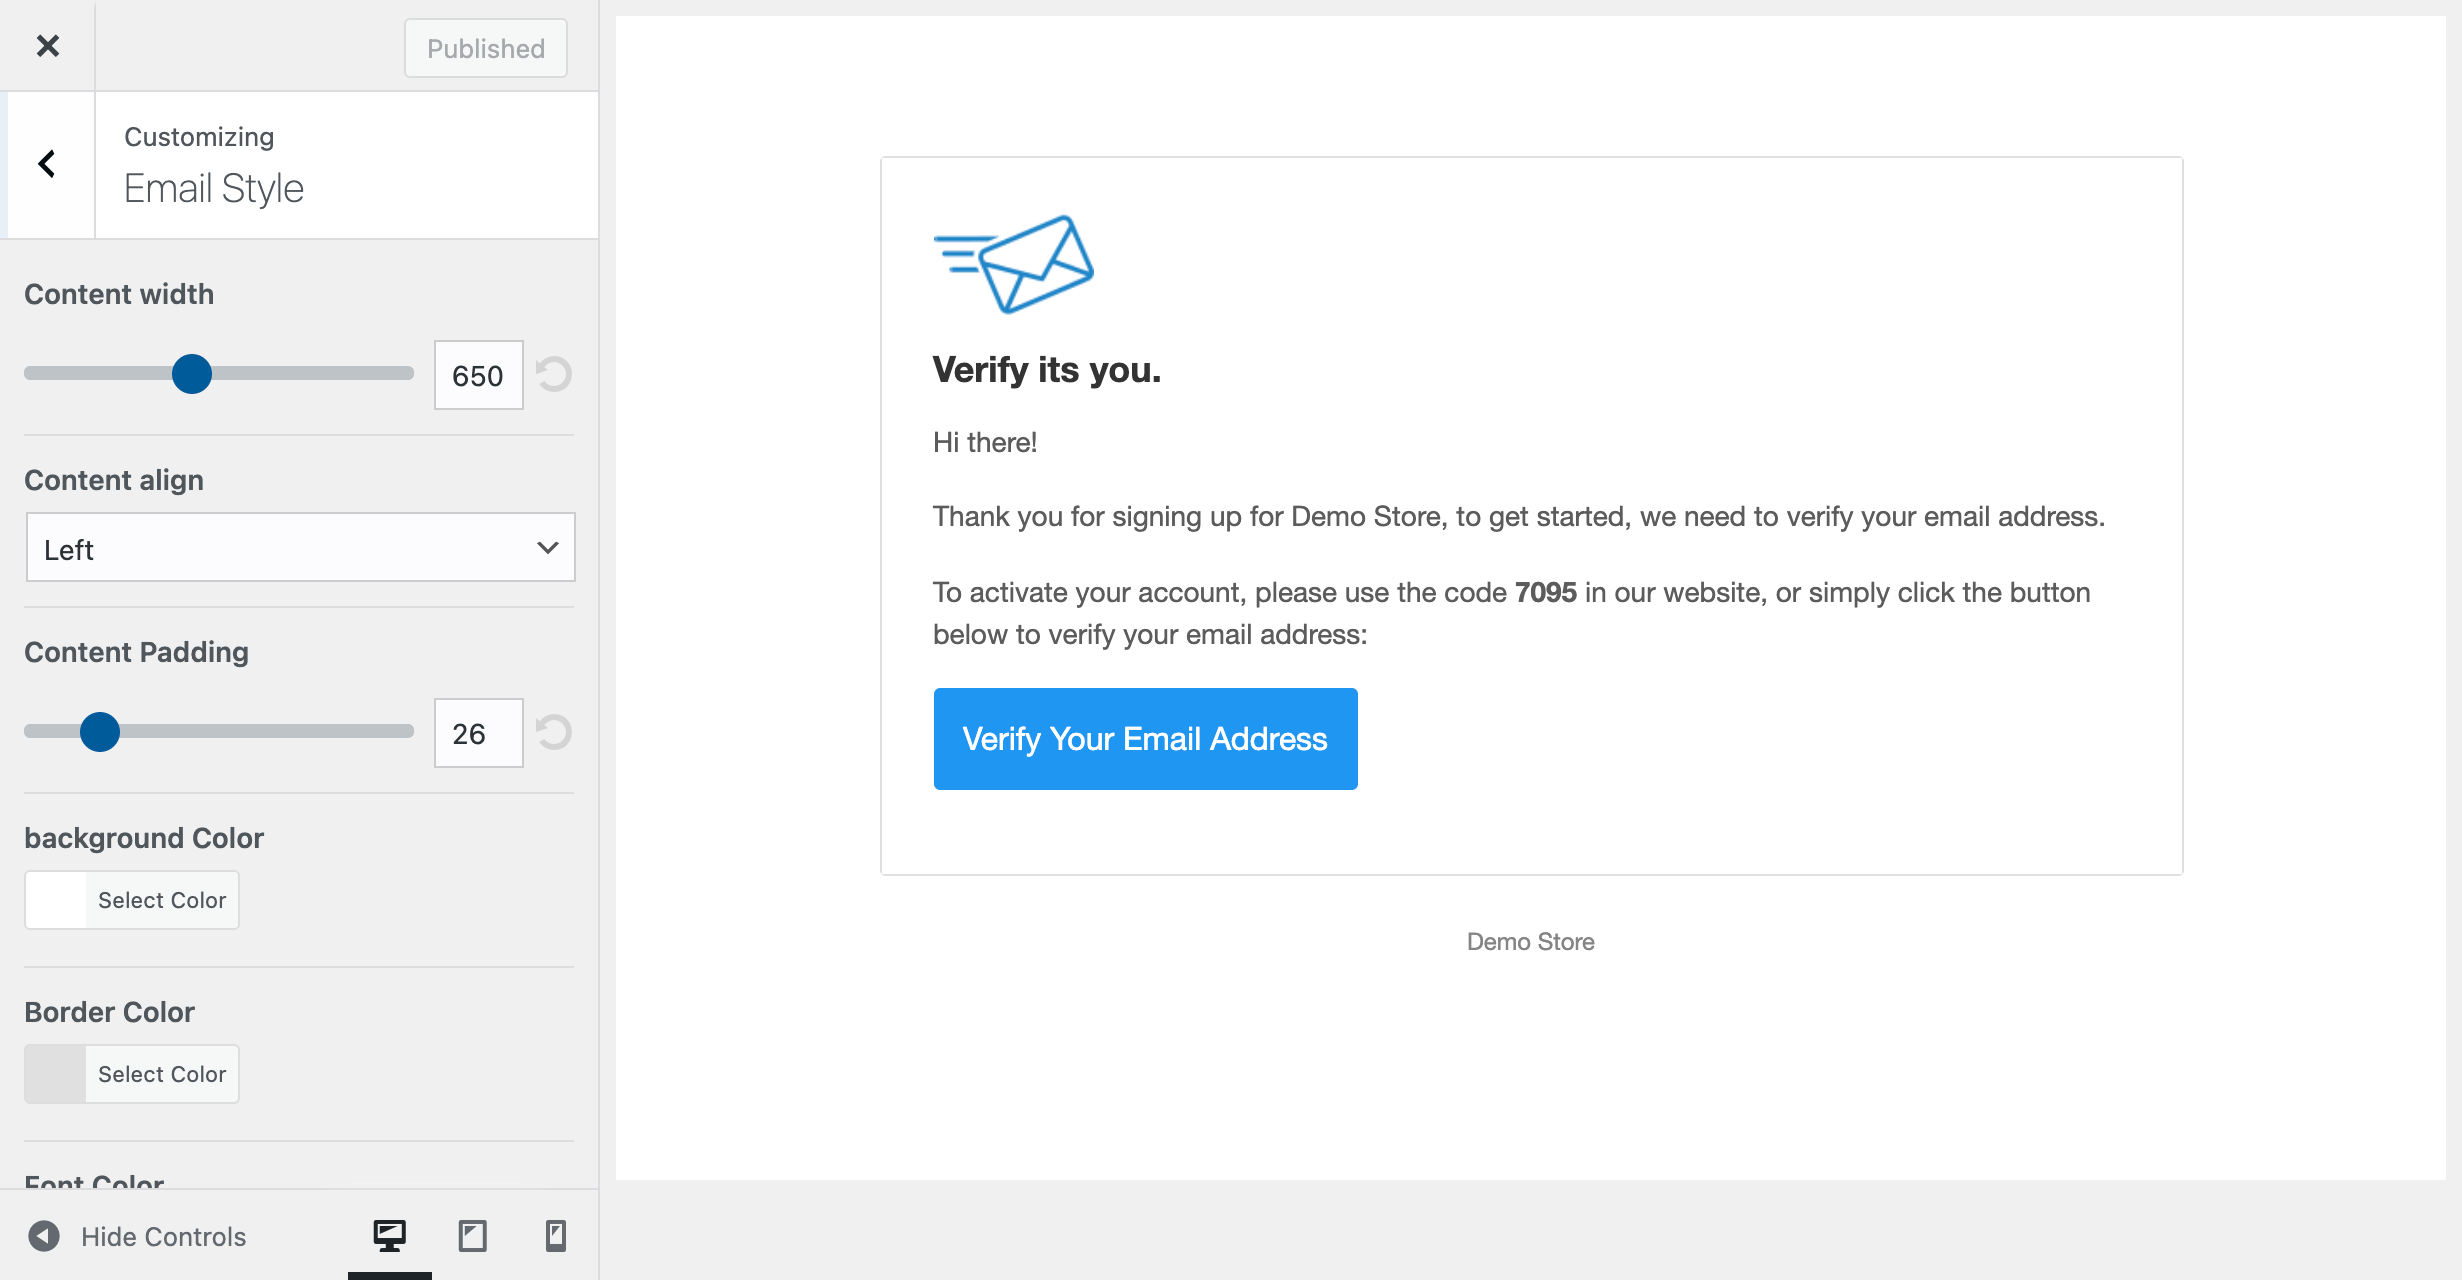
Customize the email design
↑ Back to top
- Content width – The email content width
- Content Padding – The email content padding
- Content Alignment – Center, Left
- Background Color – select the email content background
- Border Color – select the lightbox overlay background color
- Font Color – select the font color
Email header
- Header Image – choose image to display on the email header
- Header image width – select the header image width
- Header font size
Verification button
- Button color
- Button font color
- Button font size
- Button Padding
- Expand Button – option to expand the button to full content width.
Footer
- Footer content – additional text under the verification button
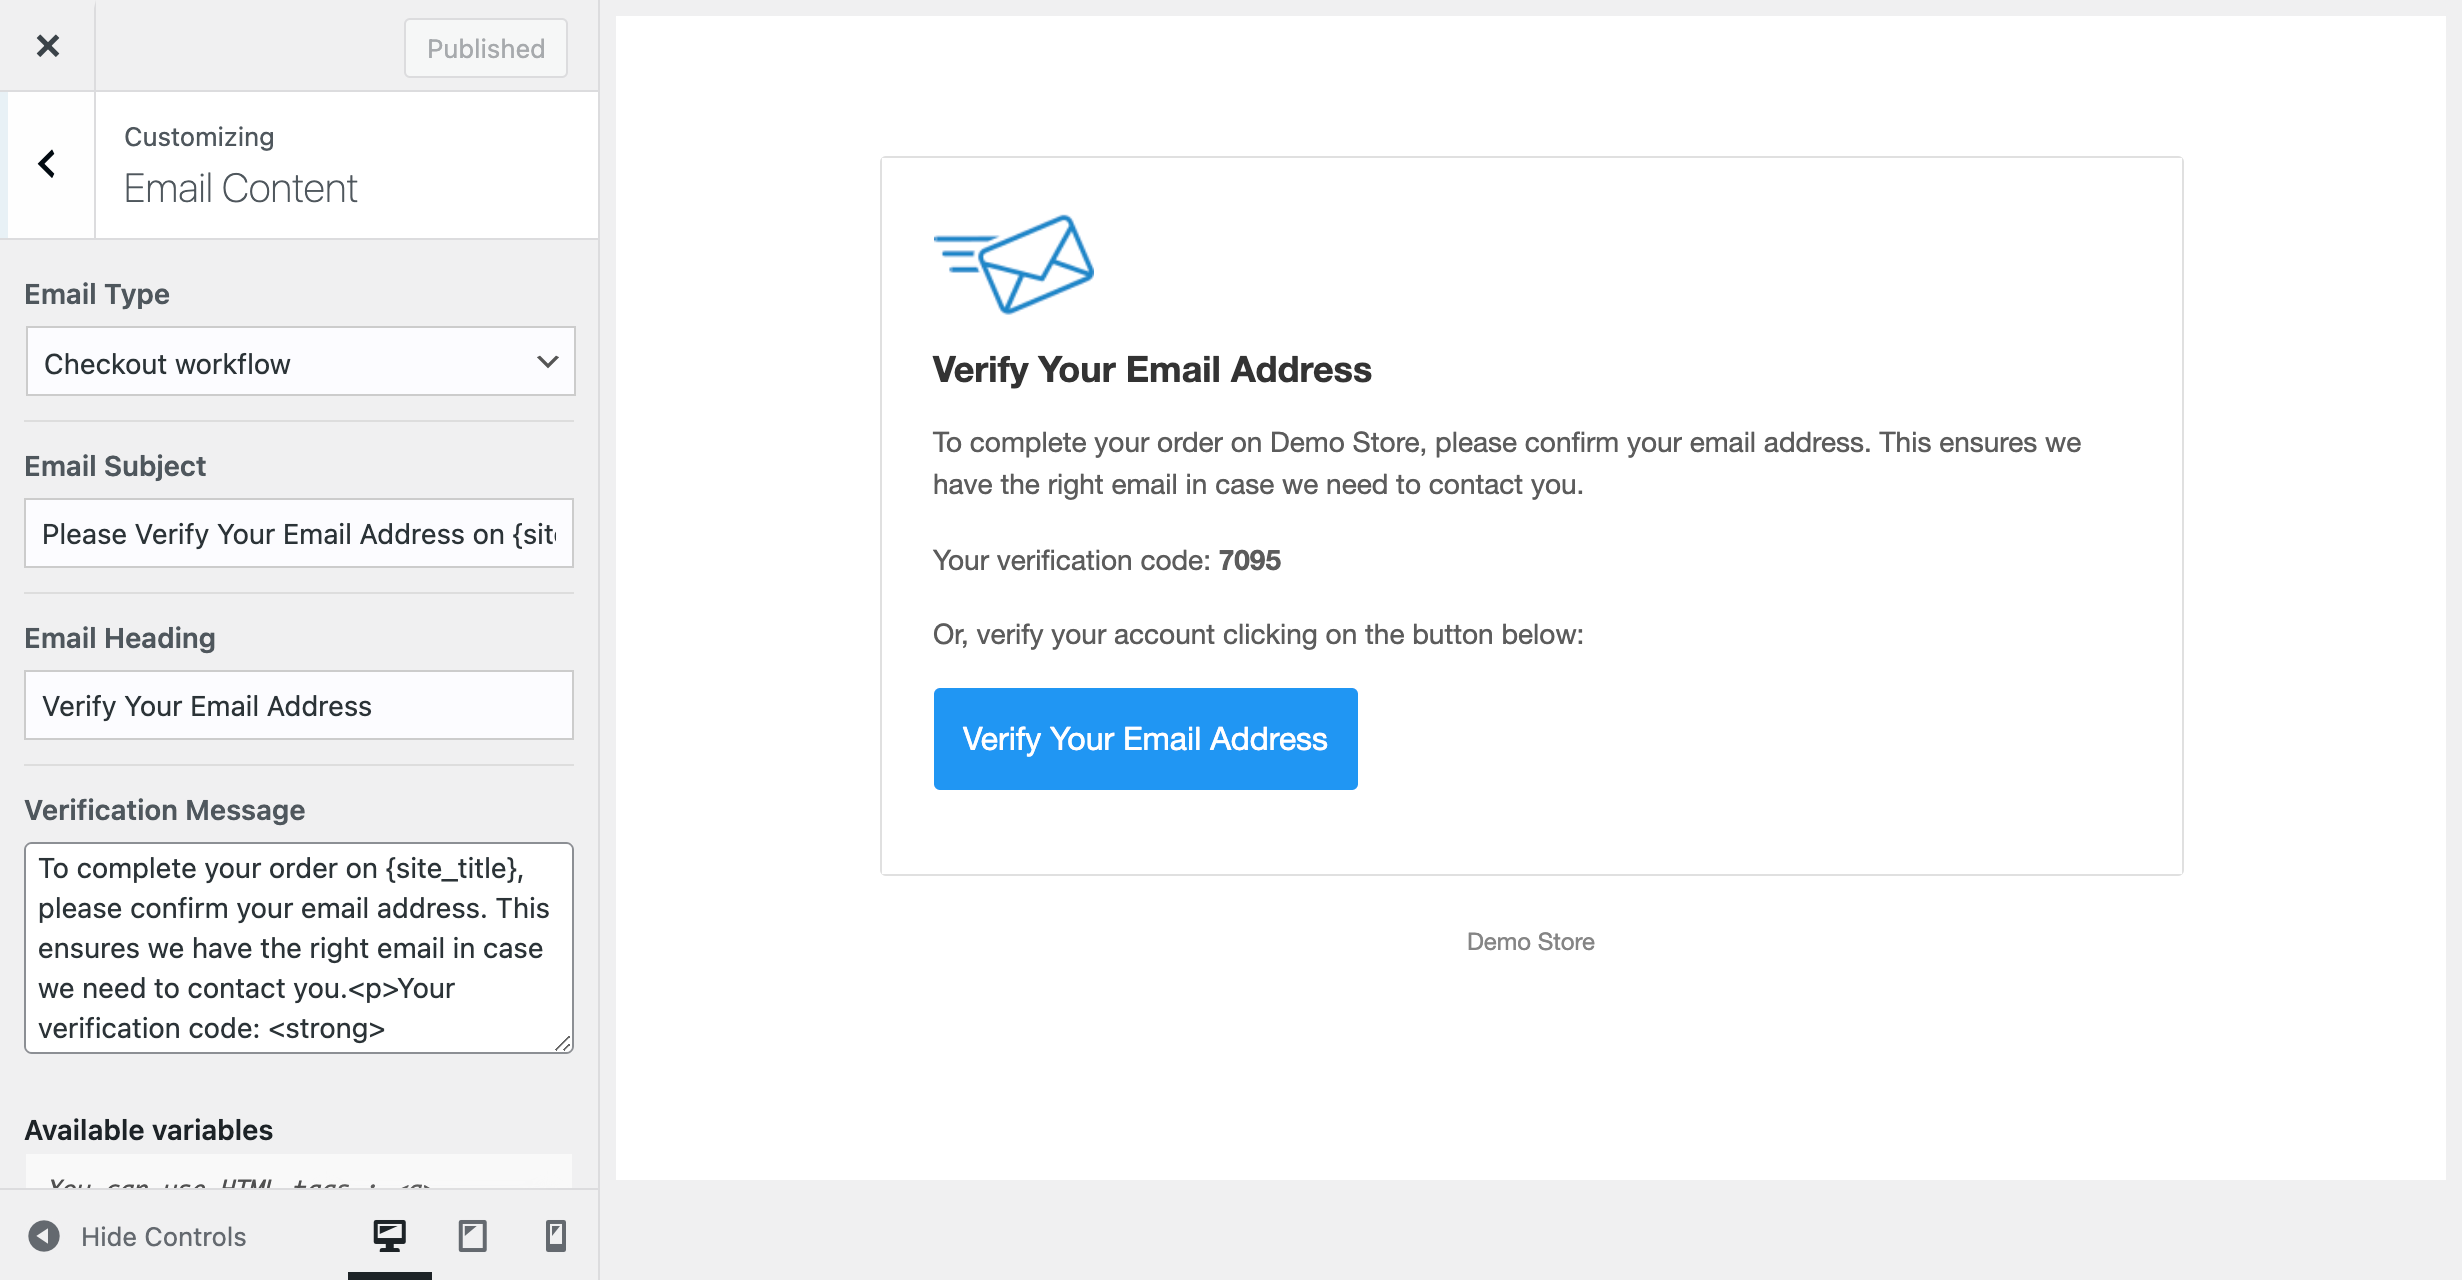
Customize the email’s content
↑ Back to top- Widget Type – navigate between the registration widget and the Checkout widget to customize the email content
- Heading text – Select the title for the Widget. Defaults to: “Verify it’s you.”
- Content message – defaults to “We sent verification code to
{customer_email}. To verify your email address, please check your inbox and enter the code below.” - Additional Footer text – Select the title for the Widget. Defaults to: “Didn’t receive an email?
{cev-resend-verification}” - Verification Button Text – the verification button text (verify code)
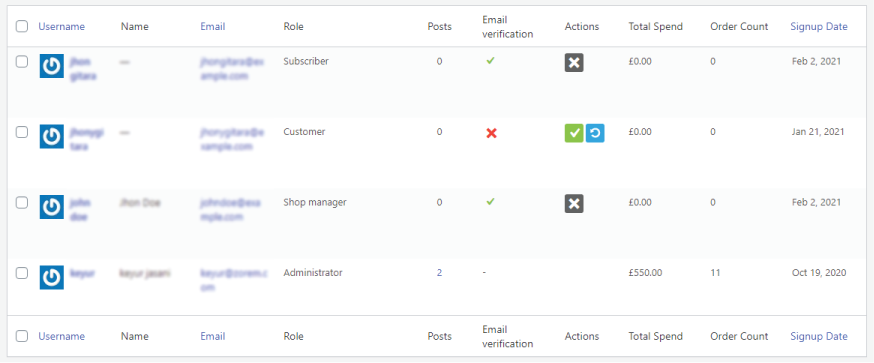
To manage the unverified users, navigate to WordPress > Users in your store’s WP Admin dashboard.
Customer Email Verification will display the email verification status for each user and the option to manually verify, un-verify and users (Customer Role) from the bulk actions menu and action buttons.