NOTE
This product is no longer available on WooCommerce.com. This document has been left available for existing users, but will no longer be updated.
Facebook Messenger Chatbot for WooCommerce is your automated customer support solution allowing you to preset responses and provide quick assistance to customers in your shop.
Installation
↑ Back to top- Download the Facebook Messenger Chatbot for WooCommerce.zip file from your WooCommerce account.
- Go to WordPress Admin > Plugins > Add New and Upload Plugin. Choose File for the file you downloaded.
- Install Now and Activate Plugin.
Configuration
↑ Back to topConfigure extension settings by navigating to WooCommerce > Settings within the WordPress admin panel and clicking on the Chat Bot tab. The following tabs are available: General Settings and Manage Replies.
How to Configure Facebook Messenger Chatbot
↑ Back to top- You will first need to create a Facebook Developer Account if you don’t already have one.
- Create an App.
- Add the Messenger Product
- Add the Webhooks Product
- Within Webhooks settings:
- Select Page
- Enter the Verify Token and Call Back URL (available on the Facebook Messenger Chatbot for WooCommerce general settings page in WooCommerce)
- Within Messenger settings:
- Click Add Page
- Click Add Subscriptions – add messages and messaging_postbacks
- Select Generate Token and copy/paste into the Access Token Field on Facebook Messenger Chatbot for WooCommerce general settings page in WooCommerce.
Click here for an instructional How-to Video.
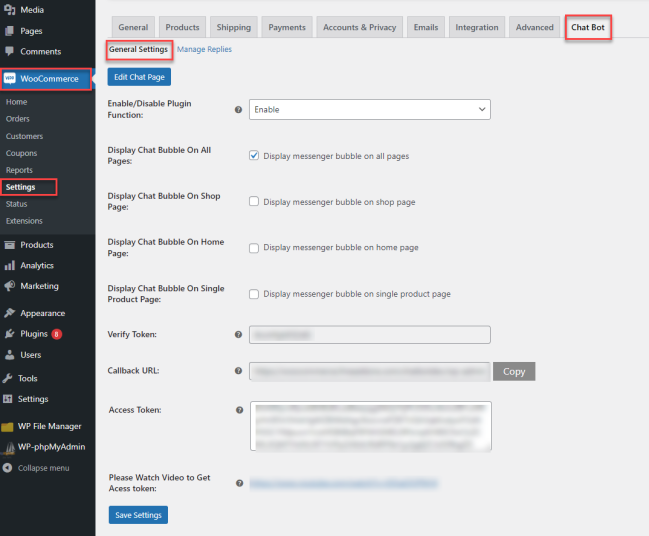
General Settings
↑ Back to top- Enable/Disable Plugin Function: Select to enable or disable plugin functionality
- Display Chat Bubble on All Pages: Check to display chat bubble on all pages
- Display Chat Bubble on Shop Page: Option to set chat bubble on shop page
- Display Chat Bubble on Home Page: Check to display chat bubble on home page
- Display Chat Bubble on Single Product Page: Select to display chat bubble on single product page
- Verify Token: Verification token for Facebook app
- Callback URL: Field to enter callback URL to activate Chat Bot
- Access Token: Access token for Facebook app (should contain no spaces)
- Please Watch Video to get Access Token: Link to video providing instructions on how to retrieve access token
Manage Replies
↑ Back to topIn the Manage Replies section, you can further customize the chat bot replies under Start Up Replies, Conditional Replies, and Custom Message Replies.
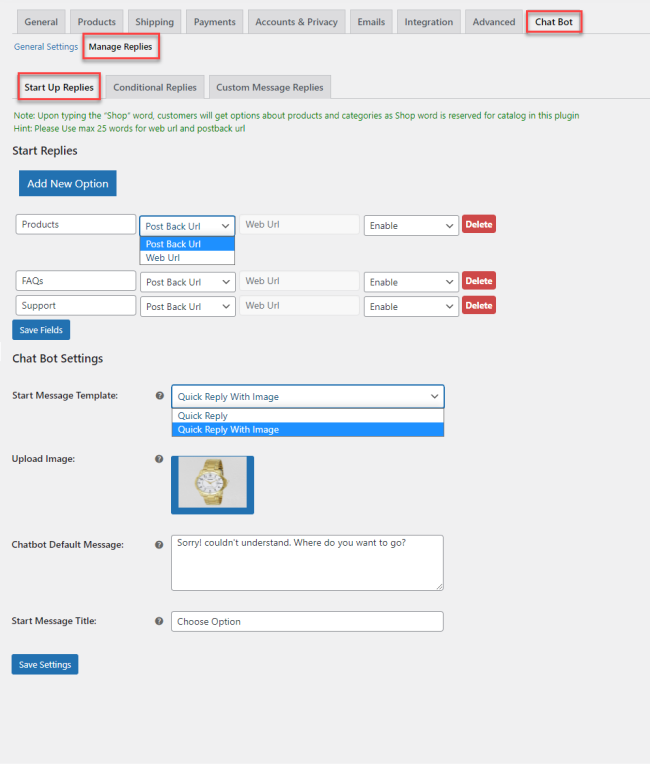
Start Up Replies
↑ Back to topStart Up Replies
In the Start Up Replies section, you can add or edit the postback replies on the chat bot. Per Facebook policy, you cannot add more than three (3) postback startup replies. This option enables you to include either a postback or web URL. You can also choose to enable or disable postback startup replies. The maximum word limit for web URL and post back URL is 25.
Chat Bot Settings
- Start Message Template: Option to include a start message using a quick reply or quick reply with image
- Upload Image: When “Quick Reply With Image” is set, upload an image of your choice to display in the start message
- Chatbot Default Message: Customize the chat bot default message
- Start Message Title: Set the start message title
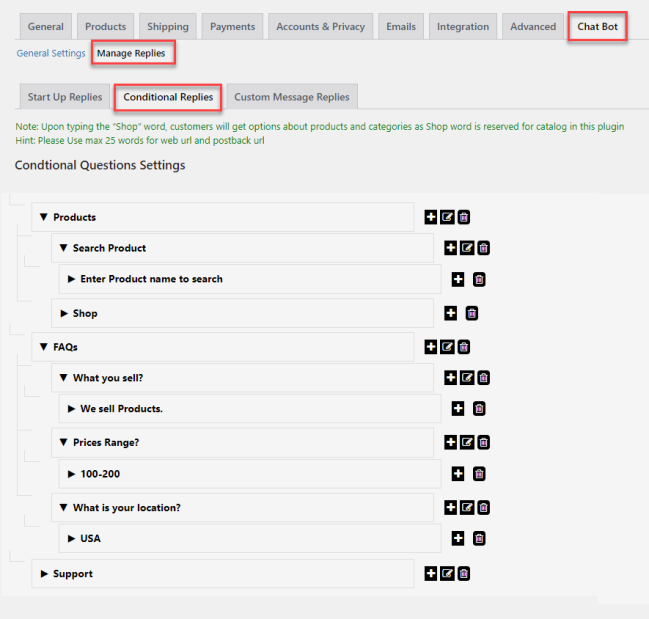
Conditional Replies
↑ Back to topThe plugin allows you to set conditional replies for startup postback replies. These preset responses will appear when the user clicks on the startup replies. You can add or edit the reply title, set the message text and type as well as enable/disable the reply. Per Facebook policy, only a maximum of three postback replies can be set and no more than 25 words.
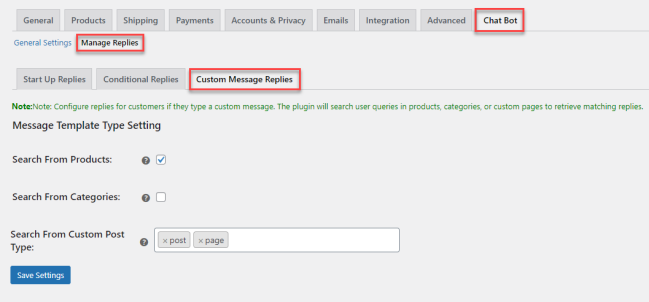
Custom Message Replies
↑ Back to topIf a user enters a custom message, you can set a custom reply using the following options:
Enable search in Chat
- Search From Products: Select to enable search from products
- Search From Categories: Select to enable search from categories
- Search From Custom Post Type: Select to search from custom post types other than product and categories
FAQs
- Do I need to create a Facebook account for the WooCommerce chatbot plugin?
You will need to create a Facebook Developer Account to use the plugin. If you don’t know how to create a Facebook Developer Account, see the video here.
- Does the chatbot for WooCommerce plugin supports automatic response?
Yes, you can set three different types of postback startup replies. Choose the conditional replies to response customer queries based on their questions and choices. You can apply different conditions on products or services and lead to different actions.
- Is it possible to reply custom messages with the WooCommerce Chatbot plugin?
If a user enters a custom message, you can set a custom reply with three different options. You can reply using the following options:
- Search From Products
- Search From Categories
- Search From Custom Post Type