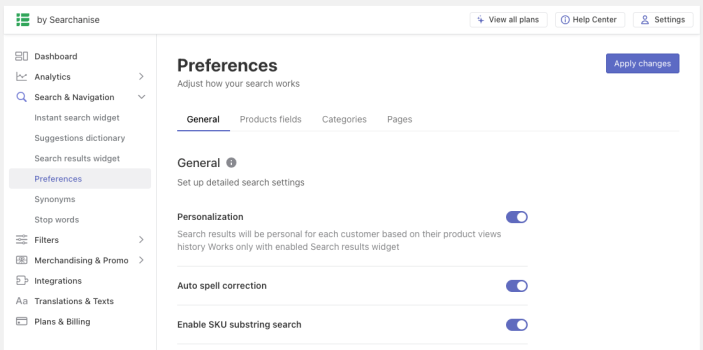
In the Searchanise control panel > Search & Navigation > Preferences section, you can adjust how your search will work. For example, you can show out-of-stock products at the end of the search results, hide some categories or pages from search.
General
↑ Back to topOpen the Search & Navigation > Preferences section > General tab to access general search settings.
| Preference | Description |
|---|---|
| Personalization | Enables the Personalization feature. When your customer visits a product page in your store, Searchanise remembers its category and type. After the customer has visited product pages with a specific category/type more than five times, Personalization starts affecting the search results: the products from a certain category/type will move up the list of suggestions. For example, there are two categories in your store: Men and Women, and there are T-shirt products in both of them. If a customer viewed ten products within the Women category and six products within the Men category, they would first see a T-shirt from the Women category in search results the next time they search for a T-shirt. |
| Auto spell correction | Enables the Autocorrection feature. After entering the query in the search bar, the app autocorrects it and displays the search results for the corrected query. The autocorrection occurs using your store’s indexed product data and Hunspell Dictionary. |
| Enable SKU substring search | Switches on the substring search by SKU. |
| Limit search results up to 10 000 items | Limits search results by products up to 10 000 items to speed up the search. |
| Show out of stock products at the end of results list | Displays your out-of-stock products at the end of the search results. |
To change the current general search preferences, follow these steps:
- Go to the Searchanise panel > Search & Navigation > Preferences section > General tab.
- Change the settings.
- Apply the changes.
Product fields
↑ Back to topProduct fields are product details that Searchanise imports from your WooCommerce store to search by. The following product details are imported:
- Title
- Description
- SKU
- SKU of Grouped products
- Price
- Stock status
- Categories
- Product type
- Product Tags
- Product Attributes
- Reviews messages
Enable/disable product fields for search
↑ Back to topBy default, all product fields are enabled for search. You can choose which ones will be enabled and which ones won’t. To enable/disable product fields for search:
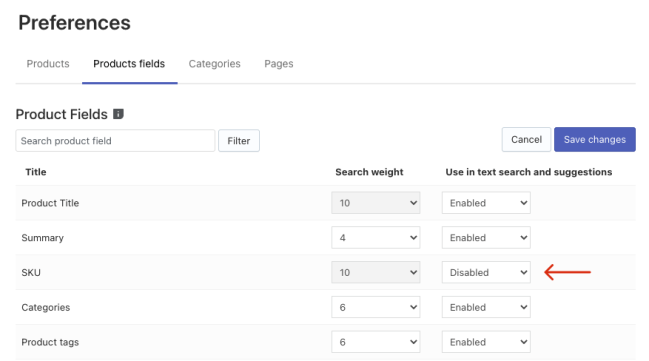
- Go to the Searchanise control panel > Search & Navigation > Preferences section > Products Fields tab to view Product Fields.
- Click the Edit fields button in the top-right corner.
- Change the state of the product field(s) from Enabled to Disabled or vice versa.
- Save the changes.
- Click the link in the notice at the top or the Force re-indexation button in the Dashboard section to start indexation.
That’s it. After the indexation is complete, the plugin won’t search by the disabled product fields.
What is more, you can edit all or several product fields displayed on the page at once. To do so, follow these steps:
- Go to the Searchanise control panel > Search & Navigation > Preferences section > Products Fields tab.
- By default, it is shown 20 product fields per page. If you want to show and edit more, change the value in the Display drop-down list above the table.
- Select the Select all checkbox in the header of the table or select certain product fields.
- Click the appeared Edit selected button.
- Select the value of the Use in text search and suggestions drop-down list for all selected product fields and click the Update button.
- Click the link in the notice at the top or the Force re-indexation button in the Dashboard section to start indexation.
Set search weight to product fields
↑ Back to topSearch weight defines the importance of each product field. According to the importance of product fields, the search engine calculates the relevance of each item in the search results list.
By default, product fields have search weights in the following order:
- Title, SKU – the highest weight
- Other product fields (product details) indexed for the search – have the same weight
- Description (Summary, Product description), Reviews messages – the lowest weight
You can change the search weight for all product fields except for Title and SKU. To do so, follow these steps:
- Go to the Searchanise control panel > Search & Navigation > Preferences section > Product Fields tab to view Product Fields.
- Click the Edit fields button in the top-right corner.
- Change the search weight of the product fields.

- Save the changes.
- Click the link in the notice at the top or the Force re-indexation button in the Dashboard section to start indexation.
That’s it. After the indexation is complete, the changed search weights will affect the relevance of search results.
Important info
* Title and SKU will always have the highest weight over other product fields.
* Merchandising rules with “always” and “keywords” ranking options have the highest weight over all product fields.
* Search weights impact the ordering of search results by relevance. In the Instant Search Widget, search results are sorted only by relevance. In the Search Results Widget, a different sorting can be selected. The “by relevance” sorting is the most recommended.
Reset weights to default values
↑ Back to topYou can always reset the changed weight to default values. To do so, follow these steps:
- Go to the Searchanise control panel > Search & Navigation > Preferences section > Product Fields tab to view Product Fields.
- Click the Reset all weights button in the top-right corner.
- Click the link in the notice at the top or the Force re-indexation button in the Dashboard section to start indexation.
Categories
↑ Back to topSearchanise indexes all categories (collections) visible to customers and shows them in the search results if they match the search query. You can see indexed categories in Searchanise control panel > Search & Navigation > Preferences section > Categories tab. These categories are enabled for search by default – have the Active status, but you can hide them from the search.
Hide a category
↑ Back to topTo hide a category from the search, follow these steps:
- Go to the Searchanise control panel > Search & Navigation > Preferences section > Categories tab.
- Click the Edit categories button in the top-right corner.
- Change the Status of any category/collection from Active to Hidden.

- Save the changes.
- Click the link in the notice at the top to start re-indexation.
That’s it. You can track the indexation status in the Dashboard section. After the indexation is complete, Searchanise won’t search and show hidden categories in the search results.
Hide several categories at once
↑ Back to topYou can hide all or several categories displayed on the page at once. To do so, follow these steps:
- Go to the Searchanise control panel > Search & Navigation > Preferences section > Categories tab.
- By default, it is shown 20 categories per page. If you want to show and edit more, change the value in the Display drop-down list above the table.
- Select the Select all checkbox in the header of the table or select certain categories.
- Click the appeared Edit selected button.
- Select the status for all selected categories and click the Update button.
- Click the link in the notice at the top to start re-indexation.
Pages
↑ Back to topSearchanise indexes all pages published on your website and shows them in the search results if they match the search query. You can see indexed pages in Searchanise control panel > Search & Navigation > Preferences section > Pages tab. These pages are enabled for search by default — have the Active status, but you can hide them from the search.
Hide a page
↑ Back to topTo hide a page from the search, follow these steps:
- Go to the Searchanise control panel > Search & Navigation > Preferences section > Pages tab.
- Click the Edit pages button in the top-right corner.
- Change the Status of any page from Active to Hidden.

- Save the changes.
- Click the link in the notice at the top to start re-indexation.
That’s it. You can track the indexation status in the Dashboard section. After the indexation is complete, Searchanise won’t search and show hidden pages in the search results.
Hide several pages at once
↑ Back to topYou can hide all or several pages displayed on the page at once. To do so, follow these steps:
- Go to the Searchanise control panel > Search & Navigation > Preferences section > Pages tab.
- By default, it is shown 20 pages per page. If you want to show and edit more, change the value in the Display drop-down list above the table.
- Select the Select all checkbox in the header of the table or select certain pages.
- Click the appeared Edit selected button.
- Select the status for all selected pages and click the Update button.
- Click the link in the notice at the top to start re-indexation.