Smart Search and Product Filter is a sophisticated site search solution for WooCommerce stores. It helps your customers find relevant information through products, categories, pages, and blog posts.
Once the extension is installed in your store, the indexation begins; it may take some time. The extension imports search data to its servers and indexes it for search.
Search data includes:
- Products that have the following settings: Status: Published, Visibility: Public, Catalog visibility: Shop and Search results/Search results only /Shop only
- Product categories
- Pages that are published
- Blog posts that are published
All the product fields are indexed to be used for search:
- Name
- Description
- SKU
- Price
- Categories
- Product type
- Tags
- Attributes
As for the categories, you can search them by Name or Description.
As for the pages and blog posts, you can search them by Title or Content.
The plugin starts to work right after the first indexation has been completed. Further indexation of product, category, pages changes occurs automatically.
You’ll need to start the re-indexation manually to update the search results after you’ve:
- changed tax settings
- modified the database manually
To start the re-indexation, click the Force re-indexation button in the Searchanise control panel > Dashboard section.
You can find the Searchanise control panel by navigating to Products > Searchanise or WooCommerce > Searchanise (v. 1.0.12 or later) in your store’s WP Admin Dashboard (v. 1.0.11 or earlier).


Using the Searchanise control panel, you can adjust all Searchanise functionality:
- Instant Search Widget
- Search Results Widget
- Analytics
- Search preferences
- Recommendations
- Filters
- Smart Navigation
- Integrations
- Suggestion dictionary
- Synonyms
- Stop words
- Redirects
- Merchandising
- Translations & Test editor

The Searchanise extension settings are located via Settings > Searchanise (v. 1.0.11 or earlier) or WooCommerce > Settings > Searchanise (v. 1.0.12 or later) in your store’s WP Admin Dashboard.

- Search input jQuery selector (default: #search,form input[name=”s”]) – jQuery selector of the search input, you need to edit it only if your custom theme changes the default search input ID.
- Search results page (default: “search-results”) – the slug of the search results page which the plugin creates after installation. The page is show if the Search Results Widget is enabled in the Searchanise control panel.
- Use Searchanise for Full-text search (default: yes) – enables or disables the Searchanise search. If it is disabled, the default WooCommerce search works, meanwhile the Searchanise widgets remain active.
- Sync catalog — the way of catalog synchronization, the list of options:
- When catalog updates (default value) — Searchanise tracks your store’s catalog changes and indexes them automatically.
- Periodically via cron — Searchanise doesn’t track the catalog changes in real time, it starts indexation at the selected time (Daily, Hourly, Twice in day). You can pick the time interval in the Cron resync interval option.
WP Cron behavior in the Searchanise extension:- When you activate the extension, WP Cron events are automatically created. Even if the Sync catalog setting is set to another value, cron events still trigger regularly. However, they won’t perform actions unless the sync process is enabled.
- By default, the cron job runs daily, meaning catalog indexation is scheduled every 24 hours from when the plugin is activated.
- If you select a different interval, such as hourly, the already scheduled event won’t be updated when the settings are saved. To apply the new interval, deactivate the plugin and activate it again.
- Manually — Searchanise doesn’t track the catalog changes automatically. You can start the indexation manually only by clicking the Force re-indexation button in the Searchanise control panel > Dashboard.
- Use direct images links (default: no) — if it enabled, the direct product image links are imported. Else, the thumbnails are imported. It can speed up the import.
- Import blog posts (default: yes) – enables or disables the import of blog posts from your store to search though them as pages (post_type: post). This setting was added to the extension in v. 1.0.5.
- Color attribute (default: color) – product attribute GUID, which will be imported as the color attribute to apply the color mapping.
- Size attribute (default: size) – product attribute GUID, which will be imported as the size attribute.
- Custom taxonomies – Plural Labels of product custom taxonomies in your store, base on which you want to create Searchanise filters. After applying the setting, the indexation starts automatically. After the indexation is complete, the filters will be created. You can see them in the Searchanise control panel > Filters.
This setting was added to the extension in v. 1.0.11. - Custom product meta fields – custom product fields generated by the Advanced Custom Fields extension. If you need any of these fields to be available for search, select them in this setting and save the changes. Indexation will start automatically after saving, you can check the progress in the Dashboard section of the Searchanise control panel. After the indexation is complete, the selected custom product fields will appear in the Searchanise control panel > Preferences > Product fields and our extension will search though them.
- Exclude products with these tags – the product tags by which you want to exclude the products from the Searchanise search. The setting added in the plugin v. 1.0.3.
- Exclude these pages (default: shop, cart, checkout, my account) – the pages you want to exclude from the Searchanise indexation, so they won’t be shown in the search results in the Pages section. This setting was added to the extension in v. 1.0.6.
- Exclude these categories – the categories you want to exclude from the Searchanise indexation, so they won’t be shown in the search results in the Categories section. This setting was added to the extension in v. 1.0.6.
- Show Smart Search dashboard widget (default: yes) – enables or disables our analytics widget in the WordPress dashboard. This setting was added to the extension in v. 1.0.7.
- Use WordPress integrated jQuery version (default: yes) – enables or disables using the WordPress’s jQuery library instead of the Searchanise’s one. The setting is available for WordPress v. 5.6 or later, and it was added to the extension in v. 1.0.9.
Checking that Searchanise works
↑ Back to topOnce you’ve installed the extension, a full indexation of your product catalog, pages, and blog posts will start.
After the indexation is complete, you can check that the extension works correctly. To do so, follow these steps:
- Go to your storefront.
- Start typing something into the search box to see a block with search results and search suggestions. It is the Instant Search Widget.
- If there is a search box (Searchanise is now built into your store’s search box), start typing something into it.
- If there is no search box, the icon with a magnifying glass will appear. It is the Sticky Widget. Click it and start typing something.
Note
If you didn’t find the Sticky Widget in your storefront, you can enable it. Look here for the instructions.
- If there is a search box (Searchanise is now built into your store’s search box), start typing something into it.
- Click the suggestion that suits your search term most to see a search results page load. It is the Search Results Widget.
Important info
The Search Results Widget is disabled by default. So, the WooCommerce search results page may be opened instead.
You can enable the Search Results Widget in the Searchanise control panel > Search & Navigation > Search results widget section and check how it works.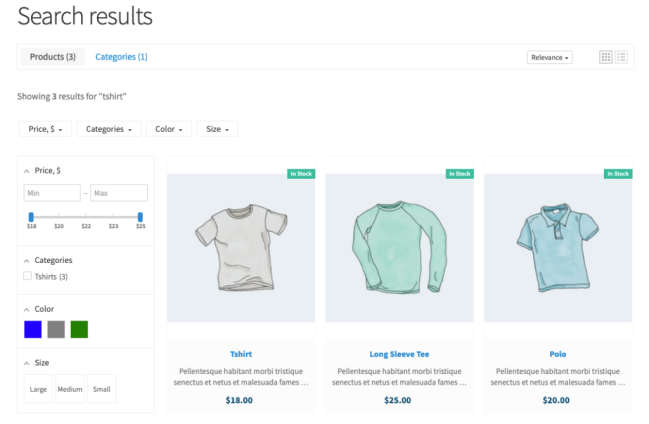
- Try different filters on the page (Search Results Widget).

That’s it. Don’t hesitate to get in touch with us if you run into difficulties. We will be glad to help you.
Enable the Sticky Widget
To enable the Sticky Widget, follow these steps:
- Go to the Searchanise control panel > Search & Navigation > Instant search widget section > Sticky widget tab.
- Select the Always value in the Show ‘sticky’ widget setting.
- Apply the changes.
That’s it. You can now retrace the steps described above to check that the app works correctly.
Subscription
↑ Back to topAfter you’ve installed the extension, you will have a 14-day trial period, giving you access to all features.
You can subscribe in the Searchanise control panel by clicking the View all plans button in the top-right corner.

You can cancel the subscription at any time. After unsubscribing, the extension stops working at once.
If you decide to deactivate/remove the plugin, you need to cancel the subscription first. Otherwise, the subscription remains active, and you will be charged for it.