Installation
↑ Back to topTo start using a product from WooCommerce.com, you can use the “Add to store” functionality on the order confirmation page or the My subscriptions section in your account.
- Navigate to My subscriptions.
- Find the Add to store button next to the product you’re planning to install.
- Follow the instructions on the screen, and the product will be automatically added to your store.
Alternative options and more information at:
Managing WooCommerce.com subscriptions.

Setup and Configuration
↑ Back to topAfter activation of the Invoice Payment Optionextension, you can find the “Invoice Payment Option” section in your WordPress admin menu. Additionally, an invoice payment method will be created under WooCommerce > Settings > Payment.
How to enable Invoice Payment Method:
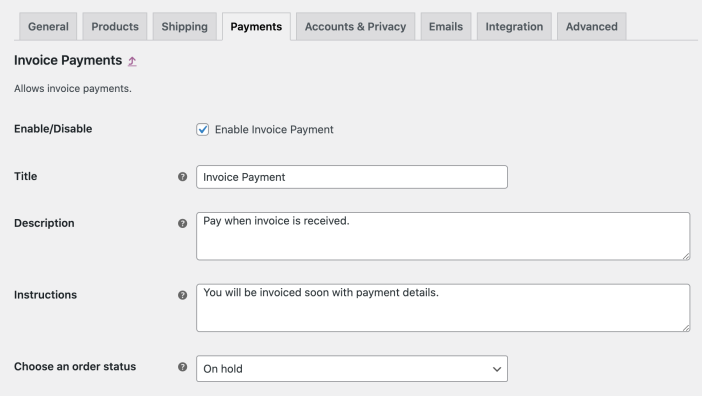
↑ Back to topAfter the extension is installed, you can find the invoice payment method under the WooCommerce > Settings > Payment. Here you can configure the following options:
- Enable/disable payment option
- Change payment method name/label
- Add description and instructions
- Select default order status (when the user places an order using this method, the selected status will be used as the default order status)
Please note: If the invoice payment option is created and no restriction rule has been added, the invoice payment method will appear for all customers during checkout allowing them to order using this payment method.
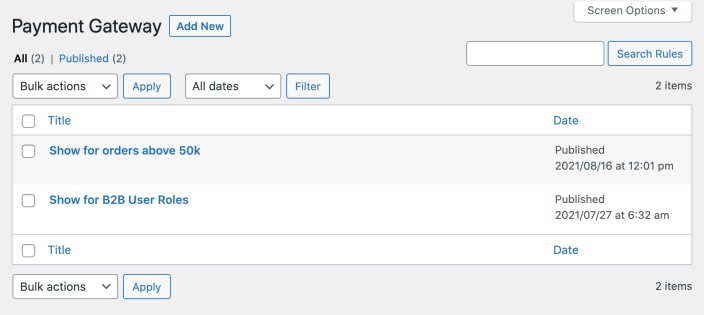
Creating Invoice restriction rules:
↑ Back to topYou can create multiple rules to display invoice payment options based on products, categories, shipping methods, order amounts, quantity and user roles.
You can create different rules to set different restrictions for different situations. For example, you might want to show invoice payment option to orders above $50,000 as well as keep it visible all the time for B2B user role. You can achieve both by creating two different rules, one for cart amount restrictions and the other for user roles.
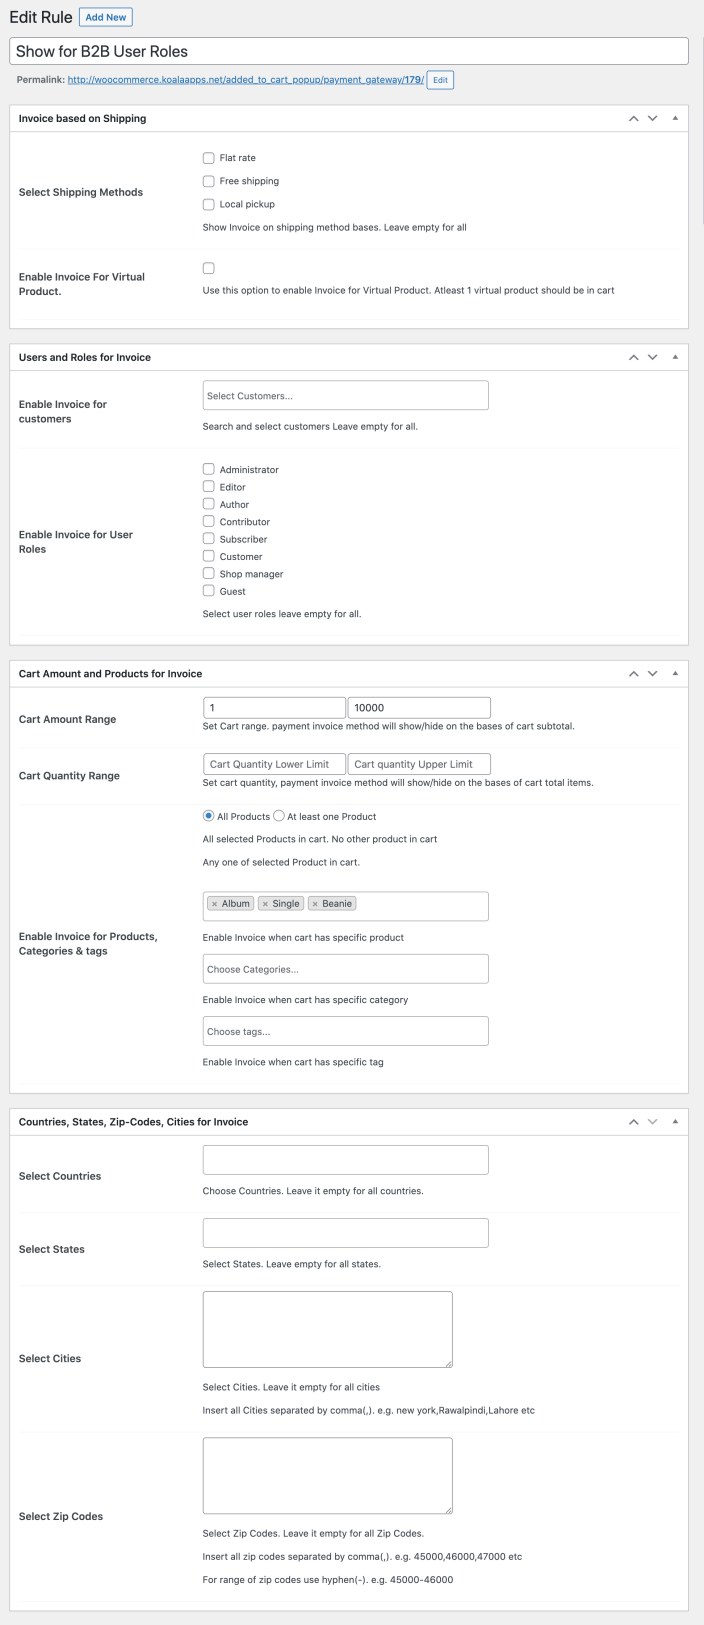
Invoice based on shipping:
↑ Back to topChoose specific shipping methods to display the invoice payment method when any of these are selected. Under this section, you can also choose to enable invoice payment method for virtual products.
User roles and customers:
↑ Back to topSpecify to which user roles and customers you want to display the invoice payment option.
Cart amount, quantity and product:
↑ Back to topCart amount range: You can add minimum and maximum amount, the invoice payment option will appear if order amount falls within that range.
Cart quantity range: Just like cart amount, you can add min and max quantity range. As soon as the quantity range falls in the limit, the invoice payment option will appear.
Product in Cart: You can specify individual product, product category or tag. The invoice payment option will appear if any of the selected product is in cart.
Country, City, State, Zip Codes: You can specify country, city, states or zip codes to display the invoice payment option. You can add comma separated or range of zipcodes using “-“.
Invoice PDF Settings:
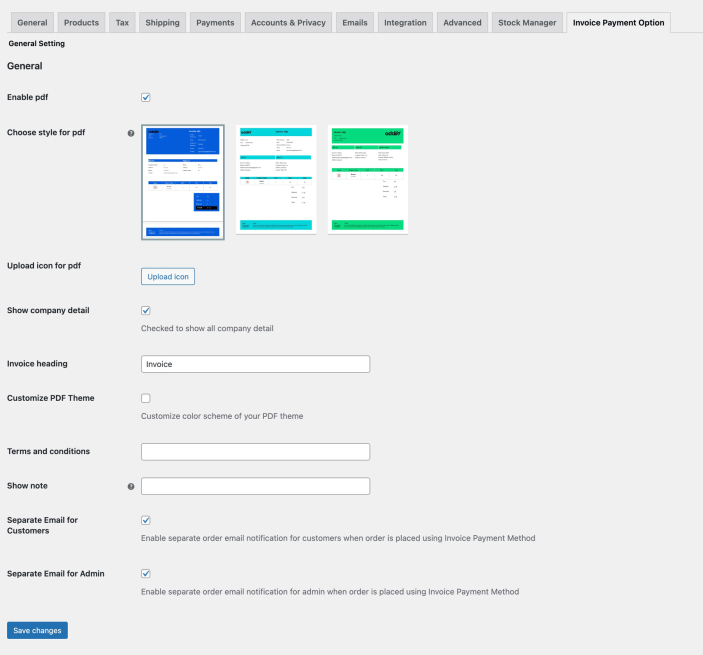
↑ Back to topYou can enable Invoice PDF generation from WooCommerce > Settings > Invoice Payment Options tab.
Choose from 3 PDF templates
The extension comes with 3 different PDF templates to choose from.
Personalize PDF template
Once the template is selected, you can customize following options,
- Template icon/logo
- Select checkbox to show your company details in invoice
- Add invoice heading
- Customize color scheme of PDF to make your store color scheme
- Add terms and conditions to embed in PDF file
- Add any additional note to embed in PDF footer
Enable separate email for customers:
Once enabled, the extension will send a separate email to customers along with the standard WooCommerce order email. The separate email will only trigger when the order is placed using the “Invoice Payment Method”. You can customize this email template from WooCommerce > Settings > Emails > Addify Invoice Email for Customer.
Enable separate email for store admin:
Once enabled, the extension will send a separate email to store admin along with the standard WooCommerce order email. The separate email will only trigger when the order is placed using the “Invoice Payment Method”. You can customize this email template from WooCommerce > Settings > Emails > Addify Invoice Email for Admin.
FAQs:
↑ Back to topDoes extension attaches a PDF Invoice with Order?
Yes, the extension does create a PDF invoices and attach it with the orders placed using Invoice Payment Method.
How to send payment link to customer?
You can move the order to pending payment and from order actions, you can trigger an email to the customer with order details and the payment link.