Make your refunds easy and quick by using the advance returns and refund for WooCommerce extension. It automates the refund process, saving time for both store owners and customers. Say goodbye to the hassle of refund requests and processing, and keep your customers happy with smooth, efficient refunds.
Setup and Installation
↑ Back to topInstallation
↑ Back to top- Download the .zip file from your WooCommerce account.
- Go to WordPress Admin > Plugins > Add New and Upload Plugin with the file you downloaded with Choose File.
- Install Now and Activate the extension.
More information at Install and Activate Plugins/Extensions.
Setup & Configuration
↑ Back to topOnce the plugin is activated, head towards the WordPress menu > WooCommerce > Advanced Returns and Refunds. Simply click on it to access the configuration settings.
Now, let’s explore the advanced returns and refunds for WooCommerce setting one by one.
Configure Refund General Settings
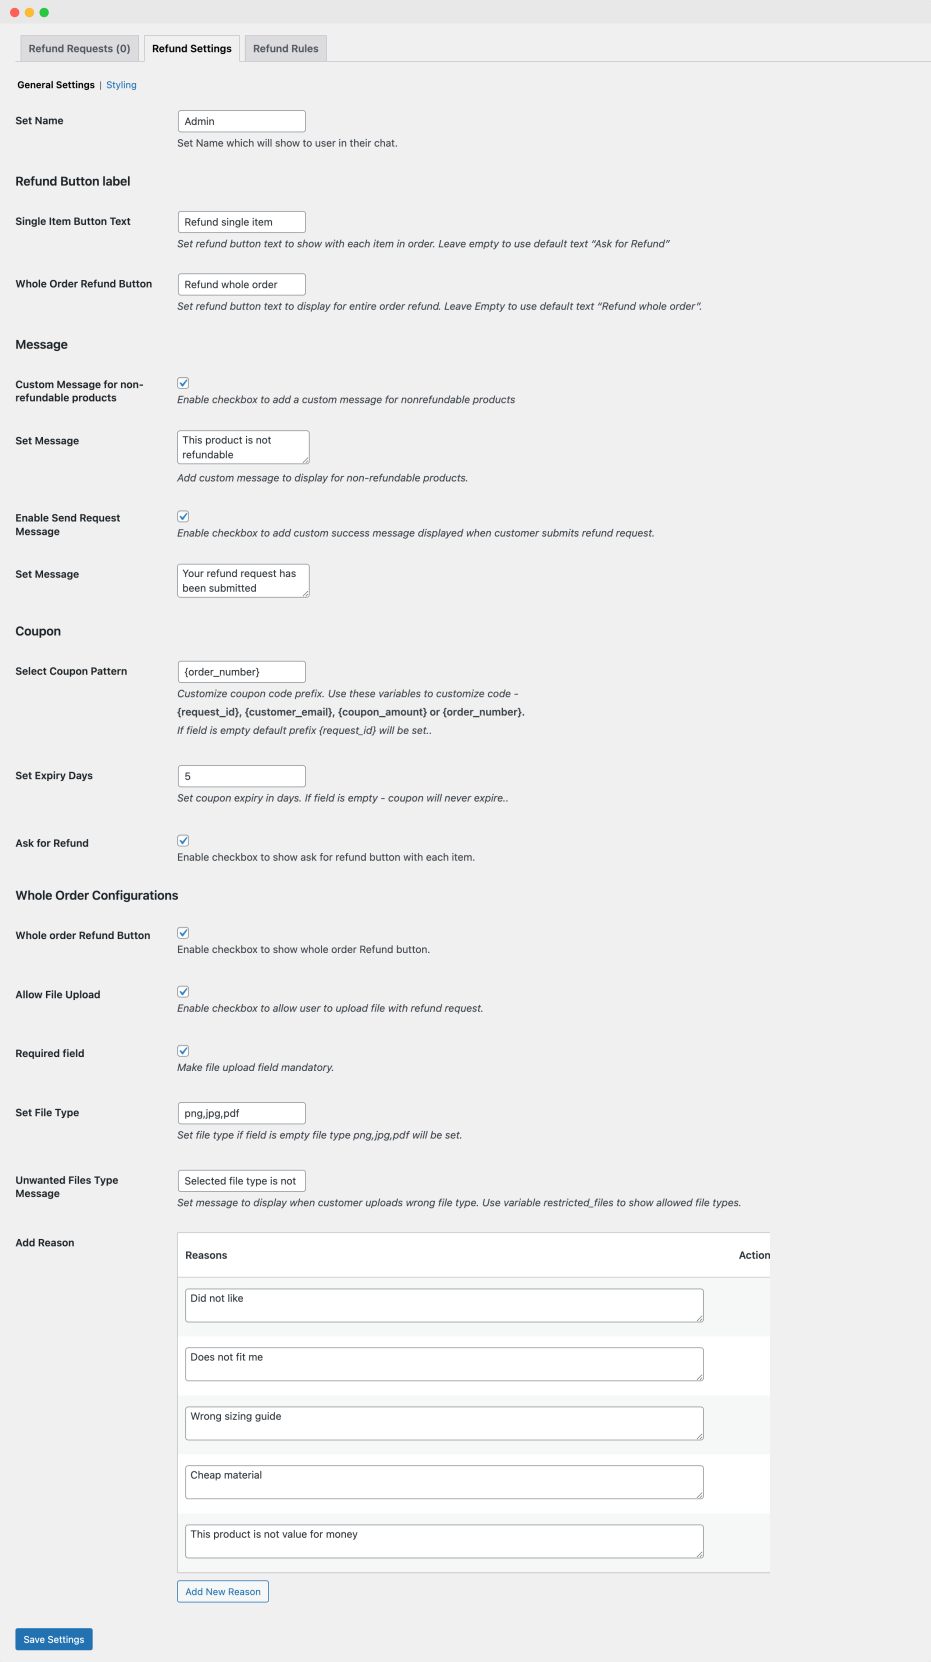
↑ Back to topGo to WooCommerce > Advance return and refunds, click Refund Settings, and choose the general option. After clicking, you will be directed to the refund section to set the general settings:
Set Name: Enter a name that will be shown to the user in their chat when a refund is requested
Refund Button Label
↑ Back to topCustomizing the refund button labels helps enhance the user experience by ensuring the options are clearer and specific to the brand identity. You can customize and insert a custom text for the refund button with options like:
Single Item Button Text: Set refund button text to show each item in order. Leave empty to use the default text “As for Refund.”
Whole Order Refund Button: Refund Whole Order Set refund button text to display for the entire order refund. Leave Empty to use the default text “Refund whole order.”
Refund Message
↑ Back to topYou can easily set up the custom message that will be displayed during the refund process to the user, such as:
Custom Message for nonrefundable products: Choose to enable the checkbox to add a custom message for nonrefundable products
Enable Send Request Message: Click on the checkbox to add a custom success message that will be displayed when the customer submits a refund request.
Set Message: Insert a custom message that must be displayed when the request is submitted. You can enter any text to let customers know their request for a refund was received.
Establish Refund Coupon
↑ Back to topTo set the coupon on your store, see the following options:
Select Coupon Pattern: Customize coupon code prefix. Use these variables to customize the code mentioned below, but if the field is empty, the default prefix {request_id} will be set.
- {request_id}
- {customer_email}
- {coupon_amount}
- {order_number}
Set Expiry Days: Enter the coupon expiry in days. If the field is empty, the coupon will never expire.
Ask for Refund: Enable the checkbox to show the ask for refund button with each item.
Whole Order Configuration
↑ Back to topYou can easily configure the whole refund order settings with the customization, including:
Whole order Refund Button: Enable the checkbox to show the whole order refund button.
Allow File Upload: Enable a checkbox to allow the user to upload a file with the refund request.
Required field: Make the file upload field mandatory.
Set File Type: If the field is empty, the file type will be PNG, JPG, or PDF.
Unwanted Files Type Message: Set a message to display when a customer uploads the wrong file type. Use variable restricted_files to show allowed file types.

Setup Refund Styling
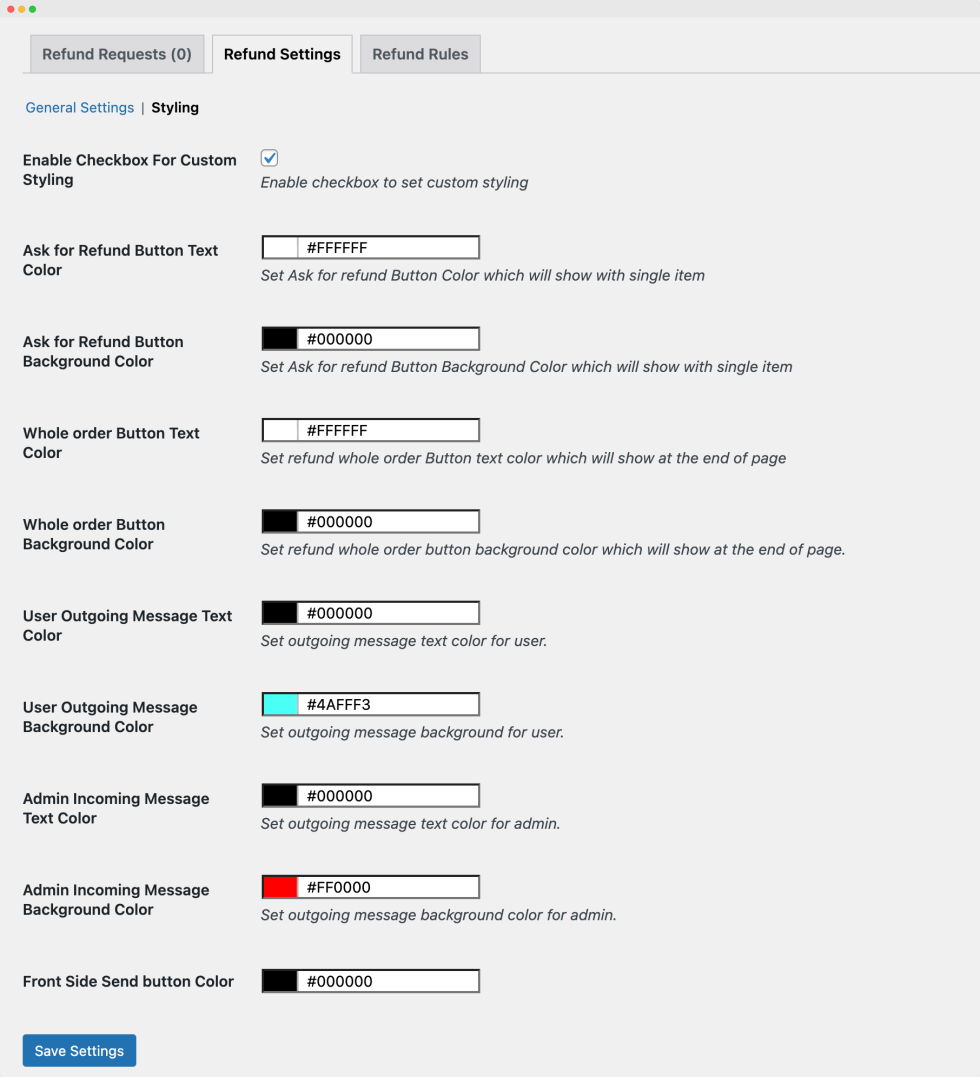
↑ Back to topChoose to customize the appearance of the buttons and custom messages in your refund process on the store. Setup the styling according to your brand identity by following the steps and personalized options below:
Enable Checkbox For Custom Styling: Enable checkbox to set custom styling
Ask for Refund Button Text Color: Set Ask for refund Button Color, which will show with a single item
Ask for Refund Button Background Color: Set Ask for refund Button Background Color which will show with a single item
Whole order Button Text Color: Set refund whole order Button text color, which will show at the end of the page
Whole order Button Text Background Color: Set the refund whole order button background color, which will show at the end of the page.
User Outgoing Text Message Color: Set the outgoing message text color for the user.
User Outgoing Message Text Background Color: Set the outgoing message background for the user.
Admin Outgoing Message Text Color: Set outgoing message text color for admin.
Admin Outgoing Message Background Color: Set the outgoing message background color for admin.
Send button Color: Customize the color of the send button.

Manage Refund Rules
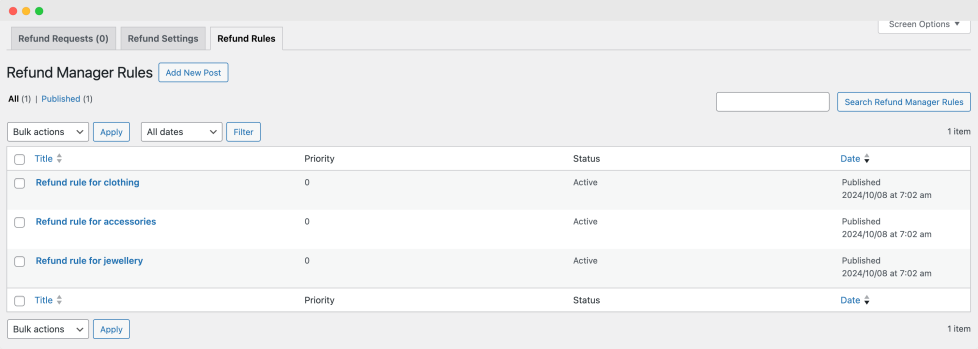
Go to WooCommerce > Refund Manager. You will see a detailed log of all refund rules. You can create and manage multiple refund rules from here.
By clicking on the refund rules section, you will be able to configure the “Log” of all refund rules created before. You can easily manage multiple with the provided option, such as:
- Add new rules
- Edit or trash the existing rules
- Execute bulk actions
- Filter products by dates
- Search Refund Manager Rules

Creating New Rules
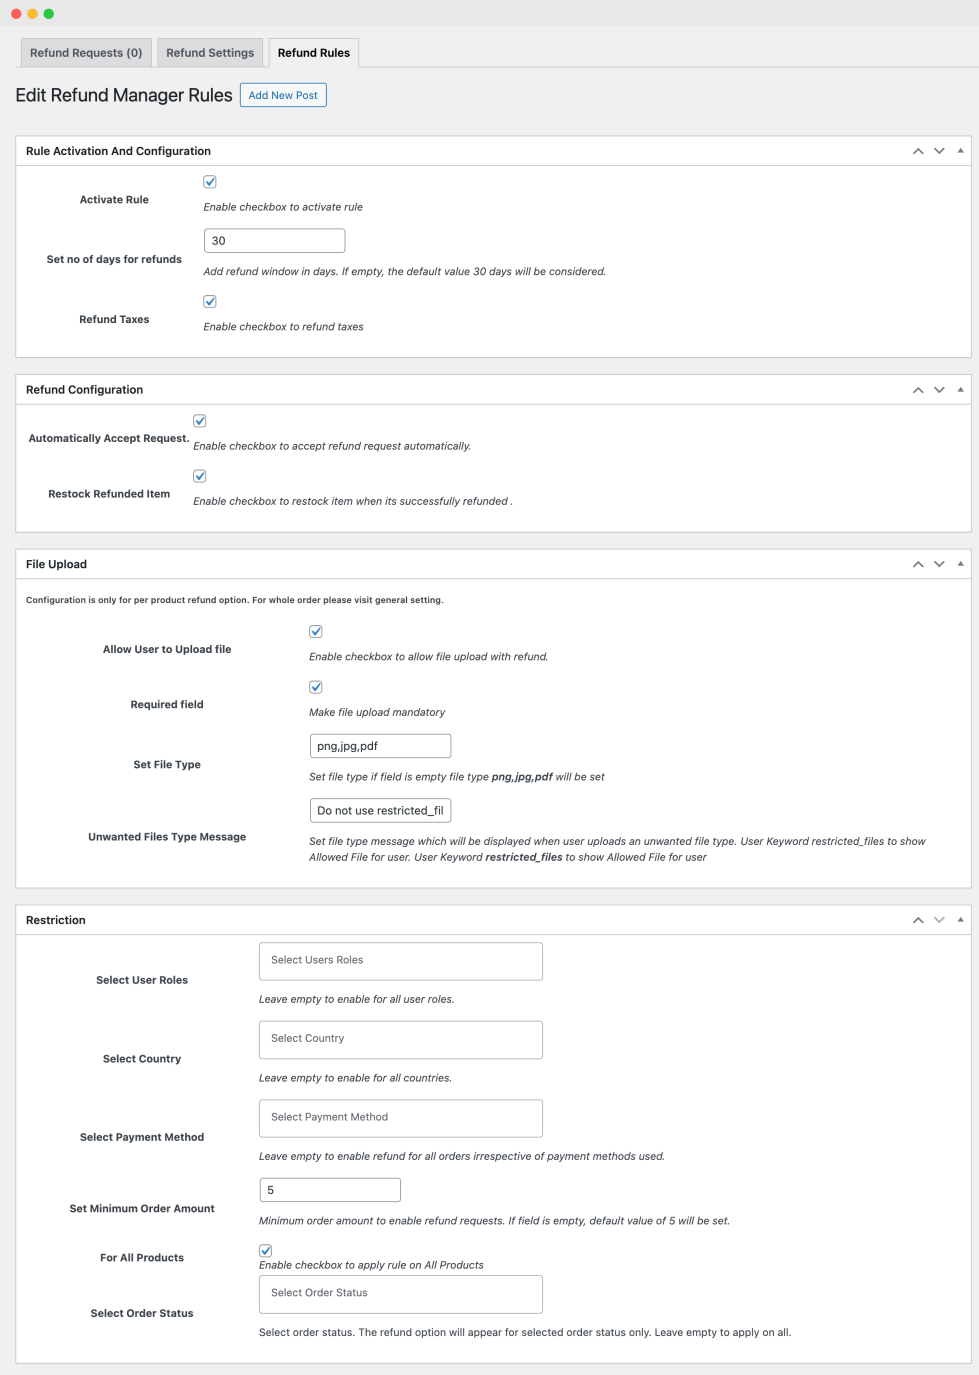
↑ Back to topGo > WooCommerce > Refund Manager, choose the refund rules section, and click “Add New Rule.” You will see a new page to provide information after clicking on the add new rule button. Following are the necessary details you will have to provide:
Add Title: Insert a unique title for the rule you are creating.
Customize Rule Activation and Configuration
↑ Back to topThe plugin helps you to easily activate and configure the smart refund manager rule with customization options like;
Activate Rule: Choose to enable the checkbox to activate the refund rule
Set Rule Priority: You can set the rule priority. The minimum value is 1; change it according to your preference.
Set the number of days for refunds: Enter the number of days for refund, but if you leave it empty, the default value of 30 days will be considered.
Refund Taxes: Enable the checkbox to refund taxes
Refund Configuration
Automatically Accept Request: Enable the checkbox to accept refund requests automatically.
Restock Refunded Item: Enable the checkbox to restock the item when it is successfully refunded.
File Upload
↑ Back to topThe configuration is only for the per-product refund option. If you want the whole order, you have to visit the general setting.
Allow User to Upload File: Choose to enable the checkbox to allow file upload with a refund simply.
Apply & Manage the Refund Restriction
The plugin allows you to apply the restriction on the refund while setting the refund rules. The restriction includes:
Select User Roles: Choose any of the one user roles to restrict or leave empty to enable for all user roles.
Select Country: Select the countries where customers will be able to refund the products or you can choose to leave empty to enable for all countries.
Select Payment Method: Choose any of the one payment method where the refund option is available:
You can leave it empty to enable a refund for all orders, regardless of the payment methods used.
Set Minimum Order Amount: To enable refund requests, select the minimum order amount. If the field is empty, the default value of 5 will be set.
For All Products: Enable the checkbox to apply the rule on All Products.
Select Order Status: Select an order status from the options below. The refund option will appear for the selected order status only. Leave it empty to apply to all.

Manage Refund Request Log
↑ Back to topGo to WooCommerce > Refund Manager you will see a detailed log of all refund requests. Here, you can create and manage multiple refund requests.
By clicking on the refund request section you will be able to configure the “Log” of all refund requests. The refund request log provides the title with some details like:
- Customer
- Order
- Products
- Date
- Request ID
- Status
- New Message

