Giveaway for WooCommerce is a full-featured plugin for creating and managing online giveaways in your WooCommerce Shop.
Installation
↑ Back to topTo start using a product from WooCommerce.com, you can use the “Add to store” functionality on the order confirmation page or the My subscriptions section in your account.
- Navigate to My subscriptions.
- Find the Add to store button next to the product you’re planning to install.
- Follow the instructions on the screen, and the product will be automatically added to your store.
Alternative options and more information at:
Managing WooCommerce.com subscriptions.

Server Configuration Requirement for Giveaways with a higher number of tickets
PHP max input variables: 10000 or higher
PHP post max size: 300M or higher
PHP memory limit: 2GB or higher
PHP time limit: 600 or higher
Supported Giveaway Types
↑ Back to topAutomatic Ticket Generation Giveaway
↑ Back to topIn this type of giveaway, the ticket number will be automatically generated once the user participates in the giveaway. The ticket details will be mailed to the user.
User selection giveaway tickets Numbers
↑ Back to topIn this type of giveaway, site admin can allow their users to choose their own ticket numbers for participating in the giveaway. The ticket details will be mailed to the user.
Supported Winning Item Selection Types
↑ Back to topProducts Inside the Site
↑ Back to top- In this type, you can choose one or more products sold on your site as the Giveaway Winning Item.
- Once the winner is decided(Automatically/Manually), an order will be created on behalf of the winner with the winning item for free of cost.
- The product can be shipped to the winner in case if the product is a physical product. If the product is a downloadable product, the winner will gain access to files.
- The Giveaway Winning Item can be accessed from the My Account Page > Orders similar to any other order.
Products Outside the Site
↑ Back to top- You can choose this type if your Giveaway Winning Item is not sold on your site.
- You may have to create a page that explains what the winners will receive if they participate in the giveaway and link that page’s URL in the URL option provided.
- Once the winner(s) are decided, you will have to manage the process of sending the winning items to the winners outside the site.
Setup and Configuration
↑ Back to topServer Cron Configuration
↑ Back to topGiveaway for WooCommerce Requires Server Cron in order for the plugin to work. To setup Server cron do the following steps.
1. Login to the cPanel of your site
2. Locate “Cron Jobs” within the cPanel
3. Under the “Add New Cron Job” section, fill the following data
a. Common Settings
In this section, you can set up how frequently the Cron should run. For Example, if the value is set as “Once Per Minute”, then the cron will run once every minute. Once the cron is triggered, the following activities will be updated.
- Starting Future Giveaways
- Ending Closed Giveaways
- Automatic Relist for finished and failed giveaway
- Ending Soon Giveaway Email Notifications
b. Update Cron Command
Starting Future Lotteries and Ending Closed Giveaways
wget -q -O – http://www.your-domain.com/ lty_lottery_cron=update&token=YOUR_SECURITY_TOKEN
Automatic Relist for finished and failed giveaway
wget -q -O – http://www.your-domain.com/?lty_lottery_cron=relist&token=YOUR_SECURITY_TOKEN
Ending Soon Email Notifications
wget -q -O – http://www.your-domain.com/?lty_lottery_cron=ending_soon&token=YOUR_SECURITY_TOKEN
Note:
- Replace “your-domain.com” with your actual domain name.
- Replace “YOUR_SECURITY_TOKEN” with the token generated in the plugin settings(Giveaway -> Settings -> Advanced -> Cron -> Cron Type ->Server Cron).
- You can regenerate the security token from the Giveaway Server Cron settings. If the token is regenerated, make sure to update it in the cron URLs to ensure uninterrupted execution. Save the settings once regenerate the security token.
- The security token helps protect cron URLs from unauthorized access.
Plugin Settings
General
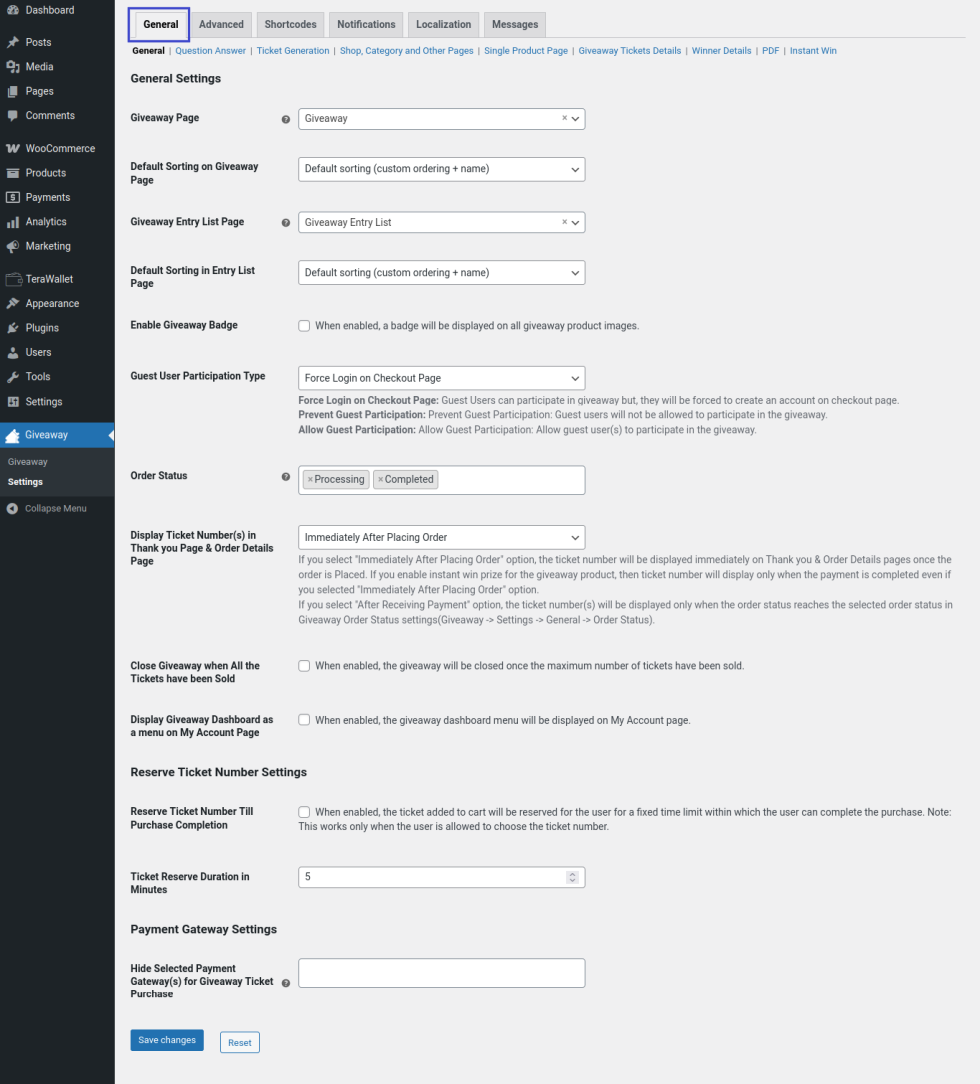
General Settings
- Once the plugin is installed, a page for displaying the giveaway products will be automatically created and assigned. If you want to modify the page in which the giveaway products are displayed, you can do so by selecting a different page in the “Giveaway Page” option.
- The giveaway products created will be displayed in the giveaway page. The order in which the giveaway products should be displayed can be customized in the “Default Sorting in Giveaway Page”.
- A separate page to list the On-going, Closed, Finished and Failed giveaway products will be available to the user. Your users can view additional details regarding the giveaway product from this page. To display this information on a different page, you can do so by customizing the “Giveaway Entry List Page” option.
- If you want to differentiate normal products from Giveaway products, you can do so by adding a badge to the product image. To configure a badge, enable the “Enable giveaway Badge” option.
- By default, an image will be selected. If you want to change the badge icon, you can do so by choosing a new image.
- By default when guest users try to participate in the giveaway, they will be forced to login on the checkout page. Optionally you can completely prevent guest user participation/allow guest user participation by customizing the “Guest User Participation Type” option.
- By Default, the Giveaway will reach “Completed” status when their payment order reaches “Processing or Completed”. If you want to customize the order status, you can do so by modifying the “Order Status” option.
- By default on the thank you page, the giveaway ticket numbers will be displayed immediately after the order is placed. If you wish to ticket numbers only after payment confirmation, you can do so by customizing the “Display Ticket Number(s) in Thank You Page & Order Details Page” option.
- By default, all giveaway products will be closed only when the end date has reached. If you want to close the giveaway products once all the tickets have been sold, you can do so by enabling the “Close Giveaway when All the Tickets have been Sold”.
Reserve Ticket Number Settings
- In “Users are allowed to choose the Ticket Number” mode, if you wish to hold the ticket number for a specified time period, you can do so by enabling the “Reserve Ticket Number Till Purchase Completion” option.
- You can customize the duration in the “Ticket Reserve Duration in Minutes” option.
Question Answer

Q&A Settings
- If you want to ask a Question to your users before purchasing a ticket, you can do so by enabling the “Ask a Question before Purchasing Tickets”.
- By default, the user will not be forced to answer the Question to purchase a ticket. If you want to force your users to answer the question, you can do so by enabling the “Force Users to Answer the Question”.
- By default, there is no time limit for answering the question. If you wish to place a time limit for answering the question, you can do so by selecting “Limited” in the Q/A Limit Type option. You can set the time limit in the “Set Time Limit” option.
- If you wish to prevent ticket generation for choosing incorrect answer , you can do so by enabling the “Don’t Generate Ticket Numbers for Incorrectly Answered Question” option.
- By default, the user will be allowed to purchase a ticket once they select an answer. The answer will not be verified. If you want to allow your users to purchase tickets only when a correct answer is selected, enable the “Verify Answer Purchasing Giveaway”.
- By default, if your users answer incorrectly for 1 time, they will not be allowed to participate in that giveaway. You can customize the limit to any value you want or you can set it to unlimited.
- In the “Your Question” option, input the question which you want to ask your users. You can display all the answer options at once or display the options in a dropdown by customizing the “Options Display Type” option.
- To add answer options, click the “Add Answer Options” button. You can mark the correct answer by selecting the “Correct Answer” checkbox next to the answer. You can add any number of options.
Ticket Generation
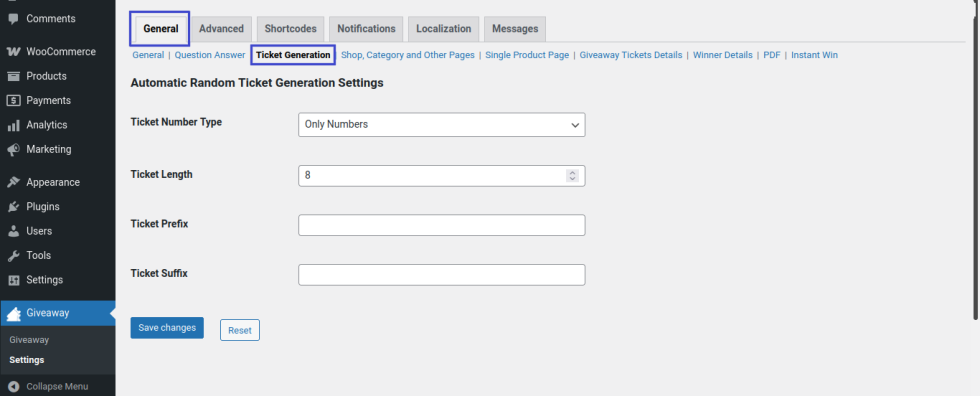
Automatic Random Ticket Generation Settings
- You can configure the ticket attributes like Ticket Number Type, Ticket Length, Ticket Prefix and Ticket suffix.
- Please note this options not applicable for User selection giveaway tickets Numbers type.
Shop, Category and Other Pages
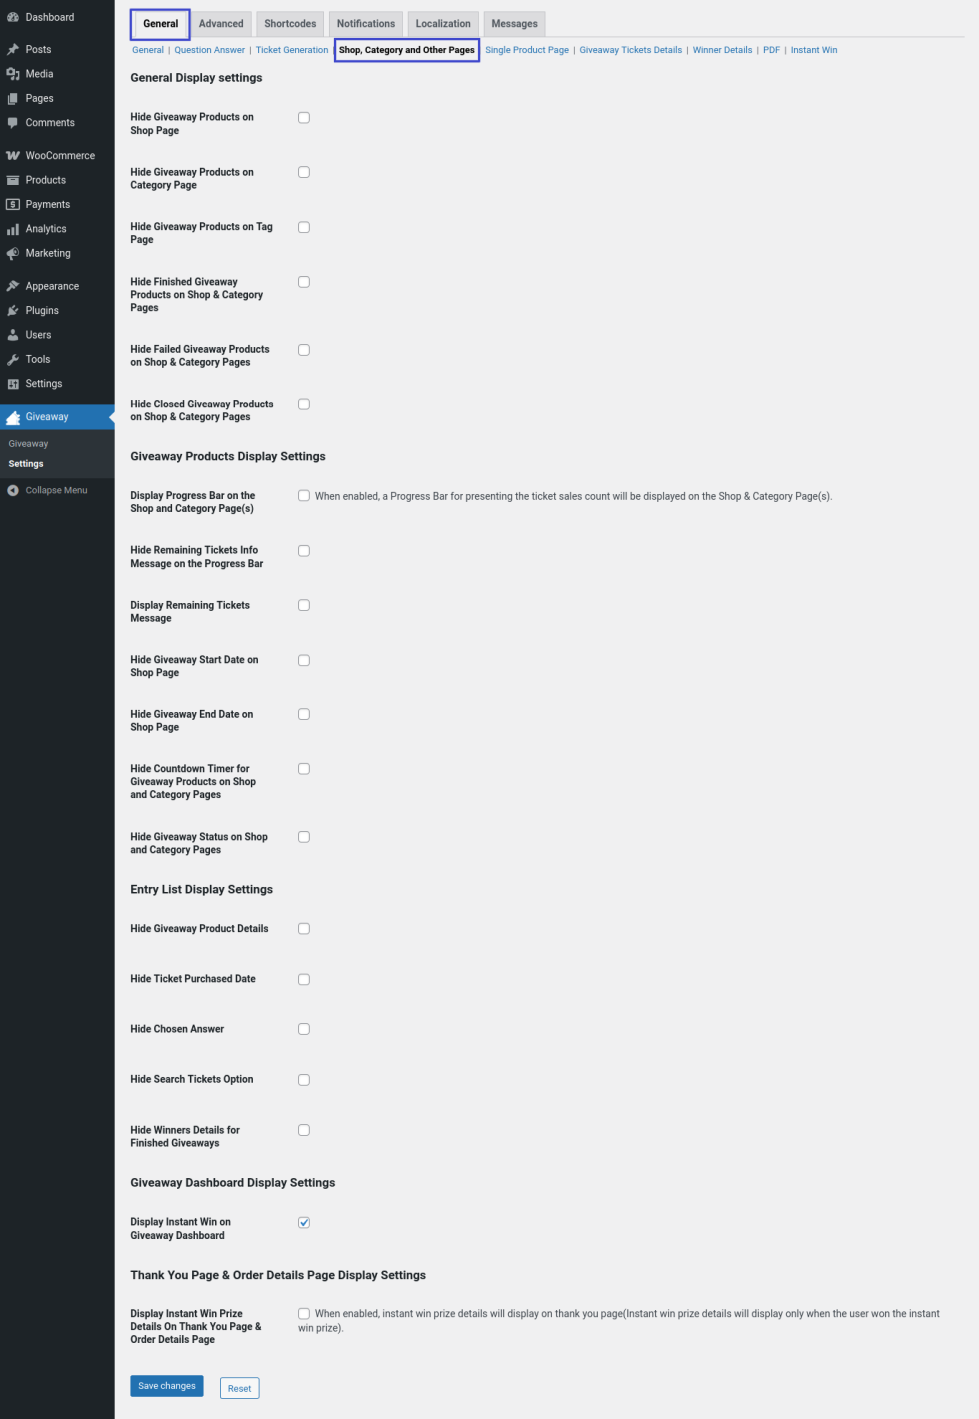
General Display Settings
- By default, Giveaway products will be visible in shop page. If you want to hide the Giveaway Products on the shop page, you can do so by enabling “Hide Giveaway Products on Shop Page”.
- By default, Giveaway products will be visible in category page. If you want to hide the giveaway products on the category page, you can do so by enabling “Hide Giveaway Products on Category Page”.
- By default, giveaway products will be visible in Tag page. If you want to hide the giveaway products from the tag page, you can do so by enabling “Hide Giveaway Products on Tag Page”.
- By default, Finished Giveaway products will be visible in shop & category pages. If you want to hide the Finished Giveaway products from the shop and category pages, you can do so by enabling “Hide Finished Giveaway Products on Shop & Category pages”.
- By default, Failed Giveaway products will be visible in shop & category pages. If you want to hide the Failed Giveaway products from the shop and category pages, you can do so by enabling “Hide Failed Giveaway Products on Shop & Category pages”.
- By default, Closed Giveaway products will be visible in shop & category pages. If you want to hide the Closed Giveaway products from the shop and category pages, you can do so by enabling “Hide Closed Giveaway Products on Shop & Category pages”.
Giveaway Products Display Settings
- If you want to display a progress bar on the shop and category pages, you can do so by enabling “Display Progress Bar in the Shop and Category Page(s)”.
- By default, the Remaining Ticket Info will be visible in the Progress Bar. If you want to hide the Remaining Ticket Info in the Progress Bar, you can do so by enabling the “Hide Remaining Ticket Info message in the Progress bar”.
- By default, the Giveaway Start Date will be visible on the shop page. If you want to hide the Countdown Timer, you can do so by enabling “Hide Giveaway Start Date on Shop Page”.
- By default, the Giveaway End Date will be visible on the shop page. If you want to hide the Countdown Timer, you can do so by enabling “Hide Giveaway End Date on Shop Page”.
- By default, the Countdown timer for the Giveaway will be displayed. If you want to hide the countdown timer, enable the “Hide Countdown timer for the Giveaway Products in Shop and Category Pages” option.
- If you wish to hide the Giveaway Status on shop and category pages, you can do so by enabling the “Hide Giveaway Status on Shop and Category Pages” option.
Single Product Page

General Settings
- To add multiple quantities of the ticket to the cart, the default quantity field will be available. If you wish to provide a range slider for choosing the quantity, you can do so by customizing the “Quantity Selector Type” option.
- If you want to disable the “Participate Now” till the user answers the question and selects the ticket number, enable the “Disable Participate Now button when Question Answer and Ticket Number not Selected” option.
- If you wish to redirect your users to the checkout page by clicking the Participate Now button, you can do so by enabling the “Enable Participate Now button Redirection to Checkout Page” option.
- If you wish to display the ticket search bar on the product page, you can do so by enabling the “Enable Ticket Search Bar” option.
- If you wish to hide Instant Win Prizes tab on the product page, you can do so by enabling the “Hide Instant Win Prizes Tab” option.
Display Settings
- By default, Giveaway status will be visible on the single product page. If you want to hide the Giveaway status, you can do so by enabling “Hide Giveaway Status on Single Product Page”.
- By default, the Giveaway start date will be visible on the single product page. If you want to hide the countdown timer, you can do so by enabling “Hide Giveaway Start Date on Single Product Page”.
- By default, the Giveaway End Date will be visible on the single product page. If you want to hide the countdown timer, you can do so by enabling “Hide Giveaway End Date on Single Product Page”.
- By default, countdown timer will be visible in the single product pages. If you want to hide the countdown timer, you can do so by enabling “Hide Countdown Timer for Single Product Pages”.
- By default, timezone info will be visible in the single product page. If you want to hide the timezone info, you can do so by enabling “Hide Timezone info in the Single Product Page”.
- By default, Minimum Ticket Info will be visible on the single product page. If you want to hide the Minimum Ticket Info, you can do so by enabling “Hide Minimum Ticket info in the Single Product Page”.
- By default, Maximum Ticket Info will be visible on the single product page. If you want to hide the Maximum Ticket Info, you can do so by enabling “Hide Maximum Ticket info in the Single Product Page”.
- By default, Minimum Tickets per user info will be visible on the single product page. If you want to hide the Minimum Tickets per user info, you can do so by enabling “Hide Minimum Tickets per user info in the Single Product Page”.
- By default, Maximum Tickets per user info will be visible on the single product page. If you want to hide the Maximum Tickets per user info, you can do so by enabling “Hide Maximum Tickets per user info in the Single Product Page”.
- If you want to display a progress bar on the single product page, you can do so by enabling “Display Progress Bar”.
- By default, the Winner Message will be visible on the single product page. If you want to hide the Winner Message, you can do so by enabling “Hide Winner Message on Single Product Page”.
- By default, the Giveaway Tickets Sold count will be visible on the single product page. If you want to hide the Giveaway Tickets Sold count, you can do so by enabling “Hide Giveaway Tickets Sold on Single Product Page”.
- By default, the bidder name will be masked and displayed. If you want to display the name of the bidder, disable the “Mask the user name in Ticket Logs tab on the Single product page” option.
Alert Settings
If you wish to hide the confirmation alert when the user answers a question correctly, you can do so by enabling the “Hide Confirmation Alert when Selected the Answer for the Question(To make sure the selected Answer)” option.
Giveaway Ticket Details
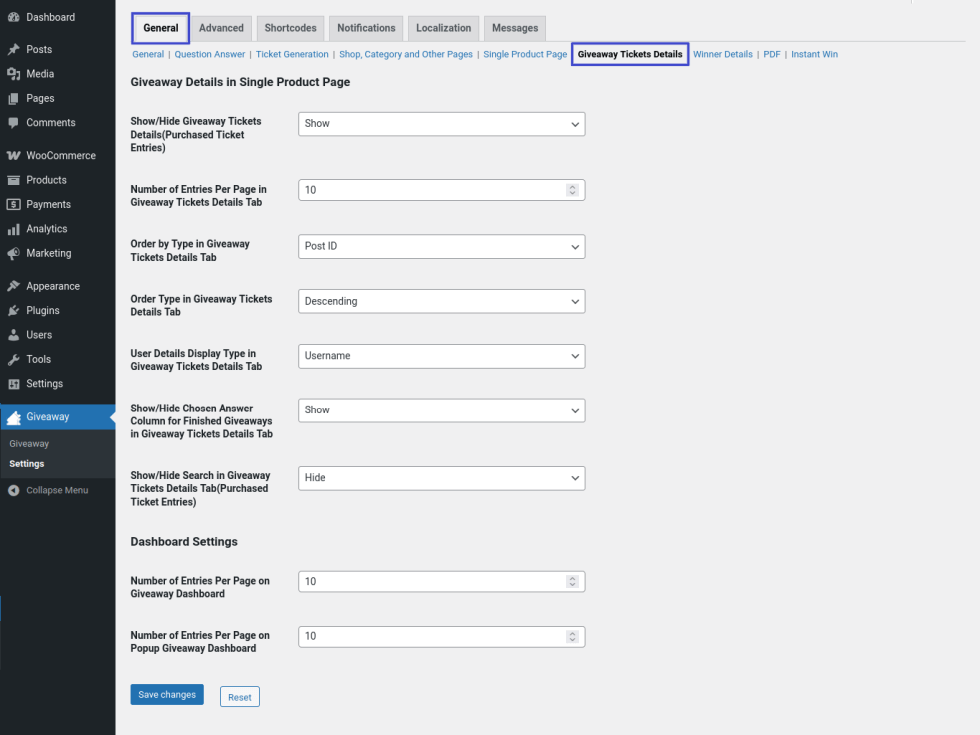
Giveaway Ticket Details on the Single Product Page
You can customize how the purchased giveaway tickets are displayed on the single product page in this section.
Dashboard Settings
You can customize the number entries of page displayed in the giveaway dashboard in this section.
Winner Details
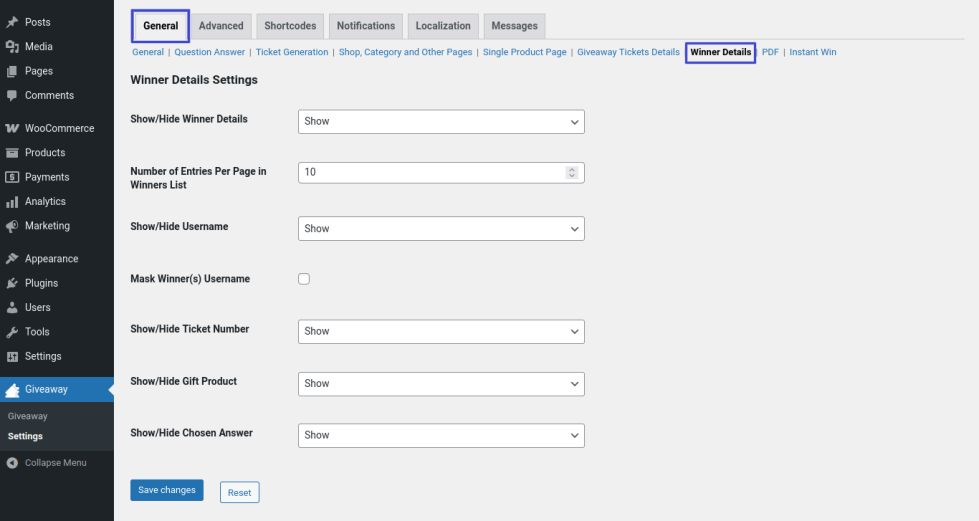
You can customize how the winner details are presented on the product page in the section.
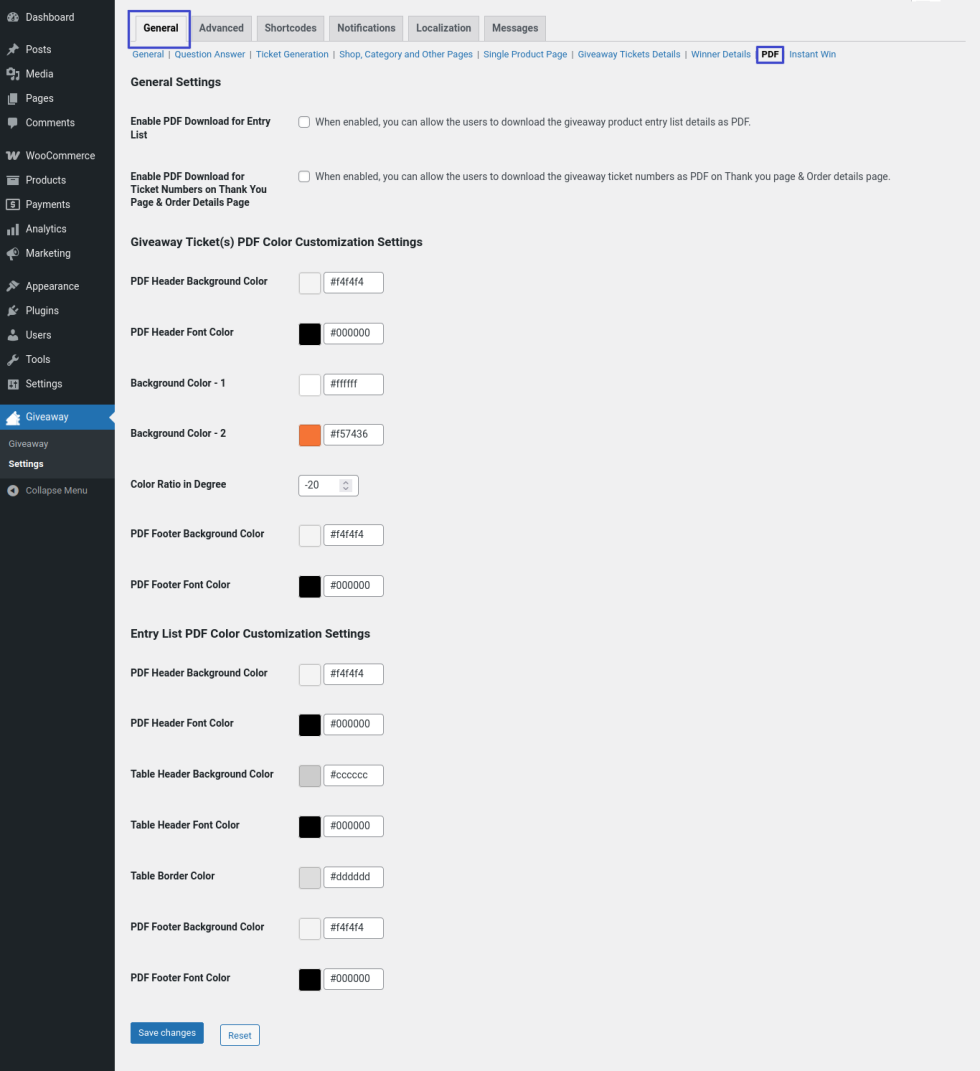
PDF for Entry List
- You can enable PDF for Entry List to download using Enable PDF Download for Entry List option.
- You can set Logo Image on the header of Entry List PDF by Upload Site logo in Entry List PDF header option.
- Customize Width & Height(In pixels) for Logo Image on Entry List PDF.
- Customizable Entry List PDF file name using Entry List PDF File Name option.
PDF for Tickets
- You can enable PDF for giveaway ticket number using Enable PDF Download for Ticket numbers on Thank you page & Order details page.
- Customizable PDF giveaway ticket number file name using Giveaway Ticket(s) PDF File Name option.
Giveaway Ticket(s) PDF Color Customization Settings
- Customizable option for giveaway ticket PDF background color -1 using Background Color – 1 option
- Customizable option for giveaway ticket PDF background color -2 using Background Color – 2 option
You can set color ratio in degree between Background Color – 1 & Background Color – 2 of giveaway ticket PDF using Color Ratio in Degree option.
Entry List PDF Color Customization Settings
Here you can customize the color for the Entry List PDF
- PDF Header Background Color
- PDF Header Font Color
- Table Header Background Color
- Table Header Font Color
- Table Border Color
- PDF Footer Background Color
- PDF Footer Font Color
Instant Win

In this section, you can configure the new coupon creation settings for instant win prize.
Advanced
General
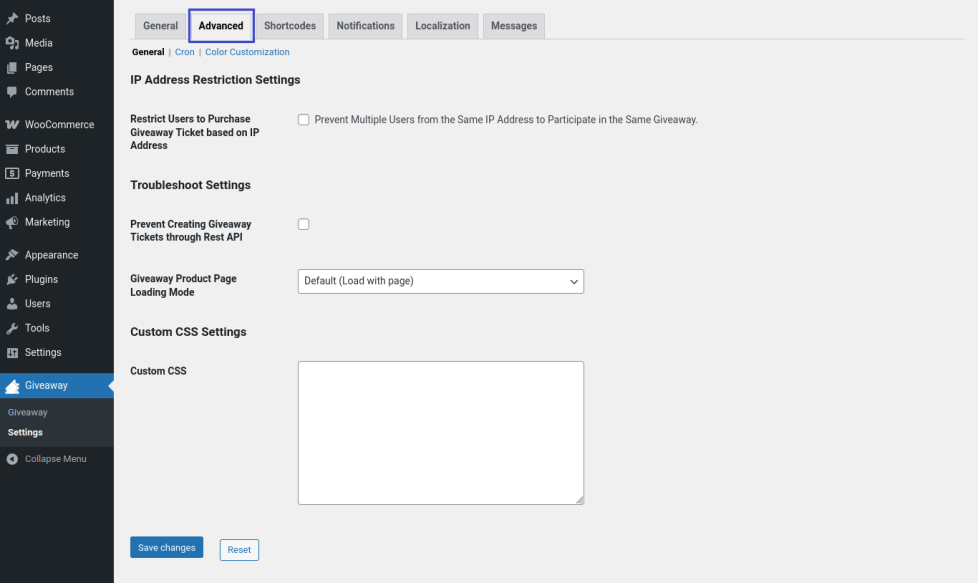
IP Address Restriction Settings
By default, multiple users from the same IP Address can participate in a giveaway. If you want to prevent multiple users from the same IP from participating in the giveaway, you can do by enabling the “Restrict User to Purchase Giveaway Ticket based on IP address” option.
Export CSV File Settings
You can customize the file name of the Export CSV file in the “Export CSV File Name” option.
Cron
Cron Settings
There are 2 types of Crons
1. WP Cron
WP Cron is supported in all WordPress sites by default(Unless turned off manually in the wp-config file). The main disadvantage of WP Cron is that it will trigger only when someone visits the site. For example, If there is no site activity for some time say 10 days, the cron will not be triggered on those 10 days.
2. Server Cron
Server Cron is an alternate to WP Cron. The main advantage of Server Cron is that it is not dependent on site activity. But, Server Cron requires separate configuration. As far as we know, it cannot be configured using a Plugin within the site. It can only be configured from the site’s C-Panel or control panel.
If you want to use WP Cron, then in “Select Cron Type” select “WP Cron”. If you want to run Server cron, select “Server Cron”. Please follow the steps mentioned in the “Server Cron Configuration” section.
Color Customization
You can customize the color of the giveaway elements in single product page, shop, category and tag pages.
Shortcodes
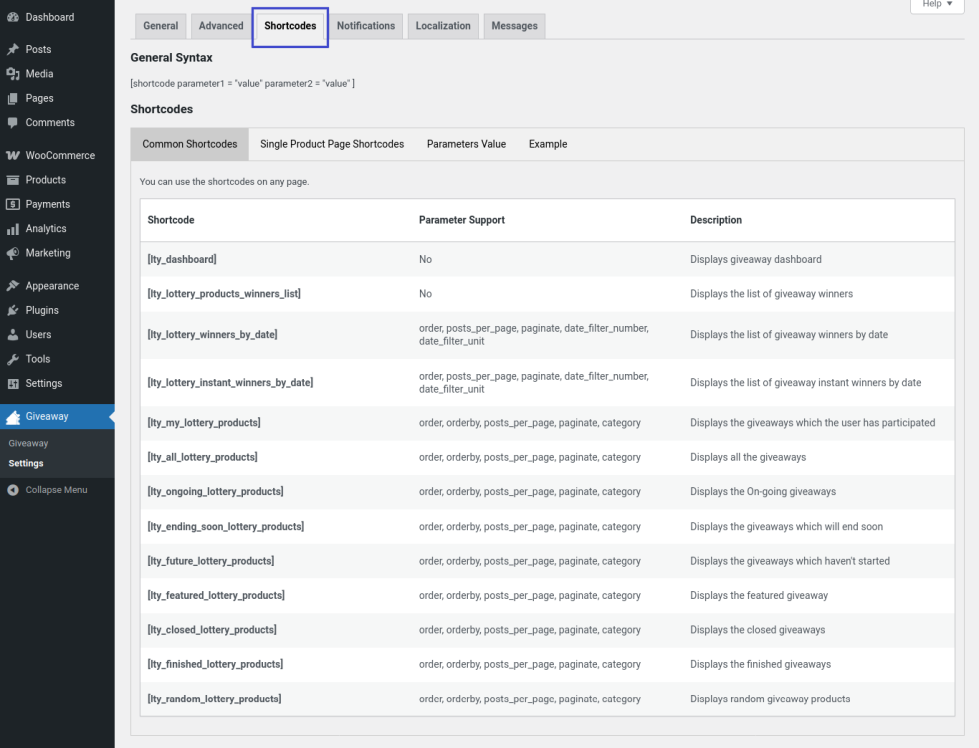
In this section, you can find the supported shortcodes along with their purpose.
Notifications
In this section, you can find the supported email notifications. Notifications can be turned On/Off as per preference.
Localization
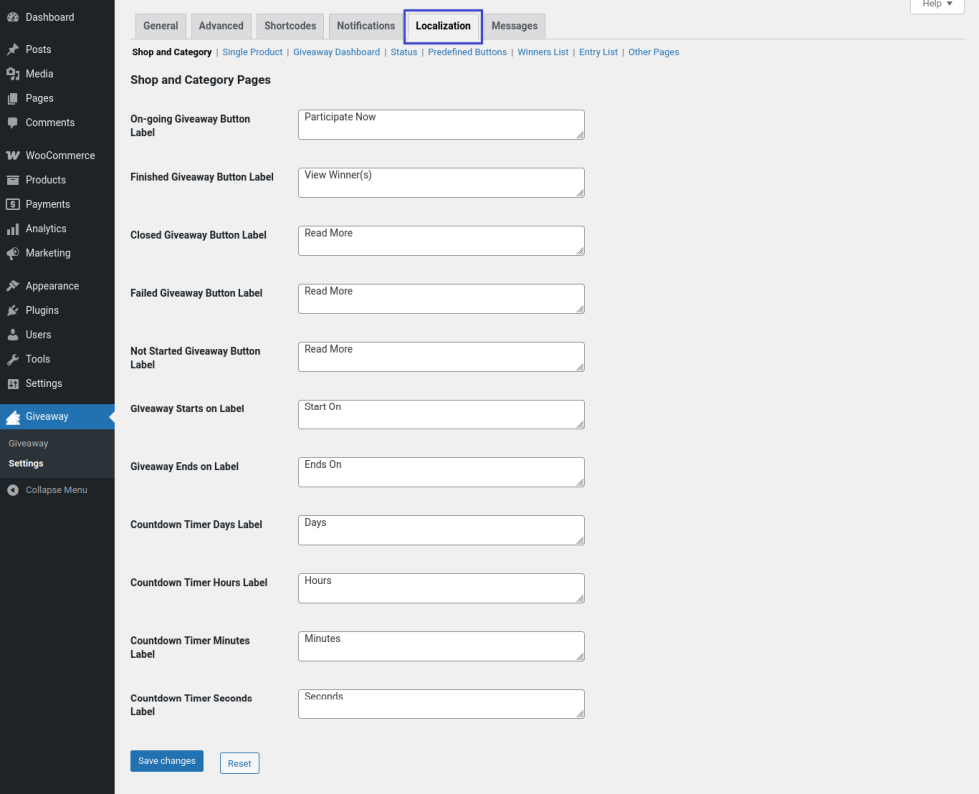
In this section, the labels displayed for the Giveaway products can be customized.
Messages

In this section, the messages displayed while interacting with Giveaway products can be customized.
Product Configuration
↑ Back to top- Once the initial configuration is completed, a Giveaway product has to be created.
- To create a new product go to WordPress Dashboard > Products > Add New.
- In the Product Type selection, select “Giveaway”.
Giveaway
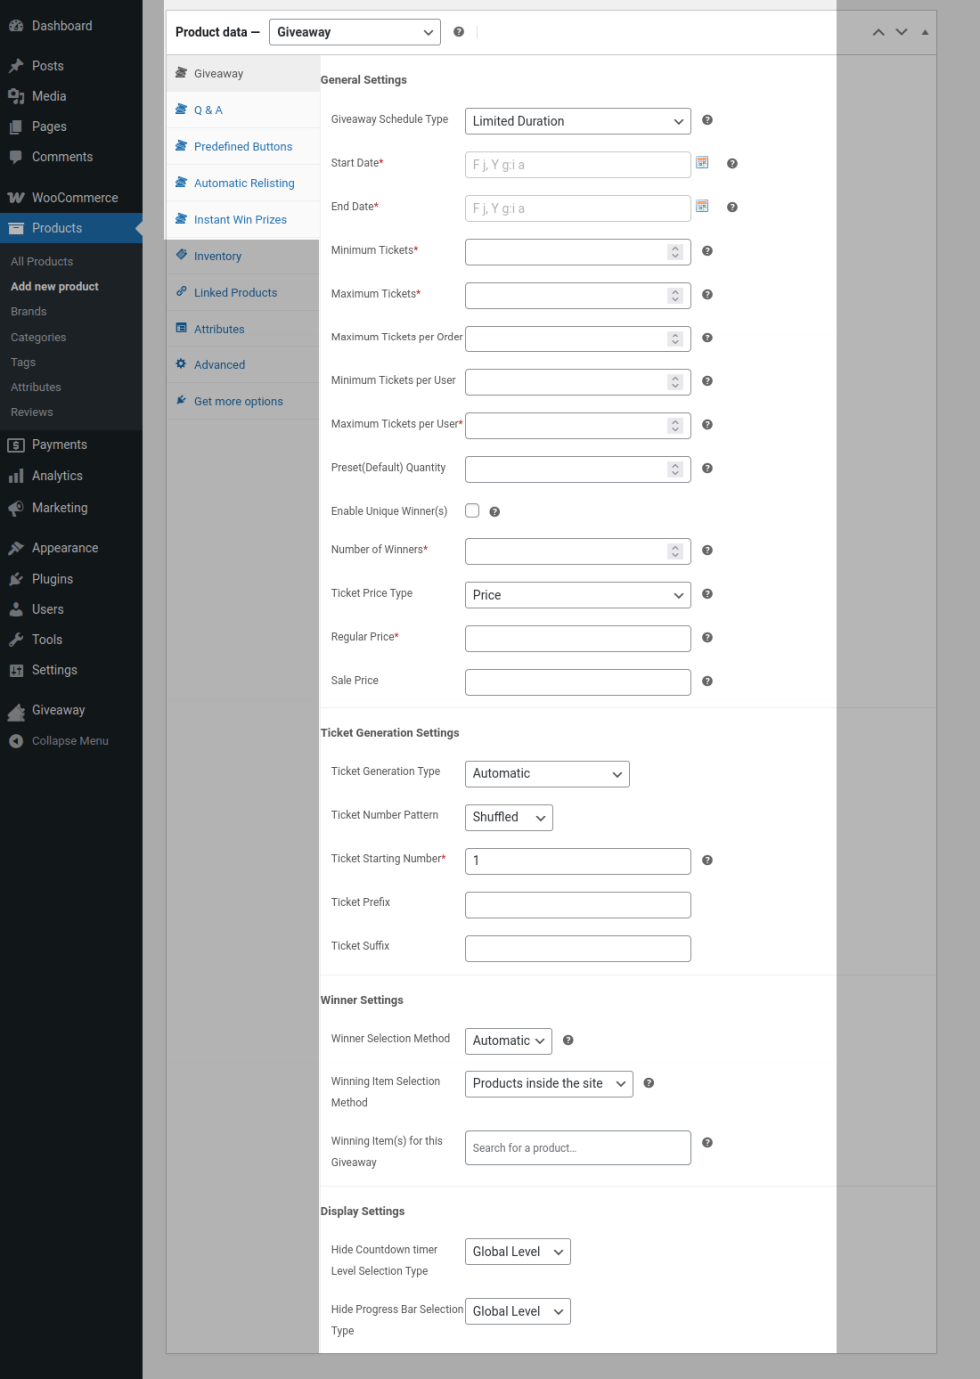
- Fill in the following details in the section,
- Giveaway Schedule Type(Limited)
- Start Date
- End Date
- Giveaway Schedule Type(Unlimited)
- Start Date
- Minimum Tickets
- Maximum Tickets
- Minimum Tickets Per Order
- Maximum Tickets Per Order
- Number of Winner
- Ticket Price Type
- Regular Price
- Giveaway Schedule Type(Limited)
- By default, the ticket number will be automatically generated.
Automatic Ticket Type
- If you choose to generate tickets automatically, the ticket numbers can be generated in the following patterns,
i. Random – Ticket numbers will be generated randomly.
ii. Sequential – Ticket numbers will be generated in sequential order. The Starting Number, Prefix and Suffix can be customized.
iii. Shuffled – Ticket numbers will be shuffled and assigned to the user. The Starting Number, Prefix and Suffix can be customized.
User Chooses Ticket Type
If you want the user to choose the ticket number(s), You can select the Allow Users to Choose Ticket Numbers option in the Ticket Generation Type dropdown.
i. Sequential – Ticket numbers will be generated & display in a sequential order. The Starting Number, Prefix and Suffix can be customized.
ii. Shuffled – Ticket numbers will be generated & display in a shuffled order. The Starting Number, Prefix and Suffix can be customized.
iii. Use Alphabet Ticket Numbers:
- Enable to display ticket number with Alphabet, Example: (A1, A2, B1, B2,………E1, E2).
- An option to display Alphabet with Sequence number, Example: (A1, A2, B3, B4,………E10, E11).
iv. Number of Tickets per Tab:
Set the value to display the number of ticket numbers per tab.
v. Display View More Tickets in each Tab
- If you have more tickets in a tab, You can split and display the tickets in multiple tabs by enabling the View More Tickets in per Tab option.
- Set value in Set Number of tickets in View More field to split and display the ticket numbers.
vi. Enable Lucky Dip
- When enabled, users can allow the Giveaway System to randomly pick a ticket number for them by clicking a Lucky Dip button and selecting the ticket quantity.
Lucky Dip Method
Display & Add the Tickets to the Cart Directly:
When selected, the ticket number will be displayed & added to the cart automatically.
Only Display the Tickets:
When selected, the ticket number will only be displayed and will not be added to the cart. User can re-generate the ticket number. Finally, once the user finalizes the ticket number, they can add the finalized ticket number(s) to the cart.
vii. Hide Sold Tickets per Tab
When enabled, the sold tickets in each tab will be hidden.
- By default, the winner of the giveaway will be automatically decided. If you want to manually pick the winner for the giveaway, you can do so by customizing the “Winner Selection Method” option.
- Configure the Winning Item Selection Method as per your preference.
- By default, Countdown Timer visibility will be decided based on Global Level settings. If you wish to override the settings for the product, you can do so by setting Product Level in the “Hide Countdown Timer Level Selection Type” option.
- By default, Progress Bar visibility will be decided based on Global Level settings. If you wish to override the settings for the product, you can do so by setting Product Level in the “Hide Progress Bar Selection Type” option.
Q&A
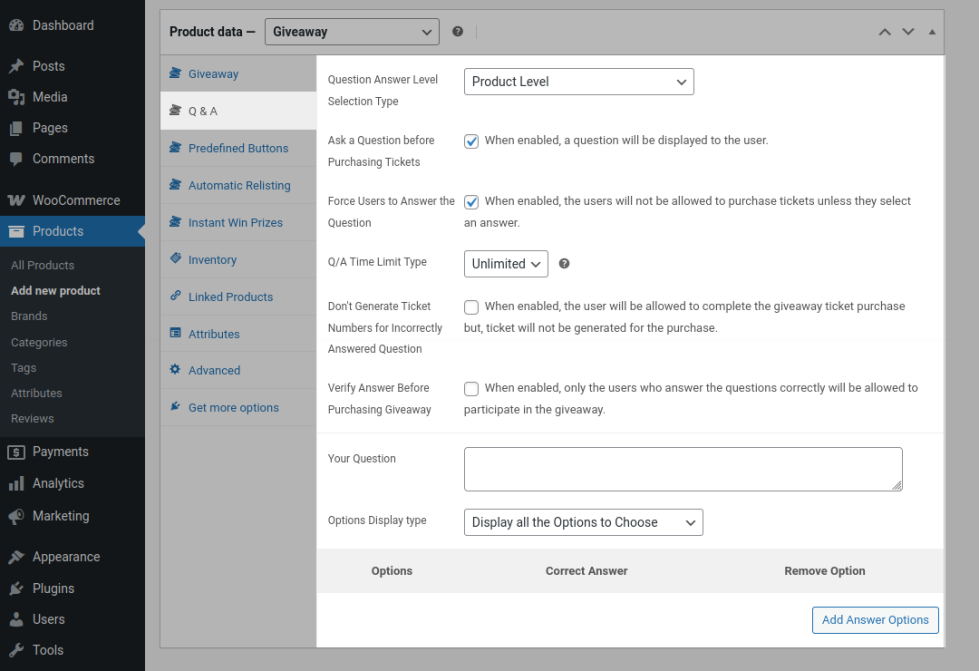
By default, When Q&A is enabled and configured, it will apply to all the giveaway products. If you want to customize the Q & A for a particular Product, then locate the “Q&A” section.
- In Question Answer Level Selection Type select “Product Level”.
- Enable the “Ask a Question before Purchasing Tickets” checkbox.
- If you want to force your users to answer the question before participating, enable the “Force Users to Answer the Question” checkbox.
- Enter your question in the “Your Question” field.
- You can provide any number of options you want to your users. To add an option, click the “Add Answer Options” button.
- To set the correct answer, enable the “Correct Answer” checkbox next to the option.
Predefined Buttons
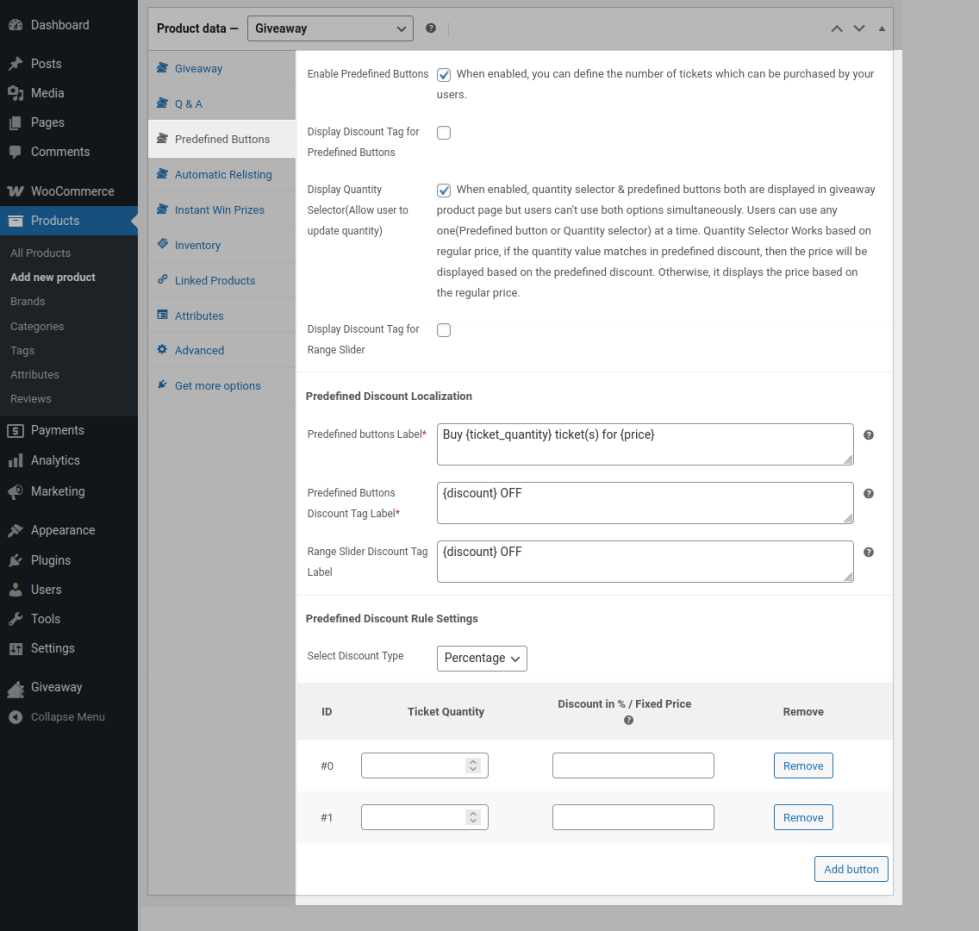
To optionally offer multiple tickets for a single price, the Predefined Buttons can be used.
- Enable the Enable Predefined Buttons checkbox.
- Enable Display Quantity Selector(Allow user to update quantity or use Predefined Button).
- Display discount tag for predefined buttons by enabling Display Discount Tag for Predefined Buttons checkbox.
- In Select Discount Type select the discount type(Percentage Or Fixed) of discount you wish to offer.
- In the Ticket Quantity, input the number of tickets which has to be purchased by the user. In the Discount field, input the discount value.
- You can create any number of buttons for a single product.
Automatic Relisting

Finished Giveaway Relisting
- If you wish to relist giveaway when it is successfully finished, you can do so by enabling the “Enable Finished Giveaway Relisting” option.
- You can set the validity of the relisted giveaway in the Set Relist Duration option.
- If you wish to relist the giveaway after a pause, you can do so by enabling the “Enable Pause Time to Relist” option.
- You can set the validity of the pause duration in the Set Pause Time to Relist option.
- If you wish to relist the giveaway for an indefinite period, you can do so by setting the value as Limited in the Finished Relitst Type option.
Failed Giveaway Relisting
- If you wish to relist a giveaway when it has failed, you can do so by enabling the “Enable Relist for Failed Giveaway” option.
- You can set the validity of the relisted giveaway in the Set Relist Duration option.
- If you wish to relist the giveaway after a pause, you can do so by enabling the “Enable Pause Time to Relist” option.
- You can set the validity of the pause duration in the Set Pause Time to Relist option.
- If you wish to relist the giveaway for an indefinite period, you can do so by setting the value as Limited in the Finished Relitst Type option.
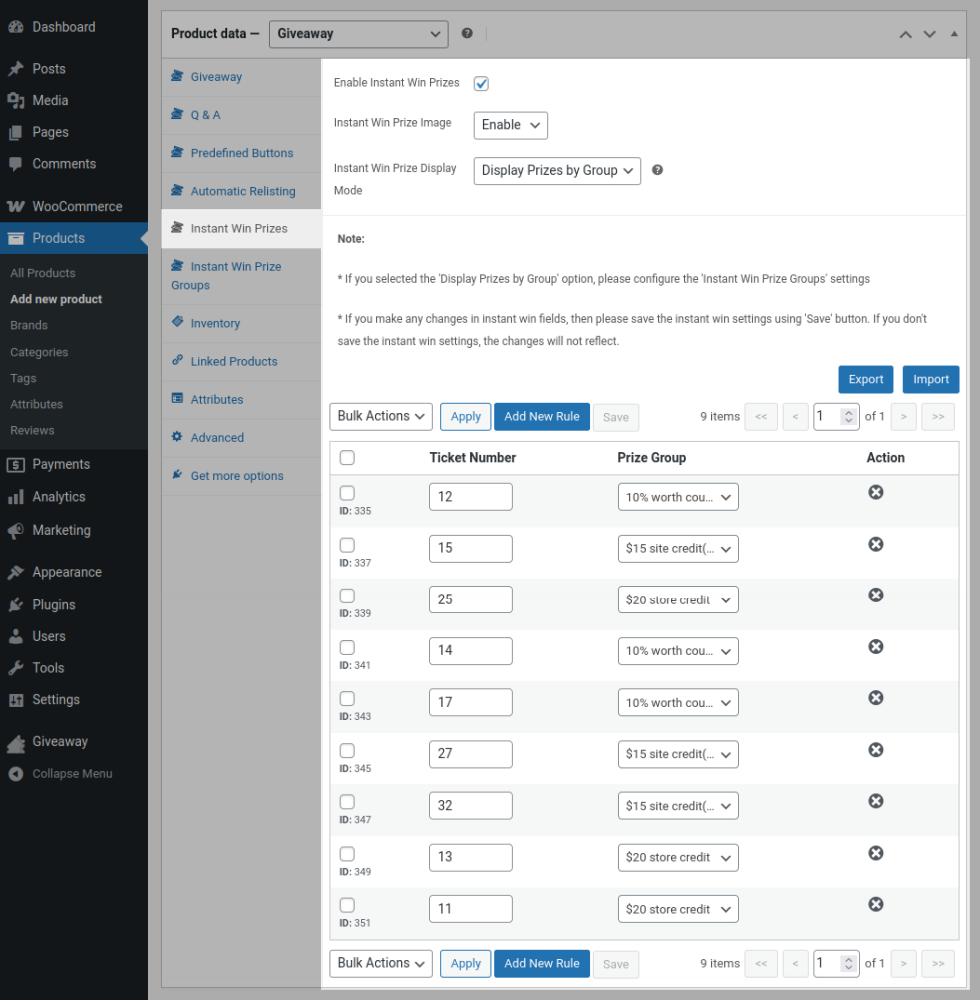
Instant Win Prizes
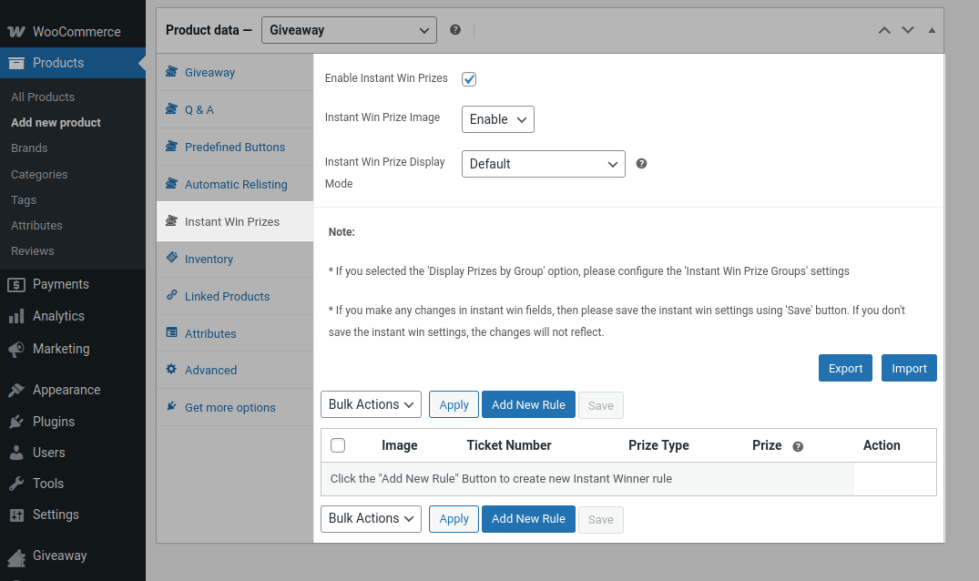
Instant Win Prize Rule Settings
- To offer Instant Win Prizes to your users for purchasing giveaway tickets.
- Instant Win Prize is applicable only for “Automatic Ticket Generation” type & “User Chooses Ticket” type.
- Enable the Instant Win Prize checkbox.
- Enable Display Image for Instant Win Prize. If the option is enabled, you can set image for each instant win prize on rule settings.
- If you wish to display an image for Instant Win Prizes, enable the Display Image for Instant Win Prize checkbox. If the option is enabled, you can set image for each instant win prize on rule settings.
- By default Instant Win Prize Display Mode will be set in Default option(Table format).
- Click on the Add New Rule button to view the Instant Win Prize rule settings.
- Enable Display Image for Instant Win Prize. If the option is enabled, you can set image for each instant win prize on rule settings.
- Fill in the eligible ticket numbers one number per row and the information on the gift the user will be receiving.
- You can also export the instant win settings data as csv file and able import to the data to another giveaway product instant win settings.
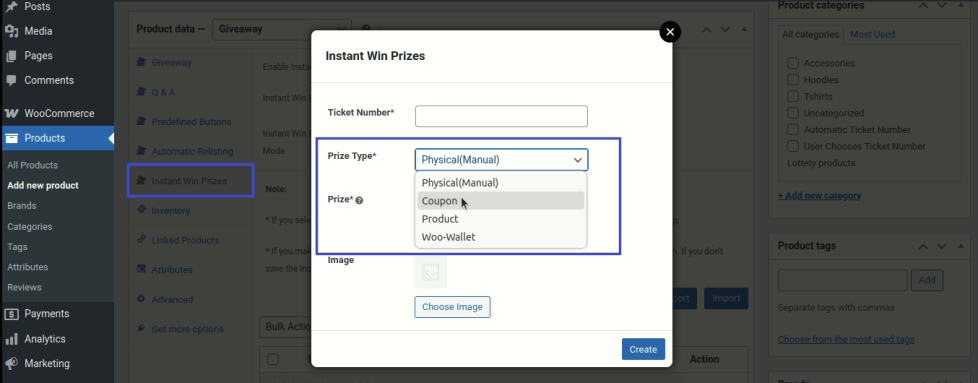
Physical
If you select Physical option in Prize Type dropdown, you can give the prize to the instant winner manually. Enter the prize details in Prize text field.
Coupon
If you wish to offer a WooCommerce Coupon as an Instant Win Prize, select Coupon option in Prize Type dropdown.
- Select the Coupon Type dropdown option to create New Coupon or Existing Coupon.
- Before selecting the New coupon option, please configure the Instant Winner Coupon Creation Settings. Go to Giveaway -> Settings -> General -> Instant Win -> Instant Winner Coupon Creation Settings
- Select New Coupon option on Coupon Type dropdown in Instant Win Prizes rule. settings after configured Instant Winner Coupon Creation Settings.
- Select Percentage or Fixed type in Coupon Discount Type.
- Enter the Coupon Discount Value.
- Enter the prize details in Prize text field.
Wallet
This plugin is compatible with Wallet for WooCommerce. You can offer a store credit as an Instant Win Prize.
- Select Wallet option in Prize Type dropdown.
- Enter the site credit value in wallet credit value field.
- Enter the prize details in Prize text field.
Note
This option will be visible only when the Wallet for WooCommerce plugin is installed and it is active.
Store Credit(Store Credit for WooCommerce ) for Instant Win Prize
This plugin is compatible with Store Credit(Store Credit for WooCommerce). You can offer a store credit as an Instant Win Prize.
If you select Store Credit option in PrizeType dropdown
- Enter the site credit value in store credit value field.
- Enter the prize details in Prize text field.
Store Credit(Smart Coupon ) for Instant Win Prize
This plugin is compatible with Store Credit(Smart Coupon). You can offer a store credit as an Instant Win Prize.
If you select Store Credit(Smart Coupon) option in PrizeType dropdown
- Enter the site credit value in store credit value field.
- Enter the prize details in Prize text field.
Note
This option will be visible only when the Store Credit for WooCommerce plugin is installed and it is active.
Tera Wallet(Wallet for WooCommerce)
This plugin is compatible with Tera Wallet(Wallet for WooCommerce). You can offer a store credit as an Instant Win Prize.
- Select Woo-Wallet option in Prize Type dropdown.
- Enter the site credit value in wallet credit value field.
- Enter the prize details in Prize text field.
Note
This option will be visible only when the Tera Wallet(Wallet for WooCommerce) plugin is installed and it is active.
Instant Win Prize Group Settings

If you select Display Prizes by Group option in Instant Win Prize Display Mode dropdown on Instant Win Prizes settings tab, you can see Instant Win Prize Groups settings tab.
Instant Win Prize Groups Tab Settings
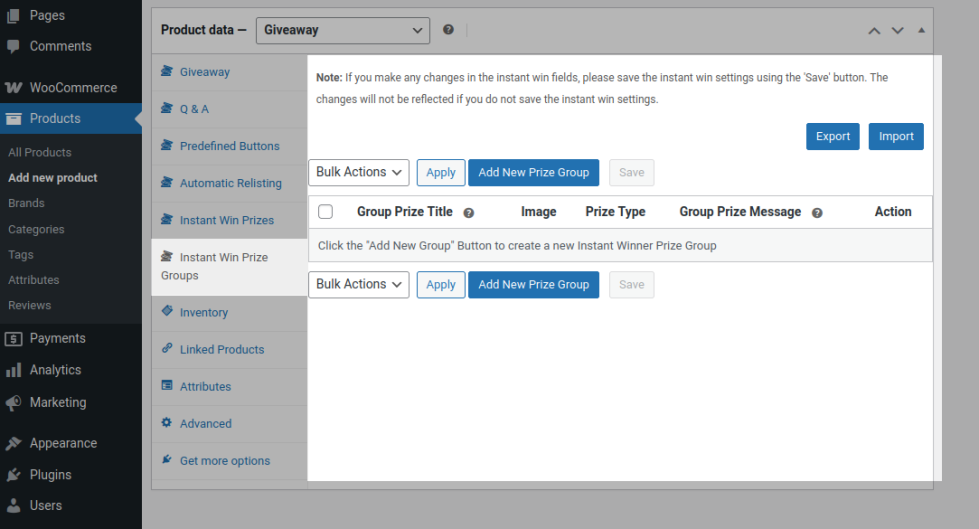
Instant Win Prize Groups Rule Settings
You can create Instant Win Prize Group to add more ticket numbers in single prize Group.
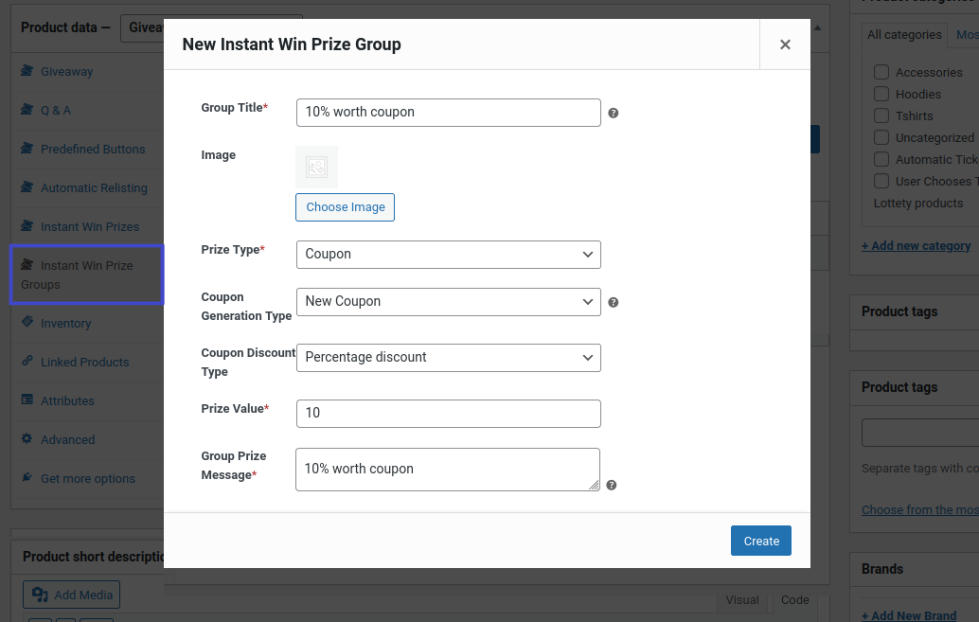
- If click Add New Prize group button you can see the instant win prize group settings
- Enter the group title in Group Title field .
- Upload prize group image.
- Select the prize type you want to award the instant winner in Prize Type field.
- If you select Physical option in Prize Type dropdown, you can give the prize to the instant winner manually.
- Enter the prize details in Group Prize Message text field.
- If you select Coupon option in PrizeType dropdown
- Select the Coupon Generation Type dropdown option to create New Coupon or Existing Coupon.
- Before selecting the New coupon option, please configure the Instant Winner Coupon Creation Settings. Go to Giveaway -> Settings -> General -> Instant Win -> Instant Winner Coupon Creation Settings.
- Select New Coupon option on Coupon Type dropdown in Instant Win Prizes rule settings after configured Instant Winner Coupon Creation Settings.
- Select Percentage or Fixed type in Coupon Discount Type.
- Enter the Coupon Discount Value.
- Enter the prize details in Group Prize Message text field.
Instant Win Prize Settings for Prize Group
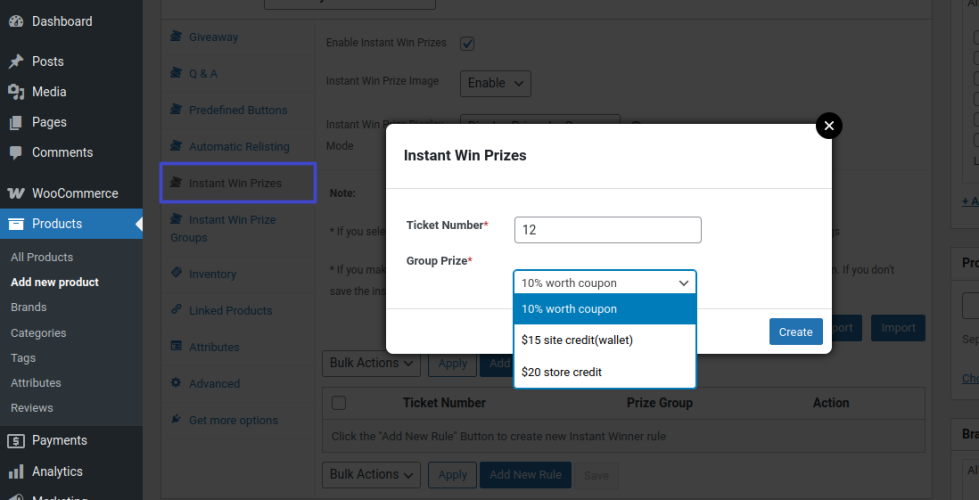
- Assign the ticket numbers to created prize group on Instant Win Prize tab by clicking the Add New Rule button.
- Enter the ticket number in Ticket Number field.
- You can see the created prize group list on Group Prize dropdown.
- Select one created prize group in Group Prize dropdown.
- You can also export the instant win settings data as csv file and able import to the data to another giveaway product or update instant win settings.
Assigned Ticket Numbers with Created Prize Groups
Usage
↑ Back to topAutomatic Winner Selection
↑ Back to top- A user lands on the single product page. The user selects the number of tickets they wish to purchase and adds the product to the cart.
- The users can also manually select the ticket number(s)/Allow the system to select a ticket for them(Based on Configuration).
- Once the purchase is completed and the payment has been received, the users will receive the ticket number(s).
- Once the Giveaway end date has been reached, the winner will be automatically picked by the system and they will be notified via email.
- If the winning item is configured “Products Inside the Site”, then the product associated with the giveaway will be added to the user’s account in a separate order for free of cost.
Manual Winner Selection
↑ Back to top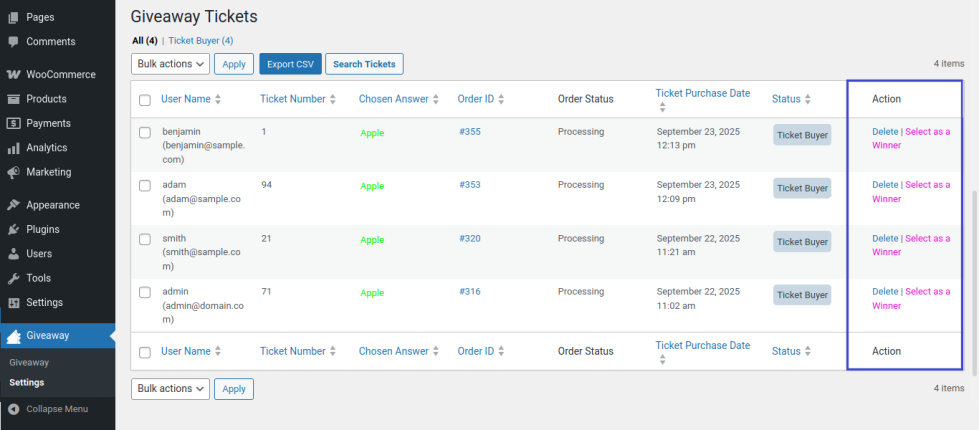
- A user lands on the single product page. The user selects the number of tickets they wish to purchase and adds the product to the cart.
- The users can also manually select the ticket number(s)/Allow the system to select a ticket for them(Based on Configuration).
- Once the purchase is completed and the payment has been received, the users will receive the ticket number(s).
- Once the Giveaway end date has been reached, the admin will be notified via email. The site admin will have to manually pick the winner(s).
- If the winning item is configured “Products Inside the Site”, then the product associated with the giveaway will be added to the user’s account in a separate order for free of cost.
Giveaway Dashboard
↑ Back to topAdmin Dashboard
↑ Back to top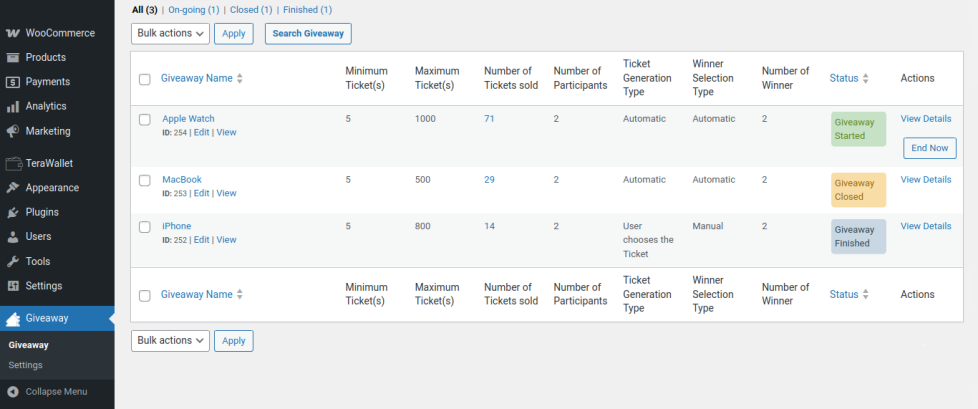
- To access the admin dashboard go to WordPress Dashboard > Giveaway > Giveaway
- From this dashboard, the site admin can view the following data
1. Status of the Giveaway
2. Minimum and Maximum Tickets for a Giveaway
3. Number of Tickets sold in a Giveaway
4. Number of Participants in a Giveaway
5. Giveaway Winning Type and Number of winners in a Giveaway
6. Admin can manage and see more details in each Giveaway
7. Admin can export the Giveaway Details as a CSV File.
Customer Dashboard
↑ Back to topTo display the customer dashboard, place the shortcode “ [lty_dashboard]”. Your customer can access the following details from the customer dashboard,
- List of Participated Giveaways
- List of Won Giveaways
- List of Lost Giveaways
Widgets
↑ Back to topTo configure the wallet widgets go to WordPress Dashboard > Appearance > Widgets. The following widgets are available,
Giveaway Products
↑ Back to topDisplays the Giveaway products. The following filters are available
- Future Giveaway
- Running Giveaway
- My Giveaway
Giveaway Search
↑ Back to topDisplays the Giveaway product Search Widget.
Translation
↑ Back to topGiveaway for WooCommerce is translation ready, meaning you can edit the po files by which you can translate the text to any language. Steps to perform the translation are as follows. For example, a translation to French.
- Download and install Poedit
- Open the file lottery-for-woocommerce > languages > lottery-for-woocommerce.pot using Poedit.
- Create a new translation file by clicking Create new translation button.
- Choose the Source text and set its corresponding French text in Translation Text Area.
- Save the changes.
- Save the file name as lottery-for-woocommerce-fr_FR.po.
- If you are using WordPress Version 3.9.13 or below, then in wp-config.php define the WPLANG as French. Syntax is define(‘WPLANG’, ‘fr_FR’);
- If you are using WordPress Version 4.0 or above, then go to WordPress dashboard > Settings > General and select the Site Language as French.
FAQ
↑ Back to topQ: Can we allow guest users to purchase the giveaway tickets?
Yes, you can allow guest users to purchase the giveaway tickets.
Q: How can i pick the manual Winners for closed giveaway?
You can see Select Winner option in giveaway post table for closed giveaway. Please refer the below steps and screenshot to select the manual winners for closed giveaway, Giveaway -> Giveaway -> Giveaway product -> View Details
Q: Does the plugin has Instant Win Prizes option?
(i) Yes, it is available.
(ii) Instant Win Prizes work for both Automatic Ticket Generation type & User Chooses Ticket Type.
(iii) Instant Win Prizes settings available in Giveaway product settings(Edit product page).
Q: I’m not able to add more than 100 Instant Win Prizes on the Instant Win Prizes settings, it is taking too long to load. How can i fix this issue?
(i) We hope this issue occurs because of “PHP max input variables” and “PHP post max size” limit is not enough to store more data on your site. That is the reason for Instant Win loading issue when creating more rules.
(ii) We suggest you please check by increasing the “PHP max input variables” to 4000 or higher and “PHP post max size” to 100M or higher.
(iii) Also, please make sure your PHP memory limit is minimum 512M to use our giveaway plugin.Please refer the below steps to see the current limits on your site WordPress Dashboard -> Tools -> Site Health -> Info -> Server
Q: Is the Email option available for Instant Win Prizes?
(i) Yes, the email option is available for Instant Win Prizes.
(ii) Admin can enable Instant Win Prizes email for both admin and customers(who win the Instant Win Prize).
Q: We don’t want to allow the user to the competition who incorrectly answered the question. It is possible?
Yes, it is possible.
(i) Verify Answer Before Purchasing Giveaway
– Using the Verify Answer Before Purchasing Giveaway option, you can set an attempt limit for the user to answer the question.
– If the user selects the wrong answer and the attempt limit is exceeded then that user cannot be allowed to participate in the particular giveaway.
(ii) Don’t Generate Ticket Number for Incorrectly Answered Question
We have another option(Don’t Generate Ticket Numbers for Incorrectly Answered Question) which allows the user to purchase giveaway even if they select the incorrect answer. In this method, the ticket number will not be generated and an email will be sent to the user to inform them about the wrong answer selection.
Q: Is Lucky Dip option is available in User Chooses the Ticket Type?
Yes, it is available.
Q: Is there a way to run a contest without a start and end date but show a progress bar of how many tickets are left until the contest is ended?
1. Currently, it is not possible to run a giveaway without assigning a Start and End date. Instead, you can set the end date to a longer duration and hide the countdown timer on the shop page and single product page.
(i) Giveaway -> Settings -> General -> Shop page -> Hide Countdown Timer for Giveaway Products on Shop and Category Pages.
(ii) Giveaway -> Settings -> General -> Single Product Page -> Hide Countdown Timer for Single Product Page.
2. Also, the option is available to close the giveaway when all the tickets have been sold.Giveaway -> Settings -> General -> Close Giveaway when All the Tickets have been sold.
Q: Is there any option available to set a preset value for the default quantity display in the Range slider for the quantity Selector?
Yes, an option is available to set a preset value(default quantity) in the Range slider for quantity Selector.
Settings
(i) Giveaway -> Settings -> General -> Single product Page -> Quantity Selector Type -> Range Slider.
(ii) Giveaway product Settings(Edit product page) -> Display Range Slider Based On -> Preset Tickets -> Set Preset Tickets Note:Range slider for quantity Selector works only for Automatic Ticket Generation Type.
Q: How to select the winner when using Manually Pick Winners option?
i) If the admin selects the Winner Selection Method as Manual and the giveaway time has ended after reaching the Minimum tickets value, then the giveaway is moved to closed status. The Users will have to wait for the admin to manually pick the winner(s).
ii) Admin can Pick the winners manually in Giveaway Post table Giveaway -> Giveaway -> Giveaway product -> View Details
Q: How to Customize the “Giveaway” word in Frontend?
(i) You can customize the messages and frontend display using Localization and Messages settings Giveaway -> Settings -> Localization Giveaway -> Settings -> Messages
(ii) Also, you can customize some messages and frontend display using Po file translation. For more information about Po file translation please refer to the “Translation” section on Giveaway
Q: It is possible to set the ticket number as 00001 to 99999 in Automatic Ticket Generation type?
1. Yes, it is possible. If you set 5 in ticket length(Only number type) in Random type and set the maximum ticket as 99999, then it will generate the ticket numbers 00001 to 99999. Giveaway -> Settings -> General -> Ticket Generation -> Automatic Random Ticket Generation Settings -> Ticket Length -> Set 5
2. Also, you can achieve this scenario using Shuffled or Sequential ticket type. If you set the Ticket Starting Number as 00001 and set the maximum ticket as 99999, then it will generate the ticket number 00001 to 99999.Shuffled and Sequential options are available in the giveaway product settings(edit product page).
Q: Is Alphabet ticket number series(Example: A1, A2, B1, B2,………E1, E2) available in User Chooses the Ticket Type?
Yes, it is available.
Q: Can we give bulk tickets(based on ticket quantities) for a certain amount?
(i) Yes, it is possible.
(ii) We have a Predefined Buttons option to apply Fixed price or Percentage discounts based on Giveaway ticket quantities.
(iii) You can see the settings in Giveaway product settings(Edit product page).
Q: Can Admin create the order for the user(Manual order) for giveaway products?
– Yes, it is possible.
– Admin can create the manual order for both ticket generation type
(i) Automatic Ticket Generation Type
(ii) User Chooses the Ticket Type
Q: How to configure Cron for Giveaway?
Giveaway for WooCommerce Requires Server Cron or WP Cron in order for the plugin to work.
1. Server Cron
(i) Please follow the below steps to configure the server cron,
1. Login to the cPanel of your site.
2. Locate “Cron Jobs” within the cPanel
3. Under the “Add New Cron Job” section, fill in the following data,
a. Common Settings
In this section, you can set up how frequently the Cron should run. For Example, if the value is set as “Once Per Minute”, then the cron will run once every minute. Once the cron is triggered, the following activities will be updated,
– Starting Future Giveaways
– Ending Closed Giveaways
b. Giveaway Plugin Server Cron Settings
Also, please select the Server Cron option in Giveaway plugin Settings,
Giveaway -> Settings -> Advanced -> Cron -> Cron Type -> Server Cron.
c. Update Cron Command
Example Format:
Starting Future Lotteries and Ending Closed Giveaways
wget -q -O – http://www.your-domain.com/?lty_lottery_cron=update&token=YOUR_SECURITY_TOKEN
Automatic Relist for finished and failed giveaway
wget -q -O – http://www.your-domain.com/?lty_lottery_cron=relist&token=YOUR_SECURITY_TOKEN
Ending Soon Email Notifications
wget -q -O – http://www.your-domain.com/?lty_lottery_cron=ending_soon&token=YOUR_SECURITY_TOKEN
Note:
- Replace “your-domain.com” with your actual domain name.
- Replace “YOUR_SECURITY_TOKEN” with the token generated in the plugin settings(Giveaway -> Settings -> Advanced -> Cron -> Cron Type ->Server Cron).
- You can regenerate the token from the Giveaway Server Cron settings. If the token is regenerated, make sure to update it in the cron URLs to ensure uninterrupted execution. Save the settings once regenerate the security token.
- The security token helps protect cron URLs from unauthorized access.
Important Notes
- The Server Cron URL Security Token will be added to the giveaway server cron URL to ensure secure execution.
- You can regenerate the security token from the Giveaway Server Cron Settings.
- Replace your-domain.com with your actual domain name.
- Replace YOUR_SECURITY_TOKEN with the token generated in your plugin settings.
- The security token helps protect cron URLs from unauthorized access.
2. WP Cron
Giveaway -> Settings -> Advanced -> Cron -> Cron Type -> WP Cron
– Set time for Cron Trigger Frequency
– Save the settings
Also, please follow the below steps to know about the last update of cron information in our plugin.
Giveaway -> Settings -> Advanced -> Cron Information.
Q: Can we re-use the old giveaway products?
Yes, we have a Relist option to reset the previous giveaway data and you can start the old giveaway as a new giveaway.
Q: Why is my giveaway failing and how can I start the giveaway again with the same purchase data?
Giveaway products fail only if the end time has been reached without reaching the Minimum ticket value.We have the Extend option which is available in Giveaway Product Settings(Edit product page). Using the extend option you can extend the giveaway without losing the purchased ticket data. Extend option will be displayed only for the failed giveaway.
Q: Can we Export the giveaway tickets?
Yes, we have the Export CSV option which is available in the giveaway post table.
Questions and Feeback
↑ Back to topHave a question before you buy? Please fill out this pre-sales form.
Already purchased and need some assistance? Get in touch with us via the Help Desk.