Usually with membership plans, multiple contents will be restricted on the site and a higher amount will be charged for membership plan. In this case, if a user just need access to some items without need to pay a high price for the membership plans, then Pay Per Item feature will be useful. Using this feature, you can charge a minimal amount for giving access to restricted items. You can also give access only for specific duration.
Setting Up
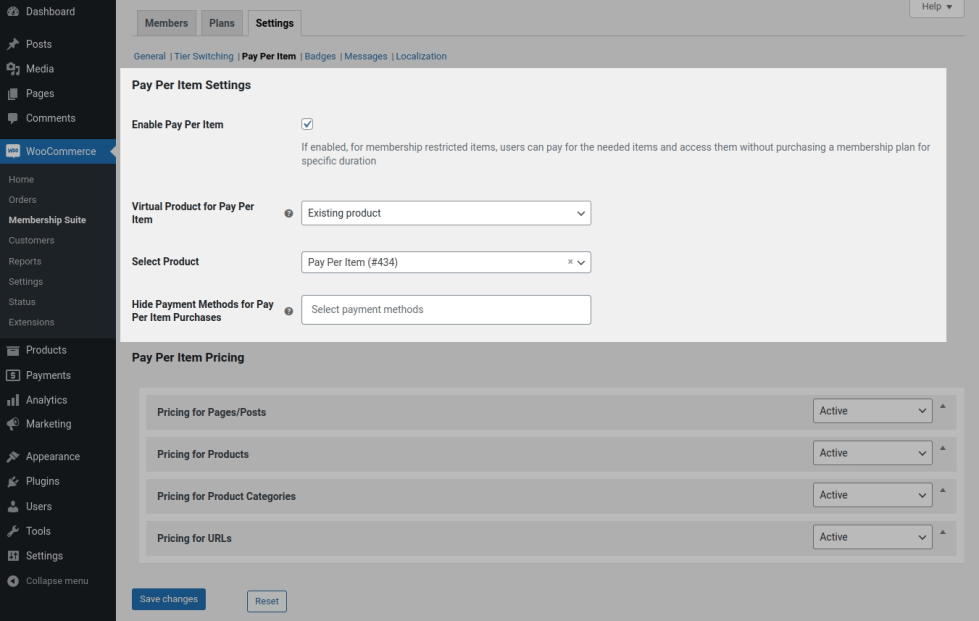
To set up Pay Per Items, go to “Membership Suite > Settings > Pay Per Item”.

Enable Pay Per Item – Enable this option to activate Pay Per Item feature.
Virtual Product for Pay Per Item – Pay Per Item fee will be charged through regular WooCommerce checkout and hence a virtual product is needed in order to get payments for pay per item purchases. Select the virtual product in this option.
Hide Payment Methods for Pay Per Item Purchases – To hide specific payment methods in checkout page for pay per item purchases, then select the payment methods to hide in the checkbox.
Pay Per Item Pricing
↑ Back to top
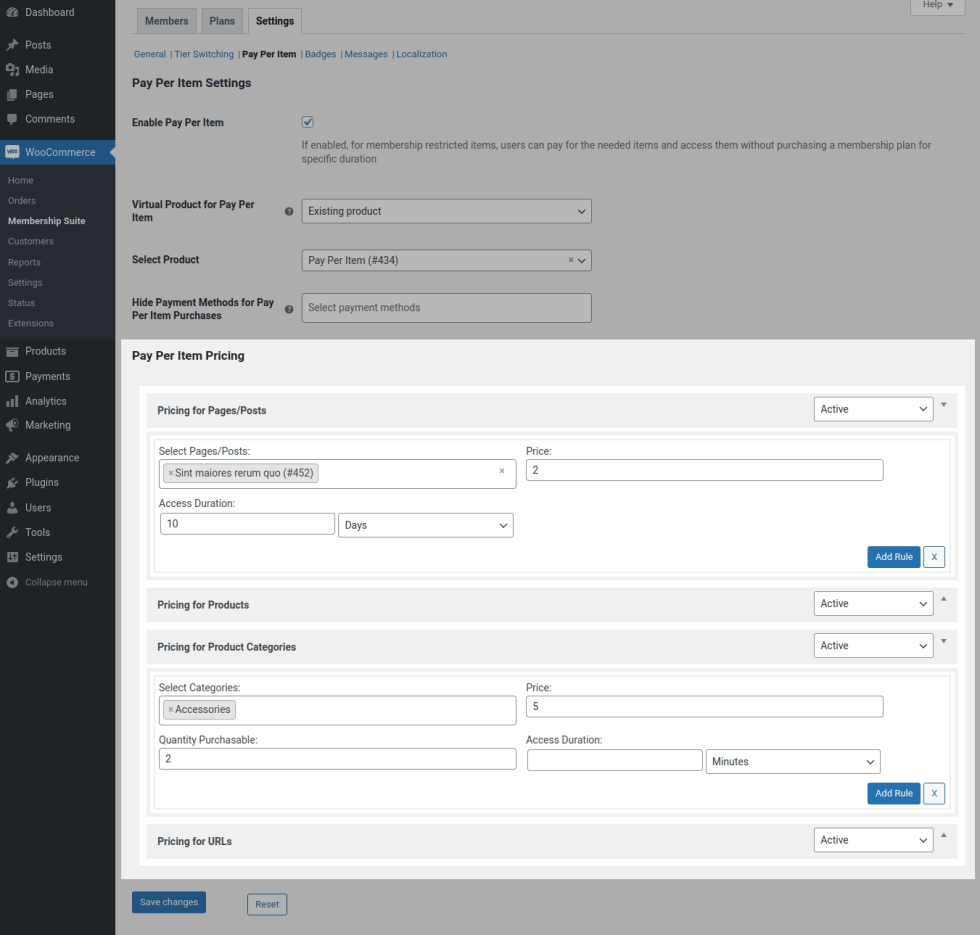
Pricing for Pages/Post
- Click on “Pricing for Pages/Posts”
- To activate pricing for page/post, select “Active”.
- Click “Add Rule” button to add pay per item for pages/posts.
- Search for the page/post name and select it in “Select Pages/Posts” option.
- Set the payable price in the “Price” field.
- In the “Access Duration” set the duration you need to give access for restricted items when users gets access through pay per item purchase. To give access for unlimited duration, leave the field empty.
- You can set different pricing/duration for different pages/posts by clicking “Add Rule” button.
Pricing for Products
- Click on “Pricing for Products”
- To activate pricing for products, select “Active”.
- Click “Add Rule” button to add pay per item for products.
- Search for the product name and select it in “Select Products” option.
- Set the payable price in “Price” field.
- In “Quantity Purchasable” field, set how many quantity user can purchase from the list of products which you have set in select products option.
- In “Access Duration” set the duration you need to give purchase access for restricted products when users gets access through pay per item purchase. To give access for unlimited duration, leave the field empty.
- You can set different pricing/quantity/duration for different products by clicking “Add Rule” button.
Pricing for Product Categories
- Click on “Pricing for Product Categories”
- To activate pricing for product categories, select “Active”.
- Click “Add Rule” button to add pay per item for products categories.
- Select the categories from the list of available categories in “Select Categories”
- Set the payable price in “Price” field.
- In “Quantity Purchasable” field, set how many product quantity user can purchase from the list of products linked with the categories selected in select categories option.
- In “Access Duration” set the duration you need to give purchase access for restricted products when users gets access through pay per item purchase. To give access for unlimited duration, leave the field empty.
- You can set different pricing/quantity/duration for different products by clicking “Add Rule” button.
Pricing for URLs
- Click on “Pricing for URLs”
- To activate pricing for URLs, select “Active”.
- Click “Add Rule” button to add pay per item for URLs.
- Give the URL restricted using a membership plan in “URL” field.
- Set the payable price in “Price” field.
- In “Access Duration” set the duration you need to give access for restricted items when users gets access through pay per item purchase. To give access for unlimited duration, leave the field empty.
- You can set different pricing/duration for different URLs by clicking “Add Rule” button.
Frontend Workflow
↑ Back to top
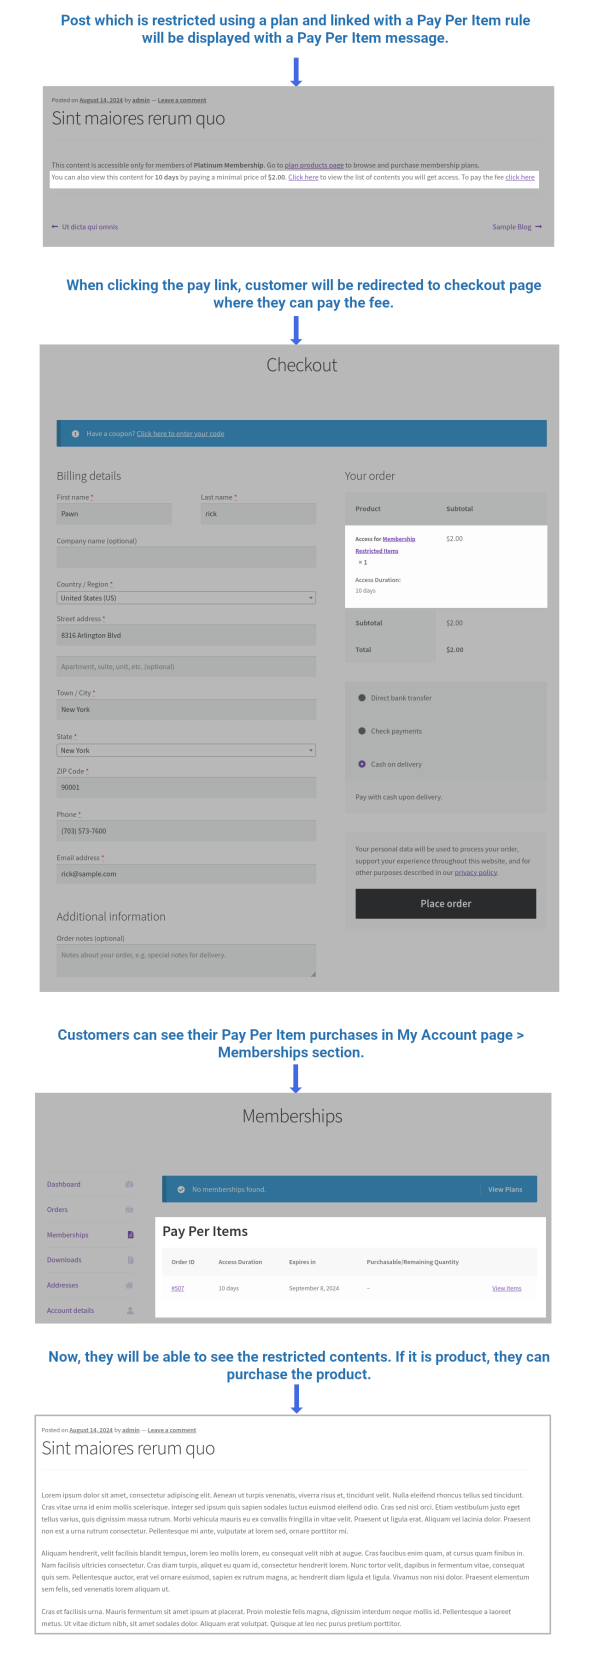
Users tries to access the restricted items and see the plan restriction message where it will be stated as the item is accessible/purchasable only for members of specific membership plans. Pay Per Item information along with a “Pay Link” will be appended with this message. When the “Pay Link” is clicked, the price set for the respective pay per item will be set and the user will be redirected to Pay for Order page where they can make the payment.
Once the payment is successful, user can access the restricted item. They can see the pay per item details in their “My Account Page > Memberships > Pay Per Items”
Note: Pay Per Item won’t work if “Restriction Type” has been set as “Redirection” for the restricted items.
