The Subscribe to Newsletter (formerly Newsletter Subscription) extension by Kestrel integrates your store with your favorite newsletter provider to subscribe your customers to a newsletter during checkout, in the registration form, or anywhere on your site, thanks to a subscription widget.
Additionally, it includes a dashboard widget that displays recent subscriber activity without leaving your store.
Supported providers:
- ActiveCampaign
- ActiveTrail
- Brevo (formerly Sendinblue)
- Campaign Monitor
- MailChimp
- MailerLite
- MailPoet 3
- Sendgrid
Do you miss any providers? Contact our support team and let us know.
Requirements
↑ Back to top- WooCommerce 4.0+.
- An account of the selected provider.
Installation
↑ Back to top- Download the .zip file from your WooCommerce.com account.
- Go to: WordPress Admin > Plugins > Add New to upload the file you downloaded.
- Activate the extension.
More information on Installing and Managing Plugins.
Setup and Configuration
↑ Back to topOnce the extension is activated, it’s time to configure it. Go to “WooCommerce > Settings > Newsletter” and select a service provider.

Depending on the selected provider, different credential fields will appear.
If you select MailPoet as the service provider, be sure you have installed the MailPoet plugin in your store.
Enter the credentials and click on “Save changes“. The form will be updated with new fields.
Provider settings
↑ Back to topThe first section of the form is for handling the options related to the selected service provider.

You can see the fields from the previous step here. These fields are disabled, but they are helpful to check the entered credentials for the service provider are correct.
The next setting is to select the list where the customers will be subscribed during checkout and registration. If the selector is empty, go to the dashboard of your service provider and create a new list.
Besides, you can find the “Double Opt-in” option. This field is only available for MailChimp, and as its name says, it enables or disables the double confirmation to subscribe the customer to your newsletter.
Finally, we have a button to disconnect our service provider and return to the first step.
Note: When you disconnect your service provider, its credentials are removed from the database for security reasons. The rest of the settings, like the selected list, keep untouched.
Subscription settings
↑ Back to topIn this section, you can find options that are common to all providers.
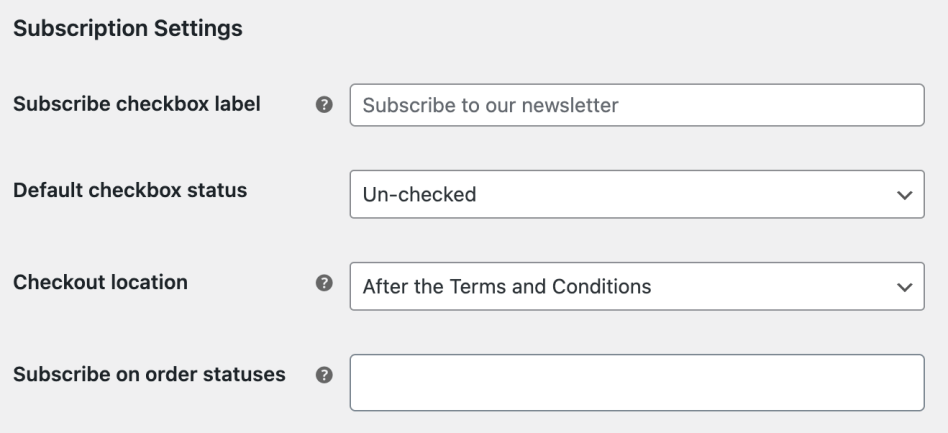
The options are the following:
Subscribe checkbox label
The label used for the checkbox field. If you leave this field empty, the default value will be used. Default: Subscribe to our newsletter.
Default checkbox status
Defines the default status for the checkbox used for subscribing the customers to the newsletter. Default Un-checked.
Important: Be careful with your country’s laws. For example, marking the field by default is not allowed in European Union countries.
Checkout location
Sets where the subscription checkbox will be displayed on the checkout page.
Default is after the Terms and Conditions.
Note: This setting is not available when using the WooCommerce Checkout block.
Subscribe on order statuses
By default, customers will be subscribed to the newsletter immediately after they complete the purchase. Optionally, you can postpone this action until the order reaches a specific status. E.g., Processing or Completed.
Product tags
↑ Back to topIf your newsletter provider supports tags, a checkbox field called “Product tags” will appear at the end of the form:

Note: Currently, we only provide support for this feature to Mailchimp and Sendinblue, but we’re extending it to other providers.
By enabling this feature, customers will be tagged with the purchased products. By default, the product slug is used as the tag, but you can customize the format with the next setting:
Product tag format
Use this setting to customize the product tag. The product data will replace the placeholders used in the string.
For example, you can add a prefix to the tag in the following way: product-{product-slug}
Important: The formatted string must contain the placeholder {product-slug}. Otherwise, the product tag will always be the same for all products.
Usage
↑ Back to topCustomers can subscribe to your newsletter in different ways:
At checkout
↑ Back to topIn the checkout form, you will get a checkbox asking the customer to subscribe to your newsletter:


Customers can check the box to be subscribed when placing an order.
On register
↑ Back to topWhen your customers create an account in your store, it is an excellent opportunity to ask them to subscribe to your newsletter.

Note: To allow customer registration from the “My Account” page, enable the option “WooCommerce > Settings > Accounts & Privacy > Account creation“.
From My Account
↑ Back to topIf the selected provider supports it, the “Manage subscription” checkbox will appear on your settings page. This setting is enabled by default, and it allows customers to manage their subscription to the newsletter from the “My Account” page.
Disclaimer: Currently, this feature is only supported by Mailchimp. If you are interested in using it on a different provider, please, contact support.

Note: Only logged-in users can make use of this feature in your store.
Widgets
↑ Back to topThe extension includes a new widget called “WooCommerce Subscribe to Newsletter“, which can be configured to subscribe the customers to the list of your choosing:

Note: To learn more about WordPress widgets and how to add them to your site, please, visit this article.
The widget includes settings to customize the title, message, and fields to display in the frontend form. It also allows you to select a different subscription list from the global setting.
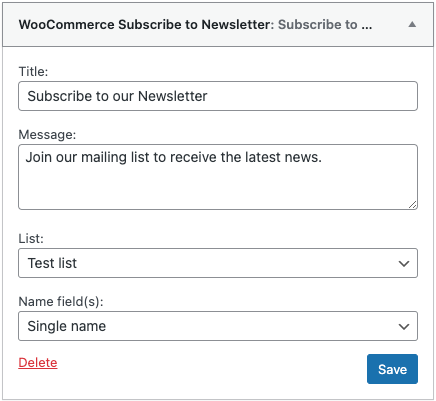
Moreover, you can have multiple subscription widgets in different sidebars to subscribe customers to a different list depending on their viewing page.
Note: All widget texts, including labels, placeholders, etc., can be customized by updating their translation for the current language. We recommend you use a translation plugin like Loco Translate to translate these texts.
Dashboard Stats
↑ Back to topOn the WordPress dashboard, admin users will see subscription stats for the newsletter:

Note: The stats parameters may vary depending on the selected provider.
Points and Rewards
↑ Back to topNewsletter Subscription is also compatible with WooCommerce Points and Rewards. That means you can reward your customers for subscribing to your newsletter. Just go to the section “WooCommerce > Points & Rewards > Settings > Points earned for actions” and set a number of points for the option “Points earned for newsletter signup“.

FAQ
↑ Back to topIs this extension compatible with the checkout block?
↑ Back to topYes, “Newsletter subscription” works with both WooCommerce checkout options: The classic shortcode, and the new Checkout block.
Can I change the location of the checkbox field in the checkout block?
↑ Back to topUnfortunately, the Checkout block presents more restrictions for placing new fields and blocks. Thus, the newsletter subscription checkbox cannot be changed from the pre-defined location.
Where can I change the options for the checkbox field in the checkout block?
↑ Back to topWhile both checkout options are available in WooCommerce, and to unify the plugin settings, the checkbox options like the label and default status can be set on the plugin settings page “WooCommerce > Settings > Newsletter“.
Troubleshooting
↑ Back to topFailed to subscribe to an email in Mailchimp
↑ Back to topIn case when trying to subscribe to a customer, you receive an error that contains this information: [{“field”: “X”, “message”: “Enter a value”} where X can be FNAME, PHONE, etc., it is because Mailchimp is not receiving the value X and it will be marked as required.
Check your configuration in the Mailchimp dashboard Audience > Preferences Center > Settings > Audience fields and Check your X tag. The X field may be marked as required.
Questions and Feedback
↑ Back to topHave a question before you buy it? Please fill out this pre-sales form.
Already purchased and need some assistance? Get in touch with a Happiness Engineer via the Help Desk.