This module will showcase popular products by placing the total count of products sold on your product listing and/or product detail page.
- Download the .zip file from your WooCommerce account.
- Go to: WordPress Admin > Plugins > Add New and Upload Plugin with the file you downloaded with Choose File.
- Install Now and Activate the extension.
More information at
Install and Activate Plugins/Extensions.
As soon as the plugin has been installed, you can view the plugin in
WordPress Admin Panel > WooCommerce > Product Sold Counter. To customize plugin settings, click on
Product Sold Counter.
This page is where all of your products are listed. Some WooCommerce users also refer to it as a product catalog.

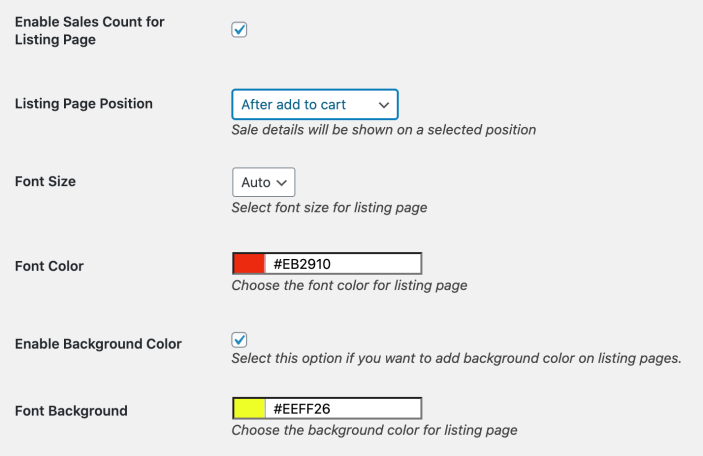
Click on this box to activate the Product Sold Counter on your
Product Listing Page.
There are seven positions to choose from while placing your counter. Click on the dropdown to reveal the options.
- Top left on image allows you to place the counter on your product’s image in the upper left corner
- Top right on image allows you to place the counter on your product’s image in the upper right corner
- Before product title allows you to place the counter above the name of your product
- After product title allows you to place the counter below the name of your product
- Before product price allows you to place the counter above the price of your product
- After product price allows you to place the counter below the price of your product
- After add to cart allows you to place the counter below your add to cart button
Select the size of the font you would like to set for the counter’s display from a dropdown containing 2pt-20pt sizes. There is also an
Auto option, which will detect your theme’s default font size and apply it to the counter.
To change the color of the font either enter the Hex code in the color field or click on the color spectrum to find a suitable color.
Tip: Using Hex codes provides more accurate colors. You can easily manage keeping colors balanced according to theme or dark/light modes
Click on this box if you want to apply a background color to your counter. Clicking on it will then show an additional field where you can either type in a Hex Code or pick a color from a color-picker spectrum.
This page the page shown to the customer when the click a product on the product listing page.

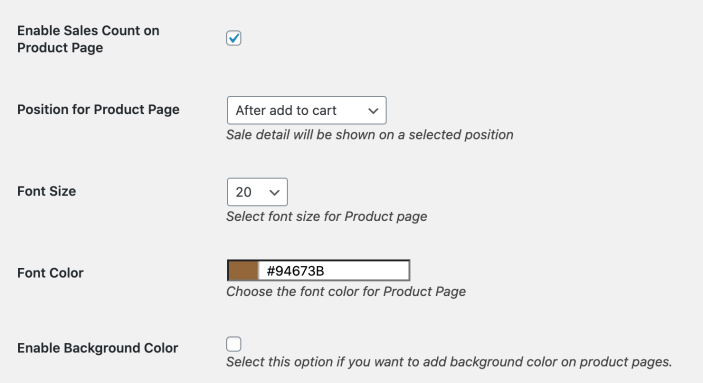
Click on this box to activate the Product Sold Counter on a popular product’s
Product Page.
There are six positions to choose from while placing your counter. Click on the dropdown to the options.
- Top left on image allows you to place the counter on your product’s image in the upper left corner
- Top right on image allows you to place the counter on your product’s image in the upper right corner
- After product title allows you to place the counter below the name of your product
- Before product price allows you to place the counter above the price of your product
- After product price allows you to place the counter below the price of your product
- After add to cart allows you to place the counter below your add to cart button
Select the size of the font you would like to set for the counter’s display from a dropdown containing 2pt-20pt sizes. There is also an
Auto option, which will detect your theme’s default font size and apply it to the counter.
To change the color of the font either enter the Hex code in the color field or click on the color spectrum to find a suitable color.
Tip: Using Hex codes provides more accurate colors. You can easily manage keeping colors balanced according to theme or dark/light modes
Background Color
Click on this box if you want to apply a background color to your counter. Clicking on it will then show an additional field where you can either type in a Hex Code or pick a color from a color-picker spectrum.
You can exclude specific products from display the count.
This checkbox helps you hide the counter on both product and product listing pages in case the popular product is out of stock. You can
Set a
Minimum Limit to define when a product should be defined as a popular product. The counter will only display on a product once this minimum number of sold products is achieved.

Using the {sales_count} tag will help you place text along with your counter. In order display the counter, you must add {sales_count} and add the text before or after it if needed.

The shortcode allows you to display counter anywhere on your product page. Please note the short code works only for product detail page, you cannot use the shortcode to display counter on listing pages.

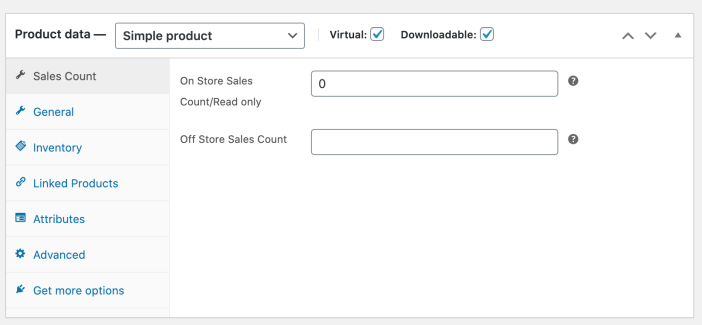
You can add sales made from physical store to reflect true sales count. To add sales from physical stores go to product edit sheet and add off-site sales.

 Click on this box to activate the Product Sold Counter on your Product Listing Page.
 Click on this box to activate the Product Sold Counter on a popular product’s Product Page.


