After activating Request a Quote plugin, you can see the “Request a Quote” in the WordPress admin under WooCommerce menu. Under the Request a Quote menu you can see the following 4 sections,
- All Quotes
- Quote Rules
- Quote Fields
- Settings
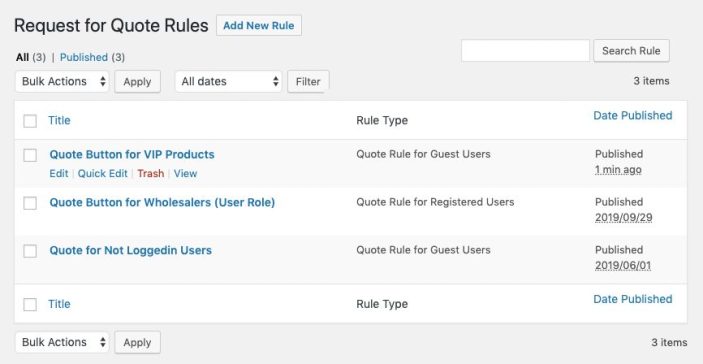
This section displays all active quote rules in a single grid. You can view, edit, or delete any rule. You can create multiple rules to enable quote button for,
- Specific products & categories
- Guest & specific user roles
- or the combination of both
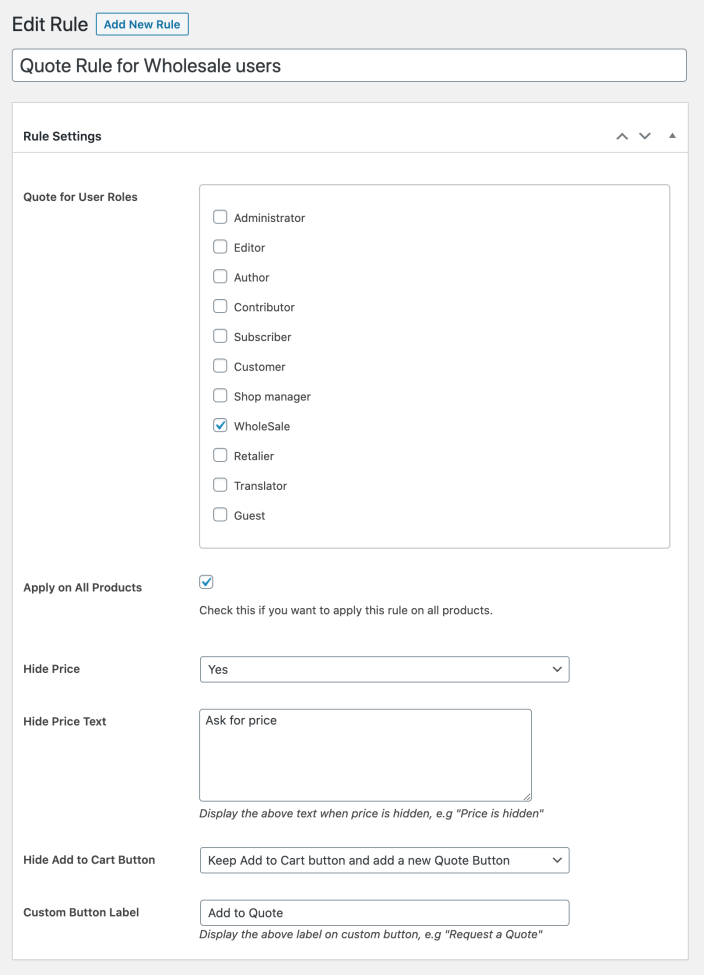
Click on “Add New Rule” to enable request-a-quote feature on the frontend. While creating a new rule you would be able to specify for which customers you want to apply the new rule. Registration(All or specific user roles) or guest users. To apply a rule for all registered customers, select all user roles, and if you need to apply on non-loggedin users only, select guest users.
While creating a new rule you can configure the following settings,
- Rule Title: Provide a unique rule title for future reference.
- App On Specific User Types: Choose to enable the quote button for guests or registered users.
- Rule Priority: In case of conflicting rules, you can set the priority to manage accordingly.
- Quote Rule for Selected Products: Here you can specify on which products the “Add to Quote” button should appear.
- Quote Rule for Selected Categories: Here you can specify for which categories the “Add to Quote” button should appear.
- Quote for User Roles: Here you can specify if you want to show the quote button to specific or all customer groups & user roles.
- Hide Price: You can hide the price of the products where the quote button is displayed.
- Hide Price Text: You can add any text to replace the price. Leave empty if you don’t want to show any custom text message.
- Hide Add to Cart button: Here you can specify if you want to keep the “Add to Cart” button but along with the quote button, or you want to replace “Add to Cart” with your new Quote button. This will only apply to the products you have selected above.
- Custom Button Label: You provide custom text for your new quote button.
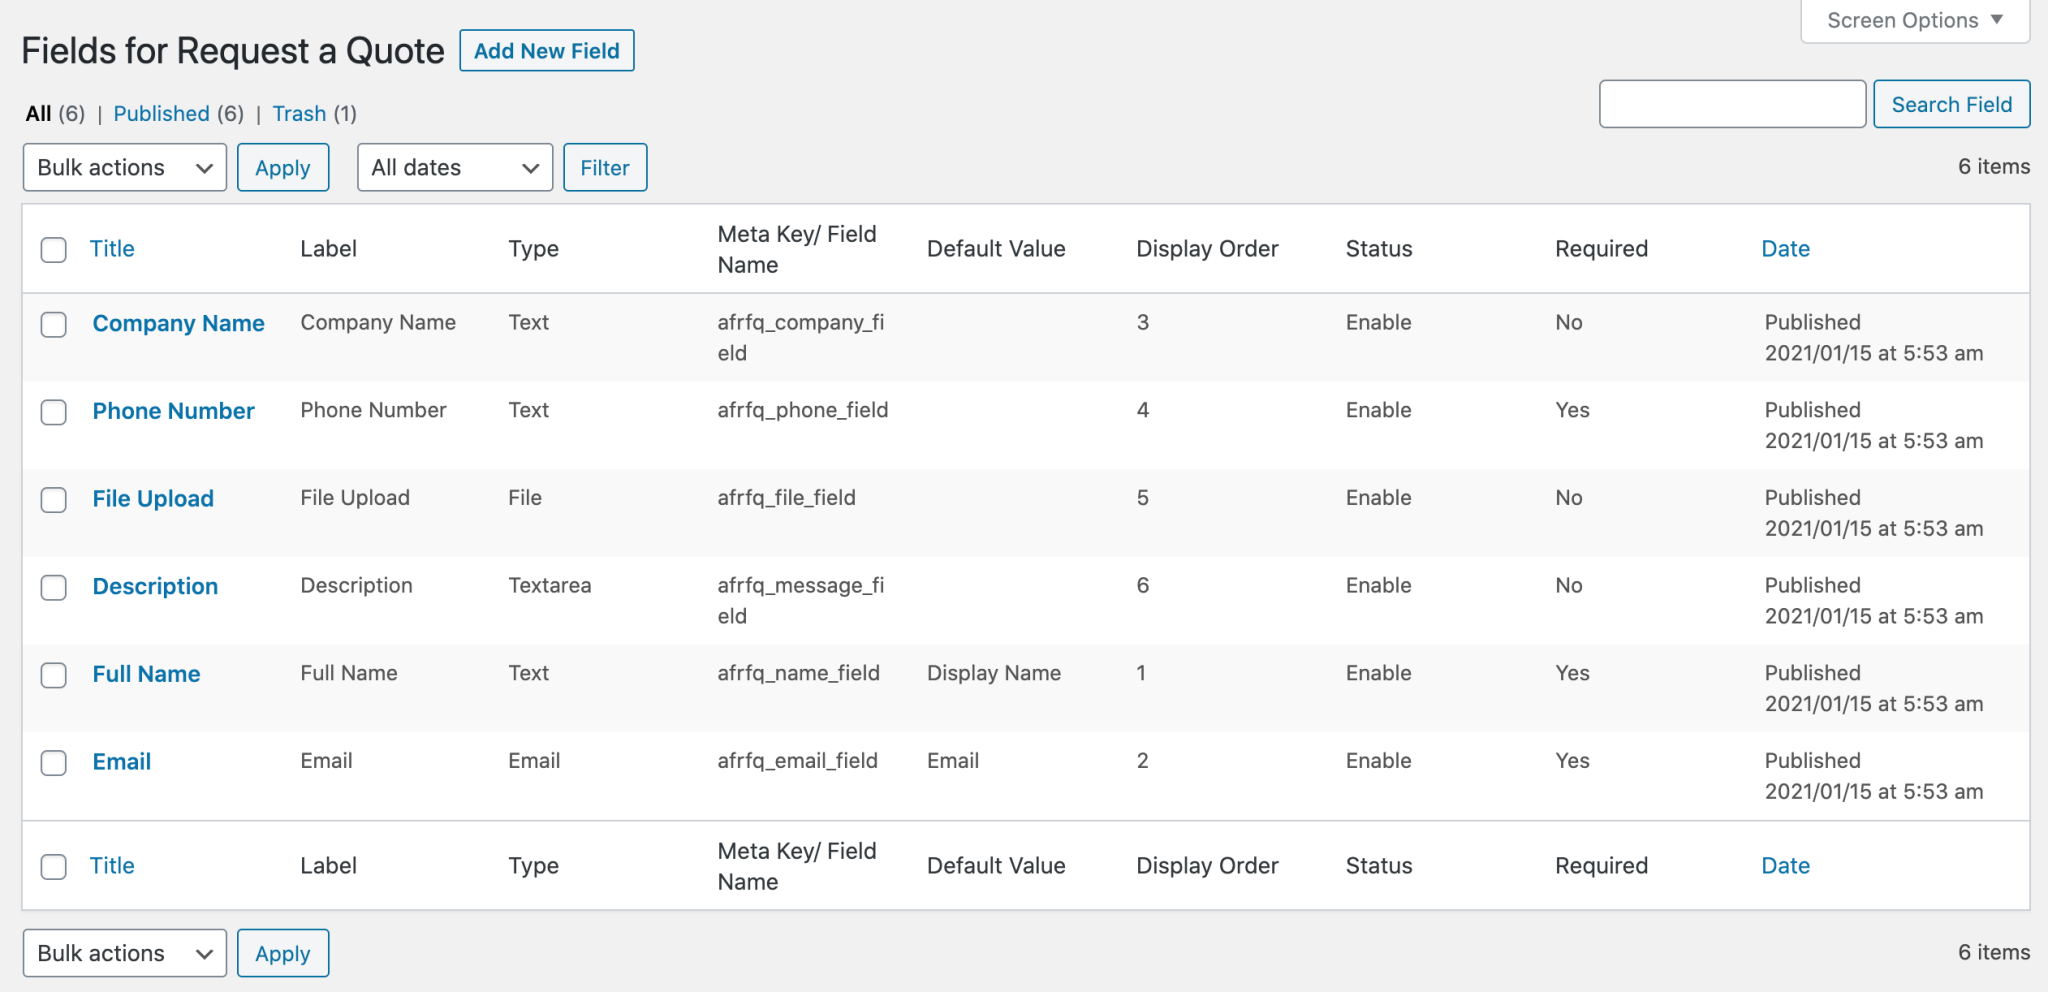
This section displays all of your Quote Fields in a single grid. You can view, add, edit, or delete any field.
Click
Add New Field each time you need to create a field that can assist in inquiring for relevant and necessary details. To make a field enter these details:
- Title: The name of the field that appears on your All Quotes page for your own reference
- Field Name: Not to be confused with Title or Field Label. Each quote field should have a unique name, the field name is a meta_key used to store value in database.
- Field Type: Assign an input format type to the field.
- Field Label: Not to be confused with Title or Field Name. The name of the field that will be shown to your customer’s at the frontend
- Field Default Value: You can select any default customer value against which that fields data should be stored. Forexample, if you adding a text field for the first name, from the dropdown you can select the first name option so that fields data can be saved as first name in the database against the default first name value.
- Field Place Holder: Give your customer an additional description or hint of what you want from them in this field, with customized text located inside the field. Remember, the text disappears once the customer starts typing.
- Field Options: Based on the input type you select in Field Type, an additional field, Field Options, will appear at the bottom for you to fine-tune Multi-Select, Select or Radio field types.
With the help of the
Field Attributes box you can make any field a mandatory field and set its order in your form. Enable or disable the field through the dropdown.

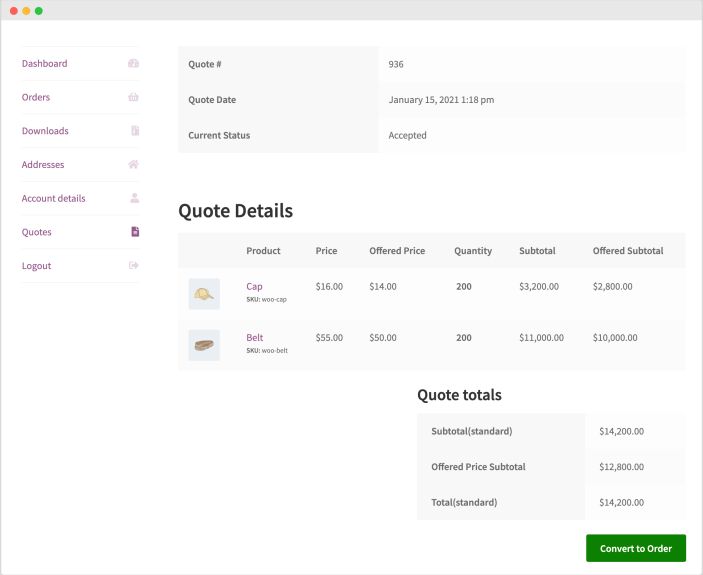
This section display all quote requests submitted by your customers and administrator on the behalf of customers. You can click on any to view its details.
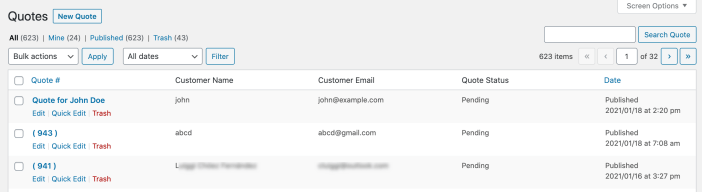
You can add new quotes on customers’ behalf or edit an existing quote to add products, change price and covert to order. You can send an email notification to the customer by selecting the quote status and select yes to notify the customer. The quote page on the backend provides following information.
- Full Name
- Email or account username if creating quote for registered customer
- Company Name
- Phone Number
- Country
- Description (type the details related to the requested quote)
The quote fields depend on the fields you have created for quote submission form.
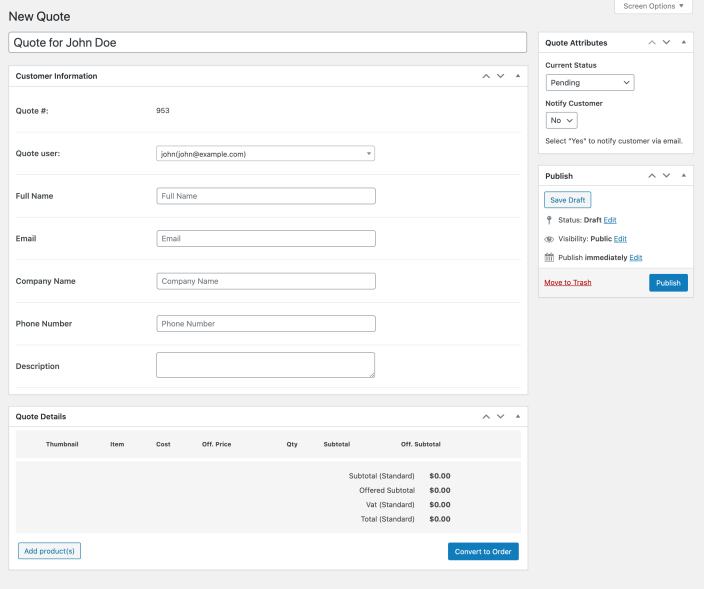
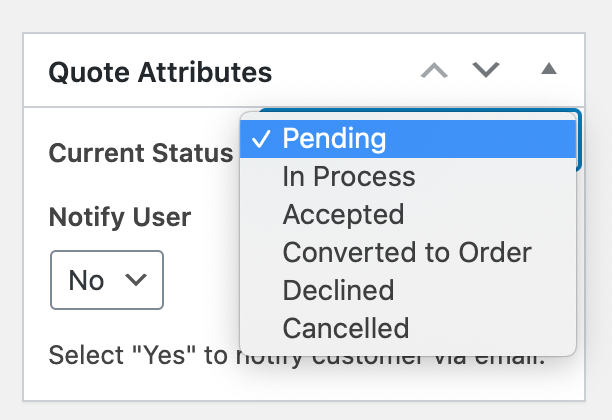
To better manage your quotes, the extension now offers multiple quote status and ability to send email notifications to customers on status change.
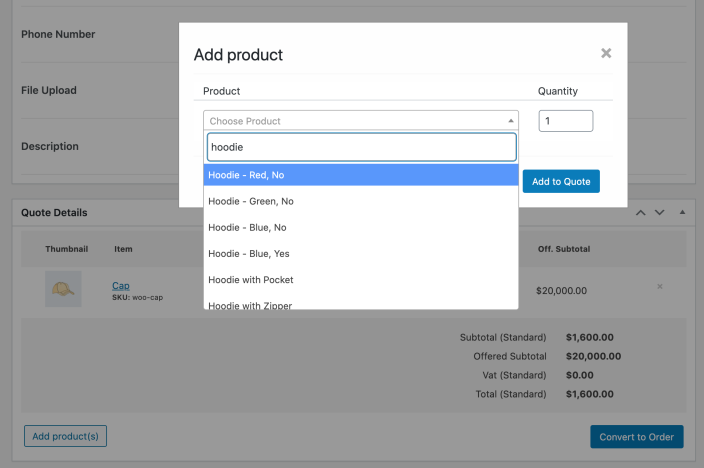
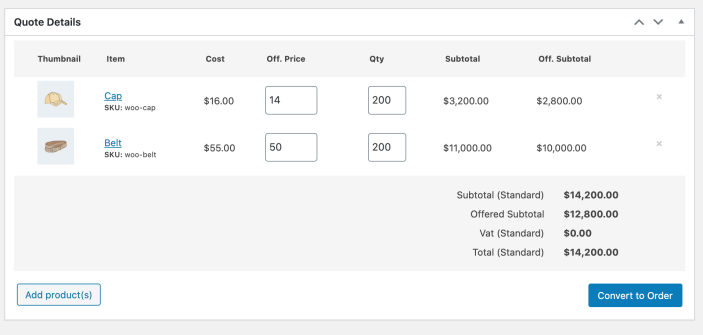
When creating a new quote or editing an existing one, you can add or remove the products along with their quantity and offered price.
You can choose to convert the quote into an order. The quote will be converted to order using the offered price. You can edit the offered price and the same will be used as the product price in order. The customer will get an email about the status change.
Instead of converting the quote into order by yourself, you can change the quote status to accepted and let customers convert the quote into order from my account page and pay.
The general settings page enables you to personalize the global configurations of this plugin. In this section, you can customize the following options:
- Enable for Out-of-Stock: If you have created a rule and added request a quote button to that product, once the product goes out of stock, you can choose to keep or remove the request a quote button.
- Add Mini Quote Basket: Select the menu where the mini quote basket should be added (Option to add on multiple menus)
- Set Basket Style: Select how you would like to display the number of items in the customer’s basket
- Set Ajax Add-to-Quote (Product Page): Enable/Disable Ajax Add-to-Quote on your product page
- Set Ajax Add-to-Quote (Shop Page): Enable/Disable Ajax Add-to-Quote on your shop page
- Redirect After Product Added: Redirect your customer to the Quote page once they have successfully added a product for Quote
- Redirect After Quote Submitted: Redirect your customer to any page once they have successfully submitted a Quote

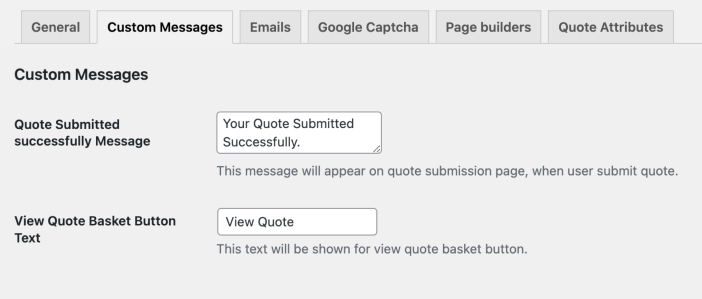
If you have enabled ajax add to quote, you can customize the success messages for
- Quote submitted successfully
- “View Quote” link text.
You can enable and customize following email notifications
- New quote notification to admin
- Pending / new quote email (customer)
- When a quote is accepted (customer)
- Converted to order (customer)
- Quote declined (customer)
- Quote canceled (customer)

To enable captcha, navigate to the captcha tab from the settings page. You can get your recaptcha keys from
here.
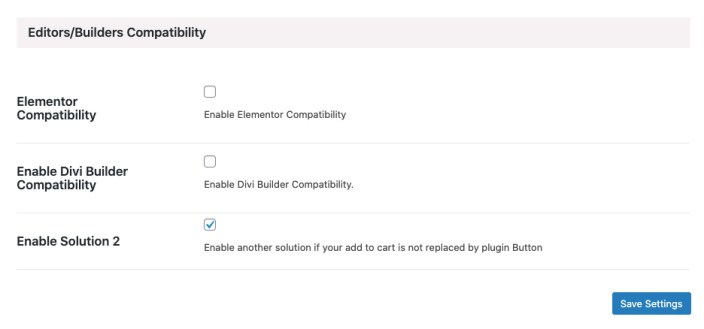
The page builder plugins sometimes remove the default Add to Cart hook and replaces it with a custom hook. In such cases, The add to cart and hide price feature does not work. In the latest version, we have added 3 alternate hooks that these page builders uses (frequently).
If you facing issues with showing the quote button or replace add to cart with the quote button, please try all these alternate hooks and retain what works for your website/theme.
You can access this from
Request a quote > Settings > Page Builders.
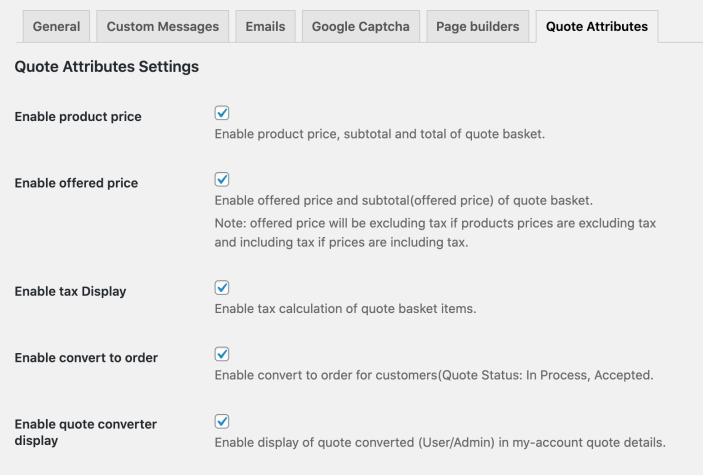
Use
Quote Attribute settings to manage the following:
- Quote Basket Price: Activate product price, subtotal and total of quote basket. If this option is active, the price will always display on quote basket and emails.
- Price Offered: Activate offered price and subtotal (offered price) of quote basket
- Tax: Display tax based on standard price
- Convert to Order: Give your customer the convert to order option at the frontend (Quote Status: In Process, Accepted
- Quote Converter: Activate display of quote converted (User/Admin) in my-account quote details
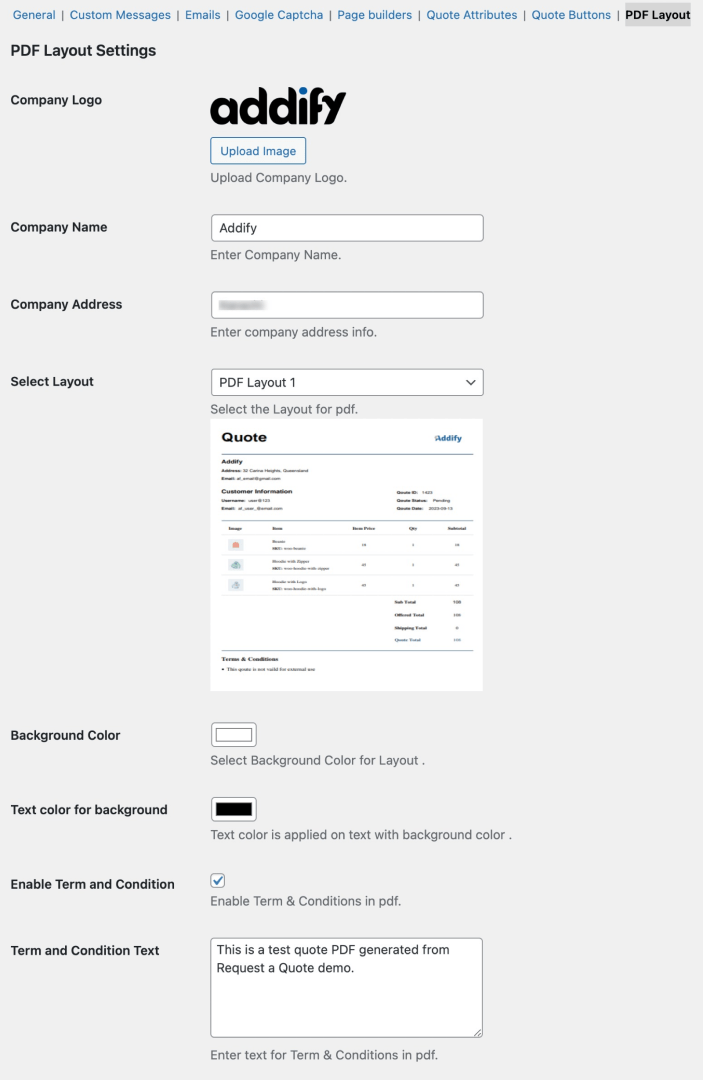
You can choose from 3 PDF layouts and customize text, color and other options of PDF file.
To use the latest version of the REST API you must be using:
- WooCommerce 3.5+.
- WordPress 4.4+.
- Role-based pricing 2.0.0+
- Pretty permalinks in Settings > Permalinks so that the custom endpoints are supported. Default permalinks will not work.
- You may access the API over either HTTP or HTTPS, but HTTPS is recommended where possible.
We have extended the v3 version of WooCommerce REST API. Read more about the WooCommerce authentication here.
https://woocommerce.github.io/woocommerce-rest-api-docs/#authentication
This API helps you to get all rules of Request a quote.
HTTP Request:
GET /wp-json/wc/v3/af_rfq/
CURL:
curl https://example.com/wp-json/wc/v3/af_rfq \-u consumer_key:consumer_secret
This API helps you to get all rules of Request a quote.
HTTP Request:
GET /wp-json/wc/v3/af_rfq/{rule ID}
CURL:
curl https://example.com/wp-json/wc/v3/af_rfq//{rule ID}
\-u consumer_key:consumer_secret
HTTP Request:
GET /wp-json/wc/v3/af_quotes/
CURL:
curl https://example.com/wp-json/wc/v3/af_quotes \-u consumer_key:consumer_secret
HTTP Request:
GET /wp-json/wc/v3/af_quotes/
CURL:
curl https://example.com/wp-json/wc/v3/af_quotes \-u consumer_key:consumer_secret
HTTP Request:
GET /wp-json/wc/v3/af_quotes/{Quote ID}
CURL:
curl https://example.com/wp-json/wc/v3/af_quotes/{Quote ID} \-u consumer_key:consumer_secret
HTTP Request:
POST /wp-json/wc/v3/af_quotes
CURL:
Curl -X POST https://example.com/wp-json/wc/v3/af_quotes/{Quote ID} \
-u consumer_key:consumer_secret
-H "Content-Type: application/json" \
-d '{your-data}'
HTTP Request:
DELETE /wp-json/wc/v3/af_quotes/{Quote ID}
CURL:
curl -X DELETE https://example.com/wp-json/wc/v3/af_quotes/{Quote ID}?force=true
\-u consumer_key:consumer_secret
HTTP Request:
PUT /wp-json/wc/v3/af_quotes/{Quote ID}
CURL:
curl -X PUT /wp-json/wc/v3/af_quotes/{Quote ID} \
-u consumer_key:consumer_secret \
-H "Content-Type: application/json" \
-d '{Your Data}'
With the release of version 2.2.0, the extension is now compatible with WooCommerce Product Add-Ons with the following limitations.
- File Upload field cannot be carry forwarded with a quote.
The extension currently supports Google Recaptcha V2 version.
You would need to configure the emails from Request a Quote > Settings > Emails. Here you can enable notifications for admin and customers for different quote statuses and customize the messages as well.
If you have already configured the above and the emails are still not working, there is a high possibility that your website emails are not working. We would recommend you please test the email configurations by using the following steps.
- Disable our extension
- Confirm if new user account email is enabled from WooCommerce > Settings > Email > “New account”
- Create a new user account and see if you receive a new account email notification.
If it doesn’t work, please check the email configurations.
As soon as your website emails start working, our extension quote emails should start working as well. If it doesn’t, please
create a ticket using this link, and don’t forget to mention that you have already tried these steps.
If you want to enable the request a quote for registered users only, you would need to create 2 rules.
Create your first rule for guest users and replace add to cart with a custom button – give it a suitable title like login/register to quote and add URL of your login/registration page.
Create another rule and this time select the registered user roles and replace add to cart with the quote button. By doing this only the registered users will see quote button whereas the guest users will see the login/register button.
You can find the email templates under following address
plugins/woocommerce-request-a-quote/includes/emails/templates
All templates have instructions to override them in the file comments. For example, customer quote email template can be overridden by copying it to yourtheme/woocommerce/addify/rfq/emails/customer-info.php.
Please make sure you have created a new rule and correctly applied to your products. Also please make sure that your product does not have empty Price Field. Due to technical limitation its mandatory to add a Standard price of your products in order to show the quote button. You can add “0” in the price field. If you wish to hide price you can hide using the same rule settings – WooCommerce > Request a Quote > Create a new rule > Rule settings > Hide price.