Master order fulfillment with Pick List for WooCommerce
↑ Back to topCongratulations on choosing Pick List for WooCommerce!
Pick List for WooCommerce is a powerful tool that streamlines order fulfillment, enabling quick generation of pick lists, packing slips, and efficient order tracking with QR and barcode support. Designed to improve accuracy and speed, this extension enhances every step of your workflow—from picking and packing to real-time progress tracking.
See vendor documentation for Pick List here…
Installation
↑ Back to top- Download the .zip file from your WooCommerce account.
- Go to WordPress Admin > Plugins > Add New to upload the file you downloaded with Choose File.
- Activate the extension.
More information at Install and Activate Plugins/Extensions.
Updating extensions
↑ Back to topThese steps should help you update the Pick List extension on your website in a hassle-free manner.
- Log in to your WordPress Admin panel and go to WooCommerce > Extensions > WooCommerce Subscriptions (tab).
- Look for Pick List and check if it’s up-to-date. If not, update it to the latest version.
- If your website is not connected to WooCommerce, connect it using your WooCommerce login. Once connected, the list of your WooCommerce extensions will appear.
Setup and Configuration
↑ Back to topGeneral
↑ Back to top
General
The General settings is mainly for the Order Tab and allow you to customize how you view and manage orders, ensuring optimal efficiency in your order fulfillment process.
- Orders per Page:
- Set the default number of orders you’d like to see on a single page. This setting controls the paging of the order list.
- Default Order Statuses:
- Choose the default order statuses you want to display in the Pick List order table. Use the control button to select multiple statuses for display.
- Show Orders in Date Range:
- Filter the order table based on a specified date range (e.g., Last 3 months) to view a more current range of orders.
- Order:
- Select ASC or DESC (default – new to old)
- Show Company:
- Enable this option to display the company information in the table and Pick Order tab, particularly useful for B2B customers.
- Show Role:
- Similar to displaying the company, activate this option to showcase customer roles (e.g., VIP Customer) in the table and Pick Order tab.
- Show Shipping:
- Enable this to add a Shipping column in Orders and Pending Pickup Orders tab. Values shown in each rows is Shipping Method and Shipping Total.
- Notifications: New Orders:
- Opt to receive notifications when new orders arrive, helping you stay informed and act promptly.
- Notifications: Order Pick:
- Receive notifications when changes are made to the order pick, keeping you updated on the order fulfillment process.
- Automatically Update:
- Enable this feature for automatic updates of the order list (table) whenever a new order arrives or changes occur in the order pick. Enjoy a dynamic, “live” order list. Note that enabling this feature will remove the notifications for new orders and order pick changes.
- Pick Status on My Orders:
- If set (checked) a new line on the order (customers My Orders list) will be added with a pick status. This enable your customers to see progress in the order.
- Hide Price Information:
- Select users (employees) that you want to hide prices for, applies to:
- Pick List:
- Order (tab)
- Pending Pickup Orders (tab)
- Pick Order (tab)
- Prints:
- Pick List
- Packing Slips
- Pick List:
- Pricing and totals is removed for the selected users.
- Select users (employees) that you want to hide prices for, applies to:
- User Roles Access:
- Select user roles that you want to have access to Pick List (e.g. roles for warehouse pickers). Default roles (always present) is: Administrators and Shop Managers.
- Use Dark Mode:
- Checking this gives a dark mode style for Pick List
Pending Pickup Orders (tab)
↑ Back to top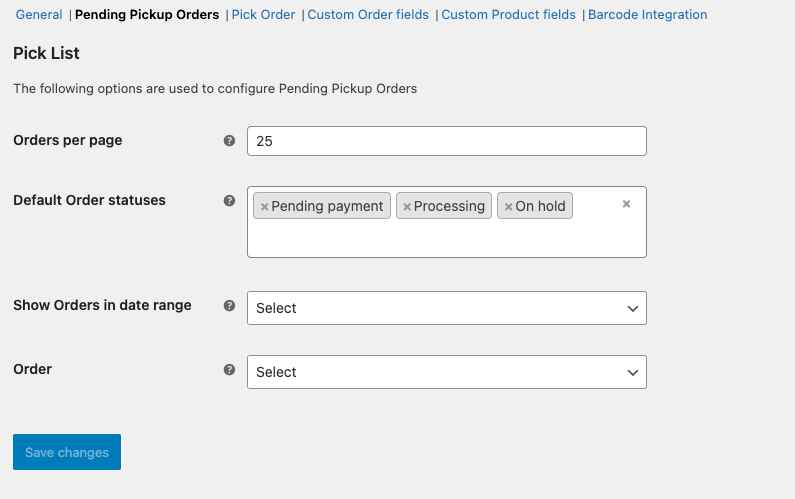
- Orders per Page:
- Set the default number of orders you’d like to see on a single page. This setting controls the paging of the order list.
- Default Order Statuses:
- Choose the default order statuses you want to display in the Pick List order table. Use the control button to select multiple statuses for display.
- Show Orders in Date Range:
- Filter the order table based on a specified date range (e.g., Last 3 months) to view a more current range of orders.
- Order:
- Select ASC (default – oldest to newest) or DESC
Pick order (tab)
↑ Back to top
Pick Order Tab SettingsFine-tune your order fulfillment process with the customizable settings available in the Pick Order tab. These settings enable you to personalize the order picking experience and enhance communication with your customers.
- Company logo URL:
- Paste your company logo’s URL from the media library here. This allows your logo to be included on printed documents such as the Pick List and Packing Slip.
- Change status when pick starts:
- Enable this option to automatically change the order status to your selected order status when someone initiates the order-picking process.
- Status pick started:
- Select the status that fits your workflow, to make this work you need to have checked on the change status when pick starts.
- Change status when pick completed:
- Enable this option to automatically update the order status to your selected order status when the order pick reaches 100% completion.
- Status pick completed:
- Select the status that fits your workflow, to make this work you need to have checked on the change status when pick completed.
- Customer message – Shipped:
- Customize a personalized message to customers when the order is shipped. Utilize this input field to create a unique message. The default message is: “Order shipped.”
- Customer message – Pick Completed:
- Tailor a special message for customers to notify them when their order has been successfully picked up and is ready for shipment. Customize this message to suit your brand. The default message is: “Order picked, ready for shipment.”
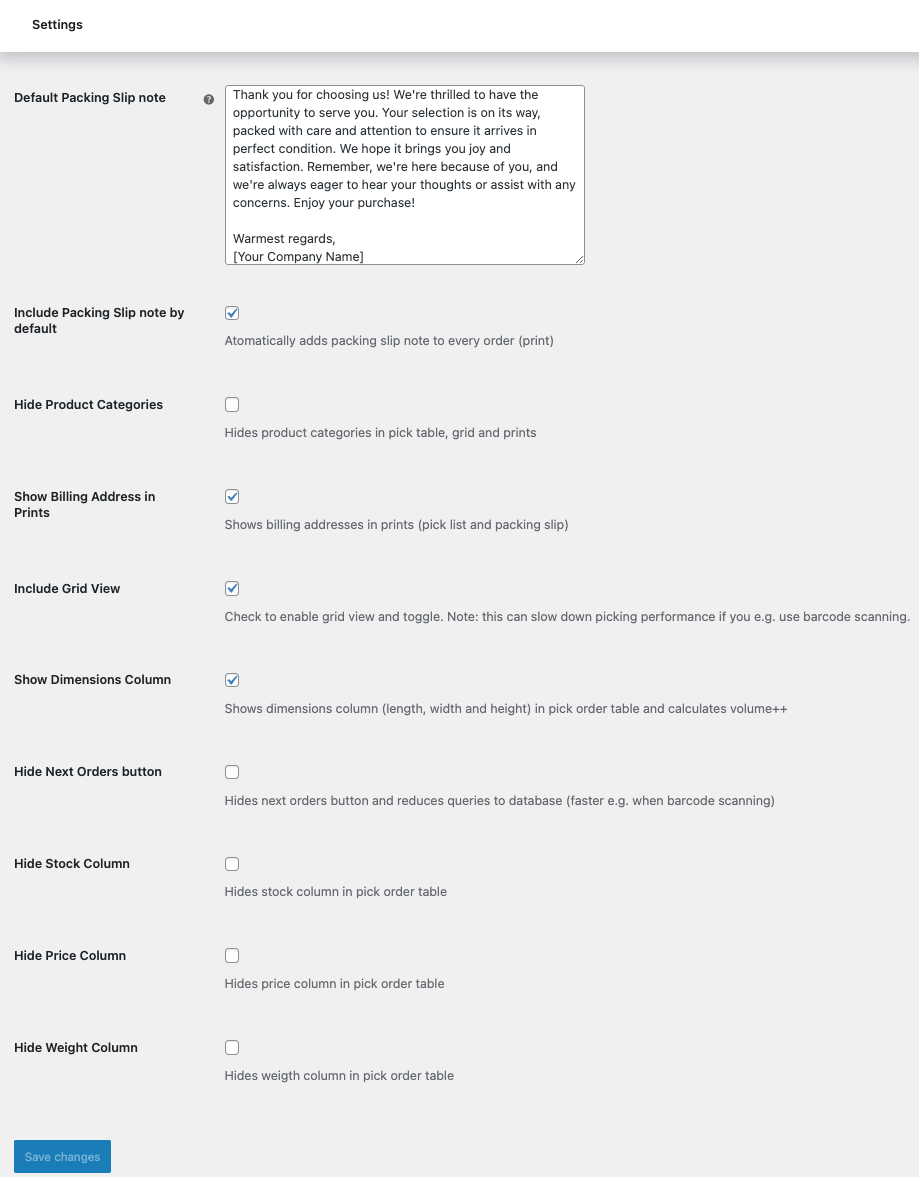
- Default packing slip note:
- Add a note (e.g. a thank you note) that can automatically be added to your packing slips. (supports basic HTML)
- Include packing slip note by default:
- Select / check this if you want the note to be default added to all packing slips.
- Hide product categories: If checked, the product categories is hidden in pick table, grid and prints
- Show Billing address in prints: Shows billing information in prints (pick list and packing slips)
- Show Dimensions Column: Add Dimensions column to the pick order (order items) table. Calculates area and volume and for volume adds the option to preview volume as a 3D box.
- Hide Next Orders button: Hides the next order button, can be handy if you use barcode scanning and want to reduce queries (to database) for improved speed.
- Hide Stock column: Hides the Stock Column.
- Hide Price Column: Hides the Price Column.
- Hide Weight Column: Hides the Weight Column.
Add Product fields (tab)
↑ Back to top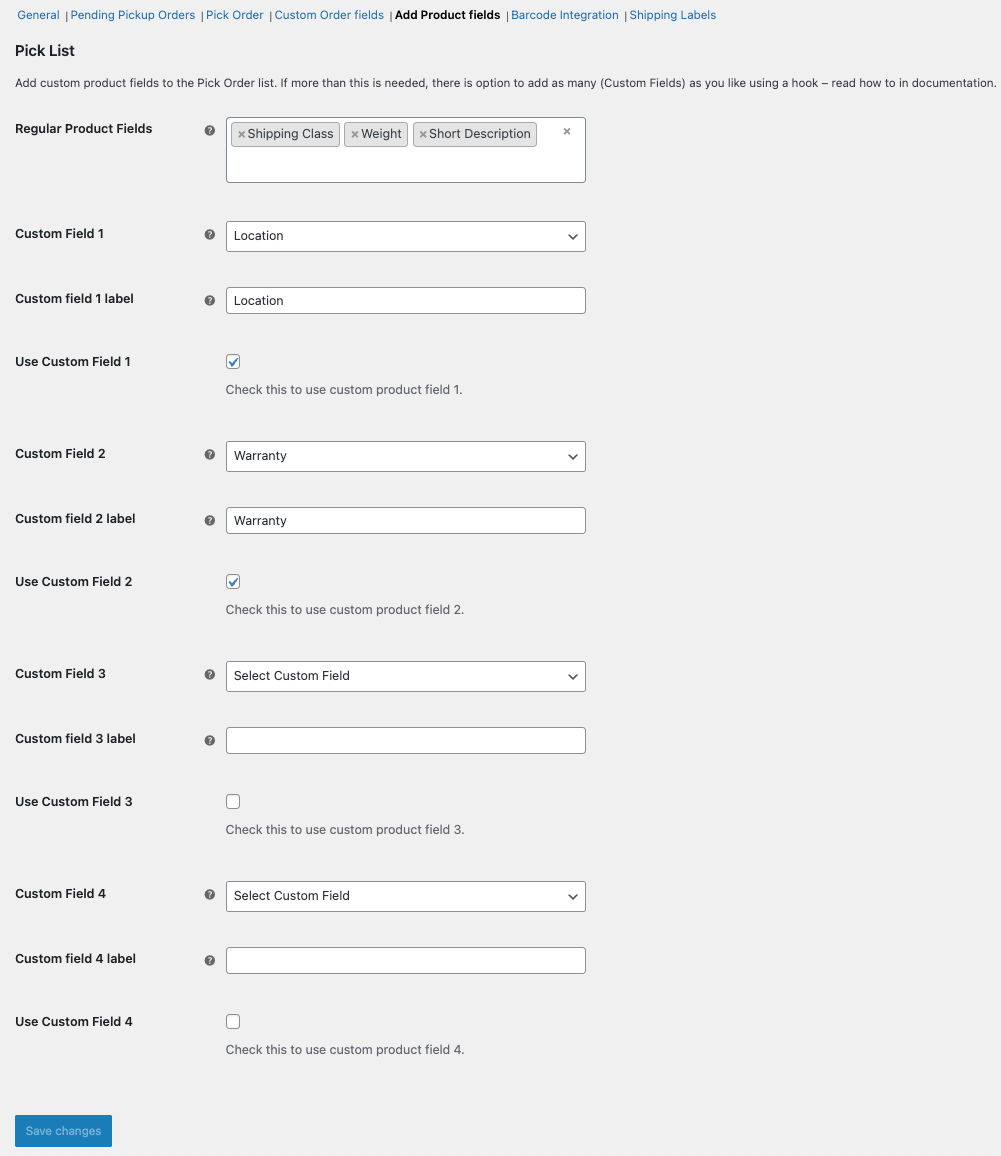
Add Product Fields allows you to tailor your order data by incorporating specific details relevant to your business needs. Customize and utilize these fields to enhance order tracking and management.
- Regular Product Fields: In the dropdown, select the fields you want to show on the product.
- Custom field 1:
- Use this input field to add a custom order field that aligns with your requirements.
- Custom field 1 label:
- Set a label for your custom field, making it easily identifiable.
- Use custom 1 – order table:
- Enable this option to showcase the custom order field in the Order list/table, providing quick access to pertinent information.
- Use custom 1 – pick order:
- Enable this option to display the custom order field in the Pick Order tab, enhancing visibility and facilitating efficient order picking.
- Custom field 2:
- Utilize this input field to add another custom order field that suits your unique needs.
- Custom field 2 label:
- Set a label for the second custom field to clearly define its purpose.
- Use custom 2 – Order table:
- Enable this option to include the custom order field in the Order list/table, ensuring easy access to relevant order data.
- Use custom 2 -Pick order:
- Enable this option to showcase the custom order field in the Pick Order tab, enhancing the order-picking experience.
- For custom product field 3 and 4 do the same as for 1 and 2.
- You can also add custom product fields using code : https://www.consortia.no/docs/pick-list/settings/custom-product-fields-add-by-hook-custom-code/
Custom Order Fields
↑ Back to top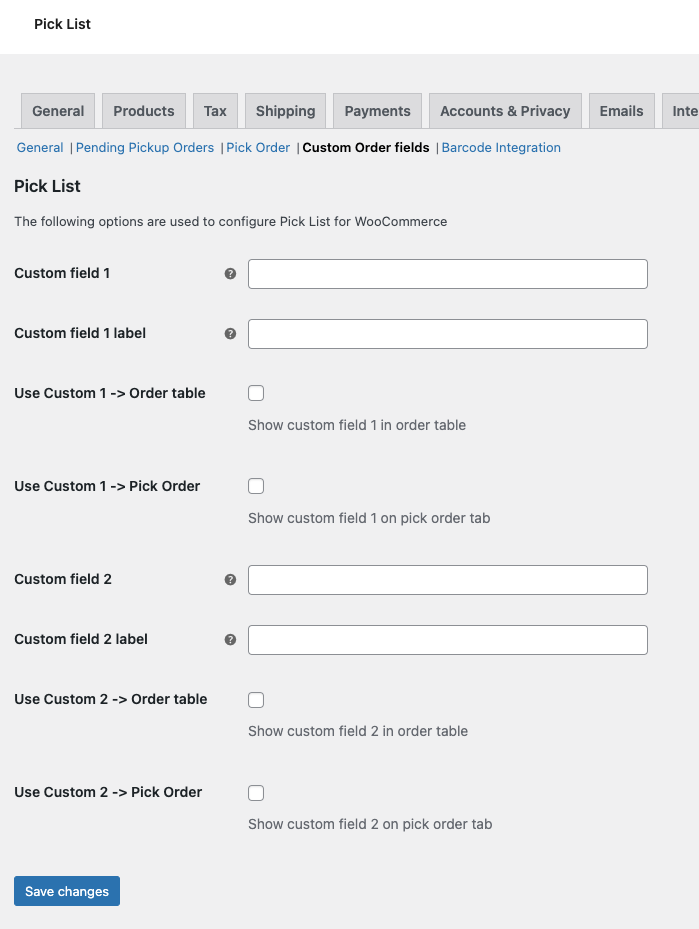
The custom product fields enable you to add up to two custom fields in the Order Pick tab. Here is how to set it up.
- Select field 1: Select a field from the dropdown list of custom fields (sorted by latest modification)
- Custom field 1 label: Set a label that fits the custom field you added.
- Use custom field 1: Check this so it become visible on the pick order tab (below product name).
- Do the same for custom field 2 (if you need).
Important note: If you create a custom field (on a product), be sure to not include spaces in the name, e.g. Warehouse Location needs to be e.g. warehouse_location.
Barcode Integration
↑ Back to top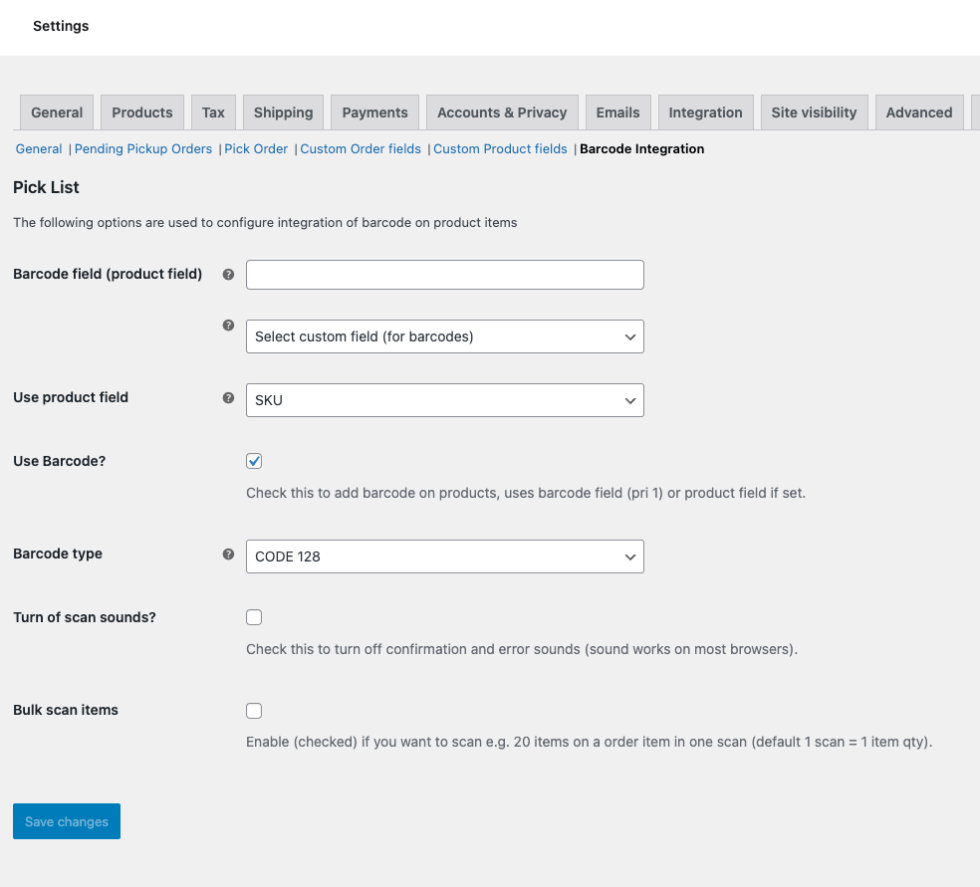
- Barcode field (product field): Add the custom product field that is used for your Barcode.
- The select dropdown below enable you to find your custom product field used for barcodes. When selected it will add the field to the barcode field above.
- Use product field: Select a regular product field if you use this for barcodes (Id, SKU or the new Global Unique ID field)
- Tip: Use the new Global Unique ID field for your barcodes (created for this by WooCommerce) – PS: field only supports numeric values.
- Use Barcode?: Check this if you want Barcodes to show on order items (products) and in Pick List print
- Barcode type: Select the type of barcode that you use (if your type is missing – please let us know and we will see if we can add it)
- Only Pick items when scanning: When selected (checked) the scanner only scan as a pick item, if you scan again (same product) it will do nothing. If not checked a second scan will unpick the scanned product item.
- Turn of scan sounds?: If you do not need or want confirmation and error sounds when picking using a scanner – check this on.
- Bulk scan items: Check this if you want to scan all quantity of an item and not the default 1 scan = 1 item quantity.
Supported Barcode Formats:
- EAN 8 (GTIN-8): Compact 8-digit barcode used for small items.
- EAN 13 (GTIN-13): 13-digit barcode widely used internationally for retail products.
- UPC-A (GTIN-12): 12-digit barcode used primarily in North America for retail products.
- Standard 2 of 5 (Industrial): Numeric barcode used in warehousing and distribution.
- Interleaved 2 of 5: Numeric barcode used in logistics and shipping.
- CODE 11: Numeric-only barcode used in telecommunications and inventory management.
- CODE 39: Alphanumeric barcode widely used in various industries for inventory and identification.
- CODE 93: Higher-density barcode than CODE 39, encoding the full ASCII character set.
- CODE 128: High-density barcode encoding all 128 ASCII characters, used in logistics and shipping.
- Codabar: Numeric barcode used in libraries, blood banks, and postal services.
- MSI (Modified Plessey): Numeric-only barcode used in inventory control and warehousing.
- Data Matrix: Two-dimensional barcode used for encoding dense data in industrial applications.
Shipping Labels
↑ Back to top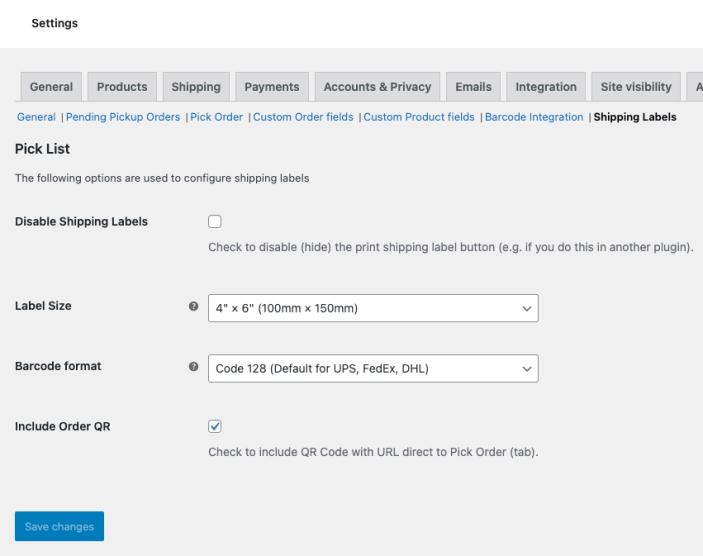
The following options is possible to configure for shipping labels + the options in the dialog when clicking the create shipping label in Pick Order (tab).
- Disable Shipping Labels:
- Check this if you do not want to generate shipping labels (e.g. have another plugin or the like for this). Note: If you check this it can make a small performance improvement when scanning barcodes.
- Label Size:
- Select your shipping label size (what the printer prints).
- Barcode Format:
- Select the format that your carrier use for their tracking number (as this is used to generate a barcode or QR code).
- The barcode format can be overwritten in the generate shipping label dialog (in Pick Order tab)
- Include Order QR:
- Check this if you like to generate a QR Code that contains the URL to the order in Pick List (Pick Order tab).
Usage
↑ Back to topThe Orders tab is your starting point in Pick List, accessible via WooCommerce > Pick List. Let’s delve into its features and functionalities:
Orders (tab)
↑ Back to top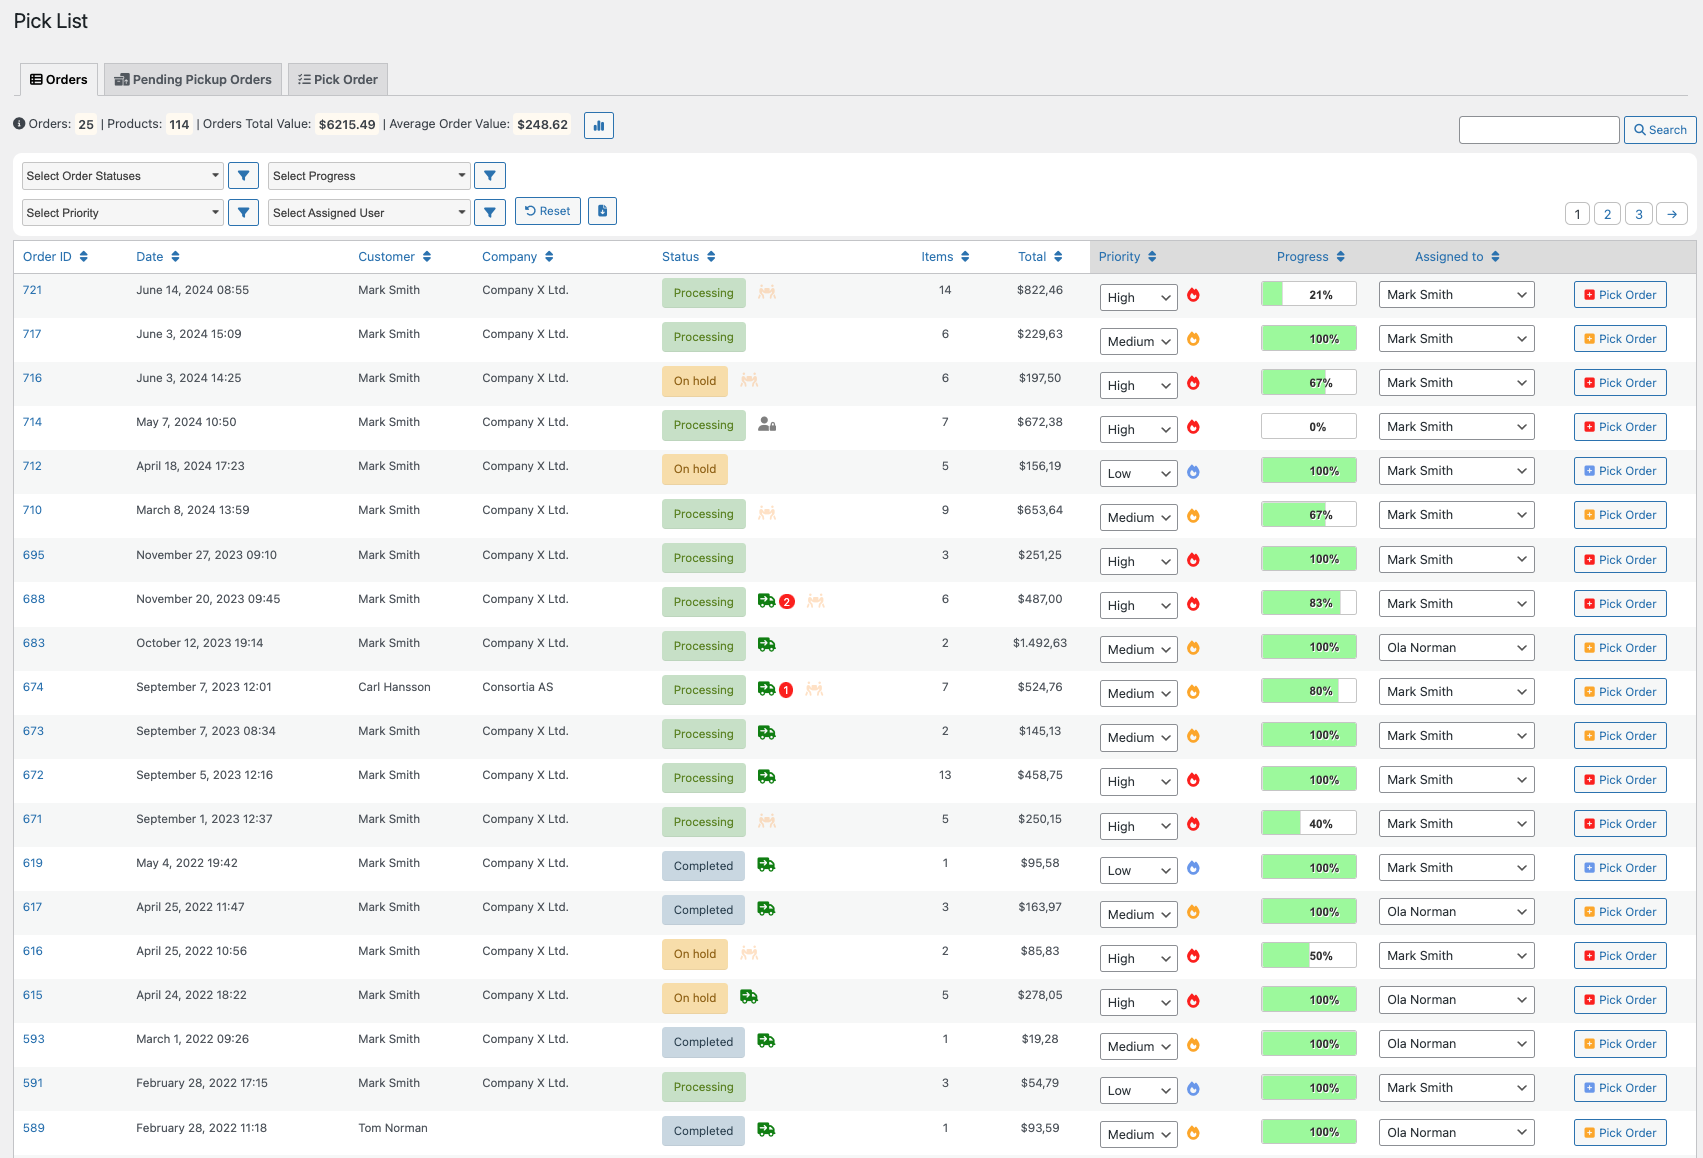
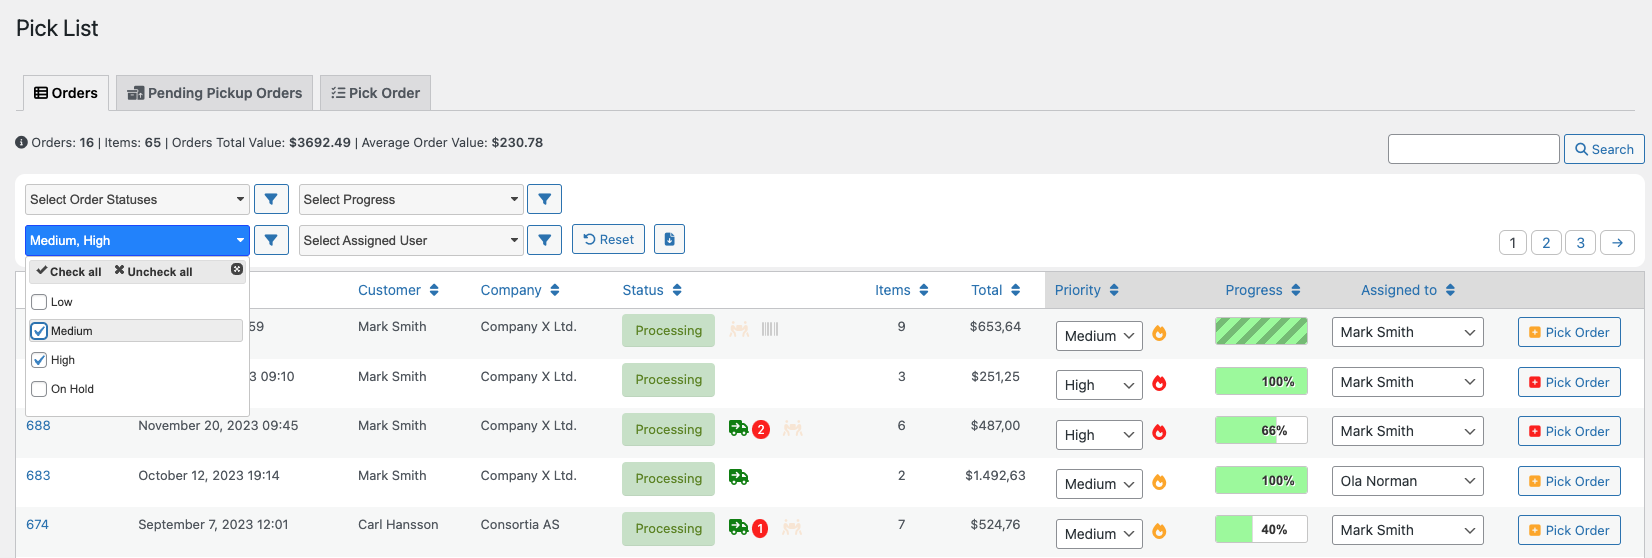
Filters:
- You can filter orders based on order statuses, priority, progress, and assigned to a user. Each filter supports multiple selections and can be combined to tailor your view.
Search:
- Utilize the search function to look for specific orders, similar to how you would in WooCommerce > Orders.
Orders table
↑ Back to top- Columns:
- Mandatory columns display essential order information, while additional optional columns such as Company, Role, and two custom columns (custom order fields) can be displayed.
- All columns are sortable except the last one housing the “Pick Order” button.
- Status:
- Reflects the order status along with corresponding icons indicating assigned users, ongoing order processing (animated icon), and order shipment.
- Priority:
- Indicates the priority level of the order. If not set, you can select a priority, which will automatically save.
- Progress:
- Displays the pick progress as a percentage.
- Assigned to:
- Shows the assigned user, usually a shop manager or administrator. You can directly assign a user by selecting from the dropdown menu (changes are saved automatically).
- Pick order buttons:
- Click here to proceed to pick the respective order.
Additional features:
↑ Back to top- Paging:
- Pagination aligns with your configured settings in the Pick List settings.
- Notifications:
- Receive notifications on this page for new orders and changes in order picks. You can customize notification settings in the plugin’s configuration.
- Auto-Update:
- Configure the order list (table) to update automatically upon new orders or changes. Adjust this feature in the Pick List settings.
Pending Pickup Orders
↑ Back to top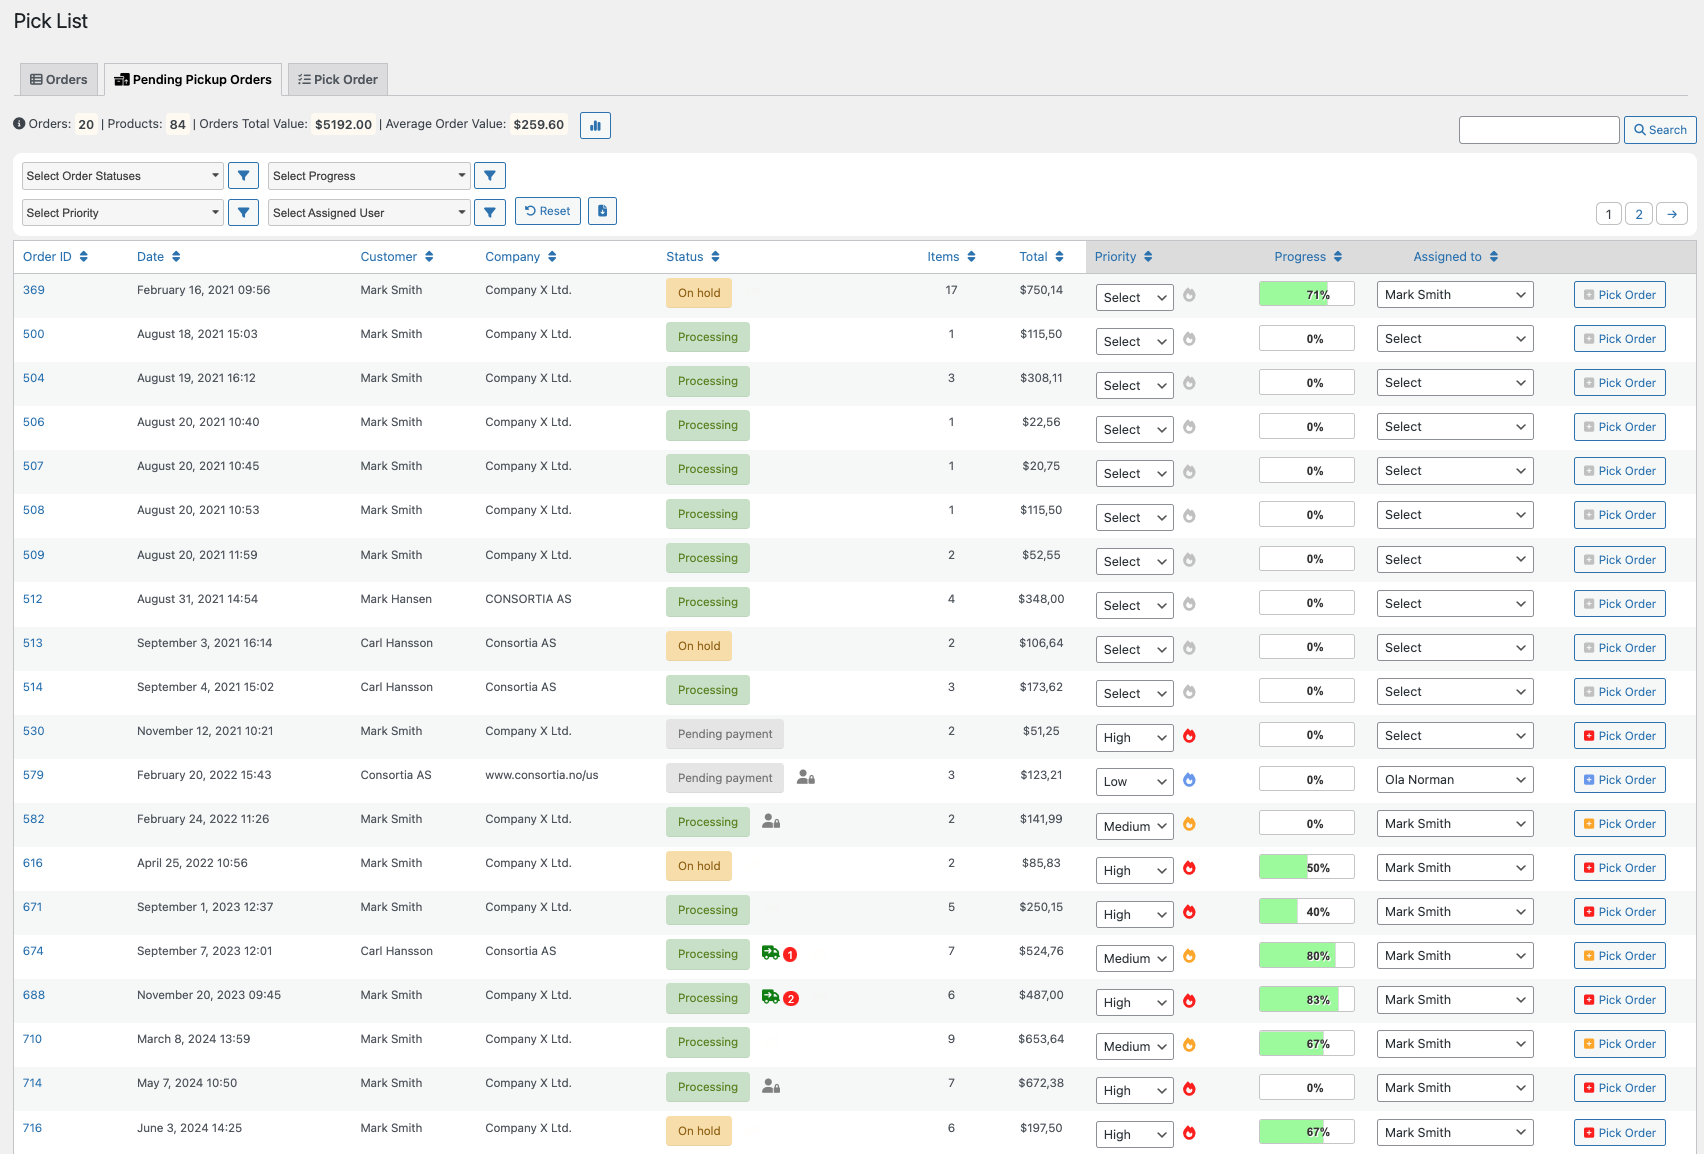
The “Pending Pickup Orders” tab is designed to streamline your order fulfillment process, offering a focused view of orders awaiting pickup. Optimized for efficiency, this tab prioritizes orders by urgency, showing the oldest items first to ensure a smooth workflow.
Key Features:
- Prioritized Order Display: Orders are automatically organized with the oldest items at the top, making it easy to identify and act on urgent pickups.
- Customizable Query Options: Tailor your order view with advanced settings, allowing for a personalized approach to order management.
- Seamless Integration: Works harmoniously with B2B and custom fields, ensuring all necessary order details are at your fingertips.
- Effortless Order Management: Directly edit order details from the tab, with changes saved instantly for a seamless operational flow.
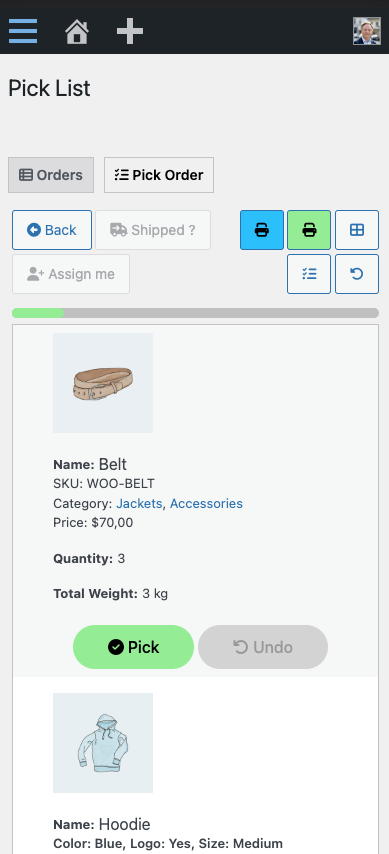
Pick order (tab)
↑ Back to top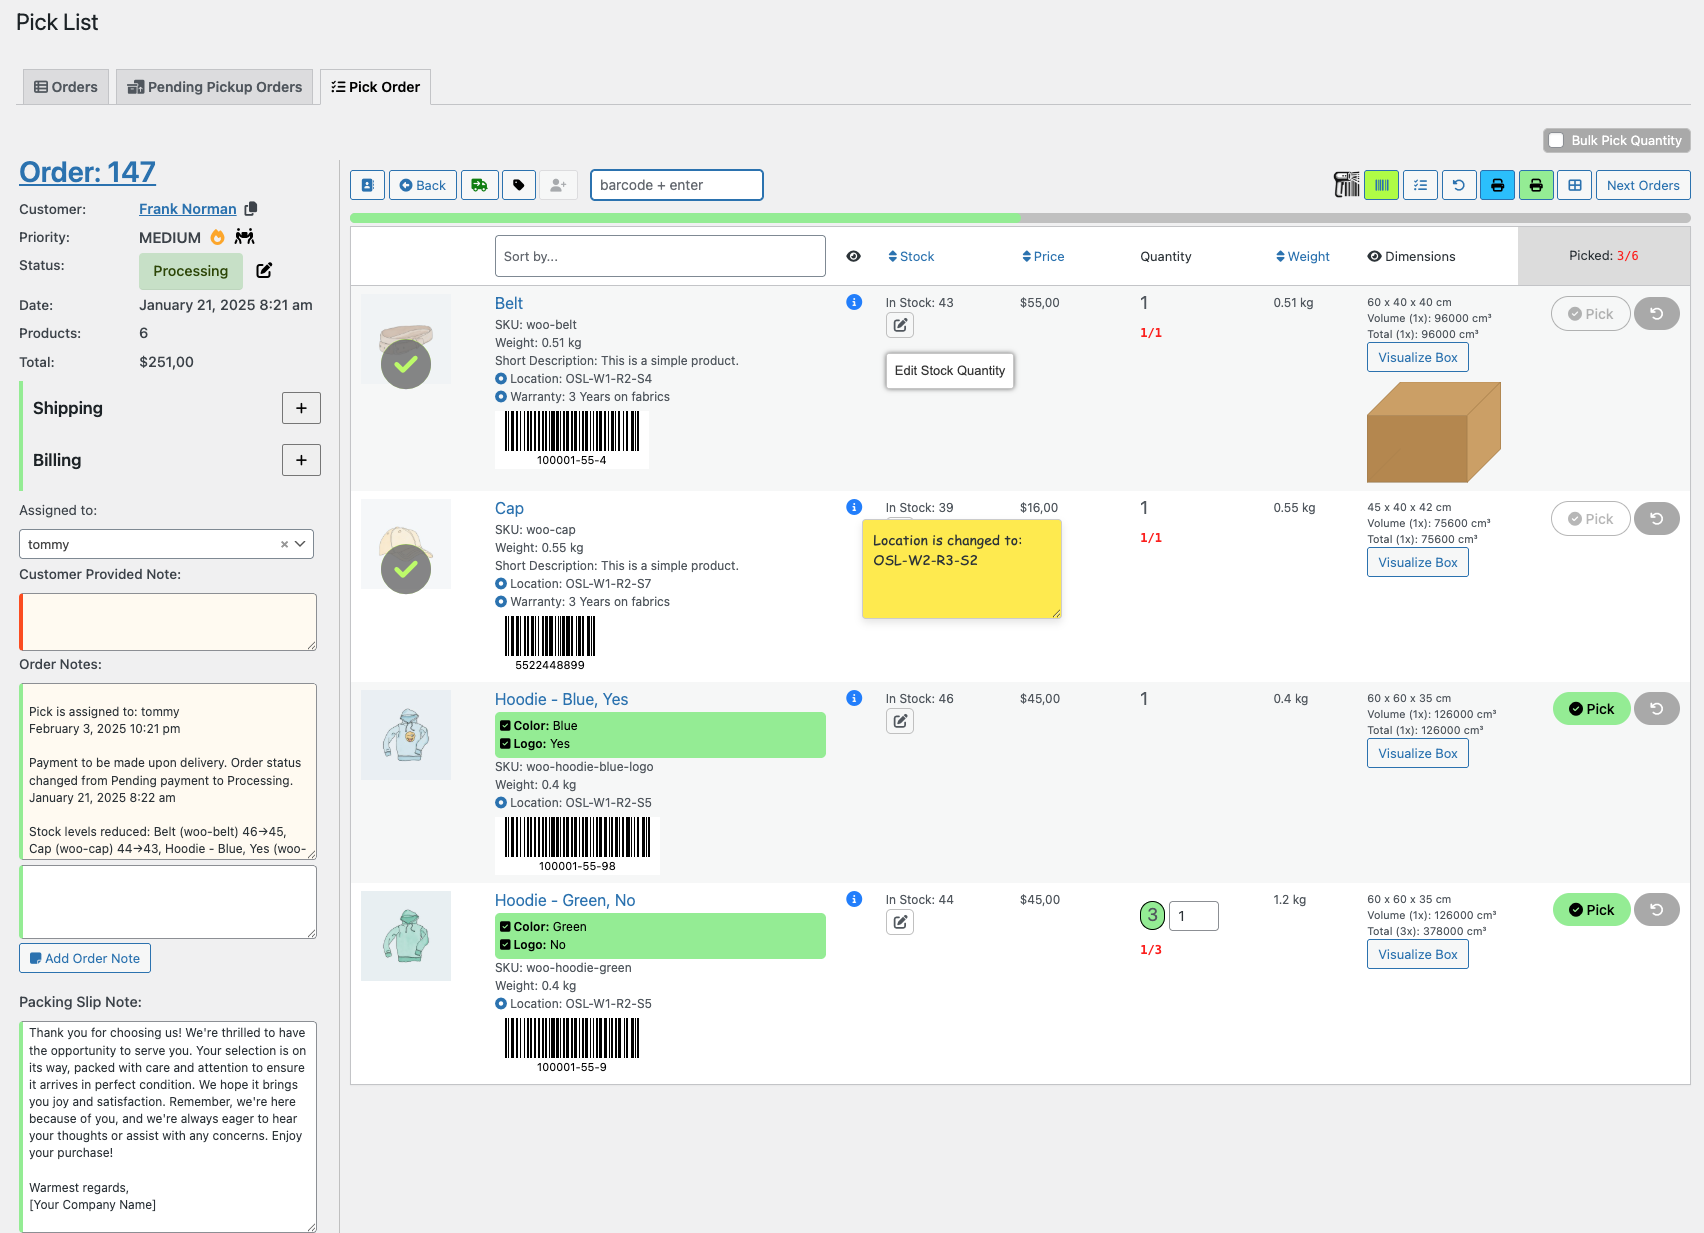
The Pick Order tab is where you initiate the order-picking process. It can be accessed via the Orders tab by selecting an order for picking. Additionally, direct access is possible from the WooCommerce Order page or through the QR Code generated during the Pick List print. Let’s explore its features in detail:
Order information (Left Side):
- Order details:
- Begin by reviewing vital order information, including the order ID. Clicking this takes you directly to the Order Edit page.
- View order priority, status, order date, products to be picked, and the total order amount.
- Access shipping details such as addresses and chosen shipping methods.
- Assigned to:
- Identify the assigned user (typically shop managers or administrators). You can easily select a user if unassigned, and the selection is saved automatically.
- Order notes:
- Access the last six notes for the order and add new notes as needed. Notes are automatically added upon order completion, reset, or shipping. “Completed” and “Shipped” statuses are added as customer notes.
- Pick list:
- The Pick List section features action buttons and a progress bar indicating your current pick progress percentage.
Action buttons and their functions:
- Back:
- Return to the Order tab to manage orders at a glance.
- Shipped:
- This button is disabled until the order is 100% picked. The order is marked shipped upon clicking, and a customer note (“Your order is shipped”) is added.
- Assign me:
- Assign yourself to the pick; available only if nobody is currently assigned to the order.
- Bulk pick all:
- Bulk completes the order, particularly when using printed Pick lists. Utilize the QR Code in the print to access the order pick directly.
- Reset pick:
- Reset the pick, clearing all pick information, including assigned user details.
- Print packing slip:
- Print the Order Packing slip (further details in a separate section).
- Print pick list:
- Print the Order Picklist (further details in a separate section).
- Toggle table and grid view:
- Enable either table or grid view to pick the order based on your preference.
Table and grid view:
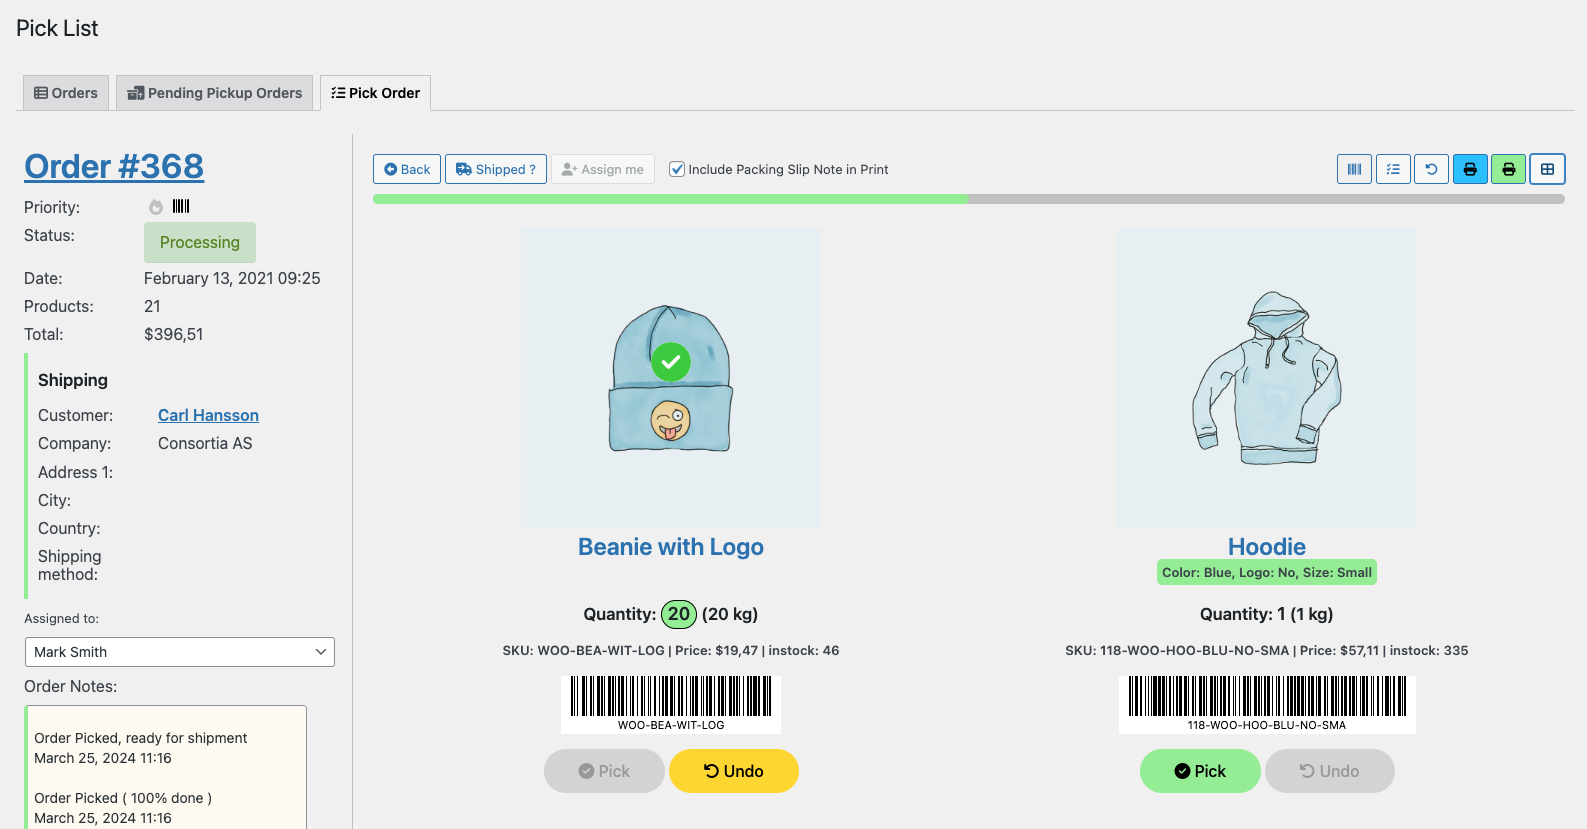
- Both views provide essential product details such as product image, name, SKU, price, quantity, and weight.
- The table view also includes the product category or categories.
- Each view offers two crucial buttons: “Pick” and “Undo.” Pick List will automatically assign you if you commence picking and no one is assigned to the order.
Barcode scanning
↑ Back to top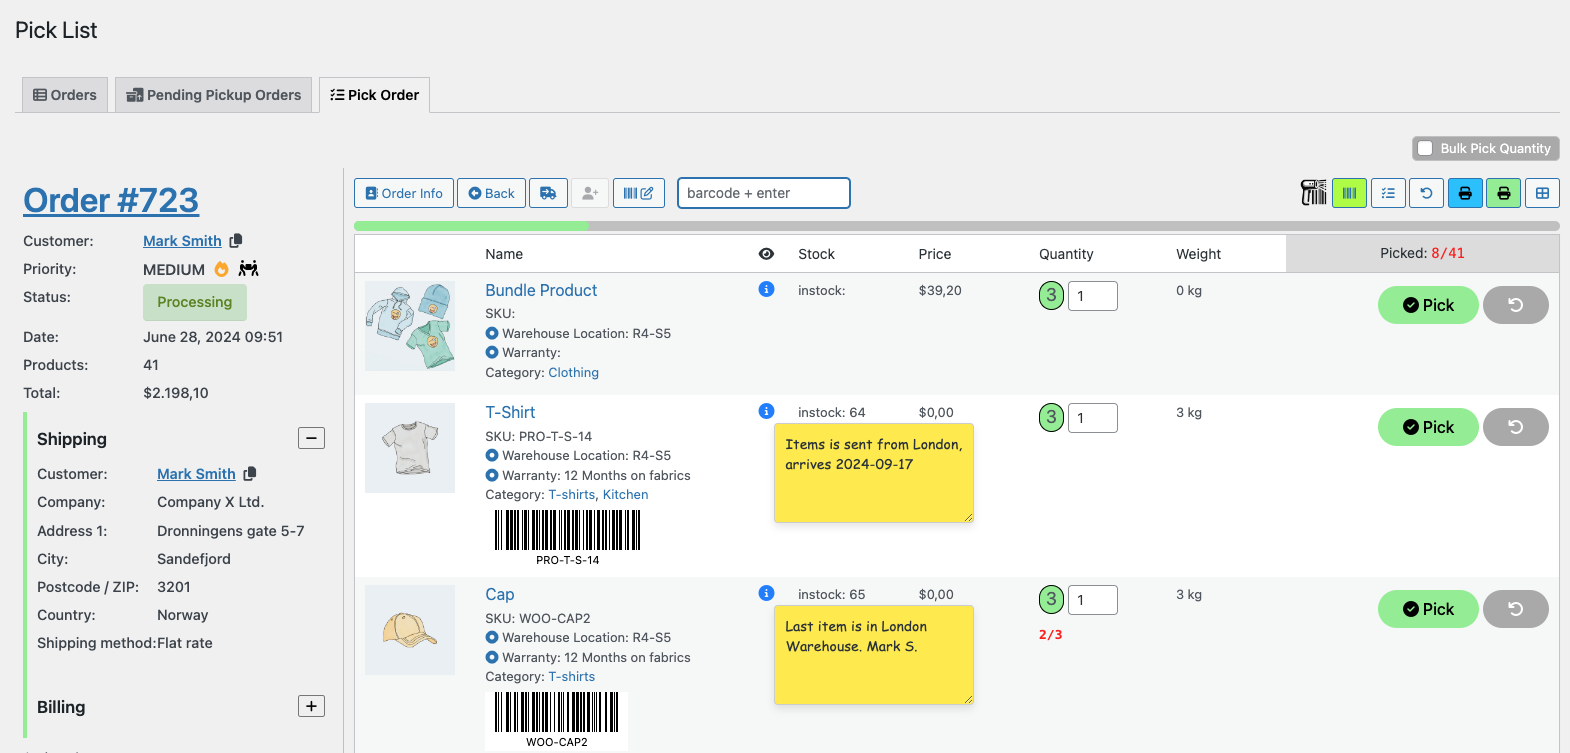
To use a barcode scanner you have to have set up barcodes on your products, like the image above shows. If you not have done that, please se how to set this up in the settings section. Let’s have a quick look at how this works.
- Connect a barcode scanner to the computer (technical details about this is out of scope – so you have to ask the vendor for the scanner how to do this and more)
- Note: The scanner needs to be set up to scan + enter
- Pick List – Pick Order (tab)
- When you enter a pick you will notice the icons/action buttons, the first in the row is the barcode focus button. If this is green, your scanner can do its job, if not you have to click that button – this gives focus to scanner input.
- Scanner icon: if the barcode button is green, the scanner icon will blink and you can use a scanner to scan barcodes.
- If your browser support sounds, a sound will be played when a pick is done (confirm) and another sound is played if the product does not exist in the order (error sound), and also a product not found notice is shown.
- When you have scanned, the green ‘Pick’ button will be disabled (gray) and the Undo button will be enabled (yellow color). In addition there will be a green check mark on the product image.
- Scan items individually for quantities greater than one, with a clear counter display (e.g., 1/4) for each scan, ensuring precise tracking and efficiency in processing bulk quantities. (see image above)
Print pick list and packing slips
↑ Back to top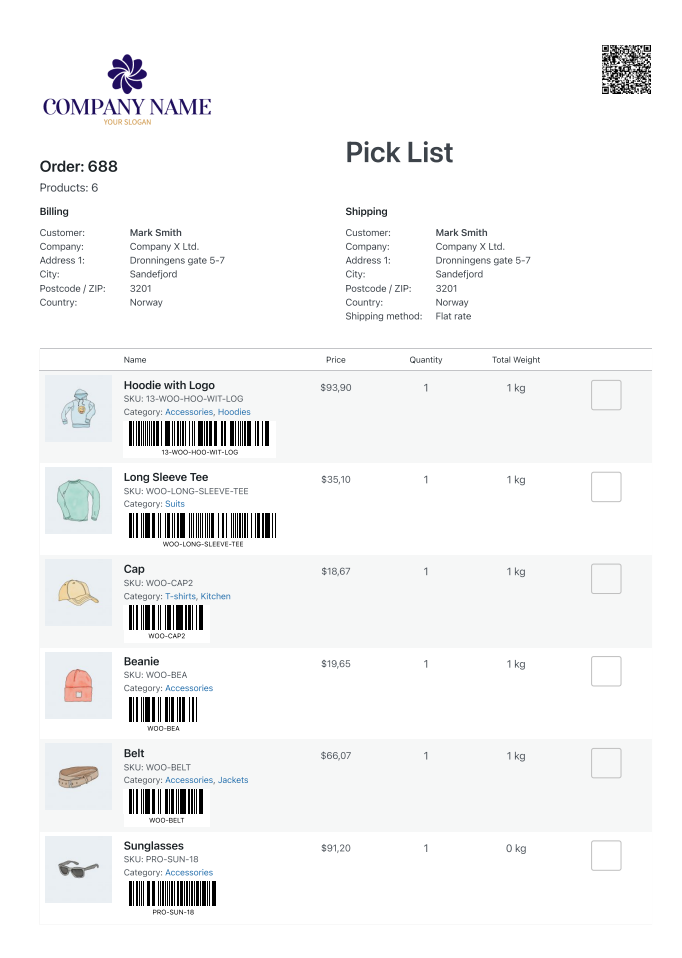
Print Pick List: Efficient Order Picking at Your Fingertips
The green “Print Pick List” button initiates the printing of a Pick List for the selected order. It’s labeled “Pick List” to differentiate it from the Packing Slip, ensuring smooth order fulfillment.
Key Features:
- Clear Identification:
- The label “Pick List” prominently distinguishes this printout, avoiding any confusion with the Packing Slip.
- Checkboxes for Order Items:
- The printout features checkboxes next to each item, allowing you to mark items using a pen for clear tracking.
- QR Code for Quick Access:
- The included QR Code holds the URL to this specific Pick Order. Scan it to swiftly access the Pick Order (in WP Admin), enabling bulk picking and accelerating the order fulfillment process.
- Barcodes:
- If you have barcodes on your products, just add the barcode (custom product field) in the Pick List settings + the barcode type and you have barcodes on your order items. Perfect to scan and verify products.
- Green background:
- The green background color is added on variations and on quantity where quantity is more than one, this is done to ease the job for the one that is picking the order.
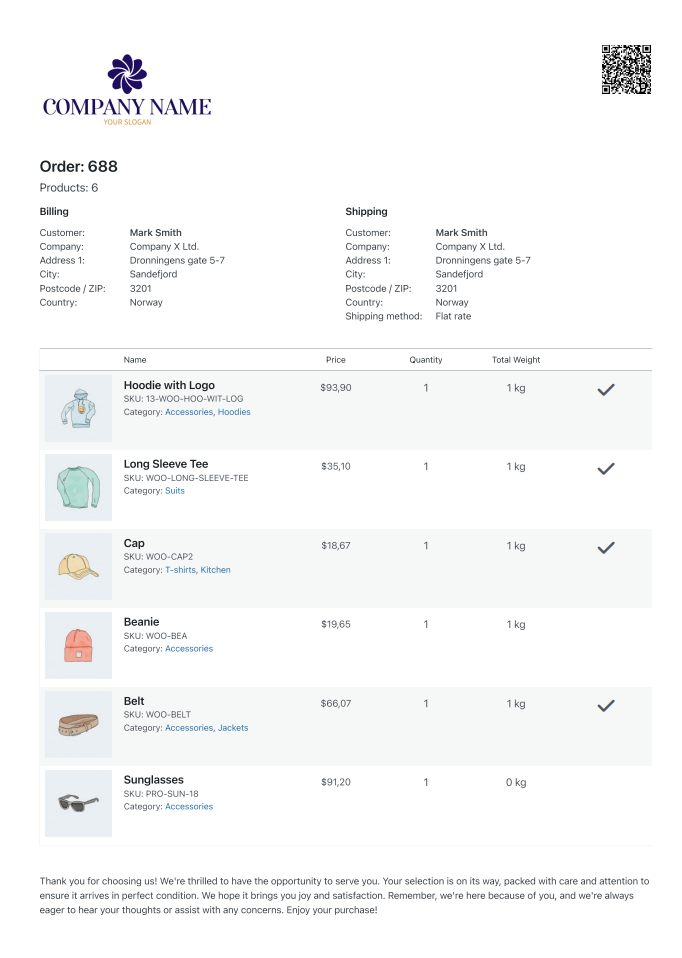
Print Packing Slip: Streamlining Order Packaging
The blue “Print Packing Slip” button allows you to print a Packing Slip designed to accompany the order during packaging. This printout is intended to be included within the package, facilitating a smooth and organized packaging process.
Key Features:
- Order Packaging Assistance:
- The Packing Slip provides essential assistance during the packaging process, ensuring accuracy and efficiency in order fulfillment.
- Customer Convenience:
- Customers can effortlessly use the QR Code on the Packing Slip to access their “My Account” and conveniently view the order status and details.
- Thank you note:
- In the packing slip you can add a thank you note, this can be set up as a default note in Pick List settings + automatically add note (optional).
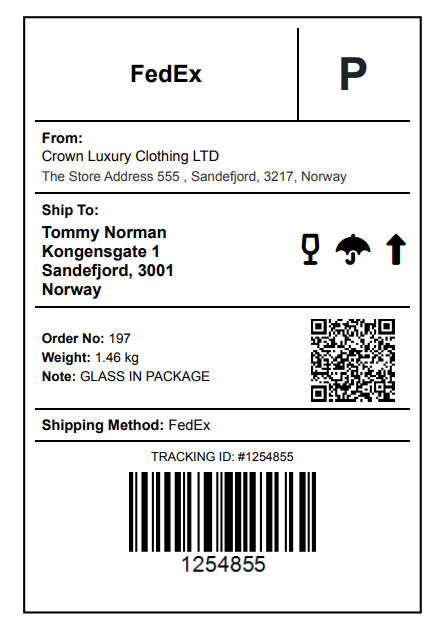
Print Shipping Labels (generate)
↑ Back to topPrinting shipping labels is an option (button) in the Pick Order tab. You find the button next to the Shipped button.

Before you start generating shipping labels, you need to set up label size in Pick List setting. So, when this is done, click the print shipping label button.
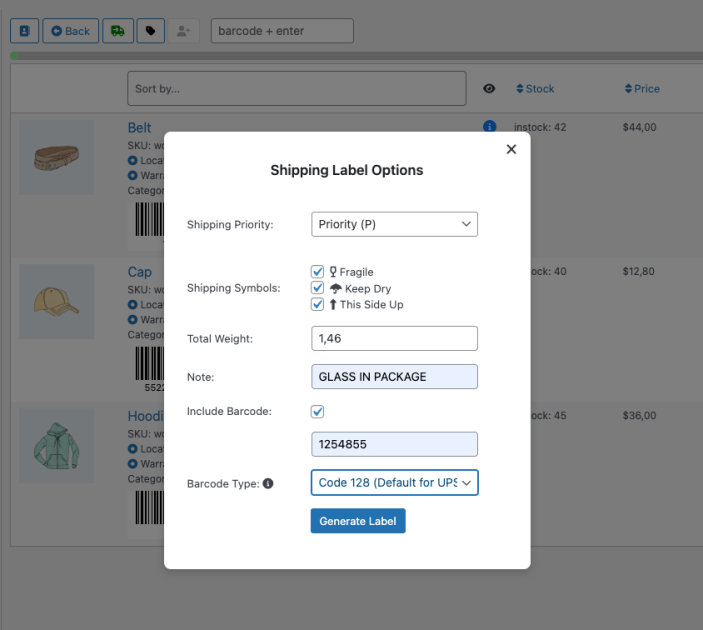
Let’s look at the options:
- Shipping Priority:
- Select priority, if custom priority, select that and fill in e.g. a letter.
- Shipping Symbols:
- Select the ones that fits the content or leave blank.
- Total Weight:
- This is the net weight for product (quantity x product weight), this means that you probably have to add the packaging weight to get total weight for the shipment.
- Note:
- Add any note you like for the shipment or leave blank.
- Include Barcode:
- Check this if you have a tracking number from your carrier and want to allow tracking.
- An input field and barcode type selector is showing if this is checked.
- Fill in tracking number
- Barcode Type:
- Common barcode types is added, default barcode type can be set in Pick List settings (then you do not need to select this every time you make a label).
- Option to make QR code (as some carriers use this).
- Some carriers may use other barcode types – let us know and we will add them to this list.
Result:
Edit order (WooCommerce edit)
↑ Back to top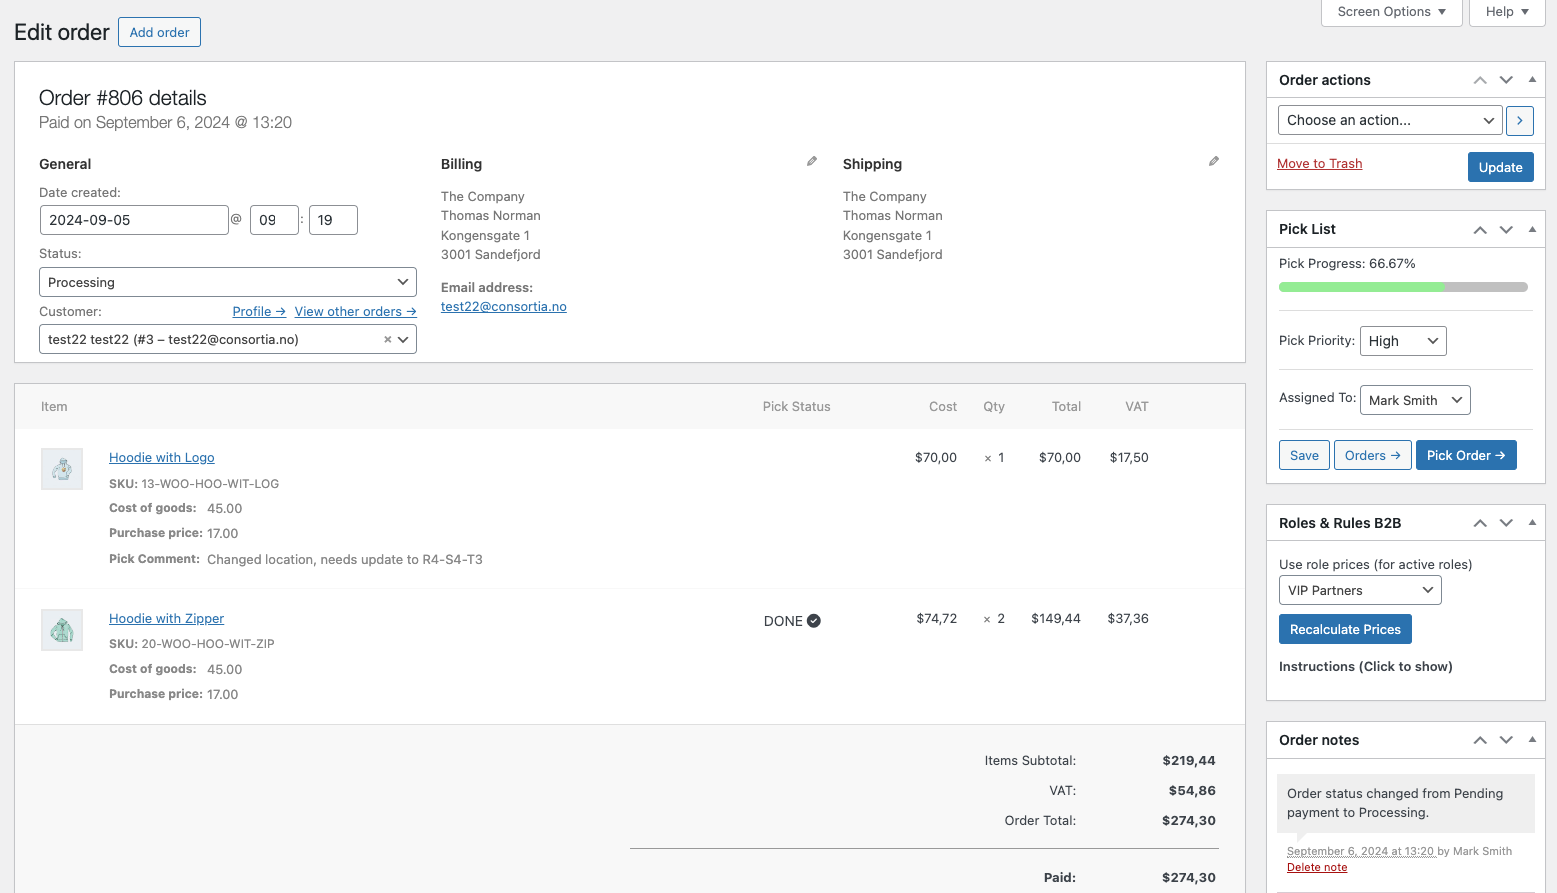
The Edit Order page is your control center for managing orders in WooCommerce. Here, you’ll find essential details and features to efficiently handle your orders:
- Progress Tracking:
- Keep track of your order’s progress with a percentage indicator and a visual progress bar.
- Quick Access Links:
- Find convenient links to both the Pick List (Orders tab) and Pick Order (directly initiate the picking process) for streamlined order fulfillment.
- Order Shipment Information:
- Easily identify whether the order has been shipped or not, providing valuable information for efficient order processing.
- Pick Priority Selection:
- Select the desired pick priority for the order, and remember to update the order after making any changes.
- Order Notes:
- Review the order notes to stay informed about the order’s progress. Important notes include:
- “Order Picked (100% done)”: Indicates that the order is completely picked.
- “Order Picked, ready for shipment” (customer note): Notifies the customer that their order is prepared for shipment.
- “Your order is shipped” (customer note): Informs the customer that their order has been shipped. If shippment #2 or more (from vs 2.4.6) this will also be shown here.
- Review the order notes to stay informed about the order’s progress. Important notes include:
- Item list:
- A pick status column is added, the rows for each order item will show DONE if picked
My account (Customer order page)
↑ Back to top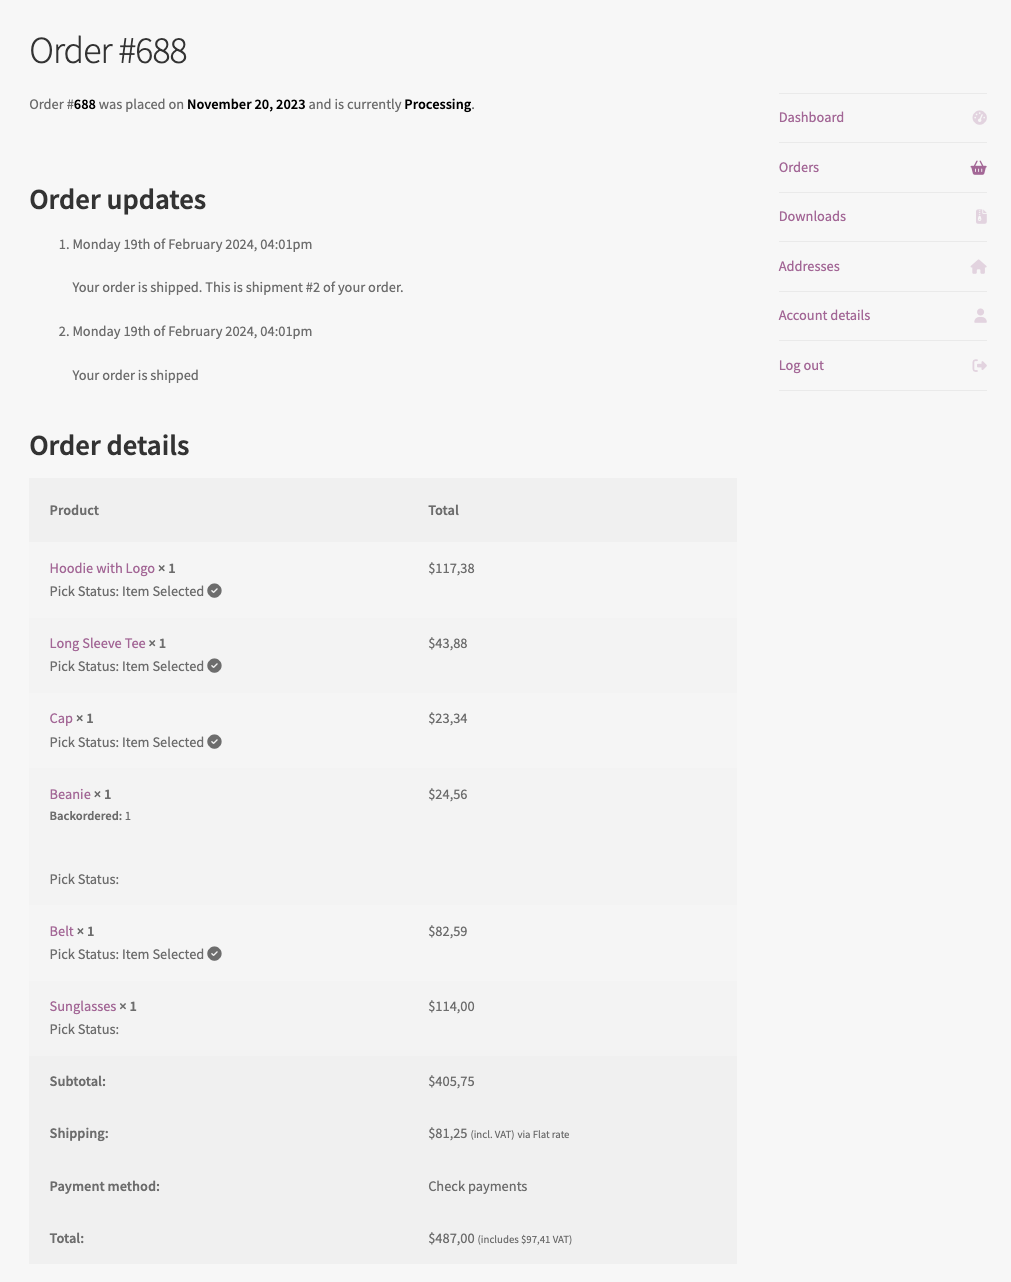
When you have completed a pick, click the shipped button, the order on the My account page updates with the message: Your order is shipped. So, from vs 2.4.6 we added the option to split shipments, so now you will be able to e.g. ship item 1 and 2, then when you have the missing product back in stock you can ship again. When shipping the second time (or more) a new message will be updated on the order: Your order is shipped. This is shipment #2 of your order.
Order details: Every order line has (from vs 2.4.6) the option to set a pick status below the product name (enable this in settings). This will show the customer that the ordered item is in progress (is picked). This status can be handy for the customer if the order shipment is split into several sendings.
Mobile Views
↑ Back to top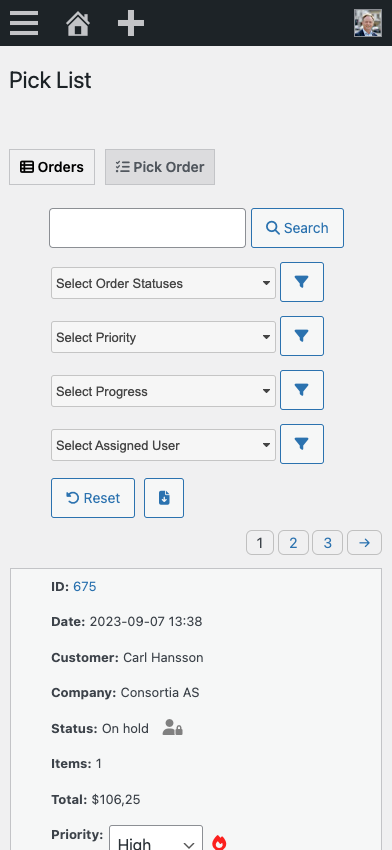
Mobile view for orders tab: Effortless order management on the go
The mobile view of the Orders tab is designed to ensure seamless order management, even while on the move. It provides convenient access to essential features and functionalities optimized for use on mobile devices.
- Search:
- Effortlessly search for orders using the search feature, allowing you to locate specific orders based on various criteria quickly.
- Filters:
- Apply filters to refine the displayed orders, tailoring the view to your needs, even from your mobile device.
- Export:
- Access the export functionality to conveniently export order data, ensuring data portability and easy analysis.
- Scrollable table:
- Navigate through orders via a scrollable table, providing a smooth and intuitive user experience on mobile phones. The scrollable table facilitates easy access to all order details.
Mobile view for pick order tab: Picking orders at your fingertips
The mobile view of the Pick Order tab is tailored to facilitate seamless order picking using your mobile device. It offers the same features as the desktop version, ensuring a consistent and efficient user experience.
- Effortless Order Picking:
- Utilize your phone to easily pick orders, thanks to the mobile-optimized view replicating the desktop features.
- Order Details Below Items:
- Access all order-related information conveniently displayed below the ordered items. This layout provides a clear overview of the order details on your mobile screen.
Frequently Asked Questions
↑ Back to topIs the extension compatible with the latest version of WooCommerce?
↑ Back to topYes, the Pick List for WooCommerce extension is regularly updated to ensure compatibility with the latest WooCommerce versions.
Can I customize the fields in the Orders tab?
↑ Back to topAbsolutely! The extension allows adding custom fields tailored to your specific business needs.
How does the QR code functionality work?
↑ Back to topThe QR code on the Pick List directs you to the specific Pick Order, enabling swift access for bulk picking. The Packing Slip’s QR code lets customers view their order status and details.
Is there a limit to the number of orders I can manage with this extension?
↑ Back to topNo, the extension is designed to handle any number of orders, ensuring scalability as your business grows.
Do I need any special hardware to use the QR code feature?
↑ Back to topNo special hardware is required. Any device with a camera, such as a smartphone or tablet, can scan the QR codes.
What happens if I encounter an issue with the extension?
↑ Back to topWe offer dedicated support for the Pick List extension. You can contact our support team or consult the detailed documentation if you face any issues.