
Freshdesk Integration for WooCommerce by Kestrel connects your Freshdesk account to your WooCommerce-powered store, allowing customers to create tickets within your Freshdesk Help Desk, and allowing you to connect a customer in Freshdesk with their information.
Requirements
↑ Back to top- WooCommerce 3.5+
- PHP 5.4+
- A Freshdesk account with a paid plan. More info at: freshdesk.com
Installation
↑ Back to top- Download the .zip file from your WooCommerce account.
- Go to: WordPress Admin > Plugins > Add New and Upload Plugin with the file you downloaded with Choose File.
- Install Now and Activate the extension.
More information at Install and Activate Plugins/Extensions.
Setup and Configuration
↑ Back to top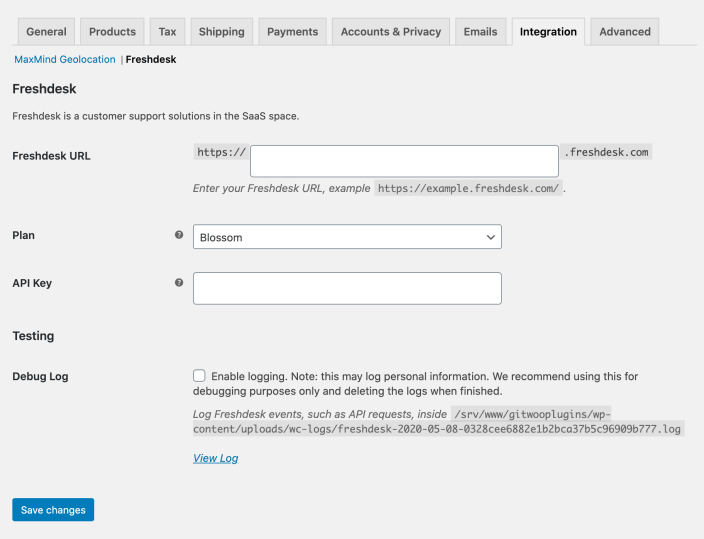
- Go to WooCommerce > Settings > Integration > Freshdesk.
- Configure your settings:
- URL from your Freshdesk account
- Plan from the dropdown
- API Key from your Freshdesk account. See Find your API Key (below)
- Testing
- Enable logging when troubleshooting. Otherwise, leave it disabled.
- Save changes.
Find your API Key
↑ Back to top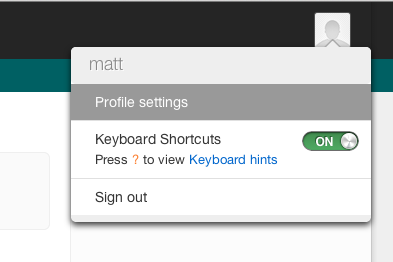
To locate your API key, log in to your Freshdesk account and select User Profile in the top-right corner. Visit Profile Settings and view your API key.
Why do you need to know what Freshdesk plan I’m using?
WooCommerce Freshdesk comes bundled with quite a few features which are only available to upgraded plans. To keep the user experience and interface as clean as possible, we only show features available for the Freshdesk plan you’re using.
When you upgrade your Freshdesk plan, change the setting here and enjoy a whole host of new features.
Connecting a product to Freshdesk
↑ Back to top
To make it easier for customers to request your assistance, WooCommerce Freshdesk makes it possible to connect a product in your store with a Solutions category and a Forum category in your Freshdesk helpdesk.
To start, select Create for the Solution category and/or Forum category. Update the product to connect this product to your helpdesk.
At a later stage, if you change the product name or description, you could select Synchronize to update your Solution and/or Forum category information on your helpdesk.
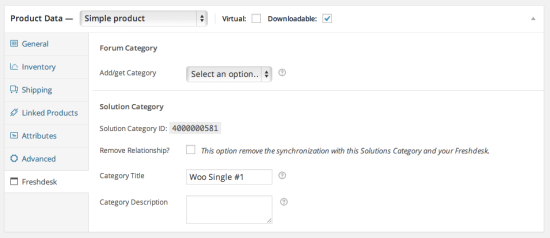
Once a product is connected, should you wish to remove the relationship, click the Remove Relationship? Checkbox and click Update on the product.
Create Freshdesk tickets in WooCommerce
↑ Back to topWooCommerce Freshdesk makes it easier for you and your customer to converse about a particular order or blog post comment by providing a one-click solution to create a new ticket within Freshdesk. The various implementations of this are described below.
Customer – Create a ticket for an order
↑ Back to topWhen viewing their orders, your customer may have a query or issue they would like to address, pertaining to the specific order.
A new Get Help button is displayed when viewing the My Account or My Orders screens within your WooCommerce store.

When this button is clicked, the customer is directed to the View Order screen for the order in question. This screen now contains a short form for receiving help via your helpdesk.

Provide a Subject and Description, and click Send. You’ve now sent a ticket to the helpdesk, to help get your query attended to.
Customer – View existing helpdesk tickets
↑ Back to topMost commonly, ticket interactions are best dealt with via email. When you (the merchant) have responded to the customer’s ticket, they will get an email with the reply. From there they can just respond accordingly via email.
Keeping track of several tickets, and their statuses, isn’t easy… until now. WooCommerce Freshdesk provides a neat way to keep track of all of your helpdesk tickets via your WooCommerce My Account screen.

Select Reply next to a ticket to go to Freshdesk and interact with the ticket.
It’s possible to hide this table using the following code:
add_filter( 'woocommerce_freshdesk_hide_my_support_tickets', '__return_true' );
Store Owner – Create a ticket for an order
↑ Back to topIn some instances, when viewing an order within WooCommerce, the store owner may wish to quickly reach out to the customer (perhaps based on an irregularity in their order, or a special order note/request). They may also wish to track this discussion within their helpdesk.
A new meta box is now made available for each order, titled Report an Issue.
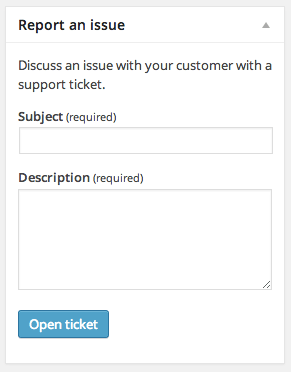
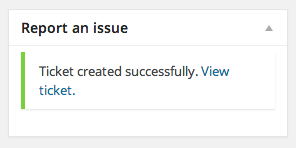
To use this form, fill in the Subject and Description and click the Open Ticket button. A new ticket will be created in Freshdesk without reloading the screen. You will be notified of the ticket URL once the ticket has been created.
Store Owner – Create a ticket from a blog post comment
↑ Back to topSometimes, a customer may have an issue or query and may not know how to contact your helpdesk. This may result in the customer commenting about their issue on a related (or unrelated) blog post.
Convert this discussion into a helpdesk ticket to help speed up the resolution time.
Visit the Comments section of your WordPress admin. Locate the comment and click the Convert to Ticket button alongside it.

Feedback widget shortcode
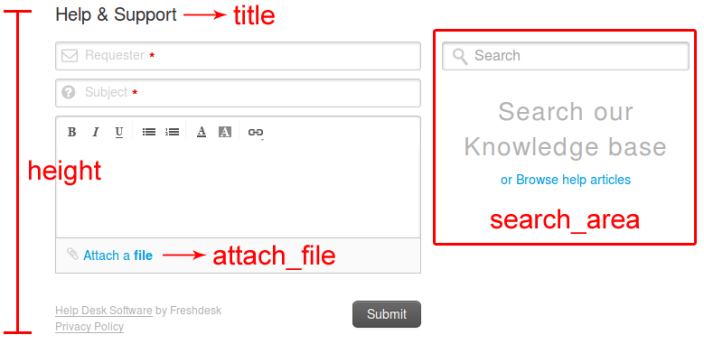
↑ Back to topYou can add the Freshdesk feedback widget on any page with the wc_freshdesk_form shortcode.
Example
↑ Back to top[wc_freshdesk_form title="Custom title" submit_message="Custom message" attach_file="yes" search_area="yes"]Shortcode parameters
↑ Back to topheight– form height (default: 500px)title– custom form heading (defaul: Help & Support)submit_message– custom message to be displayed after a user submits the ticket form (default: Thank you for submitting feedback)attach_file– display the “Attach a file” field (accepted values: yes/no, default: no)search_area– display the “Search Articles” area (accepted values: yes/no, default: no)
Questions and Feedback
↑ Back to topHave a question before you buy? Please fill out this pre-sales form.
Already purchased and need some assistance? Get in touch with a Happiness Engineer via the Help Desk.
