Allow customers to upload files with orders and charge optional fees for uploads with File Upload for WooCommerce.
Installation
↑ Back to topTo start using a product from WooCommerce.com, you can use the “Add to store” functionality on the order confirmation page or the My subscriptions section in your account.
- Navigate to My subscriptions.
- Find the Add to store button next to the product you’re planning to install.
- Follow the instructions on the screen, and the product will be automatically added to your store.
Alternative options and more information at:
Managing WooCommerce.com subscriptions.
Setup and Configuration
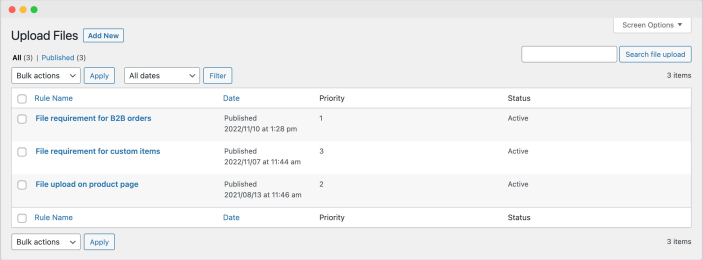
↑ Back to topOnce the extension is installed and activated, you can create and access rules under WooCommerce > Upload Files. General plugin settings can be accessed from WooCommerce > Settings > Upload Files tab.
Creating a new file upload rule
↑ Back to topThe extension allows you to create multiple rules to enable file upload option for specific products, categories, user roles, order statuses and more.

While creating a new file upload rule, you can customize the following options:
Rule title and priority –
↑ Back to top- Set a rule title and priority where 1 is highest priority and 100 is lowest.
General settings
↑ Back to top- Enable rule – Checkbox to enable rule; if disabled, rule won’t apply even if the settings are saved.
- Add a title for the file upload field – For customer convenience, Add a title that is displayed above the file upload field.
- Enable description – Check to enable description for special instructions. If this checkbox is not enabled, then the description field won’t be displayed.
- Set description – Add special instructions for the file upload field, such as what to upload, allowed formats, size limitations, etc.
- File types – Add allowed file types separated by commas, such as png, jpg, jpeg, and gif.
File Size Restrictions
↑ Back to top- Add combined file size restrictions – Enable this checkbox to add file size restrictions in case of multiple file uploads.
- Add maximum file size – From here, you can set size-based restrictions in MBs on file uploads. If you’re allowing customers to upload multiple files, the restricted size will be applied to the aggregate size of all uploaded files. The default size restriction is set to 5 MBs and will be applied if the checkbox is enabled and the size field remains empty.
User Roles Restrictions
↑ Back to top- Select user roles – Control file upload visibility by user roles. Only selected roles will be able to see the file upload field, if left empty, then the file upload option will be visible to all the roles.
File Upload Message (Customer)
↑ Back to topYou can enable this option to display a description box allowing customers to add notes upon file upload. Customize the heading and maximum character limit for the description.
- Enable feedback – Enable this checkbox to provide the customer with a field to provide instructions along with their uploads.
- Enable label – Check this checkbox to display a title with a feedback field
- Set character limit – Enable this checkbox to set a character limit for the feedback field
- Set character limit – Enter the character count here to limit the feedback field input.
Privacy Policy Disclaimer
↑ Back to topDisplay a privacy policy checkbox when users upload a file. Add a custom message and link to privacy policy page to remain GDPR complaint. The checkbox appears when the file is uploaded.
- Enable disclaimer – Check to enable the disclaimer field with the file upload field.
- Set disclaimer – Write the disclaimer message that will be displayed along with file upload field
File Upload Field Visibility
↑ Back to topFrom this section, you can control the file upload field visibility by products, categories, and tags.
- Specify products and categories – When this checkbox is enabled the rule will be applied to all the products and categories; uncheck this checkbox in order to specify the products and categories on which the rule is to be applied
- Select product – Select products on which the file upload field will be displayed.
- Select categories – Select categories on which the file upload will be displayed.
- Enable on product page – Select this checkbox to show file upload field on product pages
- Maximum files limit on product page – Here, you specify the maximum number of files the user can upload from product page. If the value is entered now, the user can upload a maximum of 5 files.
- Enable on cart page – Check this option to display file upload field on cart page as well.
- Maximum file limit on cart page – Here, you specify the maximum number of files the user can upload from the cart page. If the value is entered now, the user can upload a maximum of 5 files.
- Select position cart page – Select position where the file upload field will be displayed on cart page. You can display on one of these 4 locations:
- After cart coupon code
- Before the cart total heading
- After cart total heading
- Shortcode – [cart_page_short_code]
- Enable on checkout page – Check this option to display file upload field on checkout as well.
- Maximum file limit on checkout page – Here, you specify the maximum number of files the user can upload from the checkout page. If the value is entered now, the user can upload a maximum of 5 files.
Make file upload mandatory
↑ Back to top- Enable mandatory files – Check this to make file upload mandatory for completing checkout.
- Set mandatory file quantity – Set minimum number of files required to complete a purchase.
Add Fee to File Uploads
↑ Back to top- Enable fee on file for product page – Attach a fee to file uploads on product page by enabling this option.
- Select price method – Select the pricing method for the fee from the following:
- One time – one charged once if multiple files
- Per file – charged per file
- Select percentage or fixed – Select whether to attach the fee as a fixed amount or percentage.
- Set fee – Add fee value
- Cart and checkout page – Attach a fee to file uploads on cart and checkout by enabling this option.
- Select price method – Select the pricing method for the fee from the following:
- One time – one charged once if multiple files
- Per file – charged per file
Select percentage or fixed – Select whether to attach the fee as a fixed amount or percentage.
- Set fee – Add fee value

File Upload Settings
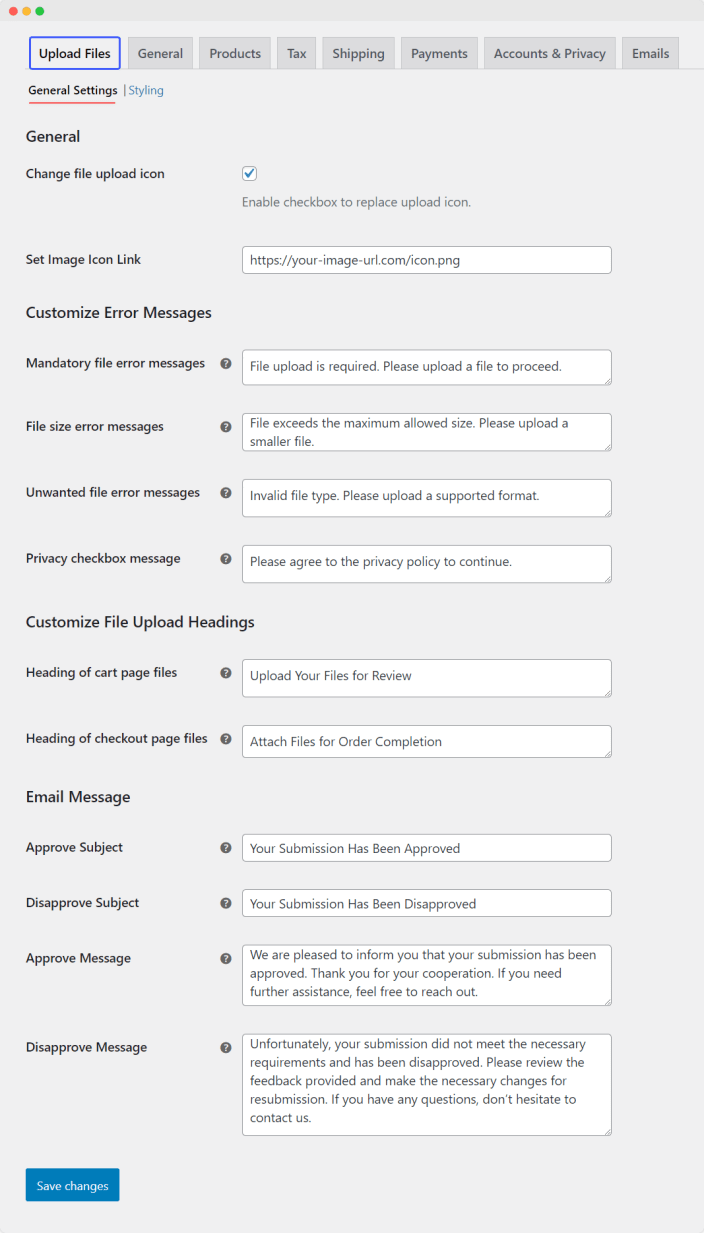
↑ Back to topFile upload’s settings can be configured from WordPress > WooCommerce > Settings > File Upload
General Settings
↑ Back to topYou can view the general settings from WordPress > WooCommerce > Settings > File Upload > General Settings
- Change file upload icon – Enable this checkbox to show a custom icon for the file upload option; if disabled, it will show a default upload icon.
- Set image icon link – Paste the link to icon that you want to display on file upload option
Customize Error Messages
↑ Back to topYou can view the customize error messages settings from WordPress > WooCommerce > Settings > File Upload > General Settings > Customize Error Message
- Mandatory file error message – Write an error message that you want to show when the file is not attached despite being mandatory
- File size error message – Write an error message to show when the file size exceeds the specified limit.
- Unwanted file error message – Write an error message to show when an invalid file type(not allowed by the admin) is attached.
- Privacy checkbox message – Write an error message to show when user tries to add-to-cart a product without checking the privacy checkbox.
Customize File Upload Headings
↑ Back to topYou can view the customize file upload headings settings from WordPress > WooCommerce > Settings > File Upload > General Settings > Customize File Upload Headings
- Heading of cart page files – Select the heading to be displayed with file upload field on checkout.
- Heading of checkout page files – Select the heading to be displayed with file upload field on checkout.
Email Message
↑ Back to topYou can view the email message settings from WordPress > WooCommerce > Settings > File Upload > General Settings > Email Message
- Approve Subject – Write an email subject when uploaded attachment is accepted.
- Disapprove Subject – Write an email subject when uploaded attachment is rejected
- Approve Message – Write the email body message when uploaded attachment is accepted.
- Disapprove Message – Write the email body message when uploaded attachment is rejected.

Styling Settings
↑ Back to topYou can view the styling settings from WordPress > WooCommerce > Settings > File Upload > Styling
Product Page Styling
↑ Back to topYou can view the styling settings from WordPress > WooCommerce > Settings > File Upload > Product Page Styling
- Enable custom styling – Check to enable custom styling on product page.
- Upload button text color – Select a color for upload button text color.
- Upload button background color – Select the background color for upload button.
- File type message color – Select color for file type text.
- File size message color – Select color for file instructions text.
- Uploaded file name text color – Select text color for uploaded file’s name.
- Background color – Select background color for file upload option box.
- Trash icon color – Select the color for trash icon.
- View icon color – Select the color for view icon.
Cart Page Styling
↑ Back to topYou can view the styling settings from WordPress > WooCommerce > Settings > File Upload > Cart Page Styling
- Enable custom styling – Check to enable custom styling on cart page.
- File type message color – Select color for file type text.
- File size message color – Select color for file instructions text.
- Upload button text color – Select a color for upload button text color.
- Upload button background color – Select the background color for upload button.
- Uploaded file name text color – Select text color for uploaded file’s name.
- Background color – Select background color for file upload option box.
- Trash icon color – Select the color for trash icon.
- View icon color – Select the color for view icon.
Checkout Page Styling
↑ Back to topYou can view the styling settings from WordPress > WooCommerce > Settings > File Upload > Styling > Checkout Page Styling
- Enable custom styling – Check to enable custom styling on checkout page.
- Uploaded file name text color – Select text color for uploaded file’s name.
- File type message color – Select color for file type text.
- File size message color – Select color for file instructions text.
- Upload button text color – Select a color for upload button text color.
- Upload button background color – Select the background color for upload button.
- Background color – Select background color for file upload option box.
- Trash icon color – Select the color for trash icon.
- View icon color – Select the color for view icon.
Order Page Styling
↑ Back to topYou can view the styling settings from WordPress > WooCommerce > Settings > File Upload > Styling > Order Page Styling
- Enable custom styling – Check to enable custom styling on cart page.
- Uploaded file name text color – Select text color for uploaded file’s name.
- File type message color – Select color for file type text.
- File size message color – Select color for file instructions text.
- Upload button text color – Select a color for upload button text color.
- Upload button background color – Select the background color for upload button.
- Background color – Select background color for file upload option box.
- Trash icon color – Select the color for trash icon.
- View icon color – Select the color for view icon.

Viewing Files Attached with Orders
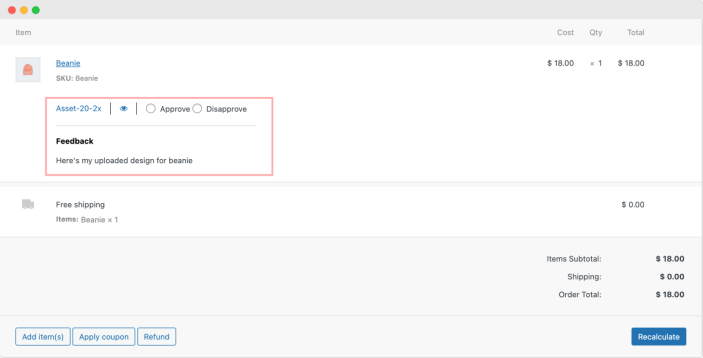
↑ Back to topIn order to view file attachments, you can go to WordPress > WooCommerce > Orders > Desired Order > Order Details
Here you can view the uploaded file. You can also approve or disapprove the attachment from here, in any case the customer will be notified via email. You can also view if any instructions have been given along with the file attachment.


