Remind customers with abandoned cart notifications to increase the probability of sales on your site using the Recover Abandoned Carts Suite extension.
Installation
↑ Back to top- Download the .zip file from your WooCommerce account.
- Go to WordPress Admin > Plugins > Add New and Upload Plugin with the file you downloaded with Choose File.
- Install Now and Activate the extension.
- More information at Install and Activate Plugins/Extensions.
Setup and Configuration
↑ Back to topRecover Abandoned Cart Suite settings can be found under WooCommerce > Recover Abandoned Cart Suite > Settings
Creating Templates
↑ Back to topTemplates must be created in order for this plugin to send notifications. To create a template, go to “WooCommerce > RAC Suite > Templates” and click “Add New Template” button.
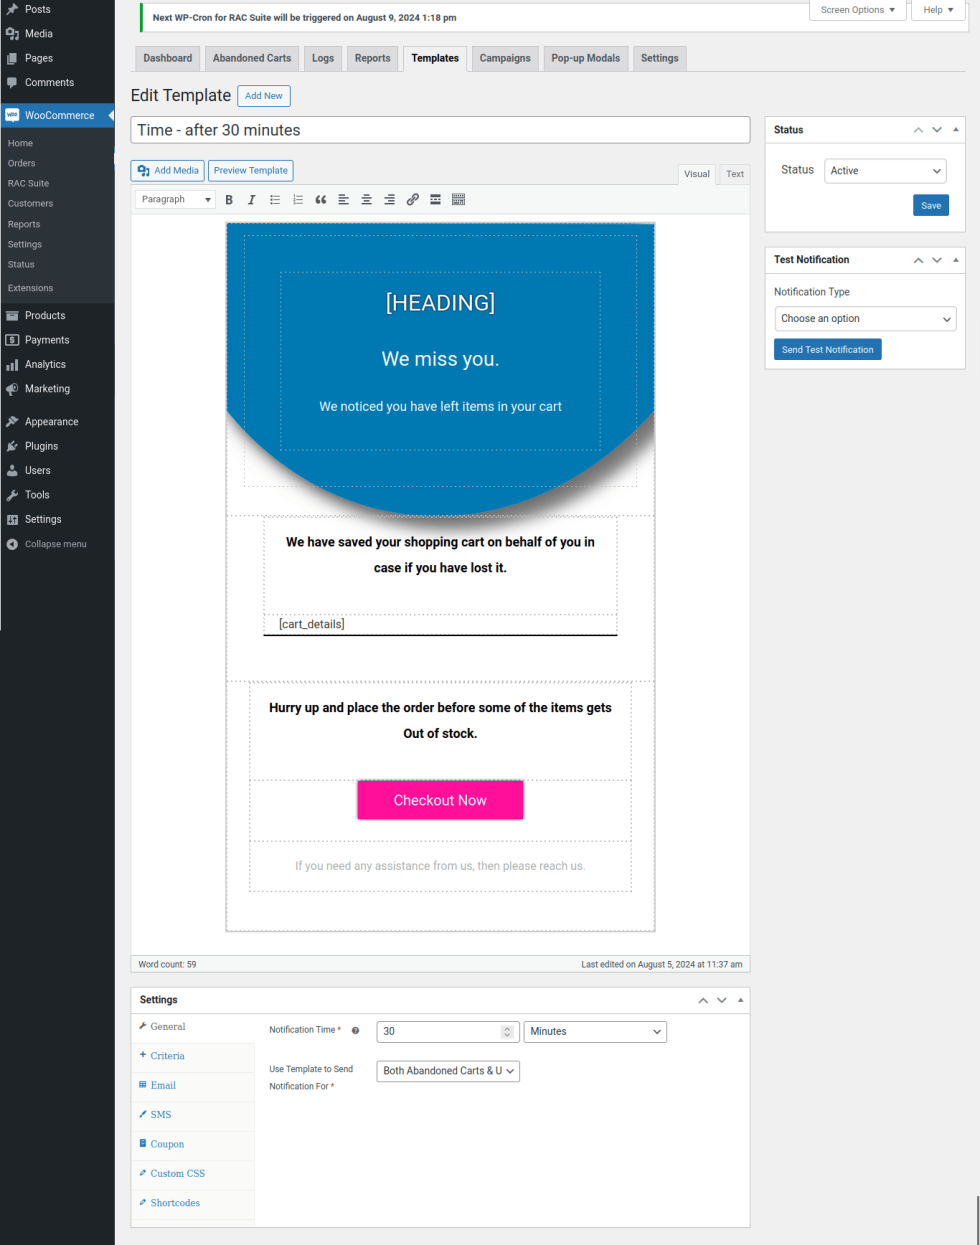
- Give the name for the template in title field.
- If you are going to use this template for sending email reminders, then fill the body contents of the email in the text editor area. You will be able to preview the email template by clicking the “Preview Template” button.
Settings
↑ Back to topGeneral
↑ Back to top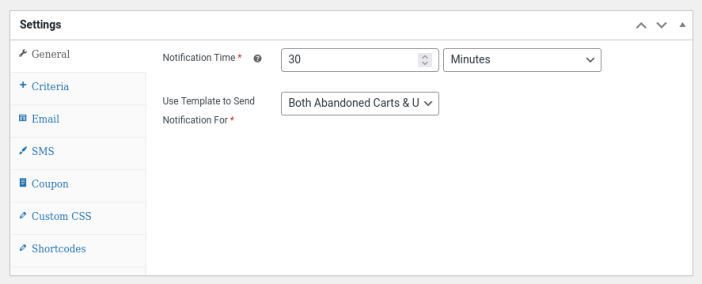
Notification Time: Once the abandoned cart ID moves to “Abandoned” status, the template will be triggered to send notifications after the set duration in this option. If you are using multiple templates, then follow up notifications will be send based on “Notification Time” which you have set in the previous template.
For example: If you have created 2 templates and “Notification Time” has been set as 30 Minutes and 2 Hours respectively, then customers will be notified after 30 Minutes and 1 Hour 30 Minutes of abandoned cart time.
Use Template to Send Notification For: This option controls for which abandoned carts(carts captured through abandoned cart/ though unsuccessful orders/ for both) the template has to be used.
Criteria
↑ Back to topYou can set criteria to use the template for sending notifications only for certain conditions.
To create a criteria, click “Add Rule” button.
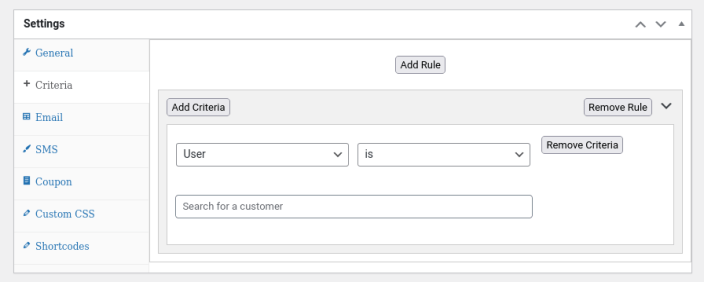
You can set multiple set of criteria which will be considered as a single rule. The template will be used only if all criteria set in a single rule gets satisfied.
Criteria can be set with different combinations of User, Cart and Date filters.
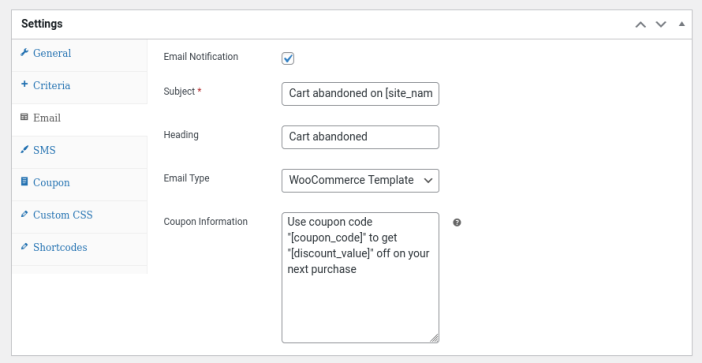
Email Notification: Enable this option if you want to use the template for sending email notifications.
Subject: Set the email subject in this field.
Heading: Set the email heading in this field.
Email Type: Select “WooCommerce Template” if you want the email settings which you are using in “WooCommerce > Settings > Emails” to be used for abandoned cart emails. If you just want to send HTML format notification, then select “HTML”.
Coupon Information: If you have enabled coupon for the template, then the content given in this field will be appended in place of the shortcode [coupon_information] for emails.
SMS
↑ Back to top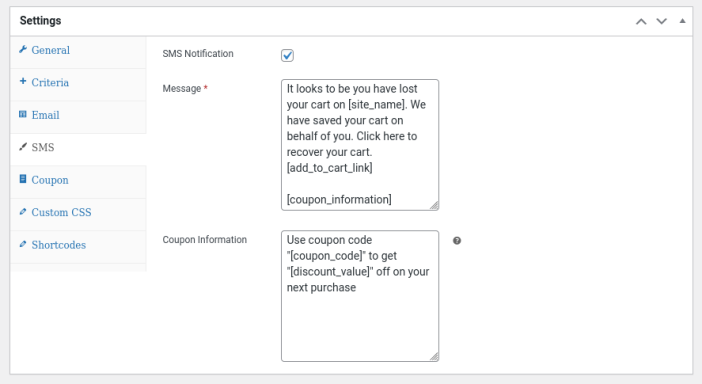
SMS Notification: Enable this option if you want to use the template for sending email notifications.
Message: Give the content for SMS notifications in this field.
Coupon Information: If you have enabled coupon for the template, then the content given in this field will be appended in place of the shortcode [coupon_information] for SMS.
Coupon
↑ Back to top
Enable Coupon: If you want to give coupon in this template, then enable this option. You have to add the shortcode [coupon_code] in text editor area for email and in Message field for SMS in order to display the coupon code in email/SMS respectively.
Coupon to Use: You can use an existing coupon code or generate unique coupon codes in this option.
If “Use Existing Coupon” option is selected,
Existing Coupon: Search and select the coupon code here.
If “Generate Unique Coupon” option is selected,
Discount Type: You can set the discount type for the coupon between “Percentage Discount/Fixed Cart Discount”.
Value: Give the discount value in this option.
Validity in Days: Once the coupon gets generated, how many days the coupon is valid can be set here.
Minimum Amount for Coupon Usage: Minimum spend(subtotal) allowed to use the coupon can be set in this option.
Maximum Amount for Coupon Usage: Maximum spend(subtotal) allowed to use the coupon can be set in this option.
Individual Use Only: Enable this option if the coupon cannot be used in conjunction with other coupons.
Exclude Sale Items: Enable this option if the coupon cannot be used for products with sale price.
Allow Free Shipping: Enable this option to give free shipping for the coupon.
Restrict Coupons to Issued Users: Enable this option if the coupon should not be given if they have already received the coupon previously.
Creating Campaigns
↑ Back to topUsing campaigns, similar pattern of sending abandoned cart notifications can be avoided. To create a new campaign, go to “WooCommerce > RAC Suite > Campaigns”.
Note: If “Campaigns” menu is not displaying, go to “WooCommerce > RAC Suite > Settings > Campaign” and select the “Enable Campaign” option and setup the campaign.
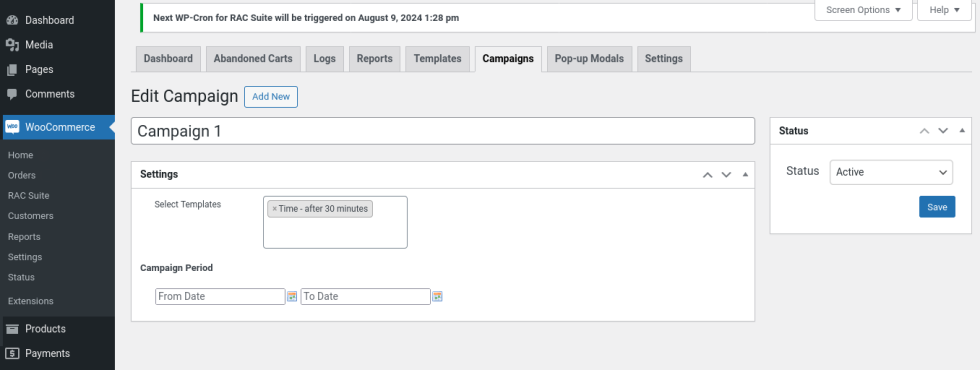
In title field, set the name for the campaign for your reference.
Settings
↑ Back to topSelect Templates: In this option, select the templates to be used for the campaign.
Campaign Period: If you want to use the campaign only during specific period, then set it here.
Points to Remember on Campaigns
↑ Back to top1. If you have enabled Campaign and haven’t created any, then abandoned cart notifications won’t be sent for the customers.
2. In case if you have created only one Campaign and have set “Campaign Period” and if date has exceeded, then abandoned cart notifications won’t be sent for the customers.
3. One Campaign only will be used for one Abandoned Cart ID.
Creating Pop-up Modals
↑ Back to topTo capture guest carts using pop-up windows you have to create pop-up modals. To create one, go to “WooCommerce > RAC Suite > Pop-up Modals” and click “Add New Pop-up Modal” button.
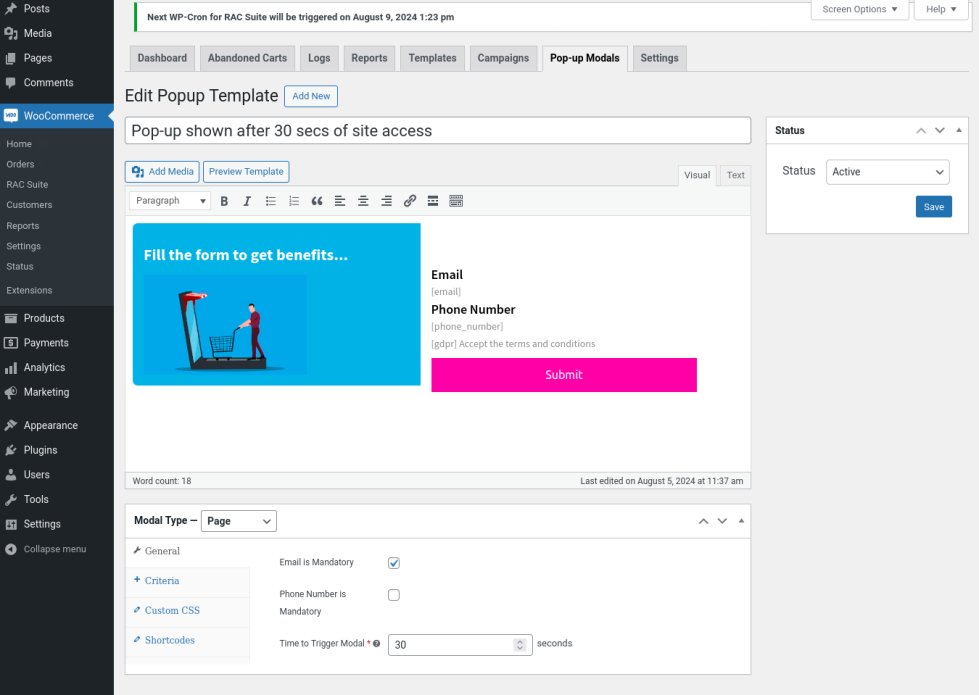
- In the title field, enter the name for the modal for your reference.
- In the text editor area, you will be able to create the modal template. You can use the shortcodes [email] and [phone_number] to display the text field to get the email address and phone number respectively. You will be able to preview the template by clicking the “Preview Template” button.
Modal Type
↑ Back to topPage
This pop-up modal will appear for guest users automatically after set duration.
Add to Cart
This pop-up modal will appear for guest users when they try to add product to the cart. i.e. users will be allowed to purchase only after filling the form.
Exit Intent
This pop-up modal will appear for guest users when they try to leave the site.
Settings
↑ Back to topGeneral
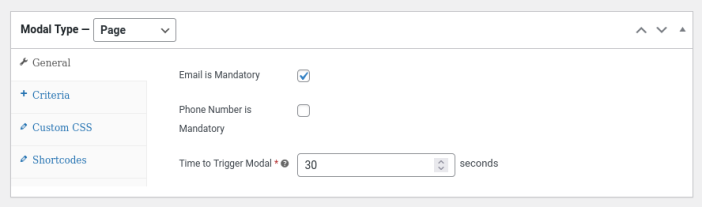
Email is Mandatory: Enable this option if you want the users to enter their email address in order to submit the form.
Phone Number is Mandatory: Enable this option if you want the users to enter their phone number in order to submit the form.
Time to Trigger Modal: For “Page” type modal, the pop-up window will appear automatically after the set duration of site accessing.
Criteria
You can set criteria to use the modal to be appeared only on certain conditions.
To create a criteria, click “Add Rule” button.

You can set multiple set of criteria which will be considered as a single rule. The modal will be appeared only if all the criteria set in a single rule gets satisfied.
Criteria can be set with different combinations of Page and Date filters.
Plugin Settings
↑ Back to topGeneral
↑ Back to top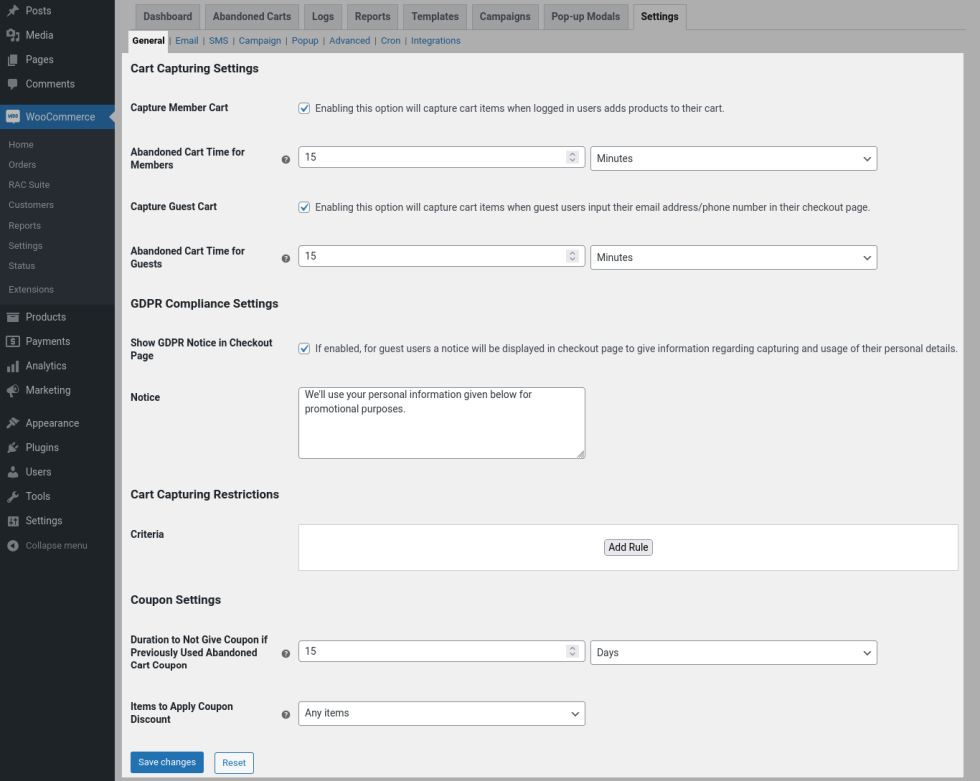
Cart Capturing Settings
Capture Member Cart: To capture carts of logged-in users on the site, enable this option. If enabled whenever a logged-in user adds products to the cart, a new cart entry will be recorded in the Abandoned Carts table with “New” status.
Abandoned Cart Time for Members: Set the duration by which the cart will be considered abandoned in the option. The cart entry will change automatically from “New” to “Abandoned” status after inactivity on the site for the set duration here.
Capture Guest Cart: To capture carts of guest users on the site, enable this option. If enabled, whenever a guest user gives their phone number/email address on the checkout page, a new cart entry will be recorded in the Abandoned Carts table with “New” status.
Abandoned Cart Time for Guests: Set the duration the cart will be considered abandoned in the option. The cart entry will change automatically from “New” to “Abandoned” status after inactivity on the site for the set duration here.
GDPR Compliance Settings
Show GDPR Notice in Checkout Page: To give information to guest users on the checkout page about capturing the user details they give in the checkout form, enable this option and give the information in the Notice field.
Cart Capturing Restrictions
You can create rules to capture specific carts or exclude capturing specific carts with multiple user and cart restrictions.
Click “Add Rule” button to create a new rule. You will be able to set multiple criteria for a single rule. To create a new criteria for the rule, click “Add Criteria” button and set the criteria as per your requirement.
Carts which doesn’t get satisfied with any of set rules won’t be captured in Abandoned Carts table.
Coupon Settings
Duration to Not Give Coupon if Previously Used Abandoned Cart Coupon: If you don’t want to append an abandoned cart coupon in notifications if the same user has used an abandoned cart coupon recently to place an order on the site, then set the duration to not append coupon in this option.
Items to Apply Coupon Discount: When abandoned cart coupons are given, by default users will be able to use the coupon and get discount for any items in the cart. If you want the users to get discount only for the actual abandoned carts, then select “Only abandoned cart items” option.

Email Settings
Enable Email Notification: Enable this option if you want to send abandoned cart email notifications from the plugin.
Customize the from name, email address, reply to email address, and product image size in the respective fields.
Email Unsubscribe Settings
Append Unsubscribe Link in Email Footer: If you want to append an unsubscribe link in the footer of the abandoned cart notification emails, enable this option.
Unsubscribe Message: Give the unsubscribe message in this field.
Unsubscribe Link Text: In the “Unsubscribe Message” field, you will be able to add unsubscribe link using the shortcode.
Admin Notification Settings
Notify Admin when a Cart is Recovered: To notify the admin if an abandoned cart is recovered, enable this option.
Recipients: By default, admin notification for cart recovery will be sent for super admin of the site whose email address will be prefilled in this field. If you want to sent this notification for any other recipients, then enter the email address here. Multiple email addresses has to be separated by comma.
Subject: Fill the email subject of cart recovered notification here.
Message: Customize the email body of cart recovered notification here.
SMS
↑ Back to top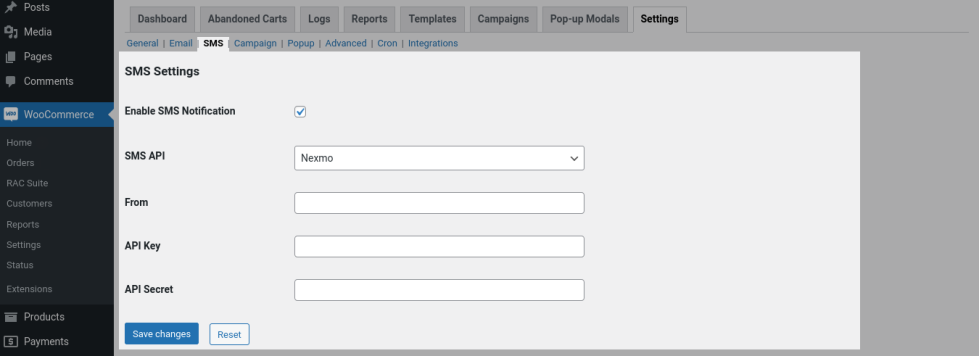
SMS Settings
Enable SMS Notification:To send abandoned cart SMS notifications, enable this option.
SMS API:Choose the SMS API(Nexmo/Twilio) which you are using.
Based on the API which you have chosen, fill the other required values which you can get from your Nexmo/Twilio account.
Campaign
↑ Back to top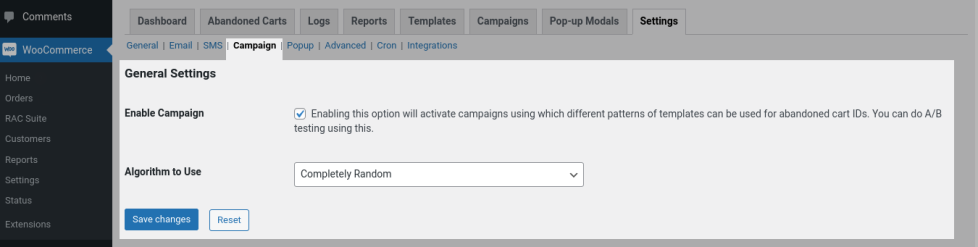
Enable Campaign: To send abandoned cart notifications using campaigns, enable this option.
Algorithm to Use: Select “Completely Random” if you want the plugin to randomly choose the campaign for each abandoned cart. Select “Round Robin” if you want to use campaigns in organized manner. i.e. if there is 3 active campaigns(for example Campaign 1, Campaign 2, Campaign 3), then for first abandoned cart, Campaign 1 will be used, for second abandoned cart Campaign 2 will be used and for third abandoned cart Campaign 3 will be used. For fourth abandoned cart, again Campaign 1 will be used. The process will be repeated again and again.
Popup
↑ Back to top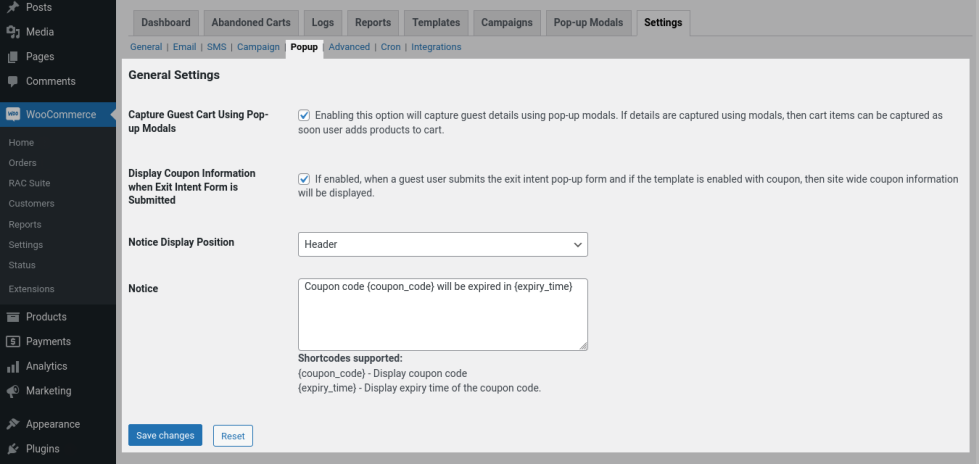
Capture Guest Cart Using Pop-up Modals: Enable this option to capture the phone number and email address of guests using pop-up modals. The Pop-up Modals tab will be displayed after enabling this option(once settings are saved) where you can create pop-up modals.
Display Coupon Information when Exit Intent Form is Submitted: Enable this option if you want to display the coupon information in header/footer in all the pages when the guest users have submitted the exit intent form.
Notice Display Position: Select the position where coupon information has to be displayed.
Notice: Customize the notice to be displayed in the header/footer here.
Advanced
↑ Back to top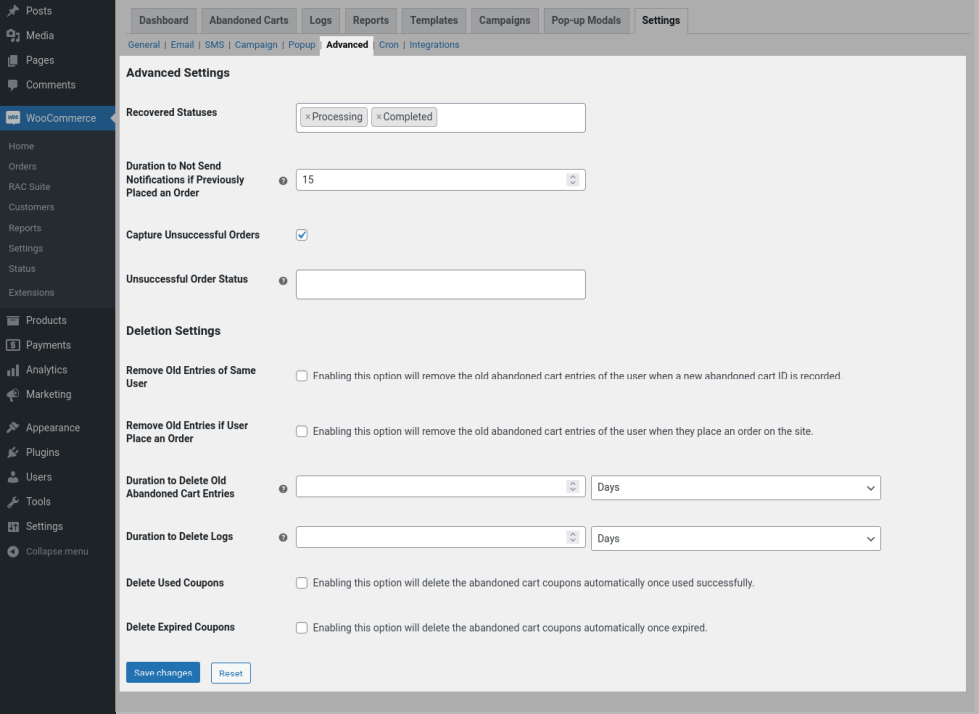
Advanced Settings
Recovered Statuses: The plugin will consider an order as recovered when the order status moves to any of the set statuses here.
Duration to Not Send Notifications if Previously Placed an Order: If you don’t want to send notifications for abandoned carts if the user has previously placed an order before set duration, then set the duration in this option.
Capture Unsuccessful Orders: Enable this option to capture unsuccessful orders. i.e. order is placed, but not successful.
Unsuccessful Order Status: Select the order status which you want the plugin to consider as unsuccessful orders.
Deletion Settings
Remove Old Entries of Same User: Enable this option to remove old abandoned cart entry from Abandoned Carts table if there is a new abandoned cart entry from the same user.
Remove Old Entries if User Place an Order: Enable this option to remove old abandoned cart entry from Abandoned Carts table if the user has placed an order.
Duration to Delete Old Abandoned Cart Entries: If you want the plugin to automatically delete old entries from the Abandoned Carts table after specific period of time, then set the duration to delete the old entries in this option.
Duration to Delete Logs: If you want the plugin to automatically delete old entries from Logs table after specific period of time, then set the duration to delete the old entries in this option.
Delete Used Coupons: If you want the plugin to automatically delete the plugin generated abandoned cart coupons from Marketing > Coupons once the coupon is used, then enable this option.
Delete Expired Coupons: If you want the plugin to automatically delete the plugin generated expired coupons from Marketing > Coupons, then enable this option.
Cron
↑ Back to top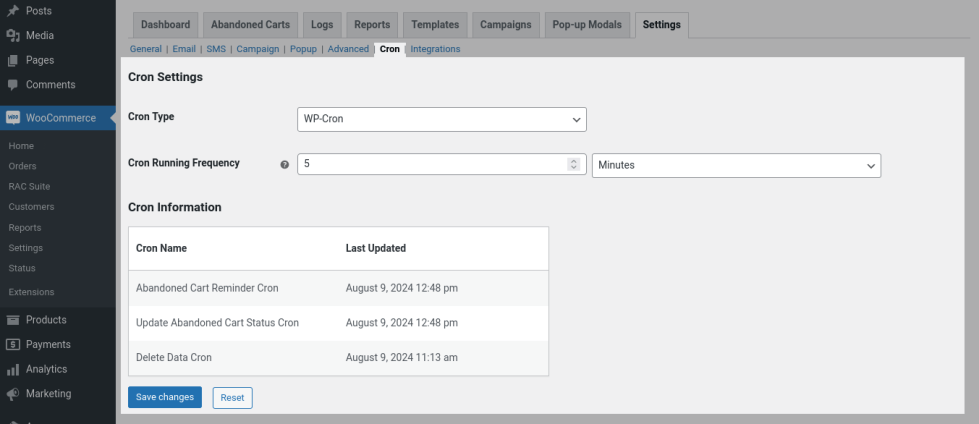
Cron Settings
Cron Type: By default, WP-Cron will used for all the automatic events triggered using the plugin. If WP-Cron is not running on your site, then the plugin won’t work properly. If you are using server cron on your site, then select “Server cron” in this option and plugin events will be triggered based on your server cron setup.
Cron Running Frequency: If WP-Cron is set as Cron Type, then set the cron running frequency here.
Cron Information
In this section, you will be able to see the last triggered cron statuses.
Integrations
↑ Back to top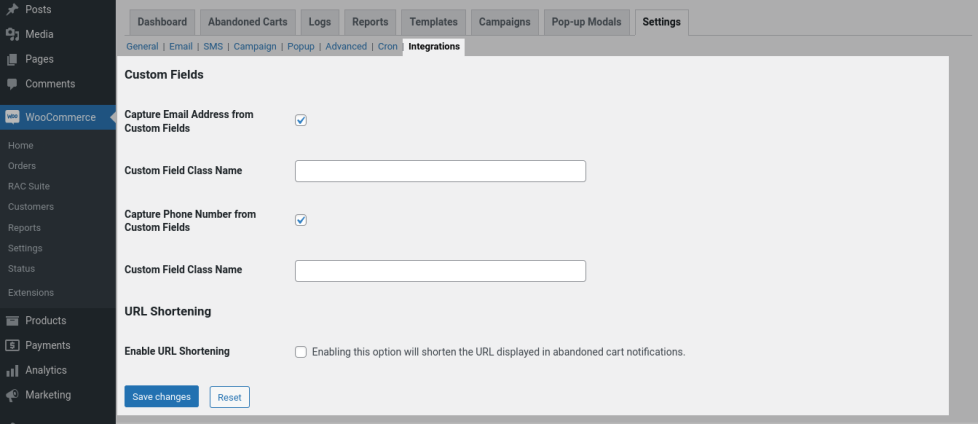
Custom Fields
Capture Email Address From Custom Fields: If you are using any custom fields to get email address of users and want the plugin to capture email address from the custom fields, then enable this option.
Custom Field Class Name: Enter the custom field class name here for the plugin to identify it as custom field for email address.
Capture Phone Number From Custom Fields: If you are using any custom fields to get phone number of users and want the plugin to capture phone number from the custom fields, then enable this option.
Custom Field Class Name: Enter the custom field class name here for the plugin to identify it as custom field for phone number.
URL Shortening
Enable URL Shortening: To shorten the URL displayed in abandoned cart notifications, enable this option.
URL Shortening Tool: Select the URL shortening tool which you are using. This plugin supports tin.ly and bit.ly
API key: Copy the key from your URL shortening tool account and paste it here. URL shortening will work only if a valid key is given here.
Usage
↑ Back to topMembers Abandoned Cart Capturing
↑ Back to top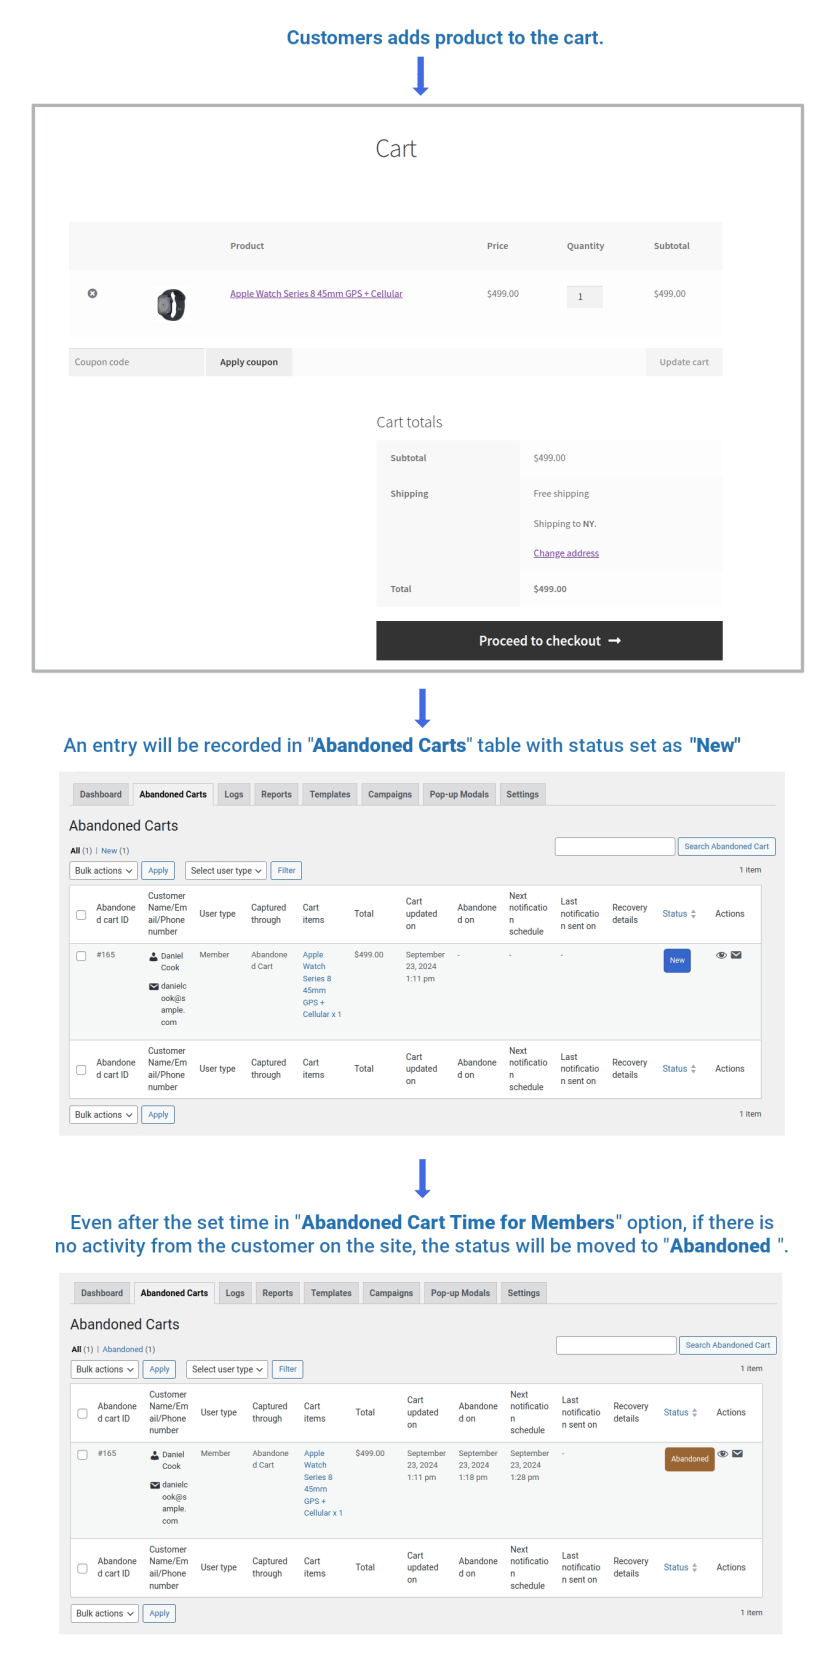
Guest Abandoned Cart Capturing – Using Checkout Form
↑ Back to top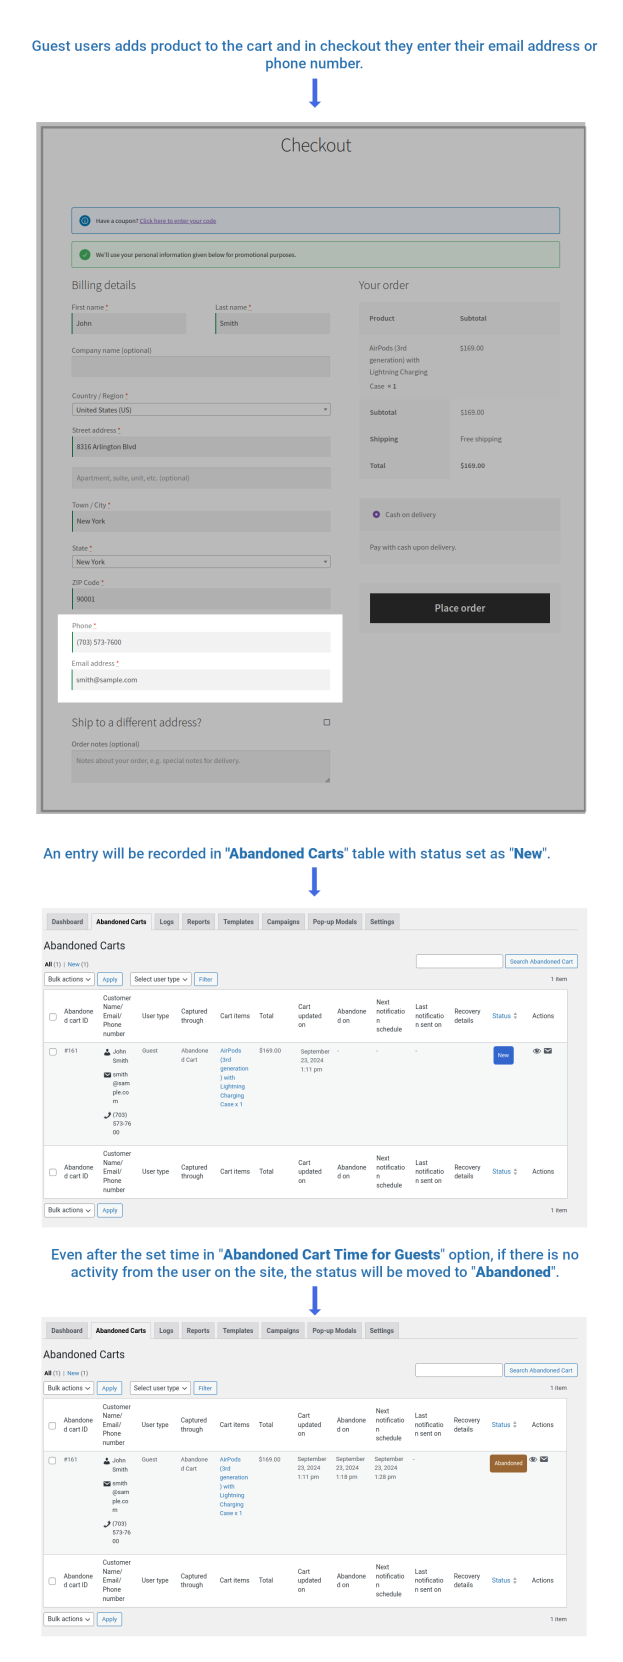
Guest Abandoned Cart Capturing – Using Page Access Pop-up
↑ Back to top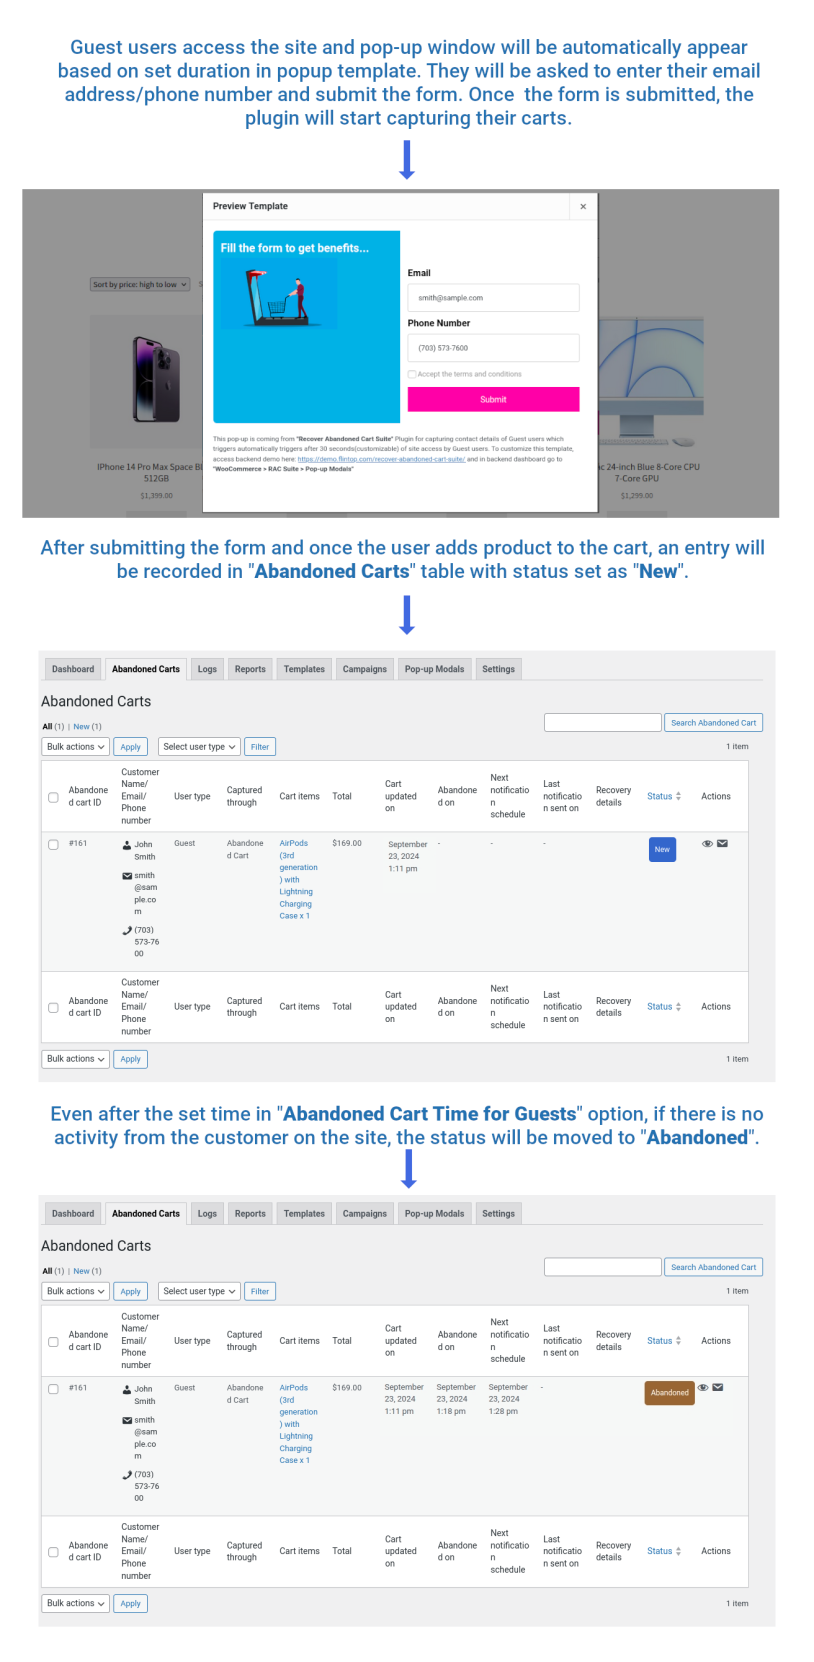
Guest Abandoned Cart Capturing – Using Add to Cart Pop-up
↑ Back to top
Guest Abandoned Cart Capturing – Using Exit Intent Pop-up
↑ Back to top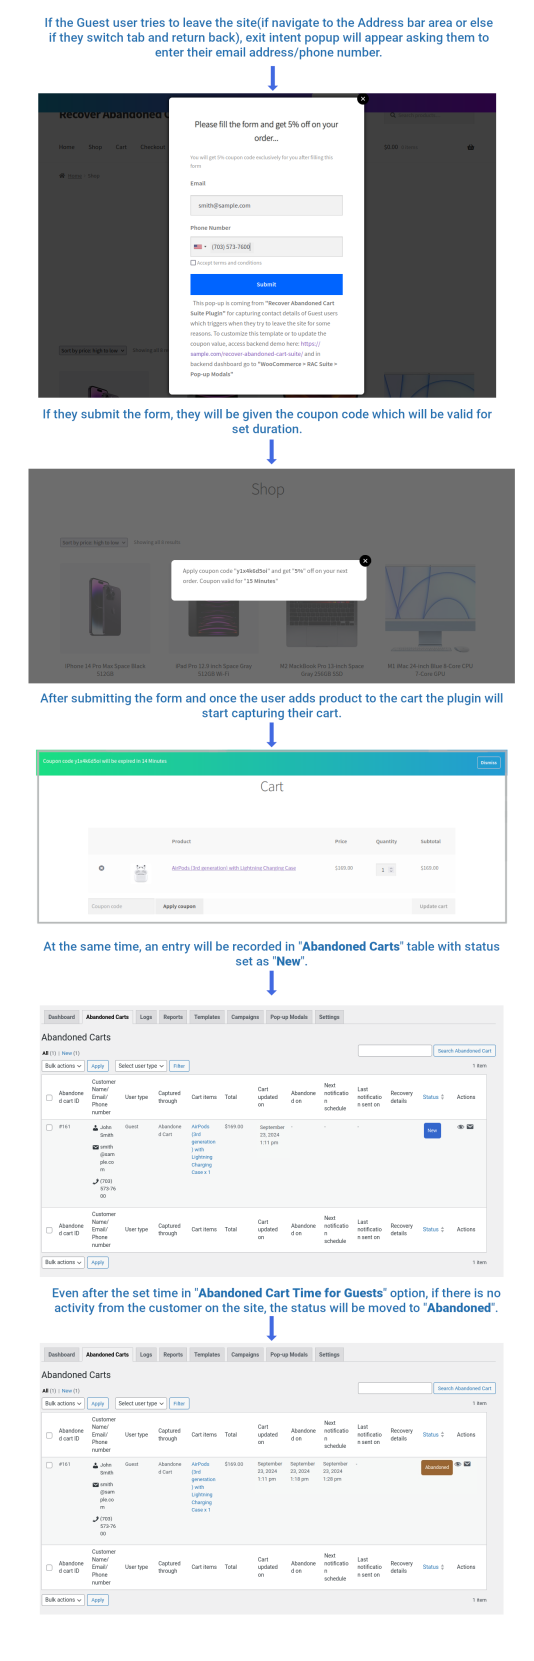
Sending Abandoned Cart Notifications and Cart Recovery
↑ Back to top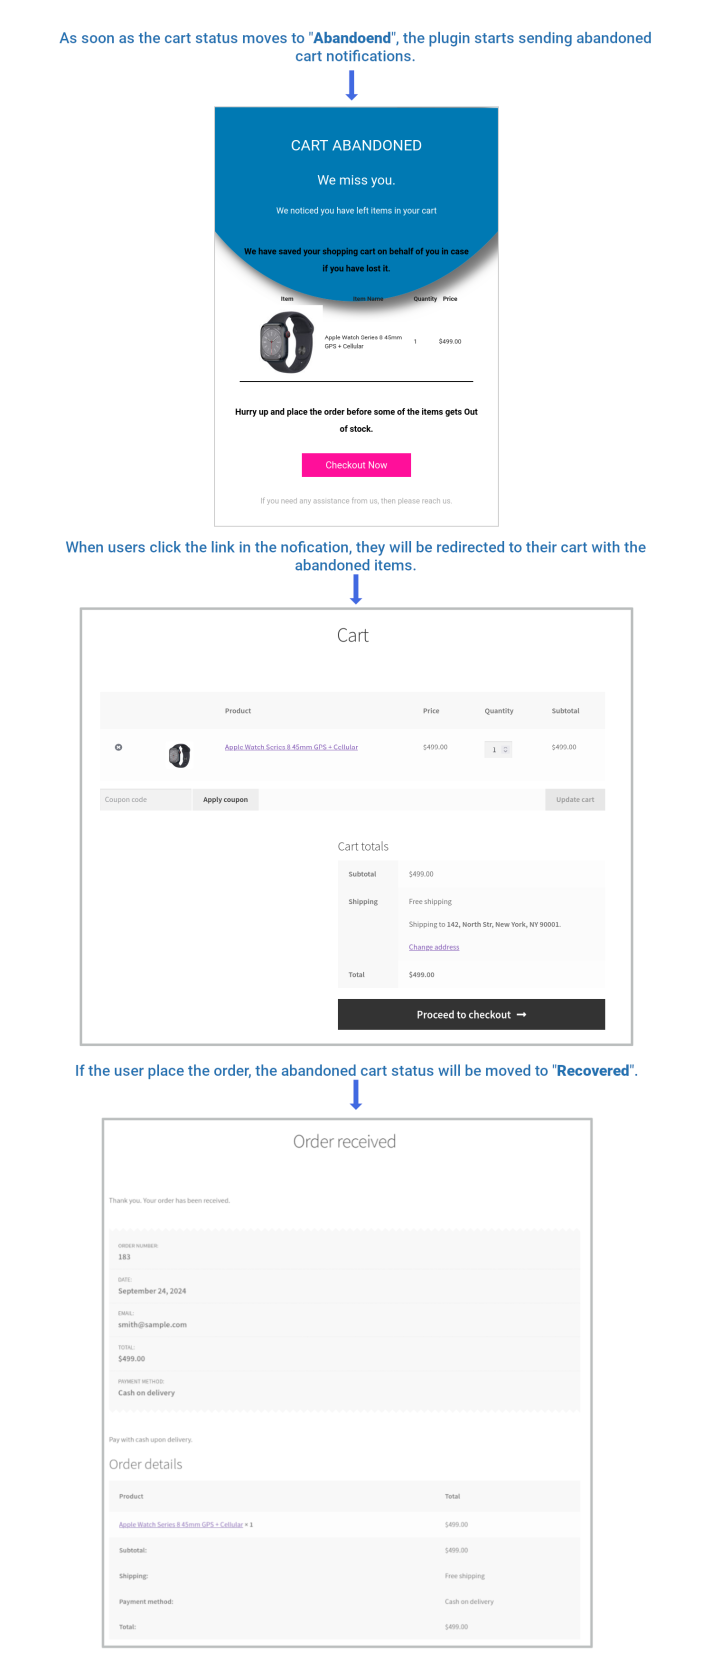
Translation
↑ Back to topRecover Abandoned Carts Suite is translation-ready, meaning you can edit the PO files by which you can translate the text to any language.
The steps to perform the translation are as follows. For example, a translation to French.
- Download and install Poedit
- Open the file recover-abandoned-cart-suite > languages > recover-abandoned-cart-suite.pot using Poedit.
- Create a new translation file by clicking the Create new translation button.
- Choose the Source text and set its corresponding French text in the Translation Text Area.
- Save the changes.
- Save the file name as recover-abandoned-cart-suite-fr_FR.po.
- Then go to WordPress dashboard > Settings > General and select the Site Language as French.