UPS® Shipping Method allows your customers to get real-time shipping rates from UPS® via the REST API (OAuth 2.0 security model) during the checkout process. Our extension uses inches (in) for measurements and pounds (lbs) for weight. You can enter other units, and the system will convert them automatically. The currency used in shipping rate calculations is based on the origin country in the shipping method settings. UPS® can calculate quotes for both domestic and international parcels.
To create shipping labels, you can use our free WooCommerce Shipping extension which offers discounted UPS® rates, or you can purchase labels directly through UPS®. You can also explore other shipping solutions available in the WooCommerce marketplace. The UPS® Shipping Method extension focuses on providing live shipping rates at checkout and works alongside your preferred shipping label solution.
Print USPS, UPS, DHL, and FedEx labels right from your WooCommerce dashboard and instantly save on shipping. WooCommerce Shipping is free…
Note:
This extension does not handle freight shipping and there is a weight limit of 150 lbs per individual package. The API and the built-in box packer require that non-virtual products have weights and dimensions set. More info can be found in the Adding Shipping Dimensions and Weights to Products doc.
Installation
↑ Back to topTo start using a product from WooCommerce.com, you can use the “Add to store” functionality on the order confirmation page or the My subscriptions section in your account.
- Navigate to My subscriptions.
- Find the Add to store button next to the product you’re planning to install.
- Follow the instructions on the screen, and the product will be automatically added to your store.
Alternative options and more information at:
Managing WooCommerce.com subscriptions.

Configure and Connect Your UPS Account
↑ Back to topUsing the new REST API (OAuth 2.0 security model)
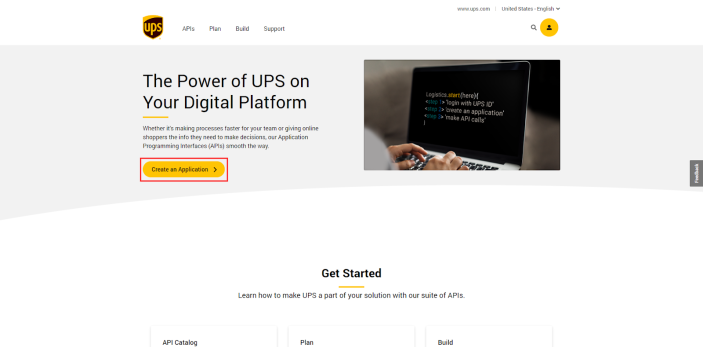
↑ Back to top- Head to https://developer.ups.com.
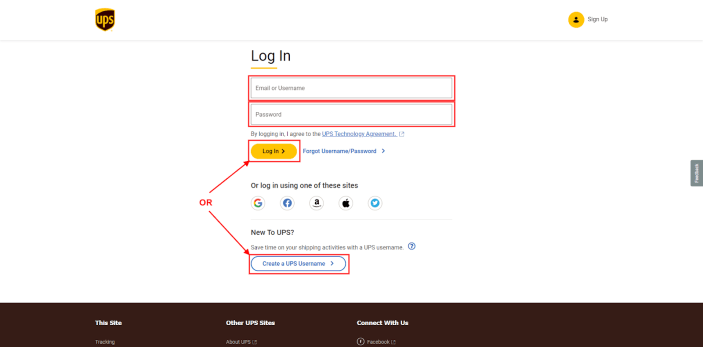
- Click the Log in button.
- Log in with your UPS account (or create a new account).
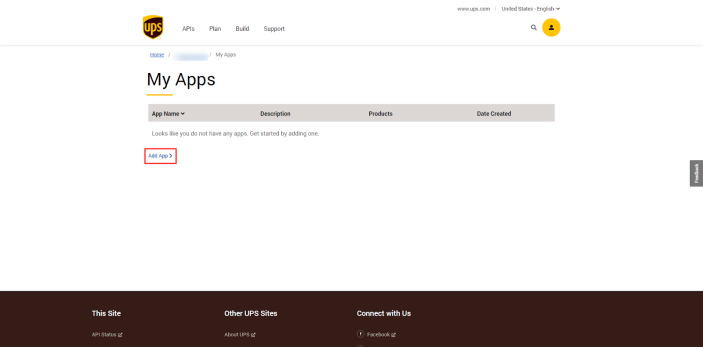
- Go to My Apps (available in the top-right of the screen of developer.ups.com).
- Click the Add Apps link at the bottom-left of the screen.
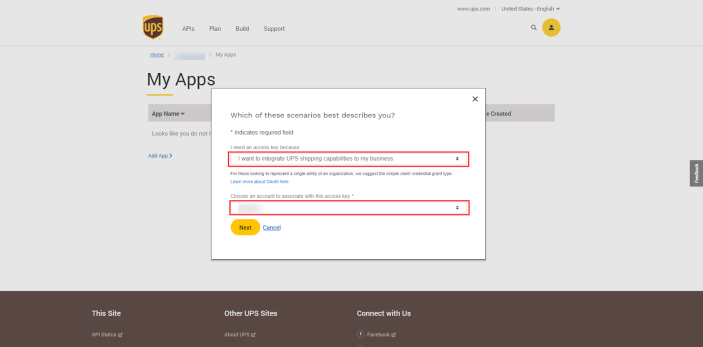
- You’ll see a form with 2 fields:
- Select I want to integegrate UPS technology into my business from the I need API credentials because dropdown.
- Select the account you want to use from the Choose an account o associate with these credentials dropdown.
- Read the terms, and check the checkbox if you agree.
- Click the Next button.
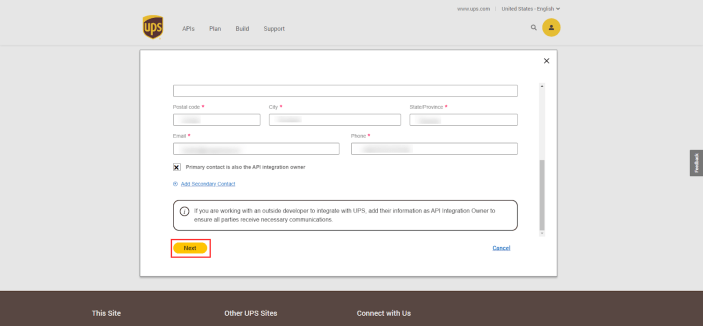
Note: You will have to repeat these steps if “Create an account” is selected. - Fill out the contact details and click Next.
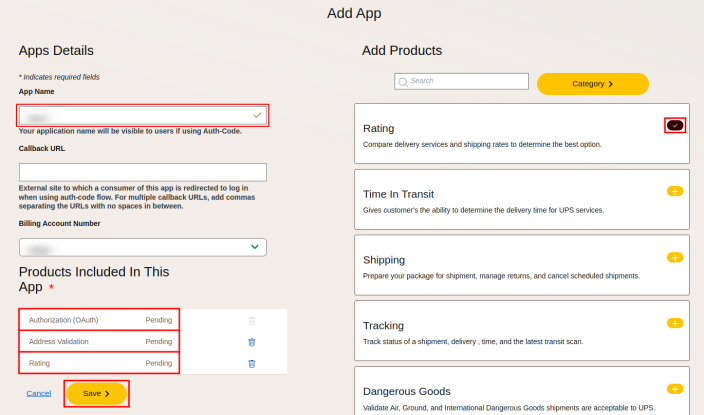
- Enter a name for your app (e.g. UPS Shipping Method for WooCommerce).
- In the Add Products section, use the search field to find and enable the following services:
- Rating
- Address Validation
- Save your changes.
- On the next screen, review the Subscription APIs section. You should see the following Product In Use along with its Status:
- Authorization (OAuth): approved
- Rating Pending: approved
- Address Validation: approved
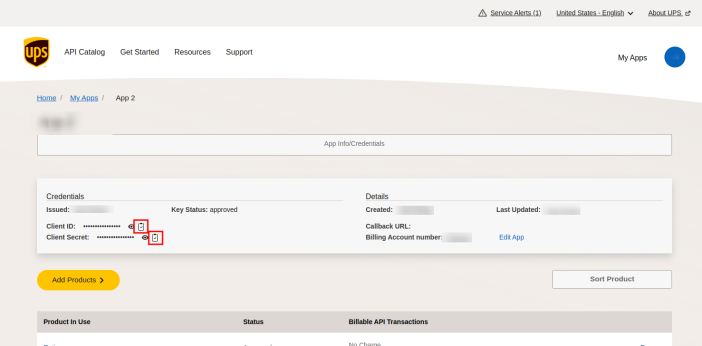
- Copy the Client ID and Client Secret keys from the Credentials section. You’ll need both in the next step.
- Log into your site’s WP Admin go to WooCommerce > Settings > Shipping > UPS and input the following settings:
- UPS API type – REST.
- UPS Account Number – Sent to you after signup.
- UPS Client ID – Displayed on the UPS website in step 9).
- UPS Client Secret – Displayed on the UPS website in step 9).
- Customer Classification – Determines what rates are returned. Note that Retail Rates will match the online calculator.
- Debug Mode – Enable/disable debug mode to show debugging information on your cart/checkout.
- Click Save changes and proceed to the Configuration section below to continue setting up the extension.
Using the XML API (legacy; for reference only)
↑ Back to topUsing the XML API (legacy; for reference only)
Note:
These instructions are only reference for merchants already using UPS Shipping Method. The REST API (described above) offers better performance and is the only connection option available in the UPS plugin from version 3.5.8+.
Additionally, UPS stopped issuing API keys for the XML API on June 5, 2023 and that connection will no longer work after August 5, 2024. The REST API (OAuth 2.0) connection will be required after that date. (The original deprecation date was June 3, 2024 but it was extended to August 5, 2024 by UPS.)
The legacy XML API connection requires that your server uses SimpleXML.
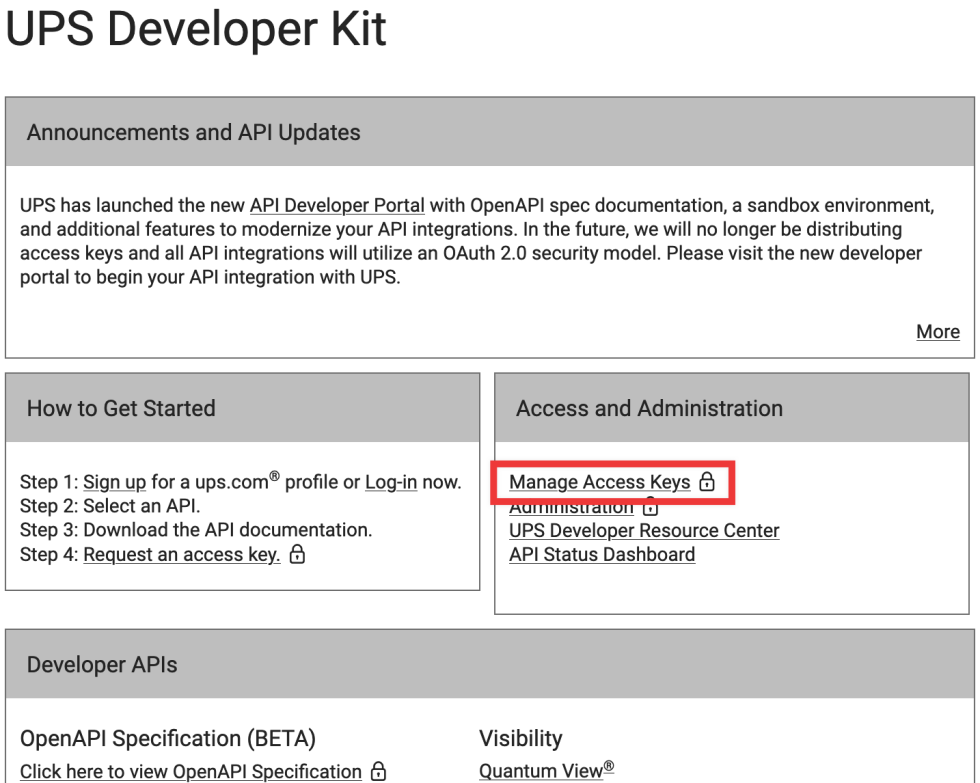
- To create a UPS account and obtain your UPS API credentials, sign up at UPS Developer Kit.
- After signing in, in the Access and Administration section select Manage Access Keys, then Request New Access Key.
- Fill out the first two form fields as follows:
- I need an access key because: I was informed by a software vendor that I need to obtain an access key to share with them
- Software/Vendor Name: WooCommerce
- Continue filling out the rest of the form.
- After successfully signing up, please go to WooCommerce > Settings > Shipping > UPS and fill out the following fields and save changes:
- UPS API type – XML (legacy).
- UPS Account Number – Sent to you after signup.
- UPS User ID – Set by you during signup.
- UPS Password – Set by you during signup.
- UPS Access Key – Sent to you after signup.
- Customer Classification – Determines what rates are returned. Note that Retail Rates will match the online calculator.
- Debug Mode – Enable/disable debug mode to show debugging information on your cart/checkout.
- Click Save changes and proceed to the Configuration section below to continue setting up the extension.

Configuration
↑ Back to topNote:
This shipping method has to be added to a Shipping zone. If you haven’t configured your Shipping zones yet, please check our Setting up Shipping Zones guide before proceeding.
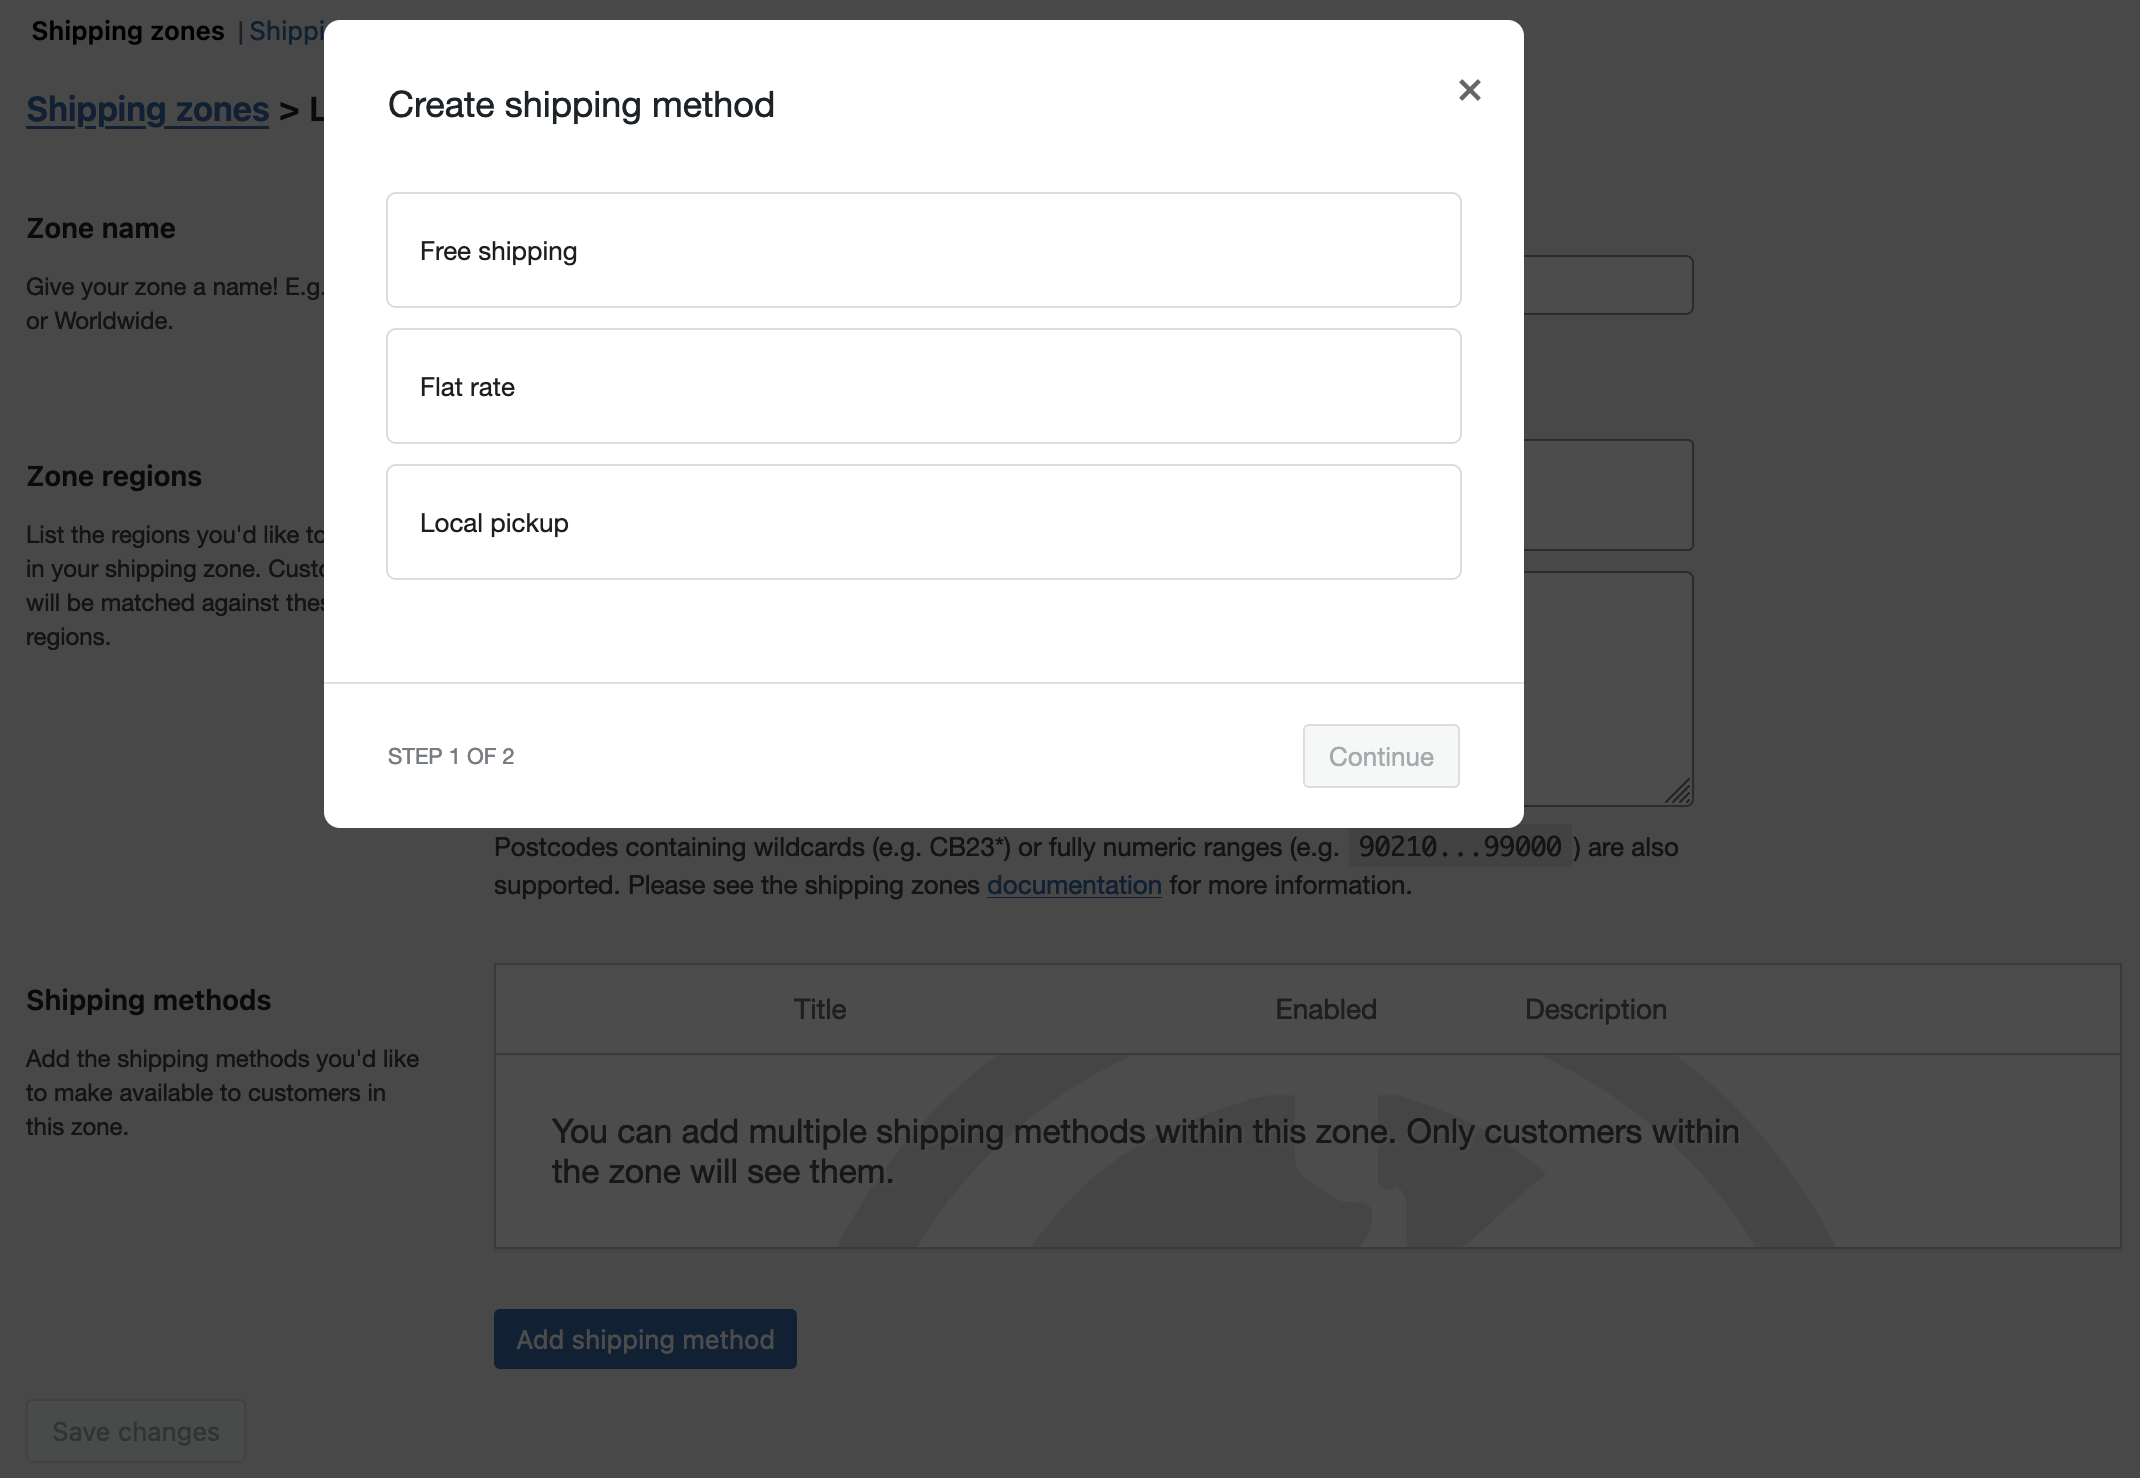
- Go to WooCommerce > Settings > Shipping > Shipping zones.
2. Click the Edit button on the shipping zone where you want to offer this method.

3. Inside the shipping zone, click the Add shipping method button.

4. Then, select the shipping method and click the Continue button.
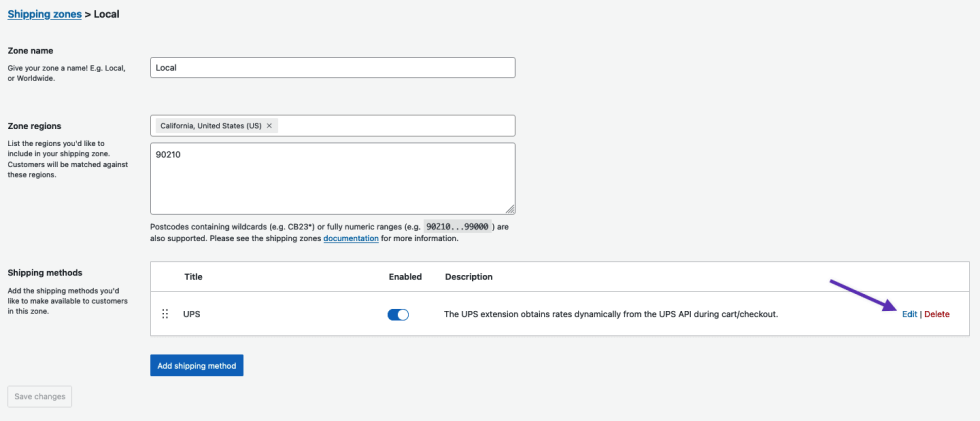
Once UPS has been added to the Shipping Zone, click the Edit button on the right to configure the shipping method settings.
Shipping Method Settings
↑ Back to topMethod & Origin Settings
↑ Back to top- Method Title – Name the shipping method. This is visible to customers.
- Tax Status – Select Taxable to charge taxes on shipping costs or None to not charge taxes. This setting is only shown if taxes are enabled in WooCommerce.
- Origin City – Enter the city you will be shipping from.
- Origin Postcode – Set to the postcode from where you ship. It is sent to the UPS API.
- Origin Country – Set to the country from where you ship. It is sent to the UPS API.
Services and Packaging
↑ Back to top- Services – Choose to rename services in the Name field and/or rearrange the order that these options are shown to customers by clicking-and-dragging that list.
- Offer Rates – Select whether to display all rates available or only the cheapest.
- Negotiated Rates – Enable negotiated rates or not.
- More at: Account-Specific Negotiated Rates. This must be approved by UPS, or the API returns an error. It is sent to the UPS API.
- Delivery Confirmation – Optionally you may charge customers for delivery confirmation. This just adds the specified amount to the returned rates.
- Parcel Packing Method – See below.
- UPS Packaging – You can select from a built-in list of standard UPS packaging to use.
- Custom Boxes – Here you can add custom box sizes to pack into.
Advanced Options
↑ Back to top- Origin Address – Sometimes you may need to enter the address for the sender/origin.
- Residential – Choose whether to indicate deliveries as residential or commercial addresses.
- Users are permitted to enter PO Boxes as a shipping address, even though UPS does not allow it.
- Destination Address Validation – Choose whether to validate the destination address at checkout.
- If enabled, users will only be able to checkout with a UPS validated address.
- Requires the Address Validation service enabled within your UPS app as outlined in the “Connecting Your UPS Account” section.
- Insured value – Request Insurance to be included in UPS rates.
- Fallback – Enter a fallback amount for shipping, if no rates are found.
- Weight/Dimension Units – Only change this if you’re getting the “This measurement system is not valid for the selected country method.”
Note:
The UPS shipping extension will calculate rates for all physical (non-Virtual) products in the cart. It does not exclude products based on shipping classes.
Parcel Packing Methods
↑ Back to topThere are two packing methods with UPS and each affects the parcels you send to the API: Pack items individually (Default) and Pack into boxes with weights and dimensions (Recommended).
Pack items individually (Default)
↑ Back to topThis packing method assumes that every physical (non-virtual) item in the cart is shipped in its own package based on the weight and dimensions entered for each individual product. Shipping rates are calculated separately for each item and then combined into the total shipping cost. Only the weight is required, but entering product dimensions produces a more accurate quote. For even more accuracy, we recommend the box packer method.
To use this method, add a new product then scroll down to Product Data > Shipping to enter the product dimensions.
Pack into boxes with weights and dimensions (Recommended)
↑ Back to topUsing this method, you create your own custom box sizes in UPS Settings. The extension uses the weight/dimensions of products added to the cart, filling the custom box size from smallest to largest based on volume and size, then sends the number of boxes/size to the UPS API for a shipping estimate. Both product weight and dimensions are needed for this option to calculate what boxes are required accurately.
After selecting this option, you must follow the steps listed below for UPS Packaging or Custom Box Packing for this method to work.
UPS Packaging
↑ Back to topUPS offers standard boxes for shipping. UPS Packaging:
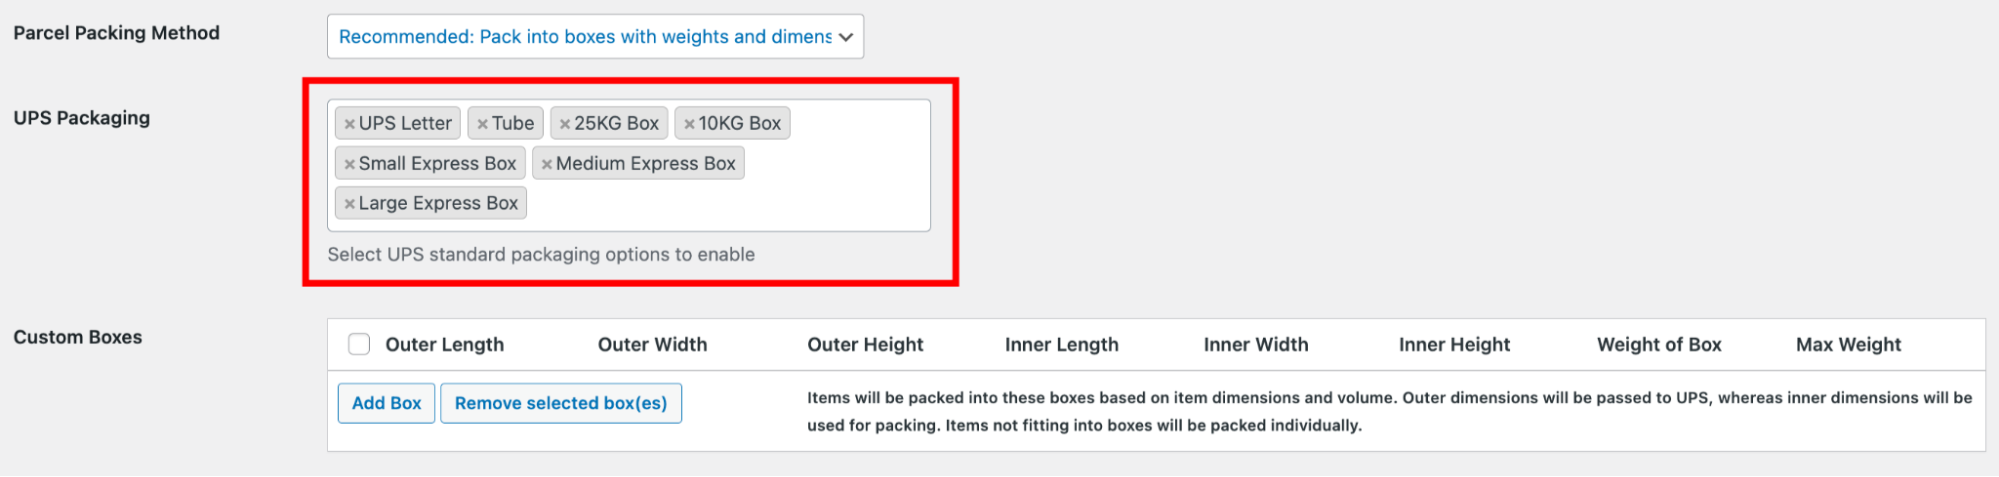
Start typing the package you want to include, and it auto-populates the field for you.
Note
If you choose Pack into boxes with weights and dimensions (Recommended) but have not chosen any UPS Packaging, nor defined any custom boxes (as explained below), the plugin displays the error message: “UPS is enabled, and Parcel Packing Method is set to ‘Pack into boxes’, but no UPS Packaging is selected and there are no custom boxes defined. Items will be packed individually.”
Custom Box-Packing
↑ Back to topThe box packer included with this shipping method groups items into boxes that you define by height, width, length, weight, and max-weight. The packing is mainly volume based, but also considers item sizes.
Note
The box packer is volume based. In most cases, this provides good results but is never as accurate as a real person packing a box (see BIN Packing Problem). Therefore, it is important to understand that packing results are as accurate as they can be, and any anomalies should be acceptable.
Setting up box sizes
↑ Back to top- Go to: WooCommerce > Settings > Shipping.
- Select your Shipping Zone containing UPS, then click UPS
- Scroll down to Custom Boxes and select Add Box to set up box dimensions:
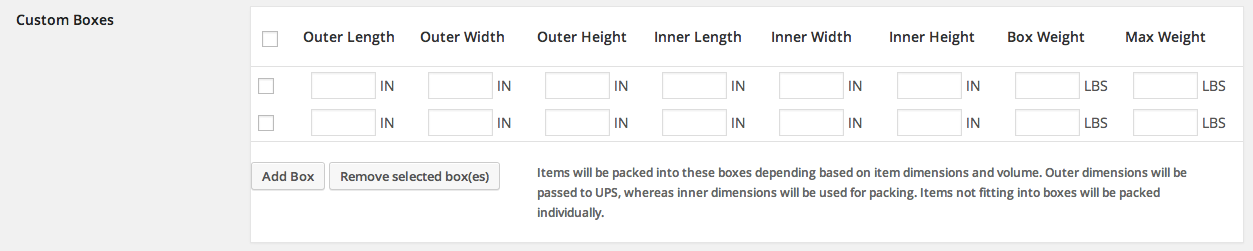
Outer dimensions are used for parcel dimensions and are passed to the API.
Inner dimensions are used for packing, and items should fit within these.
Box weight is the weight of the actual box and is added to the weight of contents.
Max weight is the maximum weight your box can hold. This includes contents weight and box weight. (Note: This value should never be set to 0 as that will result in that box not being used due to the Max Weight limitation being met before any items are packed inside.)
How the calculation works
↑ Back to topThe packer:
- Finds boxes that fit items being packed (uses L x W x H).
- Packs all fitting items into boxes (using volume).
- Uses the smallest box that fits 100% of items *or* uses the highest % packed box, and then passes unpacked items back and repeats the process.
- Packs unpackable items alone, using item dimensions.
- Returns all packed boxes.
Handling Fees
↑ Back to topTo add handling fees to shipping calculations, you can use a Price Adjustment column in the Services section. Using price adjustment columns in the row, each UPS service can be increased or decreased separately (by adding the “-” sign).
Use the Price Adjustment ($) column to add a flat amount to the shipping quote. In this example, the 3-Day Select and Ground shipping methods are increased by $3.50.

Use the Price Adjustment (%) to increase the shipping quote by a percentage. In this example, the 3-Day Select and Ground shipping methods are increased by 1% of the quote returned by UPS.

Customer Usage
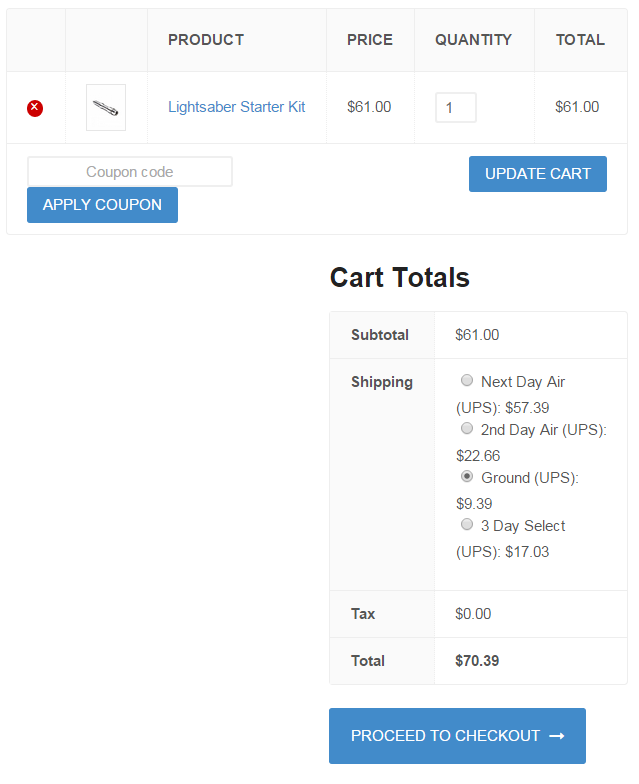
↑ Back to topCustomers get quotes after inputting their address from two places:
- Cart page – via the shipping calculator
- Checkout page – via the shipping and billing forms
Customers can select rates as normal.
Available Shipping Services for UPS Extension
↑ Back to topThese services are included with the UPS Shipping extension:
Domestic
- 3-Day Select
- Ground
- 2nd Day Air
- 2nd Day Air AM
- Next Day Air
- Next Day Air Saver
- Next Day Air Early AM
- Simple Rate
- SurePost Less than 1LB
- SurePost 1LB or greater
- SurePost BPM
- SurePost Media Mail
International
- Standard
- Worldwide Express
- Worldwide Express Plus
- Worldwide Expedited Standard
- Worldwide Saver
FAQ
↑ Back to topDoes this plugin create shipping labels and provide tracking?
↑ Back to topNo. It integrates UPS and WooCommerce and calculates live shipping during checkout so that you can charge your customers accurate shipping costs based on the items being purchased.
For shipping labels, we recommend our free WooCommerce Shipping extension. You can purchase discounted UPS shipping labels directly from your orders and automatically send tracking information to your customers when the order status is marked as “Completed”.
I dropship items. Can I use multiple origin zip codes?
↑ Back to topYes. Multiple UPS methods in the same zone with different origin addresses will return the appropriate rates for each method. Multiple API requests are made, and each origin address is used.
Troubleshooting
↑ Back to topDebug the UPS API responses
↑ Back to topThis section explains how to enable debugging in the UPS extension to troubleshoot responses from the UPS API.
Enable debug mode under WooCommerce > Settings > Shipping > UPS. Add a product to the cart, go to the cart or checkout, and enter a shipping address to see the results.
No rates returned / no rates available / no shipping methods found
↑ Back to topAll shipping rates are live from UPS, so there is something in the request and/or the UPS response that does not match expectations.
- Confirm that your API credentials are correct.
- Check that the plugin is linked to UPS API. It uses wp_remote_post, which uses fsockopen/CURL.
- Go to: WooCommerce > Settings > General and check that the store’s base country is the United States and US Dollars is the currency.
- Check that your products have sizes and weights set – without this, the calculation cannot be performed.
- Check the UPS debug output described under Debug the UPS API responses above.
- Enable development mode or turn on WP_DEBUG to see debugging information on the cart page. This often reveals the issue.
This error can also occur when shipping zones are set up incorrectly. Check that the address matches a shipping zone. You can enable Shipping Debug under WooCommerce > Settings > Shipping > Shipping Options.
The UPS shipping method is only showing up for some customers
↑ Back to topThis usually happens when an extension such as Role-Based Shipping / Payment Methods is installed. It allows site administrators to limit available shipping methods for each user role, including guests. If this extension was installed before the UPS extension, it may affect which customers see the shipping method.
Shipping rates are too high / higher than expected
↑ Back to topStart by comparing the returned prices with the prices shown in the UPS price calculator. This tool often requires the merchant to log in for their specific rates. If the prices don’t match up, there is usually a configuration issue.
Enable debug mode under WooCommerce > Settings > Shipping > UPS and visit the cart/checkout page. Check the following settings in their shipping zone:
- Parcel packing method – Default will result in higher costs
- Custom box sizes
- Negotiated rates – This may not be selected when their account enables them.
- Origin address – Is this the correct location?
- Insurance
- Check the Price Adjustment columns to see if the price has been manually adjusted on the site.
- Compare the debug request to the UPS price calculator to check if the returned prices are correct. This tool often requires the merchant to log in for their specific rates. If you need further support, please include a screenshot of the results.
“Invalid Authentication Information” error
↑ Back to topIf you see Invalid Authentication Information or 2500002: invalid authentication in the “UPS RESPONSE” section of the Debug output on your site, there is a problem with the API credentials or the App in your UPS account dashboard. To resolve this error, do the following:
- Log in to https://developer.ups.com/ and click on “My Apps”. Then, click on the link in the “App Name” column.
- Confirm that your App has “Rating” and “Authorization ( OAuth)” listed in the Product In Use column. If either of those are not listed there, click the “Add Products” button. Next, click the
+icon on the right for any missing products and save the changes. - Confirm that both the “Rating” and “Authorization ( OAuth)” products show “Approved” in the Status column when viewing the App info screen (described in Step 1). If any products show as “Pending“, try removing them with the “Remove” link on the right and re-adding them via the “Add Products” button (as described above).
- Try reconnecting to the API.
- First, clear these fields in your UPS plugin settings (WooCommerce > Settings > Shipping > UPS):
- UPS Account Number
- UPS Client ID
- UPS Client Secret
- Make sure each field is completely empty with no spaces or characters.
- Then enter your new credentials:
- Copy your Billing Account number from the App Info page and paste it into UPS Account Number
- Copy your Client ID from the App and paste it into UPS Client ID
- Copy your Client Secret from the App and paste it into UPS Client Secret
- Click “Save Changes” to finish.
- Note: In the App, click the eye icon to view your Client ID and Client Secret. Use the clipboard icon to copy these values.
- Once those steps have been completed, do another test on the front end of your site with Debug enabled to see if the error has been resolved. If you continue to see
Invalid Authentication Informationin the “UPS RESPONSE”, reach out to the UPS Support team and let them know that you are receiving this error.
- First, clear these fields in your UPS plugin settings (WooCommerce > Settings > Shipping > UPS):
Rates are not in the correct currency
↑ Back to topUPS will use the currency that is enabled on your account. If your site uses a different currency than the one that is set on the account, the rates won’t be returned. If the debug setting is enabled, this will be indicated with a warning:[UPS] Rate for Standard (UPS) is in USD but store currency is EUR.
If you need to convert these rates to the correct currency, we recommend using the Multi Currency extension and setting up a conversion rate for both the account currency and the store currency.
Customize
↑ Back to topIf you would like to remove UPS as a shipping option for some shipping classes you can use the WooCommerce Conditional Shipping and Payments extension.
You can also use code to do this. You can add the following code to your functions.php. You need to change the shipping classes used on the 14th line:
/**
 * Check the cart for specific classes, remove UPS Shipping method if they are present
 *
 * REMOVE THE TOP <?php if there is no ?> before (or you have an error after adding this)
 *
 * Add the code to your theme functions.php file
 */
add_filter( 'woocommerce_package_rates', 'unset_ups_shipping_method' , 10, 2 );
function unset_ups_shipping_method( $rates, $package ) {

    // Setup an array of shipping classes that do not allow UPS Shipping (@todo change this)
    $shippingclass_array = array( 'no-ups' );

    /**
     * loop through the cart looking for the products in the array above
     * and unset the Free shipping methods as necessary
     */
    foreach ( WC()->cart->get_cart() as $cart_item_key => $values ) {
        $shipping_class = get_the_terms( $values['product_id'], 'product_shipping_class' );

        if ( isset( $shipping_class[0]->slug ) && in_array( $shipping_class[0]->slug, $shippingclass_array ) ) {
            /**
             * Unset the shipping methods here
             */
            unset( $rates['ups:01'] );
            unset( $rates['ups:02'] );
            unset( $rates['ups:03'] );
            unset( $rates['ups:04'] );
            unset( $rates['ups:05'] );
            unset( $rates['ups:06'] );
            unset( $rates['ups:07'] );
            unset( $rates['ups:08'] );
            unset( $rates['ups:09'] );
            unset( $rates['ups:10'] );
            unset( $rates['ups:11'] );
            unset( $rates['ups:12'] );
            unset( $rates['ups:13'] );
            unset( $rates['ups:14'] );
            unset( $rates['ups:15'] );

            // The rates have been removed, no point in carrying on
            //break;
        }
    }

    // Return what's left of the $rates array
    return $rates;
}
Questions and support
↑ Back to topSomething missing from this documentation? Still have questions and need assistance?
- If you have a question about a specific extension or theme you’d like to purchase, contact us to get answers.
- If you already purchased this product and need some assistance, get in touch with a Happiness Engineer via our support page and select this product’s name from the Product dropdown.