The extension allows you to troubleshoot the order process and place orders on behalf of customers.
Installation
↑ Back to top- Download the .zip file from your WooCommerce account.
- Go to: WordPress Admin > Plugins > Add New and Upload Plugin with the file you downloaded with Choose File.
- Install Now and Activate the extension.
More information at Install and Activate Plugins/Extensions.
Setup and Configuration
↑ Back to topOnce the plugin is installed and activated, you will notice a new menu item in admin tool bar; WordPress Admin panel > Admin toolbar > Shop as customer.
How To Use
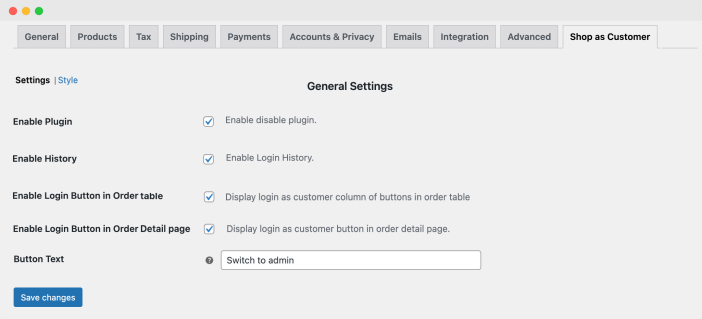
↑ Back to topOnce the extension is installed, go to WooCommerce > Settings > Shop as customer tab. Here you can:
- Enable Plugin – Check the box to enable plugin if disabled, none of the settings will work.
- Enable History – By enabling this setting, you will get detailed admin login history, but if disabled, then you cannot view any record.
- Enable login button in order table – Once enabled, the Login as Customer button will display on the admin’s order listing page.
- Enable login button in order detail page– Check to enable Login button on order detail page.
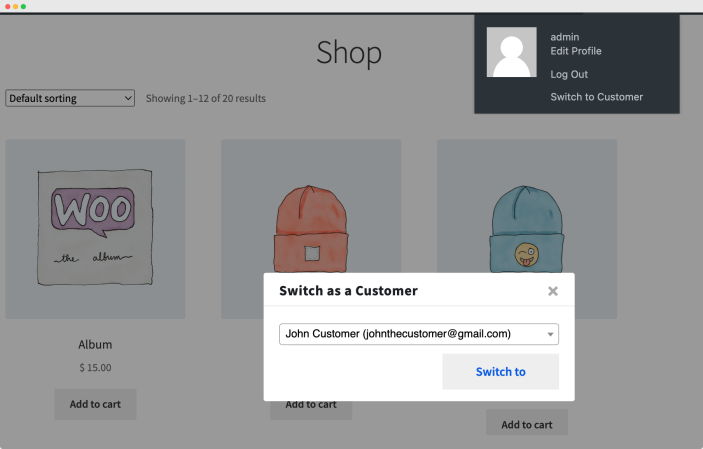
After configuring extension, login as admin and visit the frontend, you will notice a new option “Switch to Customer” in admin header toolbar under the profile picture menu. Clicking on “Switch to customer” will open a popup that will allow you to login as any customer.
How To Switch to Customer
↑ Back to topYou can switch to customer by following these three methods:
Method 1: Through WordPress Admin Panel
↑ Back to topOnce you have activated the plugin:
- Go to WordPress
- Go to frontend of your store
- From the Admin Panel toolbar, select Switch to Customer
- Add customer’s email and click on switch
- You are successfully switched to customer
Method 2: Through Order Listing Page
↑ Back to topSuppose you want to open order details for a specific customer. To switch for that particular customer:
- Go to WordPress and navigate to Woocommerce
- Go to orders
- Choose any order made by the desired customer
- You will see a login as customer button against the order
- Click the button, and you’re switched to the customer
- Now you can shop on behalf of this customer

Method 3: Through Order Detail Page
↑ Back to topTo switch from customer’s order detail page, follow these steps:
- Go to WordPress and navigate to Woocommerce
- Go to orders
- Choose any order made by the desired customer
- Click on the order number to view order details
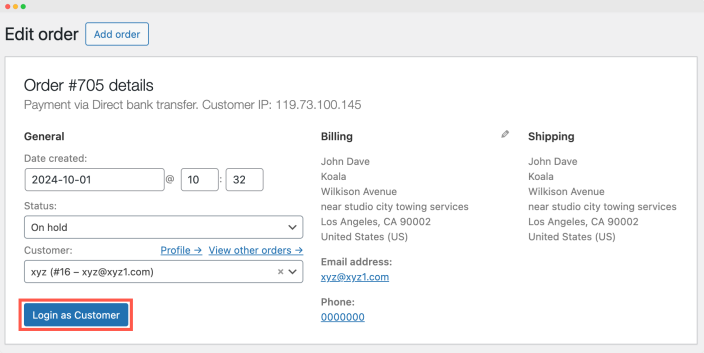
- You will see a login as customer button below customer details
- Click the button, and you’re switched to the customer
- Now you can shop on behalf of this customer
How to Change Customer’s Billing and Shipping Addresses
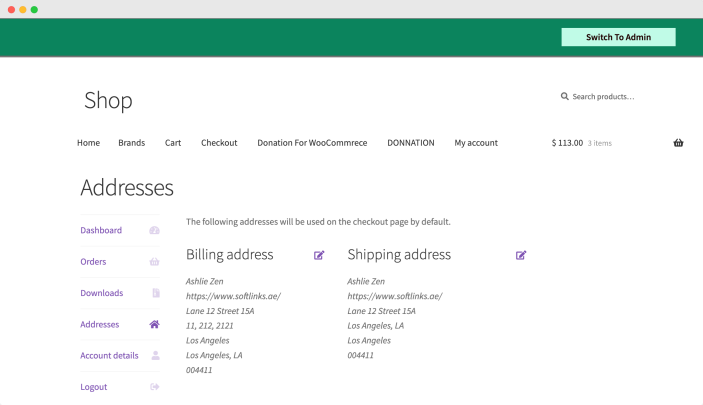
↑ Back to topYou can also edit billing addresses on behalf of customers from the frontend. To make changes in billing details:
- Visit frontend of your store
- Go to Admin Panel Bar & click Switch to customer
- From the top Menu, select My Account
- Scroll down to Addresses
- To edit the billing information, edit the billing section
- To edit the shipping information, edit the shipping section
How to Change & Add Payment Methods on Customer’s Behalf
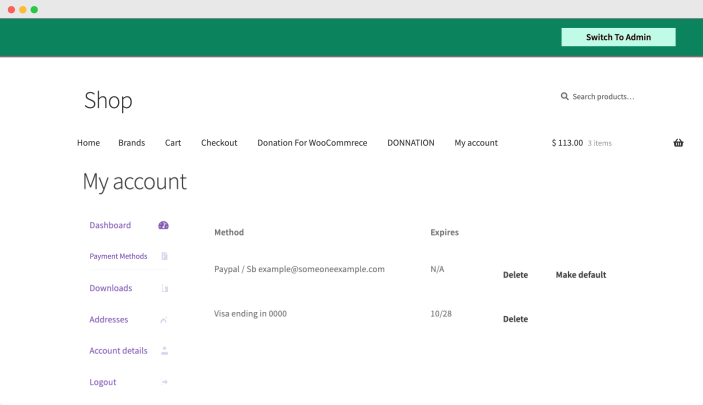
↑ Back to topIn order to change payment methods:
- Visit frontend of your store
- From Admin Panel Bar, click Switch to customer and add the customer email
- Decide if you want to continue with the existing cart or make changes to it and visit cart page
- Once decided go to My Account Page
- From the side menu select Payments Methods
- Now, add or delete any payment you would like to
How to Style Admin Bar
↑ Back to topTo add customized colors to admin bar, follow these steps:
- Go To WordPress
- Navigate to WooCommerce
- Click Settings and go to Shop as customer tab
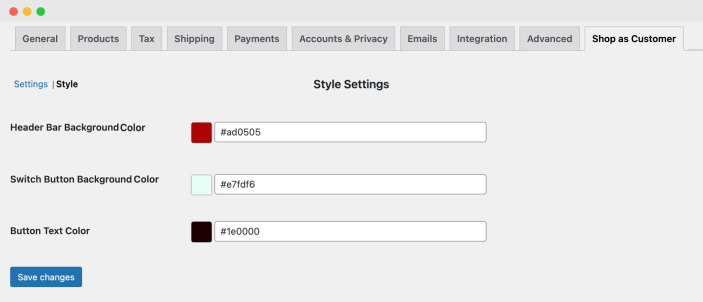
- Select Style option:
Here, you can view three different styling options:
- Header Bar Background Color– Select color for background of header bar displayed at frontend of your store
- Switch Button Background Color– For Switch to Customer button choose a color from the palette
- Button Text Color– Select color for Switch to Customer button text
Admin login history:
↑ Back to topYou can enable/disable admin login history from extension’s general settings tab. Click on “Admin Login History” to view the records.

FAQ’S
↑ Back to topQ1. Which data can I edit on customer’s My Account Page?
You can edit customer’s billing and shipping addresses from My Account Page. The extension also allows you to change and add payment methods from the same page.
Q2.Is customer data editable on checkout
Once you have switched as a customer, you can edit billing details from the Checkout page and My Account page.
Q.What roles can switch to customer?
By using the extension, only admins and shop managers can switch as a customer.
