Account Funds for WooCommerce by Kestrel allows you to reward your customers with store credit or deposit funds as store credit in their account on your WooCommerce store. You can define how store credit will be awarded automatically or let your customers increase their store credit manually by purchasing store credit products or directly from the My Account area.
Using store credit to pay for an order is quick and easy for your customers, working similarly to any other payment gateway on checkout.
Account Funds supports:
- Setting up cashback rewards that grant store credit upon purchasing specific products or paying for an order that meets eligibility criteria.
- Setting up milestone rewards that grant store credit when the customer performs specific actions in your WooCommerce store.
- Limit store credit validity by setting expiration time in the corresponding reward configuration.
- Configurable emails to notify customers about awarded or expiring store credit, as well as admin notifications when a configured reward is depleted after the configured quota has been exhausted.
- Partial payments allowing your customers to use their store credit to pay part of their order while completing the purchase with another payment method.
- Refunding an order to your customer’s account funds, allowing for refund policies that grant store credit.
- Recurring payments with Subscriptions or Constellation, allowing your customers to prepay or fund their subscription payments in advance, or to grant funds as a part of an ongoing subscription or membership.
Account Funds Requirements
↑ Back to top- WooCommerce 8.2+
- PHP 7.4+
Installation
↑ Back to topTo start using a product from WooCommerce.com, you can use the “Add to store” functionality on the order confirmation page or the My subscriptions section in your account.
- Navigate to My subscriptions.
- Find the Add to store button next to the product you’re planning to install.
- Follow the instructions on the screen, and the product will be automatically added to your store.
Alternative options and more information at:
Managing WooCommerce.com subscriptions.

Setup and Configuration
↑ Back to topAfter activating Account Funds, you’ll need to start creating your Cashback and Milestone rewards so that your customers can start receiving their funds based on meeting specific conditions. For example, you can create a cashback that will award your customers with a fixed amount of funds every time they purchase an order, or a milestone that will give them a “reward” after specific triggers happen.
Let’s go through the different options you can go through:
Cashback rewards
↑ Back to topCashback is primarily used to offer account funds to your customers based on order and product-related triggers. More specifically, the available triggers currently are:
- Order paid
- Product purchase
We’ll go through those in detail in a bit. For now, to get started, navigate to the Accounts Funds > Cashback page. From there, click on the Add new cashback reward on the top of the page.
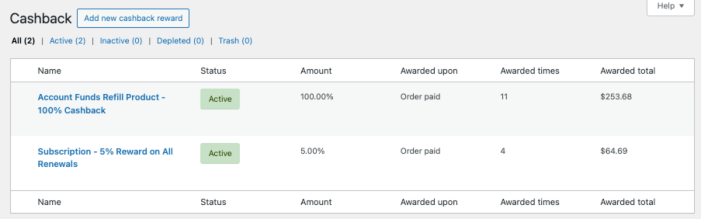
On the next page, you’ll find the configuration screen for new cashback rewards:
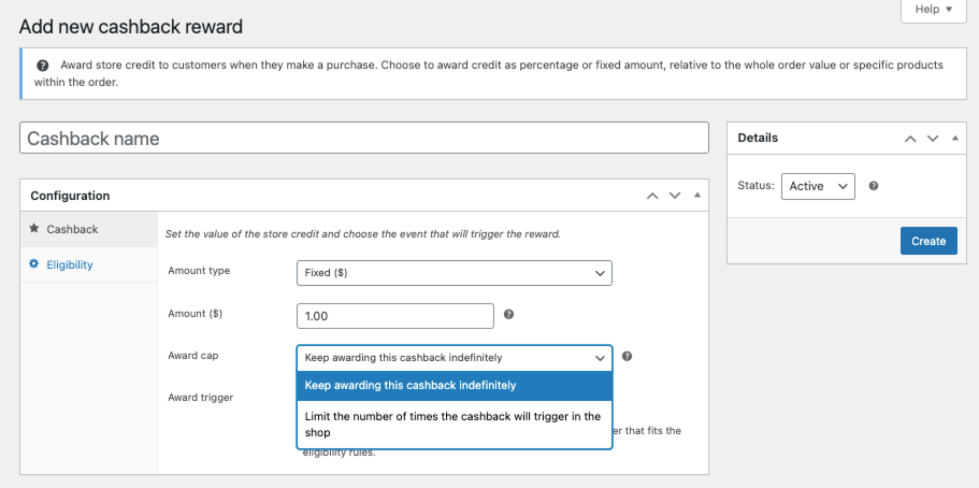
- Amount type – this is the type that the cashback will be awarded as. Currently, there are two options available:
- Fixed – to award a fixed amount as a cashback.
- Percentage – to award a percentage of the order’s value as cashback.
- Amount – the amount of the cashback, either as a percentage or fixed. The amount will be attributed to the whole order or to each product in the order, depending on the chosen award trigger (see below).
- Award cap – the limit of how many times this cashback will be awarded. The options available currently are:
- Keep awarding this cashback indefinitely – if you want this cashback to be awarded to customers as long as it’s active.
- Limit the number of times the cashback will trigger in the shop – if you want to set a limit on the number of times a cashback will be awarded to customers.
Once the limit is reached, the cashback will no longer trigger until you raise this limit or set it to indefinite.
- Award trigger – what triggers the cashback to be awarded to your customers. The options available currently are:
- Order paid – it allows you to set the Eligibility rules based on order-specific information.
Cashback will be awarded when a customer pays for an order that meets the criteria, calculated on the order’s total. - Product purchase – it allows you to set the Eligibility rules based on product-specific information.
Cashback will be awarded when a customer pays for an order, calculated for each product in the order that meets the criteria.
- Order paid – it allows you to set the Eligibility rules based on order-specific information.
Now, based on the Award trigger setting, the Eligibility rules will differ.
If the trigger is set as Order paid:
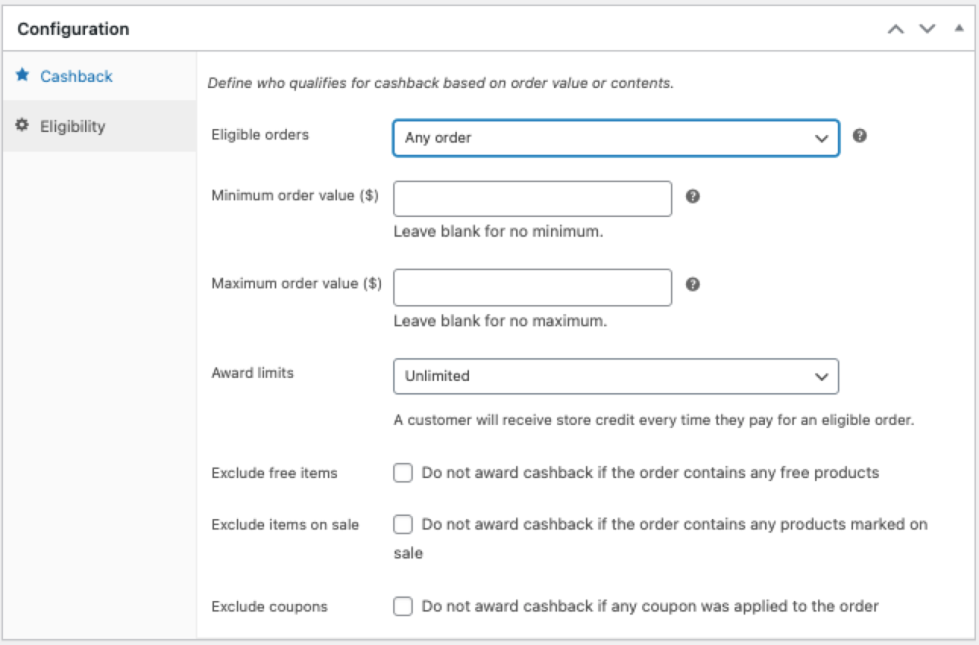
- Eligible orders – this is where you can set more specific conditions for when the customer pays for an order and the cashback is awarded. The available options are:
- Any order – no limitations on which orders are eligible. For example, if your cashback is 10%, any paid order will award 10% of its value in store credit.
- Order contains (or does not contain) specific products – based on which option you choose, you can set which products need to be included (or not) in the order for it to be eligible for a cashback.
- Order contains (or does not contain) product categories – similarly, you can choose if only products from specific categories should be contained (or not) within an order to be eligible for the cashback.
- Order contains (or does not contain) product types – set specific product types to be eligible (or not) for a cashback.
- Minimum order value – set a minimum order value that a customer needs to meet before they’re eligible for cashback. Leaving this field blank means there’s no minimum.
- Maximum order value – set a maximum order value that a customer can’t surpass to stay eligible for the cashback. Leaving this field blank means there’s no maximum.
- Award limits – set if a customer is eligible for unlimited cashbacks or only one.
- Exclude free items – enable to prevent cashback being awarded if a free product is included in the order.
- Exclude items on sale – enable to prevent cashback being awarded if an item on sale is included in the order.
- Exclude coupons – enable to prevent cashback from being awarded if a coupon has been used during checkout.
If the trigger is set as Product purchased:
- Eligible products – this is where you can set which products in a paid order will award cashback. The available options are:
- All products – each product in the order will award cashback. For example, if your cashback is set to 10%, each product in the order will award 10% of its price value in store credit.
- Some products – only the chosen products in a paid order will award the cashback.
- Some product categories – only products belonging to the chosen product categories will award the cashback.
- Award limits – defines how many times each customer can benefit from the cashback awarded from a paid order.
- Unlimited – the store credit will be awarded to a customer for each of their orders that meet the other product criteria.
- Once per customer – the customer will only be awarded with store credit the first time they submit an order that meets the eligibility criteria.
- Once per product – each product in any order will only award store credit the first time it is purchased by the customer.
- Product quantity – adjusts how product quantity affects cashback by either disregarding it (cashback is awarded one time per eligible product in the order, regardless of the quantity purchased) or by multiplying the cashback value for the purchased quantity.
After you have set up your first cashback, click on the Create button on the right side of the page. Make sure you also set the cashback as Active if you want it to take effect immediately:
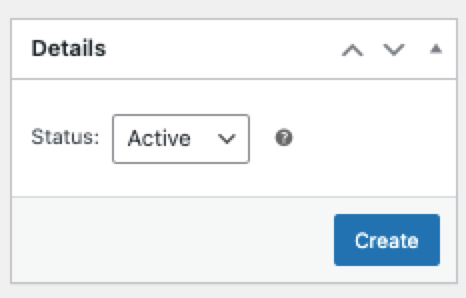
If you later change the status of a store credit reward from Active to Inactive, it will no longer be awarded to customers who meet the eligibility criteria until it’s set to Active again.
If you set an award cap to the store credit reward, and the cap is reached, the status will change to Depleted, which will count as Inactive for availability purposes. The Depleted status can only be changed if you remove or increase the cap.
For advanced cashback configurations and use cases, see the WooCommerce Cashback Rewards Guide.
Milestone rewards
↑ Back to topMilestone rewards are store credit rewards that can trigger when a customer performs certain actions in your WooCommerce store. These are:
- Customer account registration
- Product review
Like for cashback, you can browse, add, or edit milestone rewards by navigating to the Accounts Funds > Milestones page. From here, click on the Add new milestone reward at the top of the page.

On the next page, you’ll find the configuration screen for the new milestone reward:
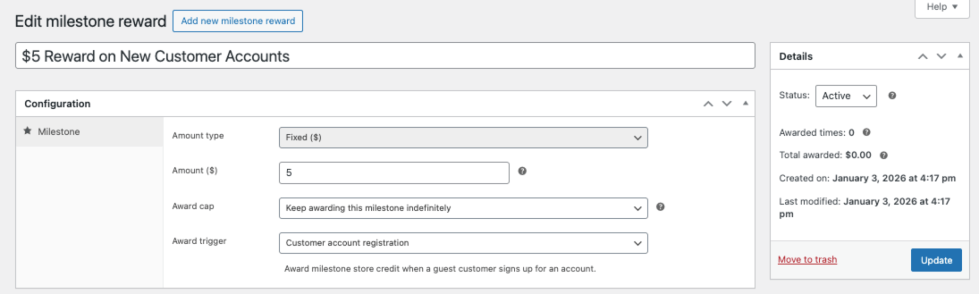
- Amount type – since the milestones aren’t tied to a monetary amount to calculate a percentage from, the amount type is limited to Fixed for milestones, unlike cashback rewards.
- Amount – the amount of store credit the customer will receive when they meet the eligibility criteria.
- Award cap – like for cashback reward, you can limit the number of times the reward will trigger among all customers.
- Award trigger – what triggers the store credit to be awarded to your customers. The options available currently are:
- Customer account registration – this trigger has no eligibility criteria other than a guest customer signing up for an account and registering on your site.
- Product review – this milestone reward will trigger when the customer submits a review for a product.
If you selected Product review, the following Eligibility rules are available:
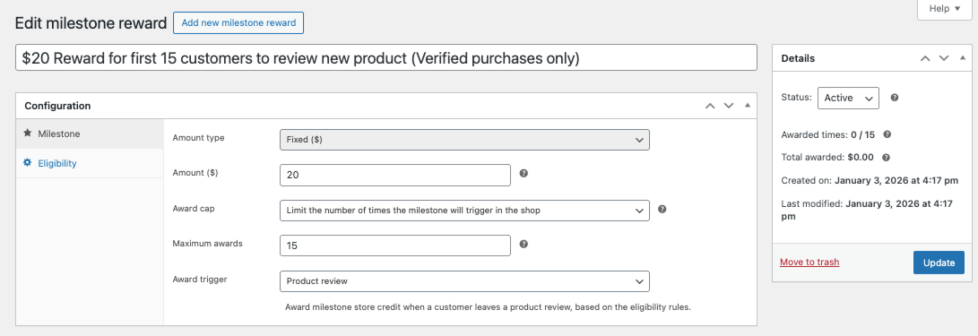
- Eligible products – this is where you can narrow down which products should award to customers with store credit when being reviewed. Choose Any products to make all products eligible, or narrow down by Specific products or Products within specific categories.
- Award limits – defines how many times each customer can benefit from the store credit awarded for reviewing an eligible product:
- Once per product – customers will receive the reward only the first time they review an eligible product. To receive the store credit reward again, they need to review a different eligible product.
- Once per customer – customers will receive the reward only the first time they review any eligible product.
- Unlimited – customers will receive the reward every time they submit a review for a product, including multiple reviews for the same product, if allowed in your WooCommerce store.
- Verified purchase required – enable to award store credit only to customers who review an eligible product they purchased. When disabled, any customer who reviews an eligible product will be rewarded.
Like for Cashback rewards, save your milestone reward before leaving this screen and make sure its Status is set to Active to make it available to customers.
Reward expiration
↑ Back to topFor both cashback and milestone rewards you can configure an optional store credit expiration: this is a date when any corresponding awarded store credit will expire and become unavailable to customers.
This date could be a period relative to the time when the store credit was awarded by the configured reward:
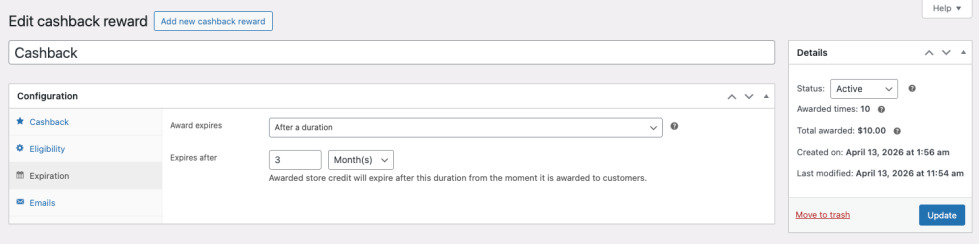
Or it could be a fixed date in the future:

In the case of a fixed date, once the date becomes past, the reward will be automatically depleted since it couldn’t be awarded anymore without causing the store credit to automatically expire.
Only the portion of the total store credit awarded by the configured reward will expire: customers will still be able to use and preserve the remainder of their store credit as normal. An optional email can be configured to remind them of any store credit about to expire from their account.
Ledger
↑ Back to topAll transactions related to store credit managed by Account Funds can be browsed in the Account Funds > Wallets screen:

Individual transactions can be inspected, and several filters are available also to browse the wallets of individual customers.
Settings
↑ Back to topTo change any global settings for the plugin, navigate to the Account funds > Settings screen:
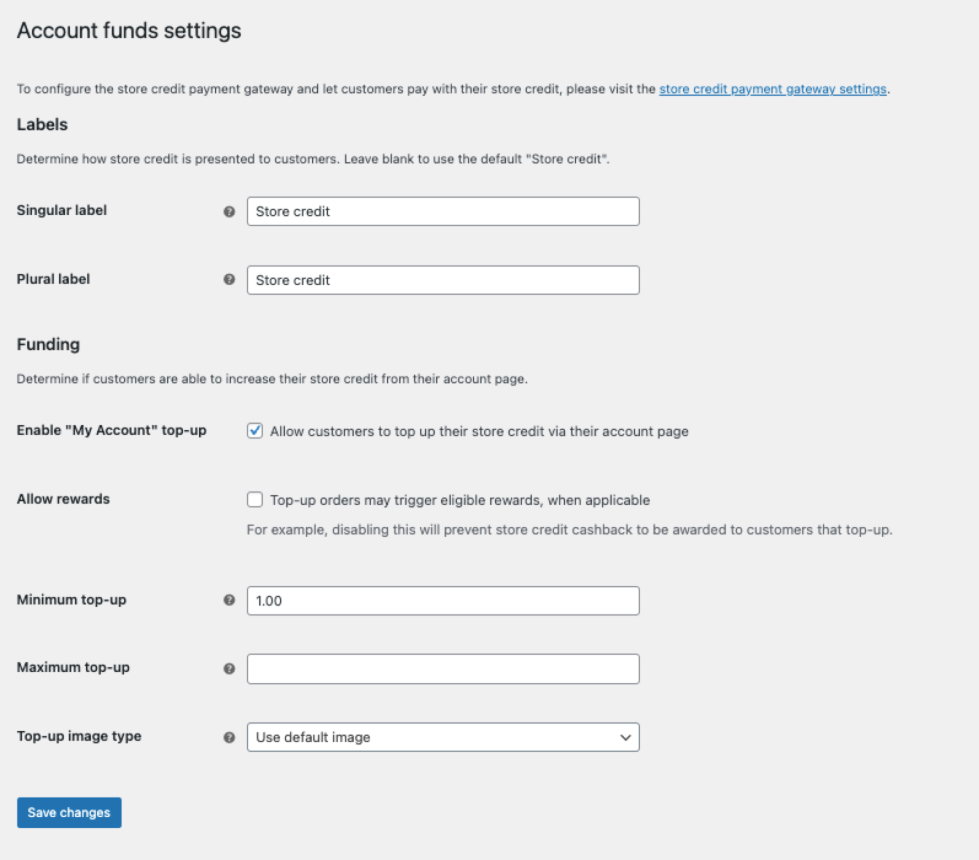
- Labels – this setting will let you change how the phrase Store credit is presented to customers whenever it is mentioned in the frontend. For example, you can change it to “Account funds”, or “Store points”. You can define these in their singular and plural forms.
- Funding – these options let you decide if customers are allowed to increase their store credit manually, rather than just being awarded with it.
- Enable “My Account” top-up – enabling this setting will allow customers to purchase store credit directly from their account page.
- Allow rewards – while this setting is disabled, orders that contain a store credit top-up will be excluded from rewards (for example, an order-based cashback).
- Minimum top-up – this indicates the minimum spend customers have to make when purchasing store credit via top-up, each time. Leave this field blank for no minimum.
- Maximum top-up – this indicates the maximum spend customers can make when purchasing store credit via top-up, each time. Leave this field blank for no maximum.
- Top-up image – since top-up is not really a product in your store, it has no associated image. By default, it will use a predefined image when added to the cart. You can customize the image using this setting.
Gateway
↑ Back to topTo let customers pay with their store credit, a special gateway is include in the plugin. This gateway should stay enabled so that customers can pay for orders using store credit.
To adjust the Store credit gateway settings, navigate to WooCommerce > Settings > Payments and click on Store credit > Manage.
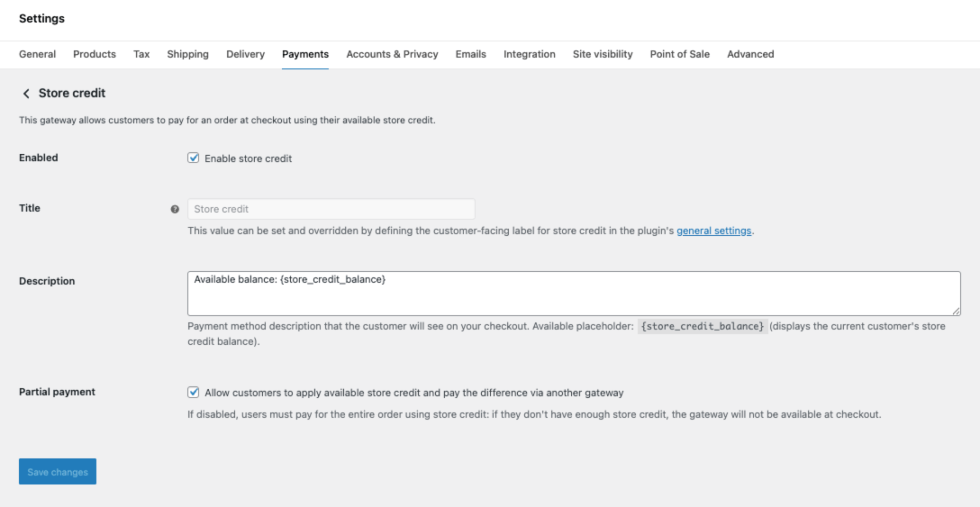
The following settings are available.
- Enabled – disabling this will prevent customers from paying for their orders with store credit. It will not disable rewards from being awarded (if any reward is active) or prevent customers from purchasing store credit as per the plugin’s settings.
- Title – unlike other gateways, this setting cannot be edited directly from this screen. That’s because the label defined in the plugin’s settings will take over instead.
- Description – like with other gateways, you can set a description that will be shown to customers at checkout. Use the {store_credit_balance} placeholder to display the available store credit in the customer’s account funds.
- Partial payment – enable customers to split the payment between store credit and another payment method if their funds are insufficient to cover the whole order.
Leaving this option disabled means customers can only use store credit if their available store credit in their account is at least the order’s total.
For detailed information on configuring partial payments, see the WooCommerce Partial Payment Guide.
Store credit products
↑ Back to topAnother way for customers to increase their store credit, other than top-up from their My Account page, is to purchase Store credit products with predefined value that will be added to their account funds when purchased.
To set up a product like that, you can click on Products > Add new product and choose Store credit as the product type. The store credit the customer will receive will be equal to the Regular price of this product when purchased. If the product has a Sale price, the customers will pay the sale price but still receive store credit equal to its Regular price.
Store credit products follow all other configuration criteria as other products. For example, if you have configured cashback rewards, they may be eligible for additional store credit rewards, depending on your eligibility criteria.
For use cases like prepaid wallets, B2B accounts, and gift card alternatives, see Selling Store Credit Products.
Refunds
↑ Back to topOrders paid with store credit can be refunded like any other order in WooCommerce. Additionally, orders paid with a different payment method or gateway can be refunded to a customer’s account via store credit.
A button will appear to use this refund option when refunding an order:
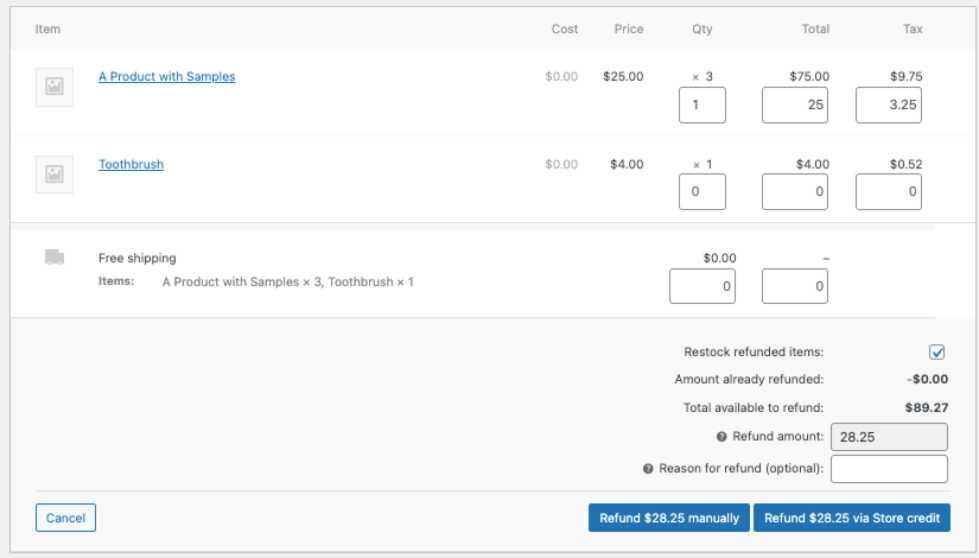
Refunding to store credit keeps revenue in your ecosystem while giving customers instant resolution—no waiting 3-10 days for payment processor refunds. For best practices and workflows, see WooCommerce Refund to Store Credit.
Managing Customer Balances
↑ Back to topView all customer balances from Users > All Users, which includes a Store Credit column. To adjust an individual customer’s balance, edit their user profile and scroll to the Store Credit section.
For detailed admin workflows including bulk adjustments and transaction history, see Managing Customer Balances.
Displaying Balances with Shortcodes
↑ Back to topDisplay customer store credit balances anywhere on your site using the [store_credit_balance] shortcode. This is useful for showing balances in headers, sidebars, or custom pages.
For parameters, examples, and page builder integration, see the Shortcodes Reference.
Reports
↑ Back to topAccount Funds include reports that show the admin how many deposits have been made and the total funds. To view reports, go to WooCommerce > Reports > Deposits.
FAQ
↑ Back to topWho can use Account Funds?
↑ Back to topOnly registered and logged-in members are able to use their awarded store credit to pay for an order.
Can I rename the payment method on the checkout page?
↑ Back to topYes!
- Go to Account Funds > Settings.
- Change the Singular Label and the Plural Label.
- Save.
Where can I see my members’ account funds?
↑ Back to topGo to the Users page (Users > All Users) and view a column for Store credit for every member of your store.
Can I add/deduct store credit from a member account?
↑ Back to topYes, you can manually add or deduct store credit from a user. To do that, go to Users > All Users and search for a member to edit. Click Edit, and scroll down to the Store credit section to a textbox with the member’s current store credit and adjust. Select Update Profile to save.
Can I set sale prices for the store credit products?
↑ Back to topYes, you definitely can! Your clients will receive the regular price as funds in their accounts.
Can I set subscription plans to get recurring funds?
↑ Back to topYou can create deposit products and establish plans for your customers to fund their accounts.
Can store credit expire?
↑ Back to topYes. When configuring rewards, you can set expiration periods. Credit expires based on when it was earned, not when the reward was created.
Is there an API?
↑ Back to topAccount Funds extends the WooCommerce REST API to include customer balances. Account Funds interacts with the WooCommerce Store API for handling the Cart and Checkout blocks.
Questions and Feedback
↑ Back to topDo you have a question before you buy or need help using Account Funds? Then you can reach out to our team, and we’d be happy to assist you.