Boson Web3 Commerce for WooCommerce empowers creators and brands to sell physical products as NFTs directly on your WooCommerce website. With our no-code plug-in, you can easily elevate your website by enabling commit and redemption functionality for your Redeemable NFTs. In just a few clicks, streamline the process and enhance your e-commerce experience.
The extension will:
- Keep in sync your Boson products, registered under your Boson seller account with WooCommerce products.
- Customers can commit to your Boson products directly from your website.
- Track redemptions as WooCommerce orders, offering you relevant information like the customer’s wallet address and the Boson Protocol Offer ID.
- Track the raised disputes within the relevant order and also notify you about updates.
Requirements
- A Boson seller account.
- A Web3 Client – Currently supported are MetaMask, WalletConnect, Coinbase and Magic Link.
- An SSL certificate. More info on how to get a free or low-cost SSL at SSL and HTTPS. Note: If the extension is already installed and you are trying to update it, you will be asked to confirm if you want to replace the installed version with the new one found in the uploaded .zip file. In that case, proceed.
- The GMP PHP Extension. Depending on your hosting provider they may enable it for you if not already available.
- Your store must be using at minimum: PHP 7.3, WordPress 6.0, and WooCommerce 7.4.
Installation
↑ Back to top- Download the .zip file from your WooCommerce.com account.
- Go to: WordPress Admin > Plugins > Add New to upload the file you downloaded with Choose File.
- Activate the extension.
More information available on Installing and Managing Plugins.
Boson Web3 Commerce for WooCommerce Account Setup
↑ Back to top- Go to: WooCommerce > Boson Web3 Commerce for WooCommerce.
- Select Connect Account if you already have a Boson seller account, otherwise, click on Create Account to create one.
- Select a Web3 Client and connect your wallet. You should already have a Boson seller account under the same wallet address.
- You’ll see the wallet address, and the plugin will check the validity of your seller account with the Boson Protocol on-chain. Click “proceed” if the displayed wallet address is as expected, or connect a different wallet and repeat the above step.
- Clicking Proceed will prompt you to sign a message through your Web3 client. This message will be used to secure the integration of the Boson Redemption Widget in the particular domain of your website.
- Once your connected wallet address is identified as a registered Boson seller, the extension is ready for usage!
Configuration
↑ Back to topBelow are the different options you can customize for the Boson Web3 Commerce for WooCommerce extension:
Commit Functionality
↑ Back to topWhen the commit functionality is enabled, your customers will be able to commit to your Boson products directly on your website. The extension offers multiple ways of rendering the commit button for each one of your synced products.
The extension offers an option to create a very basic commit page by clicking the “Create Commit Page” button, which you can customize as needed.
The extension provides two blocks to render the commit buttons:
- Boson Products: This block renders a grid replicating WooCommerce’s native Shop grid but displays only the Boson products. The commit button will replace the Add to Cart button. The style of the commit button can be customized in the extension’s commit settings section.
- Boson Commit Button: This block renders a customizable commit button for a specific Boson product, which can be placed anywhere on the site. When the user clicks on the button, the commit widget appears in a modal window.
Alternatively, the extension offers two shortcodes as a fallback in case your active theme doesn’t support blocks:
- [boson_products paginate=”TRUE_OR_FALSE”]: This shortcode renders the grid with the Boson products, with pagination enabled by default.
- [boson_commit_button]: This shortcode renders the embedded widget directly on the page. The shortcode accepts the following attributes, with only one needing to be specified:
- product_id: The ID of the WooCommerce’s product synced to the Boson product that will be committed.
- product_uuid: The Boson product’s UUID attribute.
- bundle_uuid: The Boson product’s Bundle UUID attribute.
The global style of the commit buttons can be customized in the extension’s commit settings section.
Additionally, the style of the Commit button block can be set for each instance of the block.
In addition to the Boson products template, the extension allows you to render Boson products alongside other WooCommerce products on the Shop page of your website.
The commit button can be disabled on the grid templates (Boson Products grid and WooCommerce’s Shop page). If the commit button is set to be displayed only on the Single product pages, a “Read More” button will appear on the grid templates. This button will direct customers to the Single product page where the commit button is rendered. The “Read More” text can be customized using the filter woocommerce_product_add_to_cart_text.
Non-committable products can be hidden from the grid templates. This means that voided offers and expired offers will not be displayed in the grid templates.
Redemption Page
↑ Back to topThe page that is configured as the redemption page. This is the page that should include the block (or shortcode) offered by the extension for rendering the Boson Redemption Widget. Your customers will be able to connect their wallet and redeem their rNFTs through that page or even raise disputes for their already redeemed rNFTs. The extension offers an option to create a very basic redemption page for you by clicking the “Create Redemption Page” button, which you will be able to customize if you wish to. The extension offers two blocks to render the redemption widget:
- Boson Button Widget: This block renders a button that can be customized to follow the same style lines from your website. When the user clicks on the button, the redemption widget is rendered in a modal window.
- Boson Widget: this block embeds the redemption widget directly on the page.
Alternatively, the extension also offers two shortcodes as a fallback in case your active theme doesn’t support blocks:
- [boson_button text=”TEXT_TO_BE_RENDERED_IN_THE_BUTTON”]: This shortcode renders the redemption button, with the default rendered text being “Redeem”.
- [boson_widget]: This shortcode renders the embedded widget directly on the page.
Shipping Method for Boson Orders
↑ Back to topSelect the shipping method that will be used for ALL Boson Orders. The shipping method, regardless of its registered cost, will be attached to the order at 0 cost for the customer. Third party integration with shipping (if applicable), will be able to pick up the registered shipping method from each boson order.
Debug Mode
↑ Back to topWhen enabled, the extension will keep extensive logs of actions being performed in WooCommerce > Status > Logs
Customer Commit Flow
↑ Back to top- Visit the single product page, the grid page or any page with a commit button block.
- Customers need to connect their wallet to commit to the product.
- The customer completes the commit
- At this point the commit is done. The customer can visit the Redemption page to complete the redemption process.
Customer Redemption Flow
↑ Back to top- Customers visit the page you have configured as the Redemption page.
- Customers need to connect their wallet, with which they own the rNFT they would like to redeem.
- Customers will see their wallet connected and click on “Next”
- Customers will be able to select from a list of rNFTs that are redeemable from your store and click the Redeem button.
- Customers will provide their shipping details, which will be verified by your WooCommerce store in order to determine if your store ships to the requested address.
- Customers will confirm the provided Delivery Information by clicking the “Confirm delivery information” button.
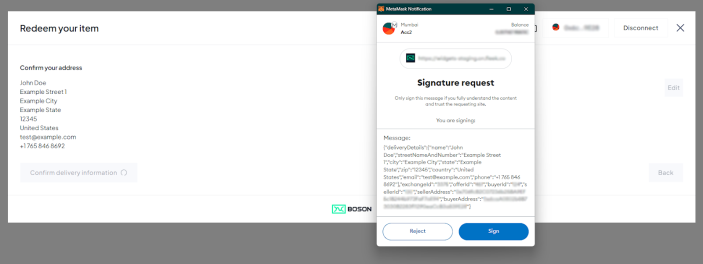
- Customers will sign the message containing the Delivery Information. The extension verifies that the customers have provided all the required information and the signature is verified to prove their authentication. At this point, the extension creates a pending order, even if the customer exits the flow before burning the rNFT. The Delivery Information is updated on future attempts, ensuring that the order is up-to-date with the latest Delivery Info provided by the customers.

- Customers will be asked to sign the redeem transaction that is submitted to the Boson Protocol on-chain.
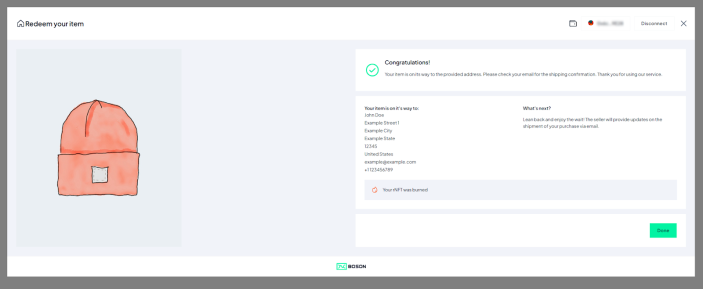
- The customer’s rNFT will get burned. When the transaction is confirmed the extension validates against the blockchain, if everything is confirmed the order is moved to the next status and is ready to be shipped.

- The Orders in the backend are easily identifiable by the visible Boson Badge right next to them.
- The order in the backend contains some detailed information about the redemption.
Customer Dispute Flow
↑ Back to top- The customer visits the page you have configured as the Redemption page.
- Customer needs to connect their wallet, with which they have redeemed the rNFT they would like to dispute.
- Customer will see their wallet connected and click on “Next”.
- Customers will be able to select from a list of rNFTs that have already been redeemed from your store and click the Dispute button.
- The customer will be redirected to the Disputes Resolution Center. He will follow the resolution’s center steps after connecting his wallet.
- The disputed orders are easily identifiable by the disputed badge that appears when listing orders.
- The Disputed date and all the Dispute state changes will be tracked within the order’s information.
Frequently Asked Questions
↑ Back to topHow does the extension detect Offers and Exchanges to register them in WooCommerce?
↑ Back to topThe extension registers 2 scheduled actions that are executed in the background every 30 minutes.
boson_protocol_sync_products – This action will check for new offers in Boson Protocol and will sync them with Products. It is also responsible for turning a product’s visibility to draft if the offer has expired and it’s not valid anymore. For every product that is about to be created a new action will be created in order to sync product images. As a result, it is normal that products are created without images for some minutes. After the action, that is responsible for downloading the product images, is completed, the product will have its images appearing as well.
After the products have been created you can easily distinguish them by the Boson badge right next to them or through the Boson filter.
boson_protocol_sync_exchanges – This action will check for new exchanges in Boson protocol and will sync them with Orders. It is responsible for verifying that an existing pending order in your WooCommerce database is also present in the Blockchain with the correct data and then updating its status to processing. Will be checking for possible news or updates in disputes and update the relevant order data to reflect that. If an exchange is detected in the blockchain that can’t be mapped to an existing WooCommerce order it will display a notification to warn you.
Why do I have pending Boson orders?
↑ Back to topA pending order is created after an rNFT owner has signed for their rNFT to be burned and redeemed with an actual product in your store. At that point in time the owner of the rNFT may abandon your site or the process in general. That is normal since the rNFT burn process may take in some cases more time than usual. The pending order will turn to processing after the transaction is confirmed by the boson_protocol_sync_exchanges background action (see question/answer above). If the order remains pending, that means that the transaction cannot be verified in the blockchain.
