Google Automated Discounts for WooCommerce is an essential plugin for enhancing your Google Shopping campaigns by automatically applying discounts. This tool optimizes your product pricing in Shopping ads, helping to increase sales and maximize revenue. By integrating this plugin, you can seamlessly manage discounts within your WooCommerce store, ensuring a smooth shopping experience for your customers.
To get started with Google Automated Discounts, follow our straightforward 3-step setup guide. By following these steps, you can effectively implement automated discounts, optimizing your campaigns for better performance and profitability.
New: The requirement to have at least 1,000 clicks per week on your Google Shopping campaigns was lifted in the summer of 2024. Now any shop can participate.
3-step Setup Guide
↑ Volver al principioYou have a full 45 days to try the plugin for free. Start with a 14-day free trial, then purchase a monthly or annual subscription with a 30-day money-back guarantee. Or, if you skip the trial, you’ll still have 30 days to decide with a full refund option. Our dedicated support team is always on standby to help. Our support policy is to reply within 24 hours during business days. Our response average is 3 hours. We are proud of our 4.9 rating in over 300 reviews on wordpress.org.
Step 1: Install & configure plugin
↑ Volver al principioThis step fulfills Google’s technical requirements
Install plugin
- Go to the pricing section
- Choose your currency.
- Select “annual” (best deal).
- Select “Buy now” or select “Start your 14-day FREE trial”.
Configure plugin
- Exclude cache.
- Optionally activate: Discount inheritance variants; Conversion push banner; Google Ads reporting.
Step 2: Install technical connection to Google
↑ Volver al principioThis step fulfills Google’s business requirements
Report cart data
- Enable conversion reporting to Google Ads with enhanced cart data with a plugin.
- We recommend Pixel Manager (and improve conversion tracking at the same time) or Google Tag Manager by Thomas Geiger
Feed COGS
- Include Cost of Goods Sold (COGS) data to your Google Merchant Centre. We recommend using a plugin and recommend WooCommerce Cost of Goods by SkyVerge or Cost of Goods Sold by WPFactory .
- Add COGS values manually or in bulk.
Feed Minimum price
- Our plugin creates an additional product field: minimum price. Include minimum price data to your Google Merchant Centre. We recommend suing a plugin and recommend: Google Product Feed for WooCommerce by Ademti or WooCommerce Google Feed Manager By WP Marketing Robot .
- Add minimum price values (manual or by automatic calculation).
Step 3: Activate, test and monitor
↑ Volver al principioActivate
Activate Automated Discounts in GMC.
Testing
Follow Google’s testing procedures and test links generated by the plugin.
Production
Monitor reports in the Merchant Centre Ad COGS and minimum prices for new products in your shop.
Business Requirements
↑ Volver al principioBefore starting to use the Google Automated Discounts plugin, you must make sure to meet the following business and technical requirements:
- Conversion reporting must contain cart data. You can achieve this by using the Pixel Manager for WooCommerce. Here’s how to set it up: Guide to set up Conversion Cart Data.
- The Google Merchant Center feed needs to contain the
cost_of_goods_soldfield for each product. - The Google Merchant Center feed needs to contain the
auto_pricing_min_pricefield for each product that you want to activate for Automated Discounts (products missing that field will be ignored by Automated Discounts). This plugin provides a feature with which you can set manually or calculate Auto Pricing Min Prices on each product. Those prices then can be ingested by a feed plugin and uploaded to the Google Merchant Center.
IMPORTANT
If your shop operates outside of the USA or Canada Google Merchant Center requires you to upload the prices including the VAT (source). This means that the auto_pricing_min_price field must include the VAT.
For the cost_of_goods_sold a different rule applies. The cost_of_goods_sold must be the cost of the product without the VAT. Because the profit margin is calculated using the product price field from the cart data which should not include the VAT as per Google’s specification: Set up Conversions with Cart Data
For businesses that have yet to meet the necessary requirements, the transition can be a complicated and time-consuming endeavor, often necessitating significant strategic decisions.
At SweetCode, our team of seasoned professionals specializes in guiding businesses through this comprehensive process. If you are interested in engaging our services to help you not only achieve these requirements but also excel beyond them, please contact us through our support form.
Technical Requirements
↑ Volver al principioOur plugin, the Google Automated Discounts Plugin for WooCommerce, meets all of Google’s requirements for processing Automated Discounts.
- Product ID validation.
- Currency validation.
- Merchant center ID validation.
- Expiry validation.
- Cryptographic token signature validation.
- Keeps the discounted price for a specific product visible during the entire visitor session on every page of the shop.
- If a visitor adds a discounted product to the cart, the plugin keeps the discounted price during the regular WooCommerce 48 hours cart session.
Configuration
↑ Volver al principioCache Exclusion for Automated Discounts
↑ Volver al principioTHIS IS IMPORTANT
You need to make sure that all cache layers exclude caching if the following parameters are set. Otherwise, Automated Discounts will not be displayed and processed correctly.
Make sure to exclude caching if the URL query parameter pv2 is present in the URL.
Example: https://example.com/socks/?pv2=1234
Typically, caches exist in one or more of the following:
- Server of your hosting provider
- Caching plugins (sometimes shop managers use more than one caching plugin. Make sure to configure all of them.)
- Content Delivery Networks (CDNs) like Cloudflare.
Once you’ve set the cache exclusion, also make sure to flush the cache(s) before testing.
Exclude caching if the the session cookie sgadwc_session_active is present
↑ Volver al principioThe plugin sets a cookie sgadwc_session_active when a visitor clicks on an Automated Discounts link.
Make sure that the cache is disabled if that cookie is present in the browser of the visitor.
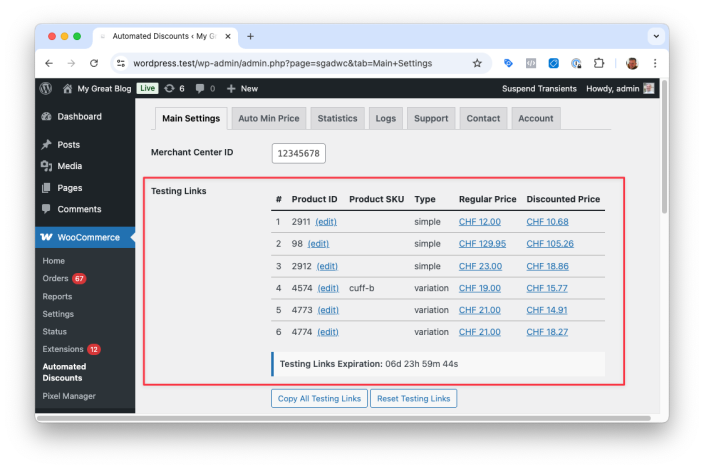
Test your cache exclusion
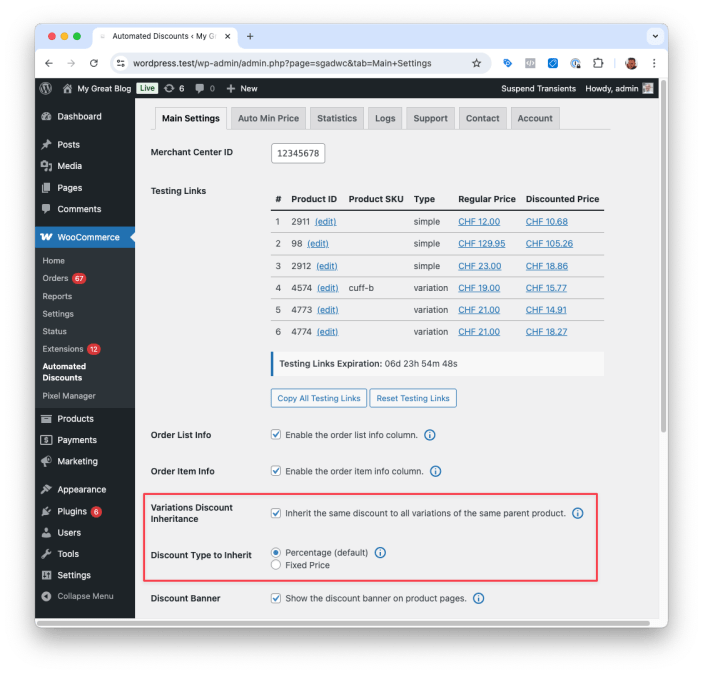
- Go to the plugin settings page. You will find testing links.
CAUTION
– The testing links expire within 7 days.
– The test only works with valid (not expired) testing links.
– In case you need new testing links, simply press the Reset Testing Links button.
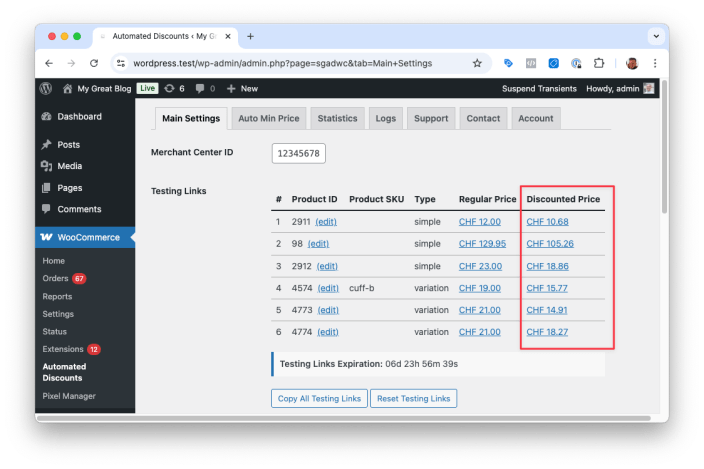
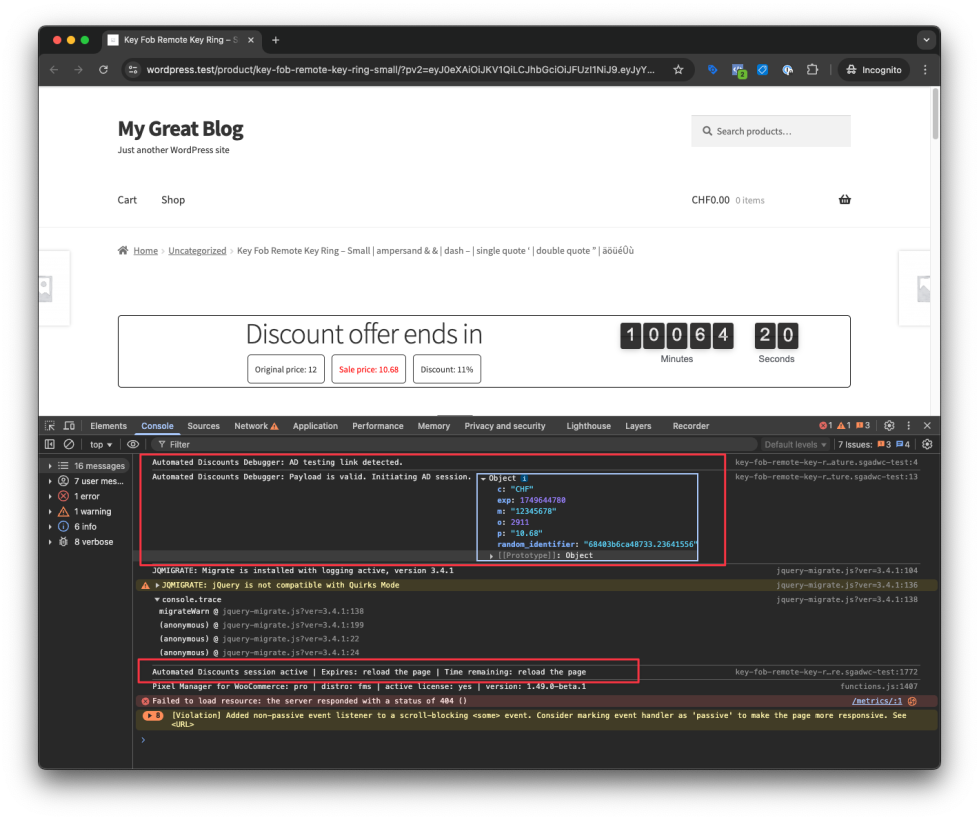
- Right click on one of the testing links in the second column of the table and open the link in an incognito window. The link contains an Automated Discounts payload. If everything has bee set up correctly, it will start a new WooCommerce session and display the discounted price.
- Open the developer tools of your browser and go to the Console tab.
- Check if the following text is present in the console:
Automated Discounts session active
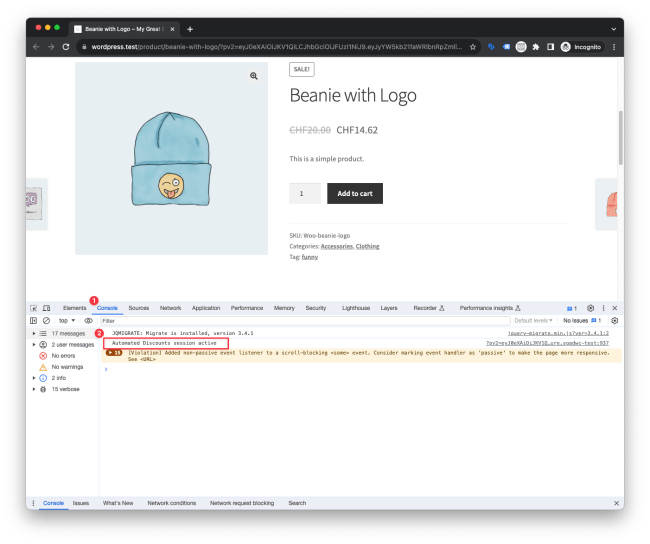
If you see the text Automated Discounts session active in the console, it means that the cache exclusion works correctly.
If you don’t see the text Automated Discounts session active in the console, it means that the cache exclusion does not work correctly, or that your testing link has expired.
Our plugin will output debug messages in the console with more information about why the session could not be started. If you don’t see any debug messages, it means that the cache exclusion is not working correctly.
Cache Exclusion for WooCommerce Sessions
↑ Volver al principioMake sure to follow WooCommerce’s guidelines on how to exclude caching for WooCommerce sessions.
If the cache exclusion for WooCommerce sessions is not set correctly, the Automated Discounts program will not approve your shop for the program.
Cart session must be valid for at least 48 hours after a click on an Automated Discounts link.
Google Merchant Center ID
↑ Volver al principio- Get the Google Merchant Center ID by logging into the Google Merchant Center and copying the ID from the URL.
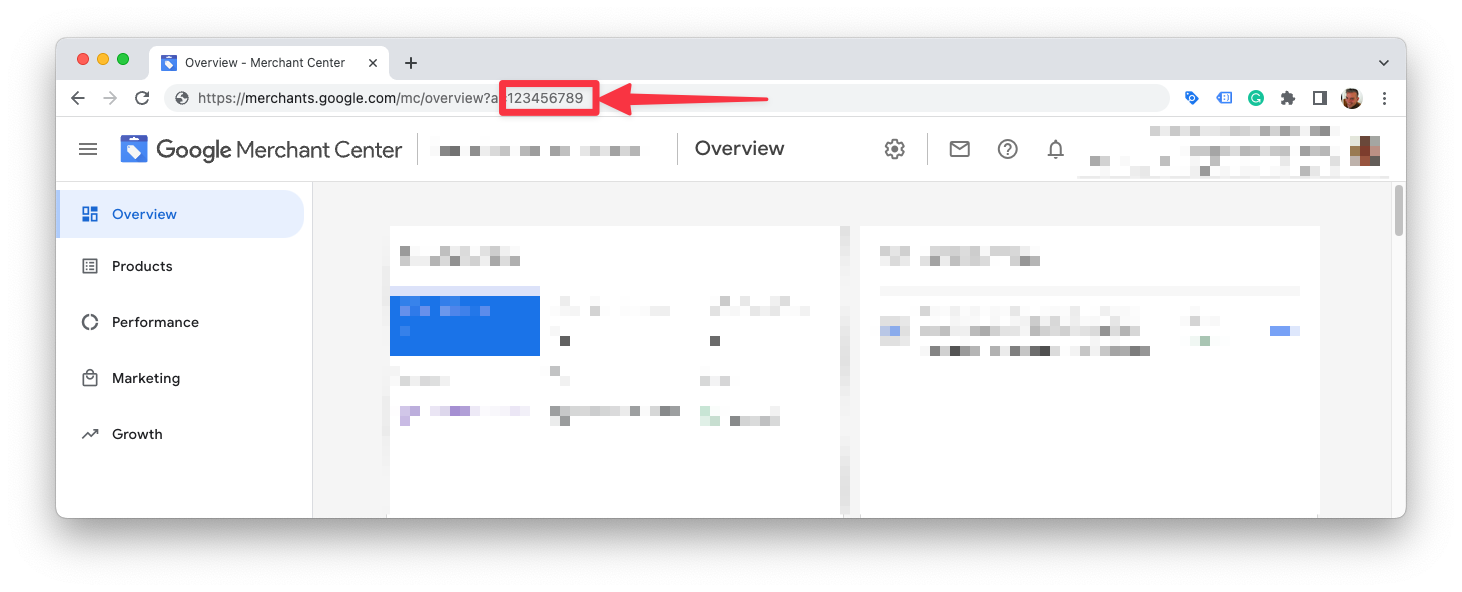
- Save the Google Merchant Center ID in the settings of the plugin.

Order Info
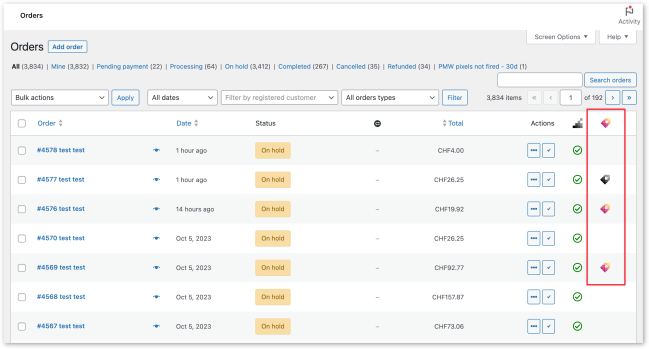
↑ Volver al principioThe plugin will add a column to the order list and a column to the order item page in the WooCommerce backend. The columns will show if an order has been placed with an Automated Discount and how much the discount was.
Order List Info
The plugin will add a column to the order list in the WooCommerce backend. The column will show if an order has been placed with an Automated Discount.
- Badge in color: The order contains items that have been discounted with Automated Discounts.
- Badge in gray: The order was created during an Automated Discounts session, but no order items have been discounted with Automated Discounts. That’s when a visitor clicks on an Automated Discounts link in Google Shopping ads, but doesn’t purchase any of the discounted products.
Order Item Info
The plugin will add a meta box to the order item page in the WooCommerce backend. The meta box will show if an order has been placed with an Automated Discount and how much the discount was.

Variations Discount Inheritance
↑ Volver al principioIf you have variable products with variations that have the same or similar prices, you may want to use the Variations Discount Inheritance feature.
An Automated Discount is only generated for specific product IDs in the Google Merchant Center feed, not for groups of products (such as product variations of the same parent product). If a visitor clicks on an Automated Discount ad for a specific product variation of a variable product, the discount will only be applied to that specific product variation.
Without the Variations Discount Inheritance feature, discounts on a product page will be lost when switching from one variation to another. With the Variations Discount Inheritance feature enabled, the new variation will inherit the discount.
The feature is disabled by default. You can enable it in the plugin settings.
Use cases
For example, if you sell shoes in different sizes and colors, the shop visitors might click on an Automated Discount ad with a shoe color they like but get directed to the wrong shoe size. Once they are on the product page for that shoe, they will likely change the size. But they will lose the discount as it was only valid for the first variant. Enabling the Variations Discount Inheritance feature will ensure the new variation inherits the discount.
However, using Variations Discount Inheritance doesn’t make sense in every case. If your variations have very different prices and/or product margins, inheriting the same discount for all variations may cause issues. This could be true if you are using variable products to sell new and used versions of the same product.
Inheritance Logic
- Only for variable products: The Variations Discount Inheritance feature only works with variable products. It is not available for simple or other products.
- Only inherit within the same product: The Variations Discount Inheritance feature only inherits discounts to other variations of the same parent product.
- Automated Discount clicks trigger inheritance: Once a visitor clicks on an ad with an Automated Discount for a product variation, the discount will be inherited to all other variations of the same parent product.
- Automated Discount clicks override inherited discounts: If a visitor clicks on a second ad with an Automated Discount for another variation of the same parent product, the previously inherited discount on the second variation will be overwritten with the new discount.
- The highest discount is inherited: If the discount for the second ad click is higher than the discount for the first ad click, the higher discount will be inherited to all other variations of the same product (except the variations that are in a specific Automated Discounts session).
- The lowest sale price rules: If a variation is about to receive a discount through inheritance but has an existing sale price lower than the price calculated through the inherited discount, the lower sale price will be used.
- Parent product: If you upload parent products instead of variable products to the Google Merchant Center, the plugin will also inherit discounts from parent products to their variations. As a reference price for the parent product, the plugin will use the lowest regular price of all variations of that parent product.
- COG overrules: If a variation is about to receive a discount through inheritance but has an existing Cost of Good (COG) price set that is higher than the price calculated through the inherited discount, the COG price will be used. (This works with the following COGS plugins: WooCommerce Cost of Goods by SkyVerge and Cost of Goods Sold by WPFactory).
Discount Type to Inherit
Google sends a fixed discounted price in the payload of the Automated Discount link (eg. 23.50).
There are two ways in which the plugin allows the discount to be inherited: Fixed Price Discount Inheritance and Percentage Discount Inheritance.
Fixed Price Discount Inheritance
The plugin will inherit the same fixed discounted price to all other variations of the same parent product.
If the discounted price is USD 23.50, then all other variations will inherit the same price of USD 23.50.
Percentage Discount Inheritance
The plugin will inherit the same percentage discount to all other variations of the same parent product.
On the first visit, the plugin will calculate the percentage discount based on the regular and discounted prices. The same percentage discount will then be inherited from all other variations of the same parent product.
Example: The regular price is USD 100.00, and the discounted price is USD 75.50. The plugin will calculate a percentage discount of 24.5%. All other variations will then inherit the same percentage discount of 24.5%.
If the resulting prices don’t follow your decimal formatting rules, you can use the following filter to adjust the two digits after the comma.
/wp-content/themes/child-theme/functions.php

add_filter( 'sgadwc_percent_discount_variation_discounted_price', function ( $price, $product_id ) {
	// Return the price with the decimals removed and replaced with .99
	return floor( $price ) + 0.99;
} );
POSSIBLE PERFORMANCE ISSUES
If a parent product has many variations (e.g. more than 100), it may cause performance issues when loading the first product page.
You can use the following filter to limit the number of variations considered for the discount inheritance.
/wp-content/themes/child-theme/functions.phpadd_filter( 'sgadwc_discount_variation_array_max_length', function () {
return 50;
} );
Discount Banner
↑ Volver al principioINFO
Available from version 1.4.2
To emphasize the discount an the urgency to buy, you can display a discount banner on the product page. In most cases it will increase the conversion rate.
When activated, the plugin will display the discount banner on the product page above the product. The banner will show the time left until the discount expires. After expiration the banner will will show an expired message.
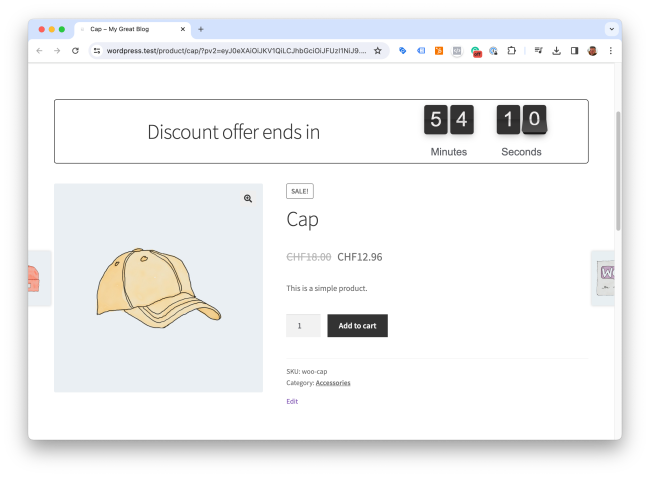
The discount banner works with simple and variable products.
It is disabled by default. You can enable it in the plugin settings.
To give you full control over the design, the banner is built as a template that can be overridden by your theme.
Activate the discount banner
- Go to the plugin settings page.
- Click on the Discount Banner checkbox.
- Click on the Save Changes button.
Discount Banner Template
You can find the template in the plugin folder under /templates/discount-banner-flipper.php.
Copy the template to your child theme folder under /sgadwc/discount-banner-flipper.php.
The default template uses the Flip counter plugin. If you want to keep using it, simply keep flipper in the template name. This will automatically load the flipper plugin scripts and stylings.
If you don’t plan to user the Flip counter plugin, you can remove flipper from the template name. This will prevent the Flip plugin scripts and stylings from being loaded. The file name would then be /sgadwc/discount-banner.php.
The template has access to the $ad_banner_settings array. The information in the array can be used to customize the banner. It contains the following values:
 $ad_banner_settings = [
 	'productId'       => 16,
 	'expiryInSeconds' => 876,   // Seconds until the discount expires
 	'discountDetails' => [
 		'sale_price'          => 17.48,
 		'regular_price'       => 21,
 		'discount_percentage' => 16.76,
 		'exp' 	  	          => 1706015751,    // Unix timestamp of the expiry time
 ],
 	'localization'    => [   // These fields are automatically used by the Flip counter plugin
 		'expiryText'      => 'exp.'
 		'MINUTE_PLURAL'   => 'Minutes',
 		'MINUTE_SINGULAR' => 'Minute',
 		'SECOND_PLURAL'   => 'Seconds',
 		'SECOND_SINGULAR' => 'Seconds',
 	],
 ];
Translate the discount banner
We provide a .pot file in the plugin folder under /languages/sgadwc.pot. You can use it to translate the discount banner into your language.
Alternatively, you can use the following filter to translate just the banner text.
Here’s and example on how to translate the default English text to German.
/wp-content/themes/child-theme/functions.php
add_filter( 'gettext', function ( $translated_text, $text, $domain ) {
if ( $text == 'Discount offer ends in' ) {
return 'Rabattangebot endet in';
}
if ( $text == 'Minutes' ) {
return 'Minuten';
}
if ( $text == 'Minute' ) {
return 'Minute';
}
if ( $text == 'Seconds' ) {
return 'Sekunden';
}
if ( $text == 'Second' ) {
return 'Sekunde';
}
return $translated_text;
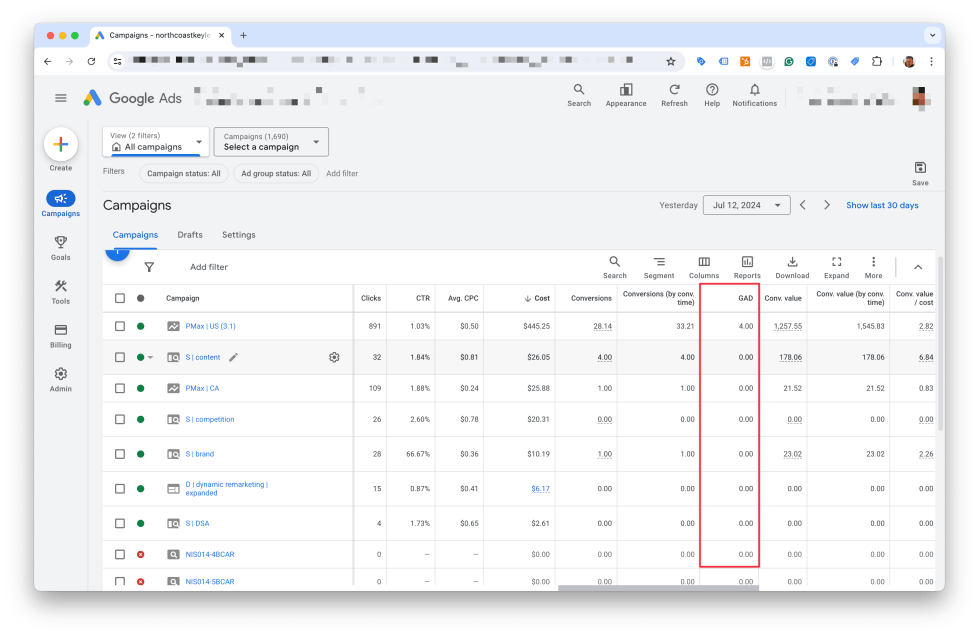
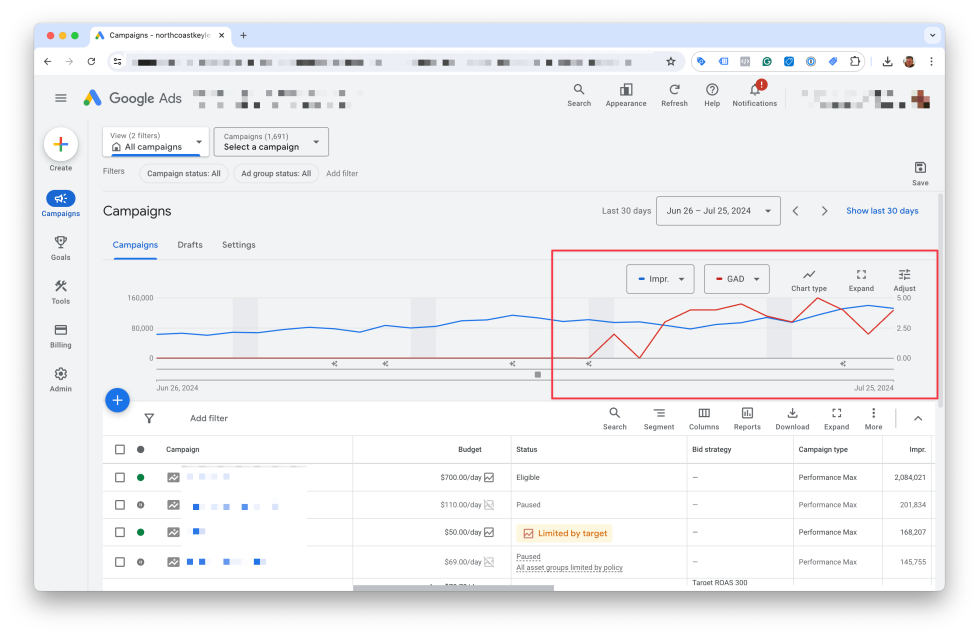
}, 10, 3 );Google Ads Custom Variables
↑ Volver al principioINFO
Available from version 1.6.0 Currently available with beta version 1.6.0-beta.4
The plugin offers an option to transmit the Google Ads Custom Variable gad_discounted with the purchase conversion event.
This will enable reports in Google Ads that show the number of conversions that were made with a product that was discounted with Automated Discounts.
The requirement is that you are using our Pixel Manager for WooCommerce.
Setup Part 1: Enable the Custom Variable and use Segmentation
Setup Part 2: Create a Custom Column in Google Ads
Example with a segmentation report

Example with a custom column
Example with a graph
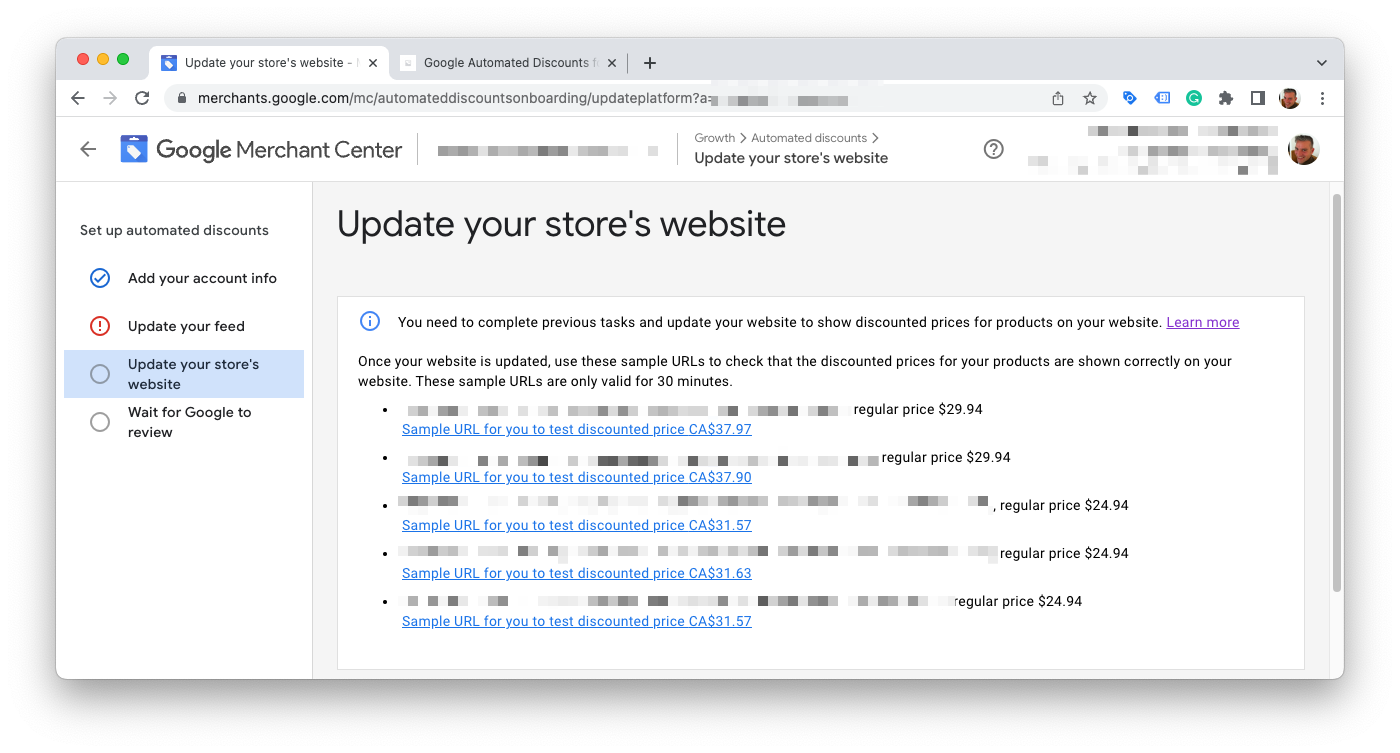
Testing
↑ Volver al principioGoogle’s Testing Procedure
↑ Volver al principioGoogle will guide you through the setup step-by-step. At one point, it will generate links with which you can test and see if automated discounts work on your website.
Set product IDs to test
↑ Volver al principioThe plugin also provides automatic testing links, with randomly generated discounted prices. You can find them in the plugin settings.
Use the following filter to set the specific product IDs that you want to test.
/wp-content/themes/child-theme/functions.php

add_filter( 'sgadwc_testing_product_ids', function ($product_ids) {

	$product_ids[] = 123; // Add your product IDs here
	$product_ids[] = 456;
	$product_ids[] = 789;

	return $product_ids;
} );
Console Debug Messages
↑ Volver al principioWhen testing with the internal testing links, you can see debug messages in the browser console. This will help you understand what is happening behind the scenes.
It will show information if the Automated Discount session could be started and the payload that is processed.
It will also show error details if something goes wrong, such as when the product ID is not found.

Logger
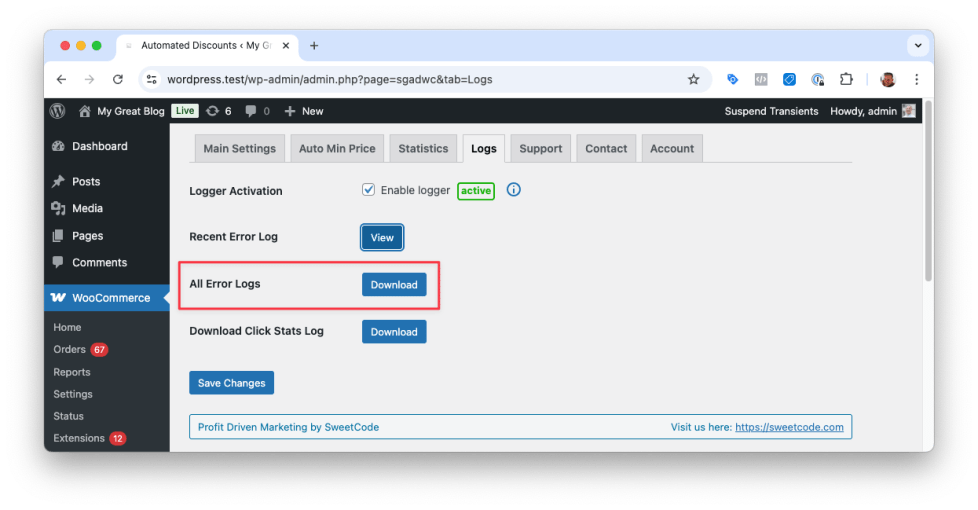
↑ Volver al principioOur logger can be used to log various events in the plugin and is especially useful for debugging purposes. It can be enabled in the plugin settings.
All logs are stored in the WooCommerce /wp-content/uploads/wc-logs directory and are prefixed with sgadwc-. You can access the logs via the WooCommerce settings page under Status > Logs or directly in the file system.
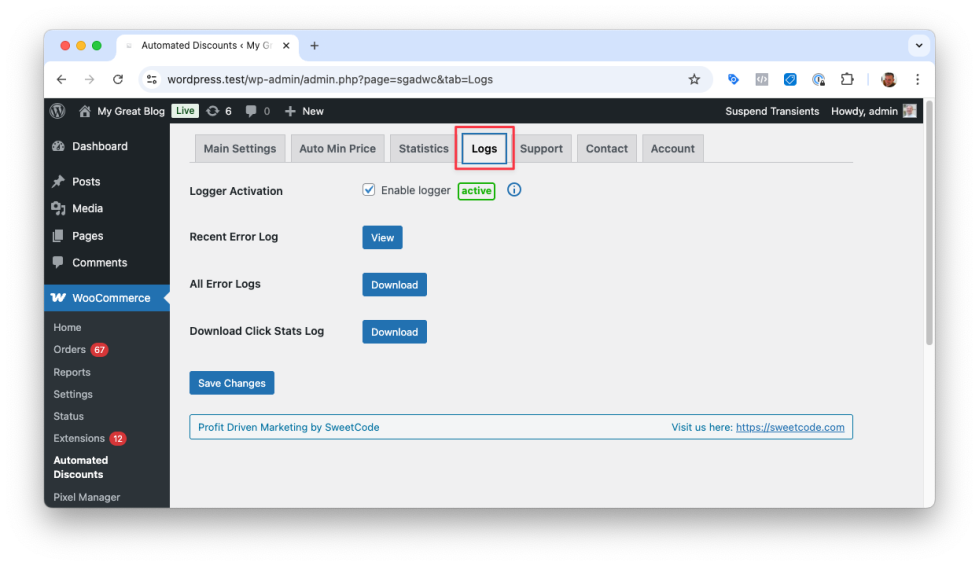
Use the Recent Error Log button to view the file with the most recent logs.

Use the All Error Logs button to download all logs as a zip file. This is useful for sharing logs with support or for backup purposes.
Scenarios
↑ Volver al principioFirst, we show a simple and a variable product how they look like with regular prices.
Then we go through each possible scenario that can occur with price discounts.
Simple product with no discount
↑ Volver al principio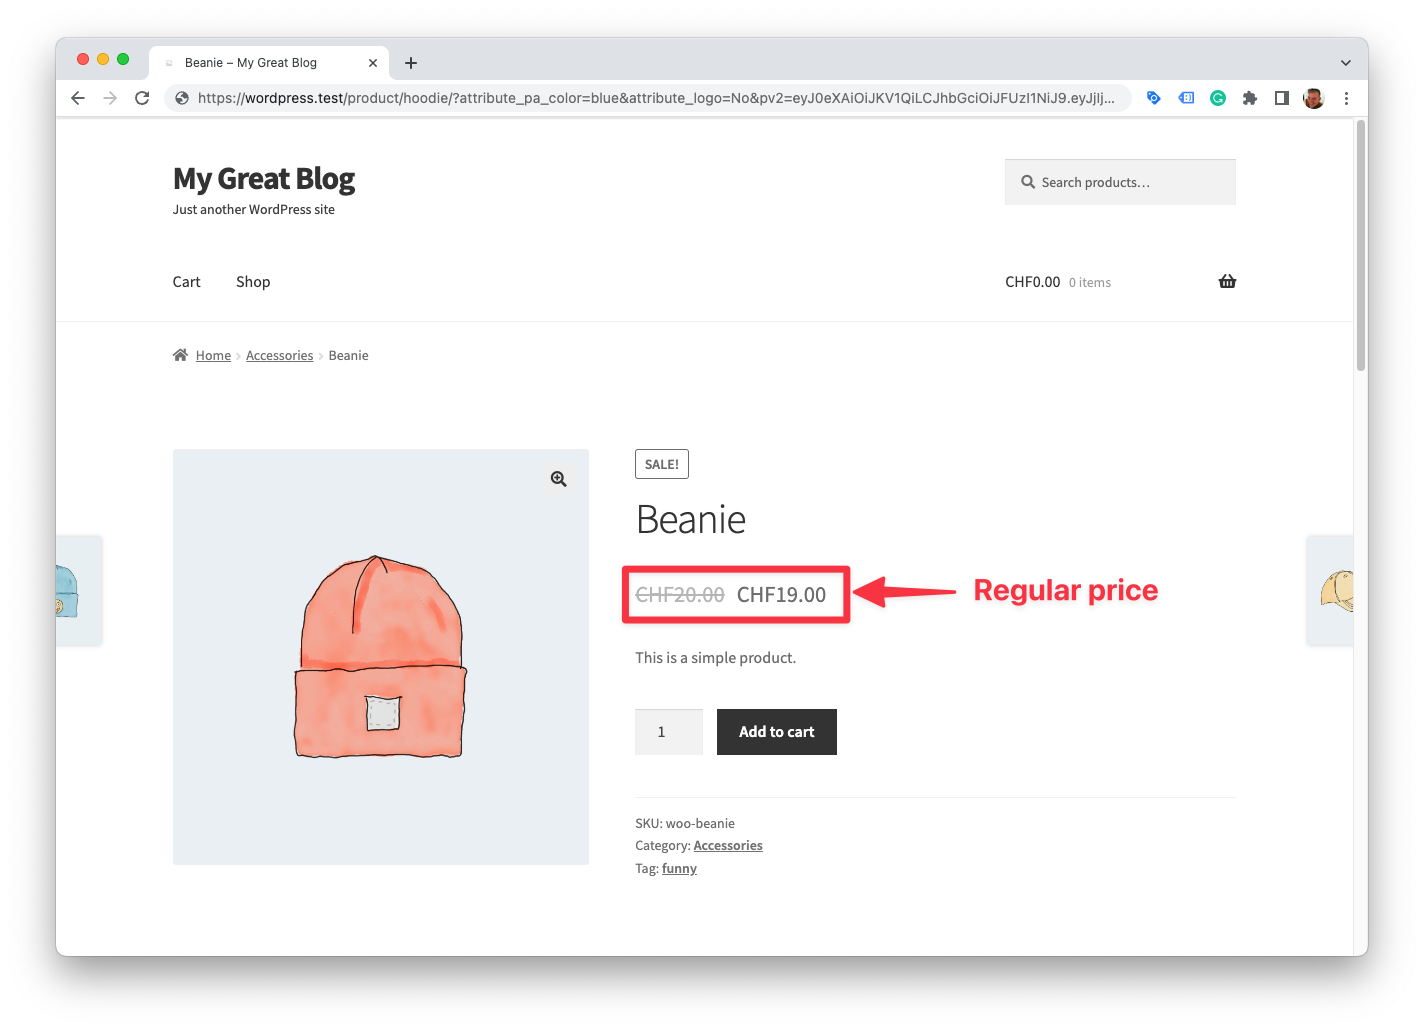
Variable product with no discount
↑ Volver al principio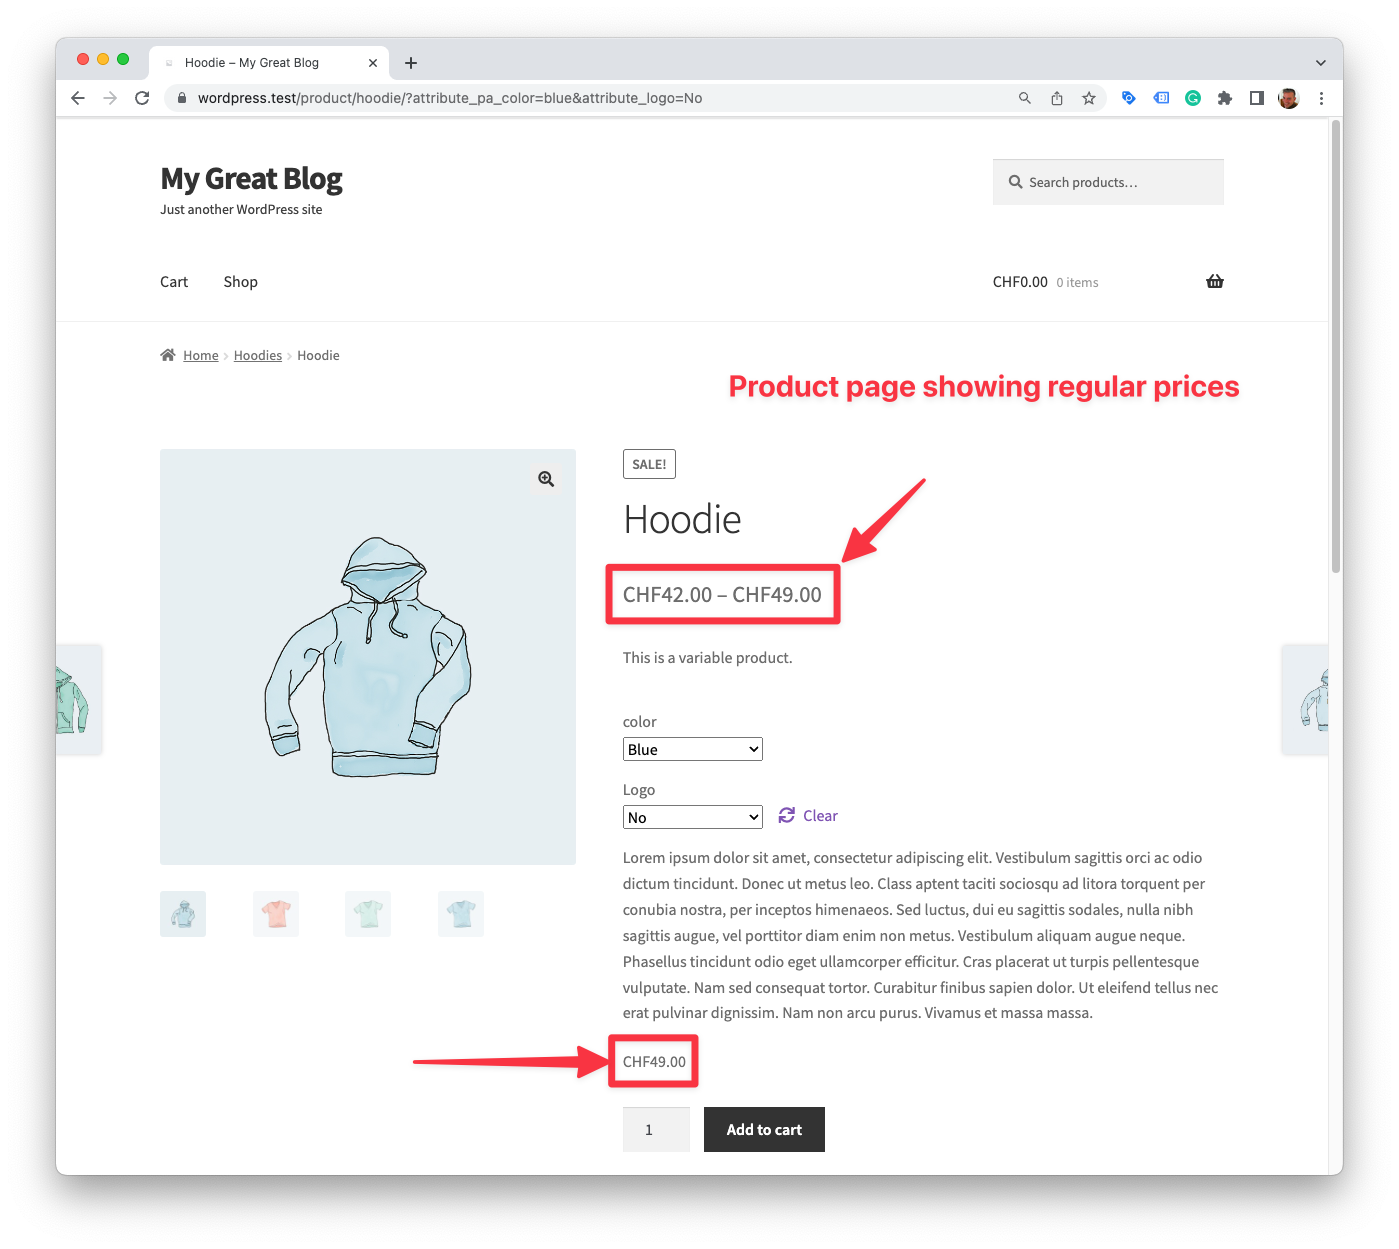
Simple product with a discount applied
↑ Volver al principio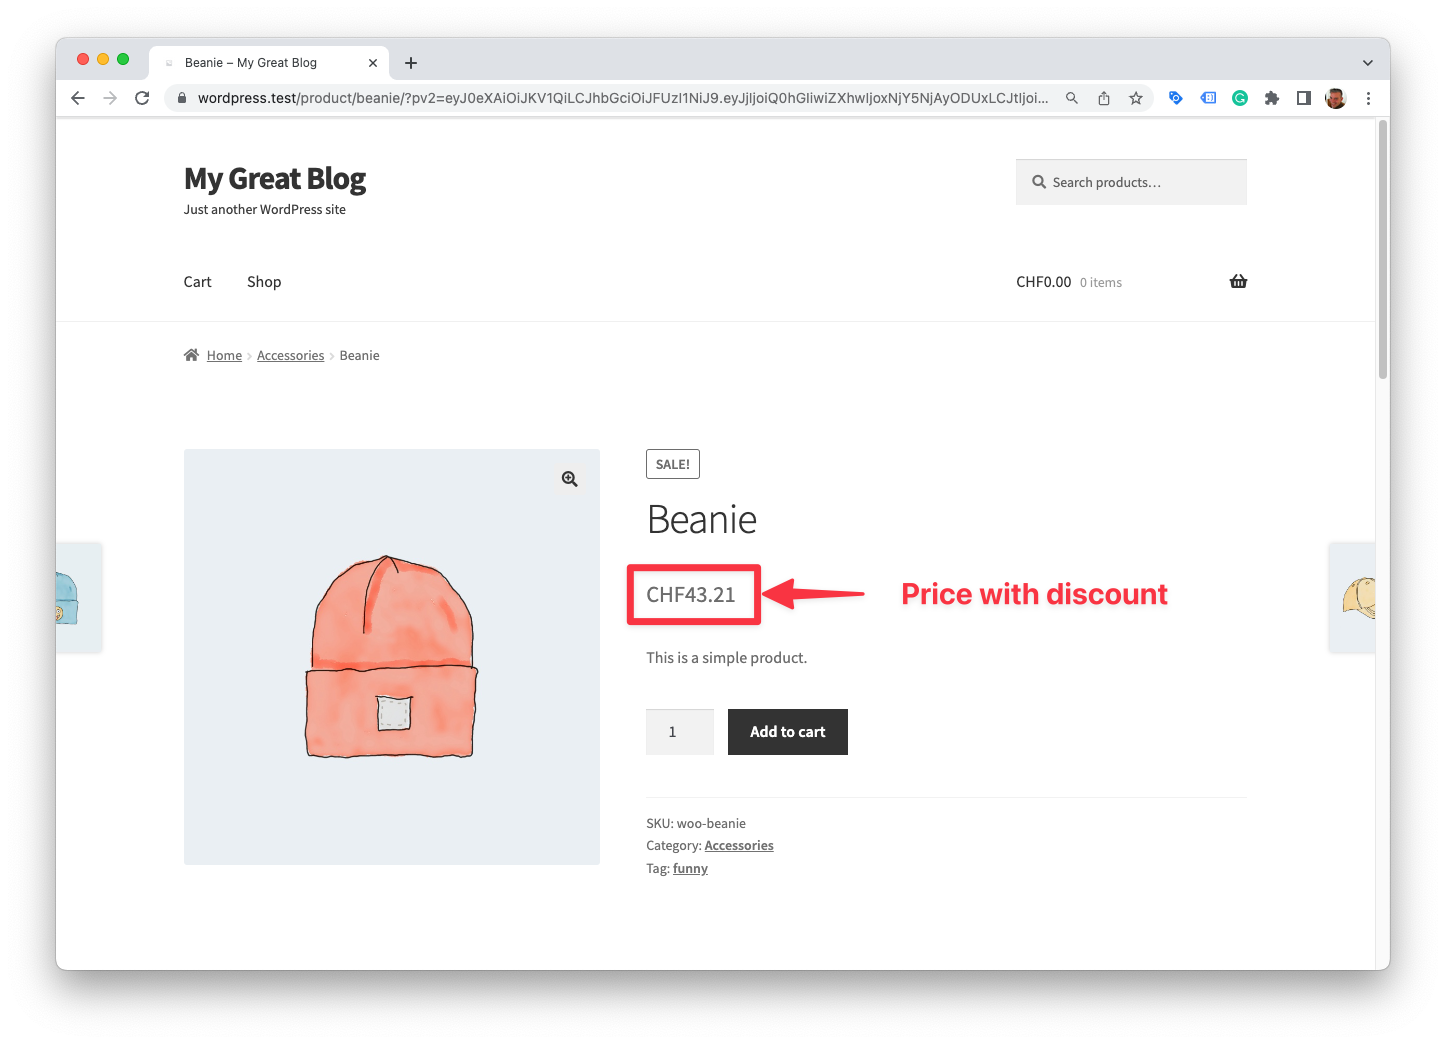
Variable product with a discount applied
↑ Volver al principio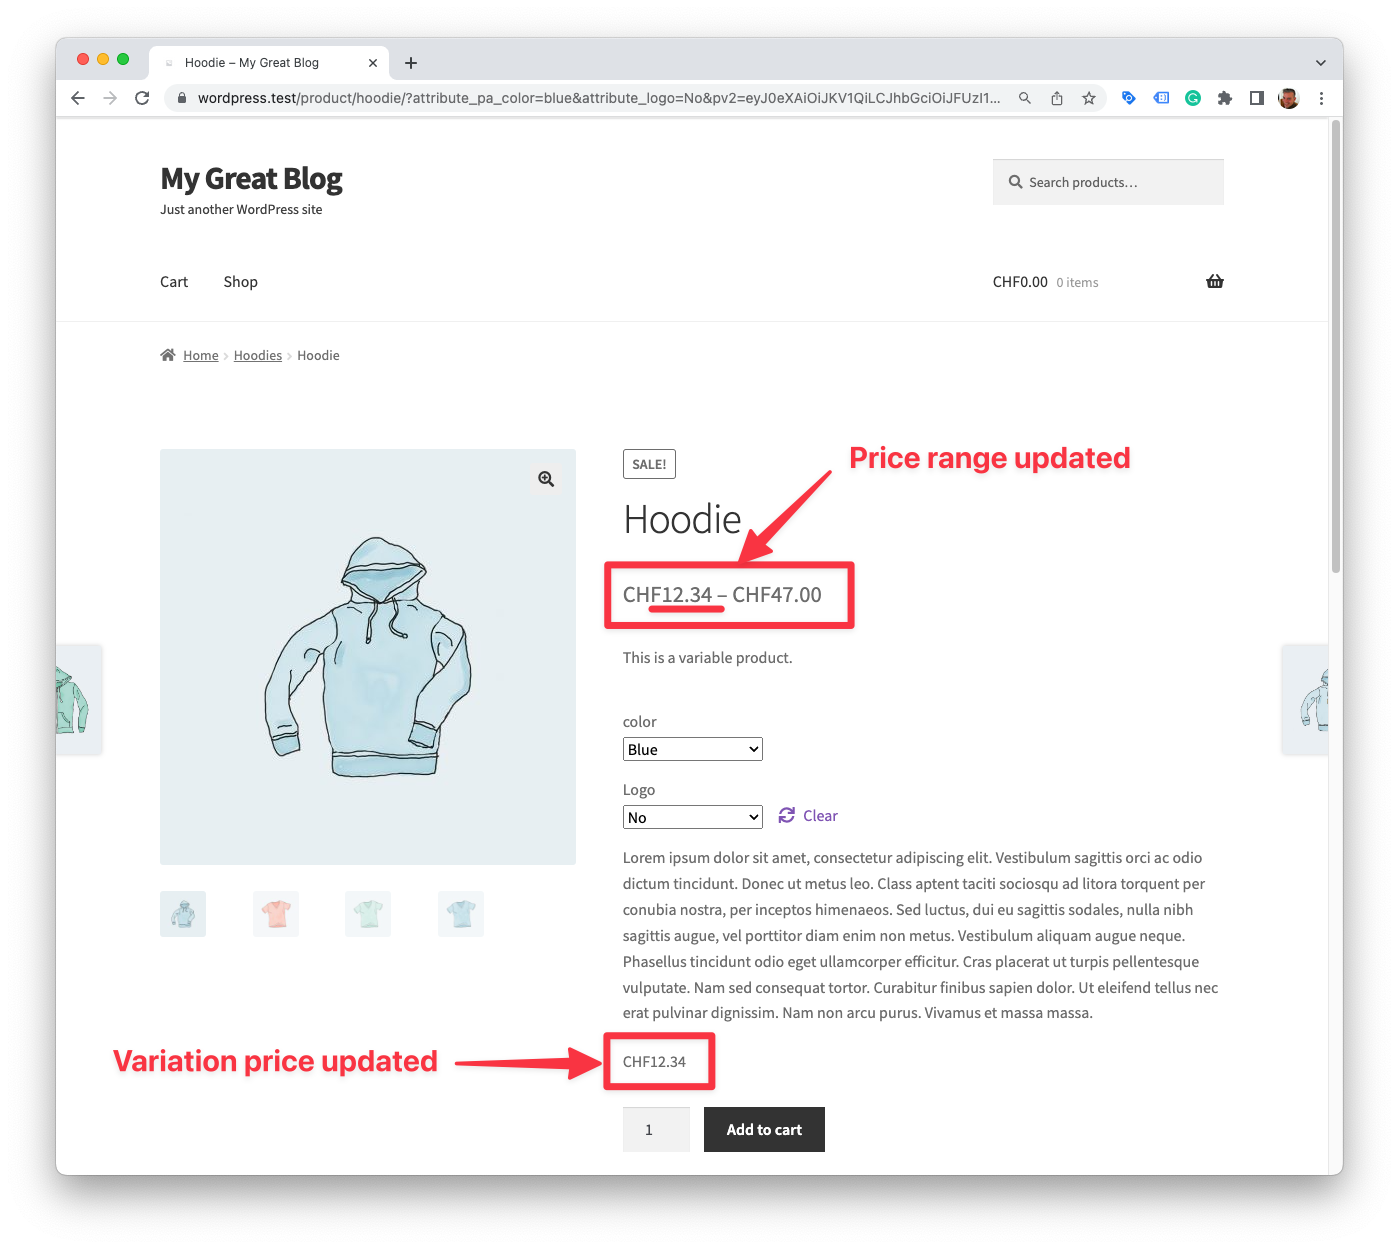
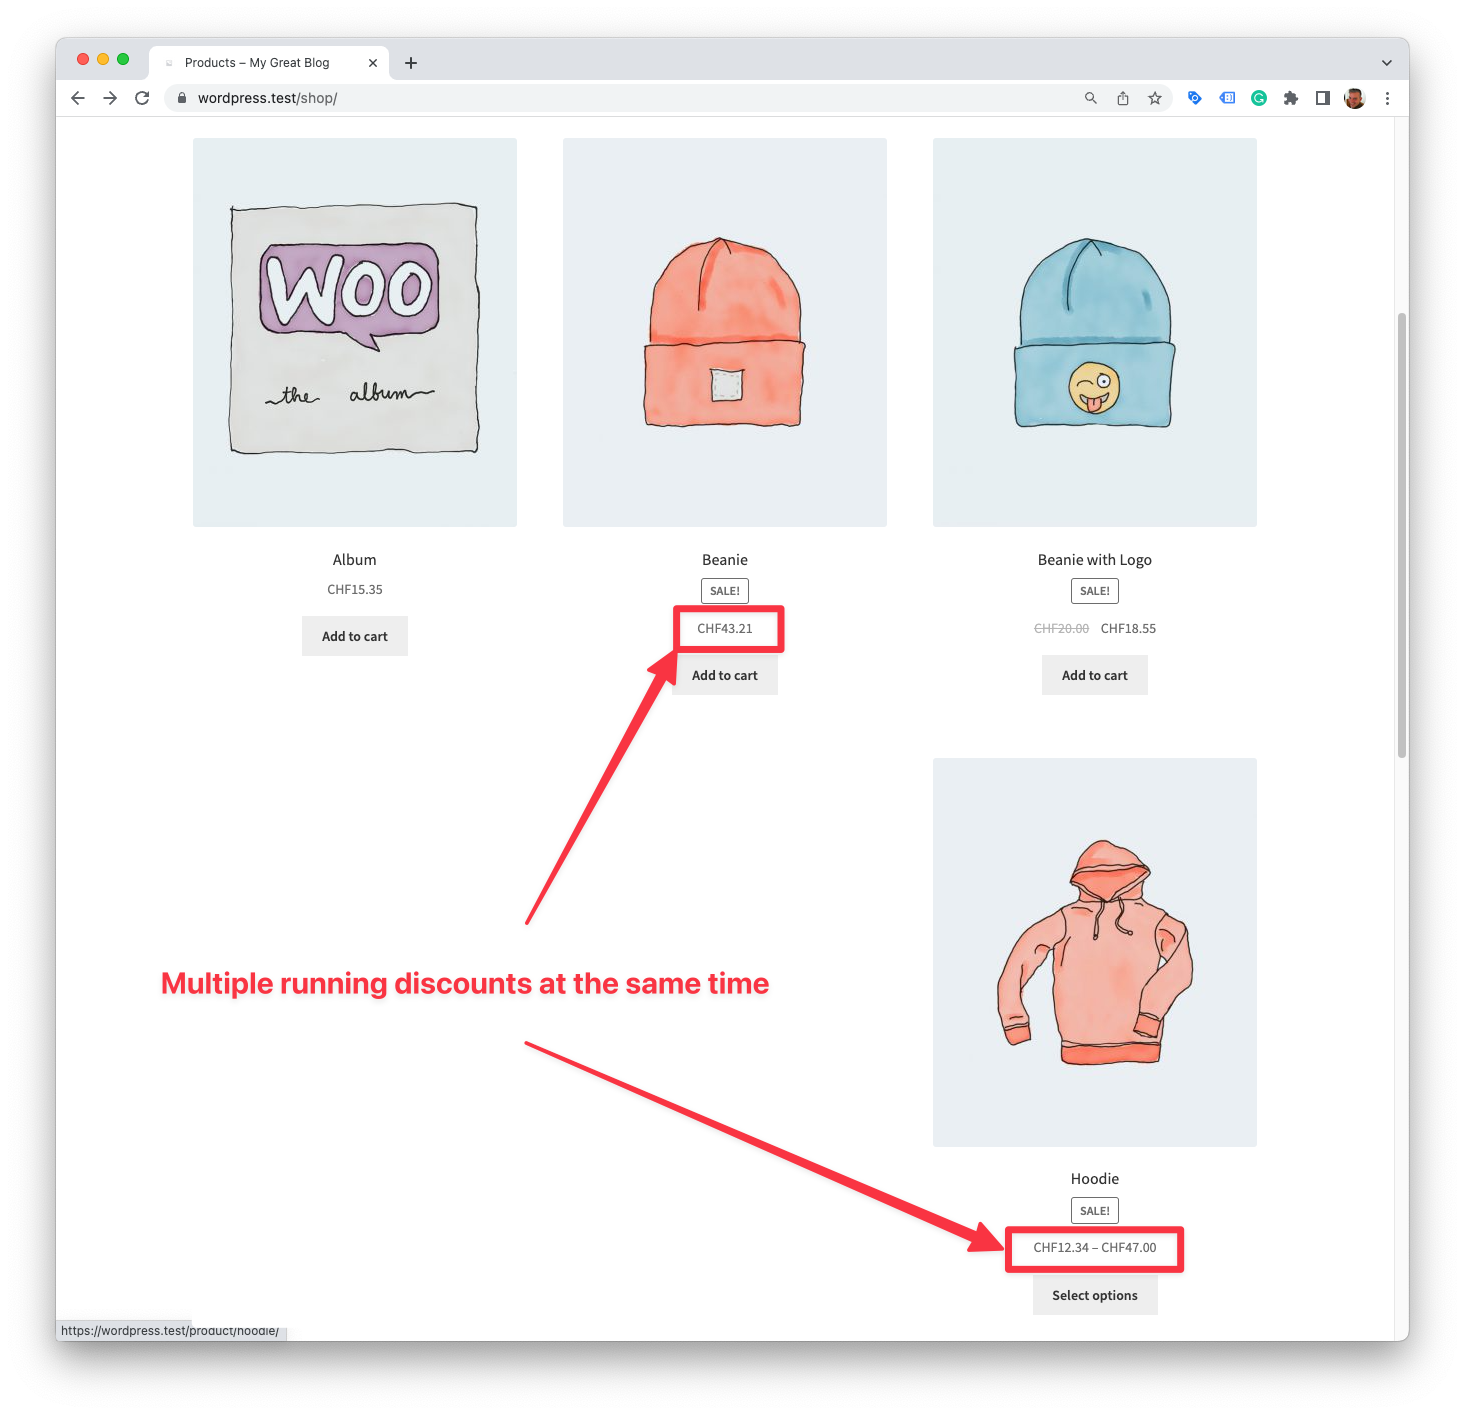
Shop page with discounts applied
↑ Volver al principio
Mini cart with discount applied
↑ Volver al principio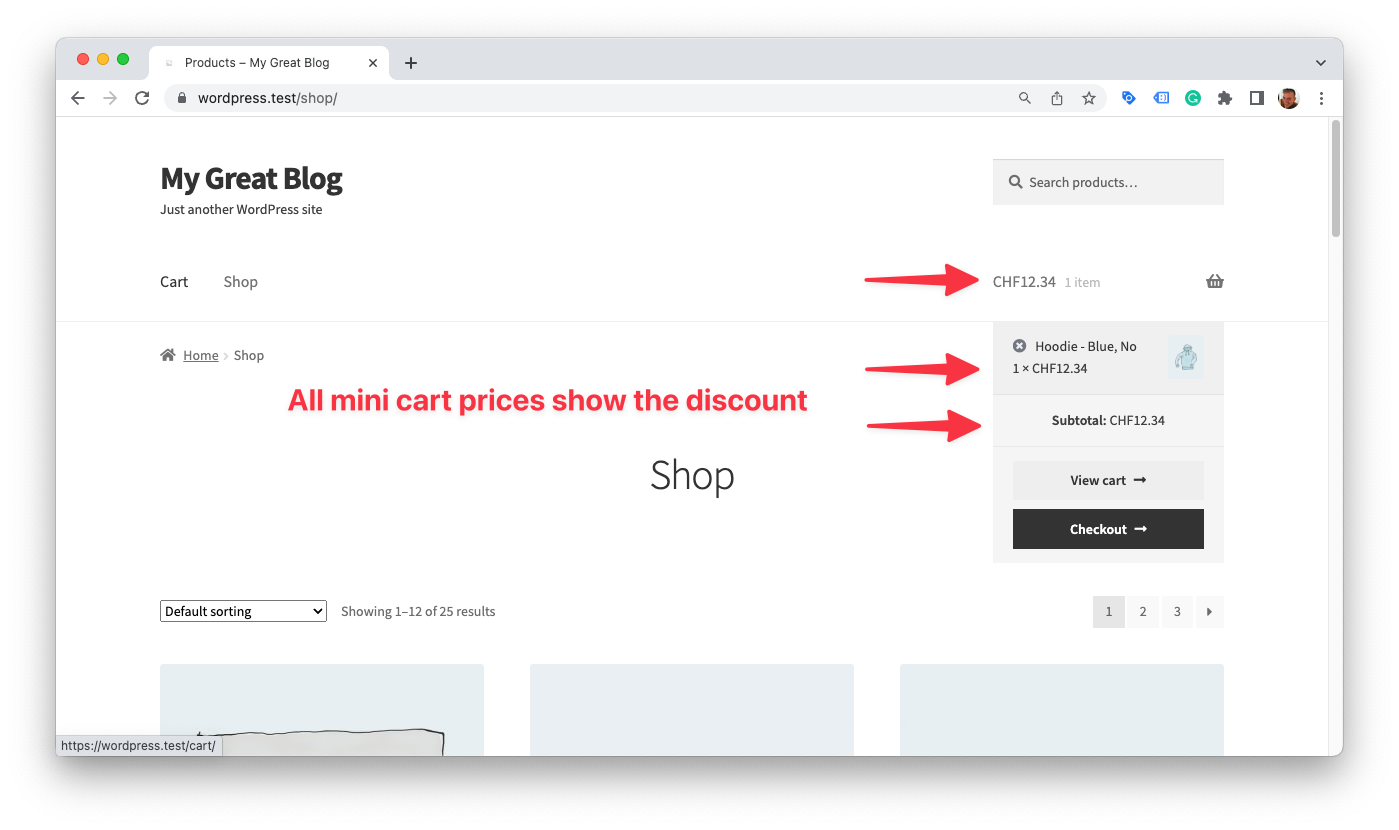
Cart page with discount applied
↑ Volver al principio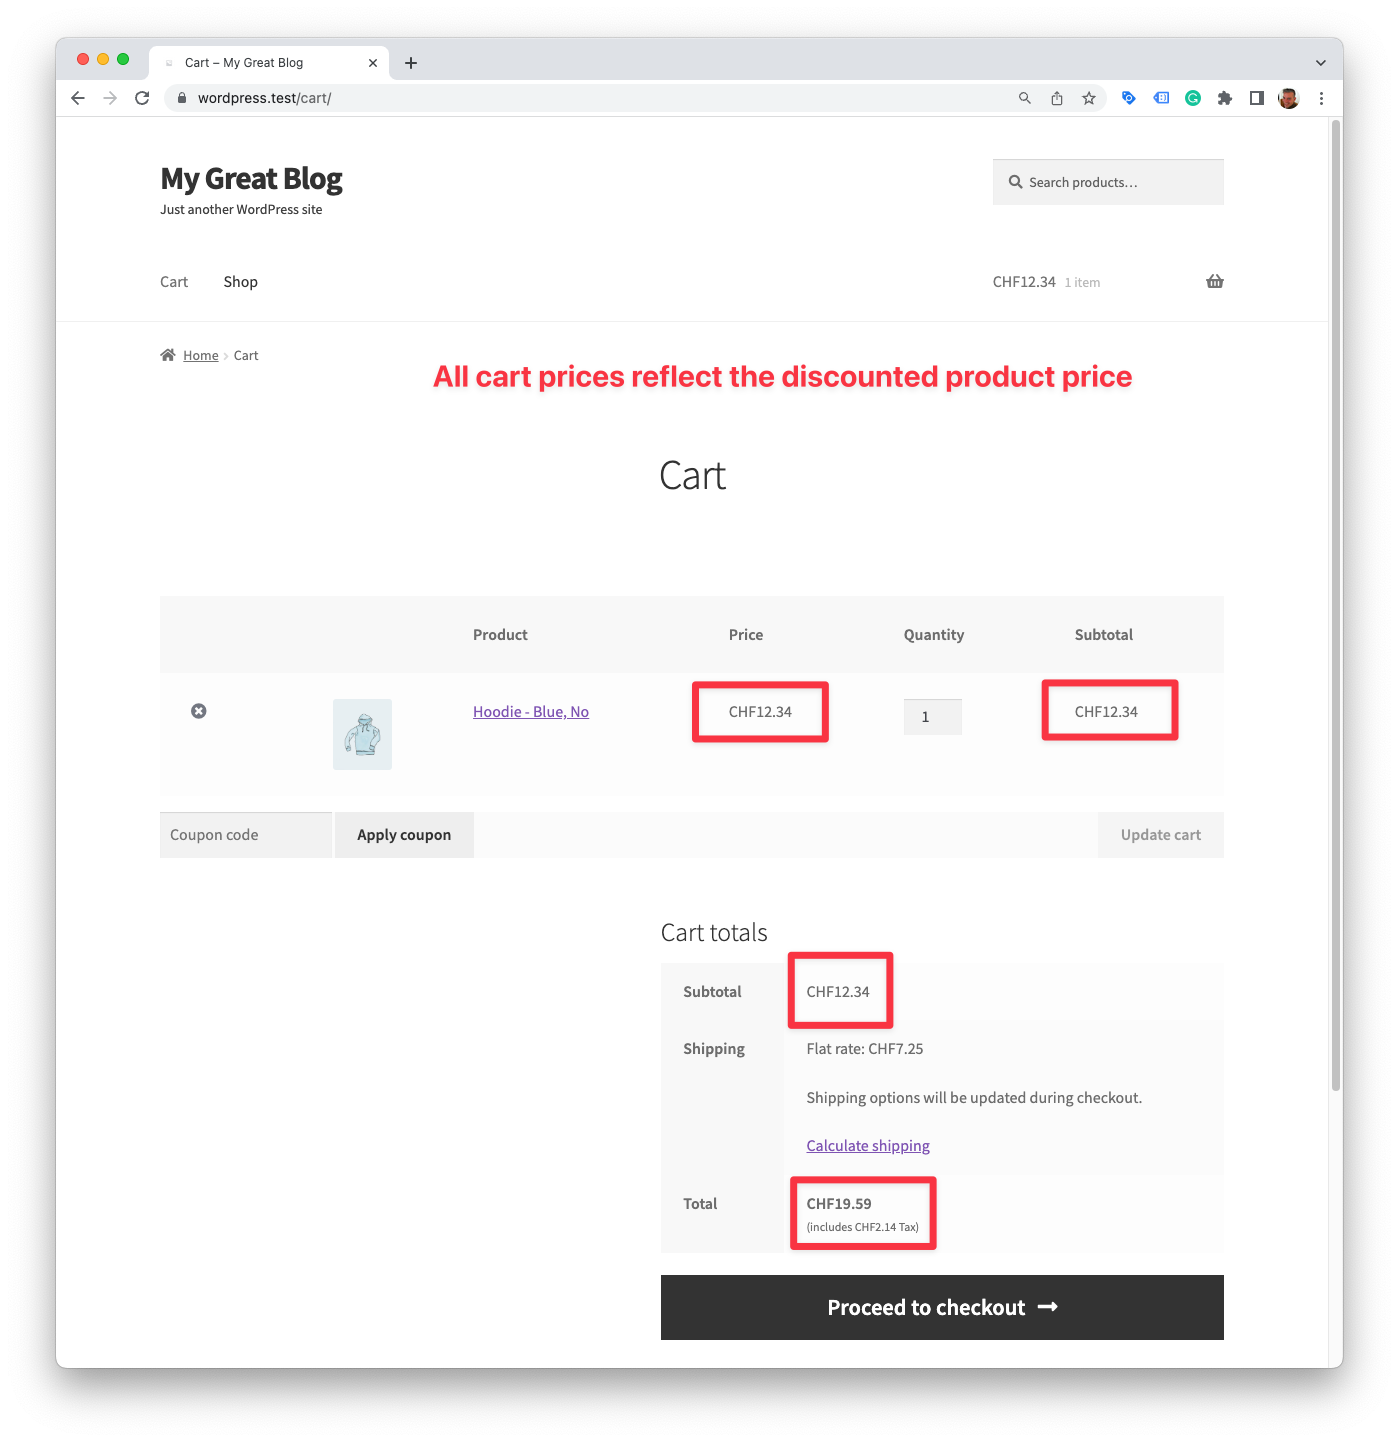
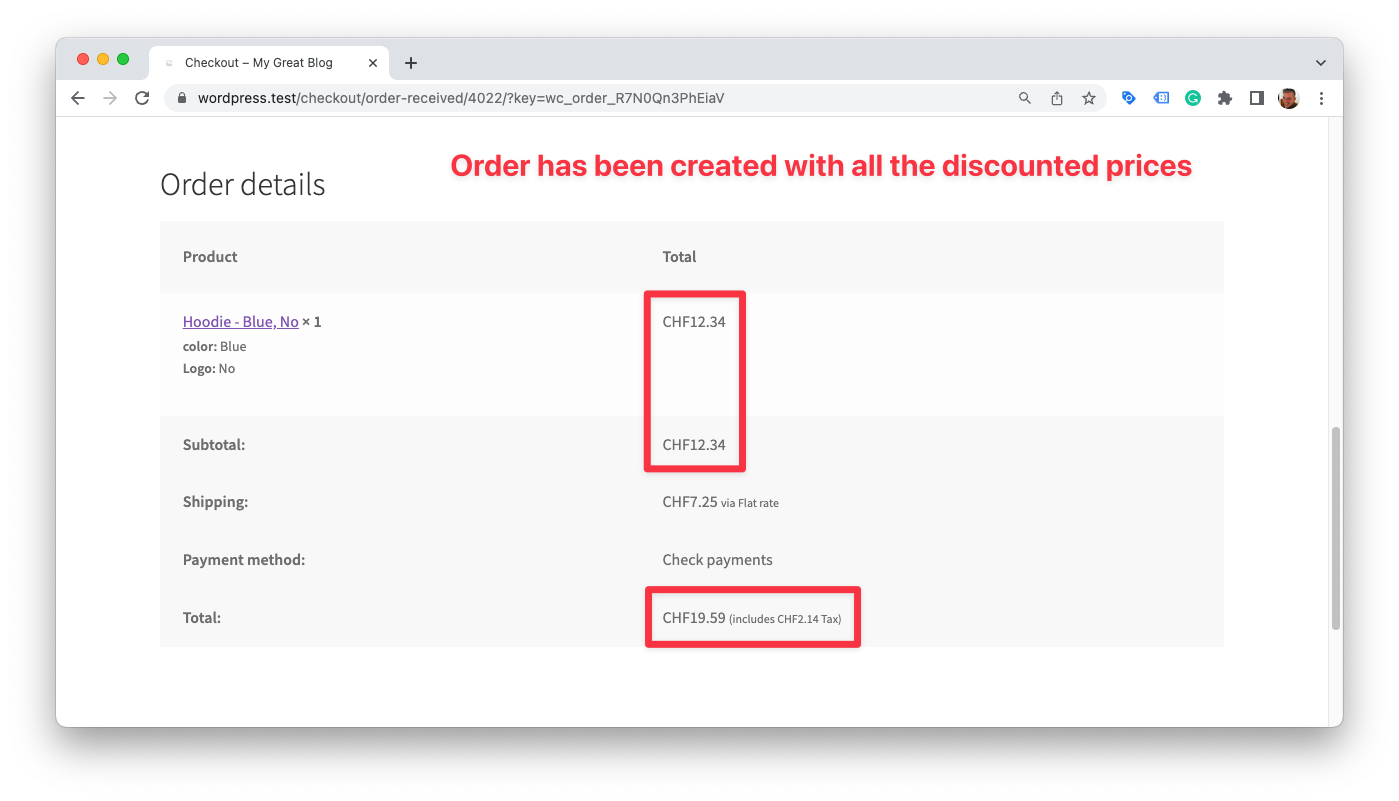
Checkout page with discount applied
↑ Volver al principio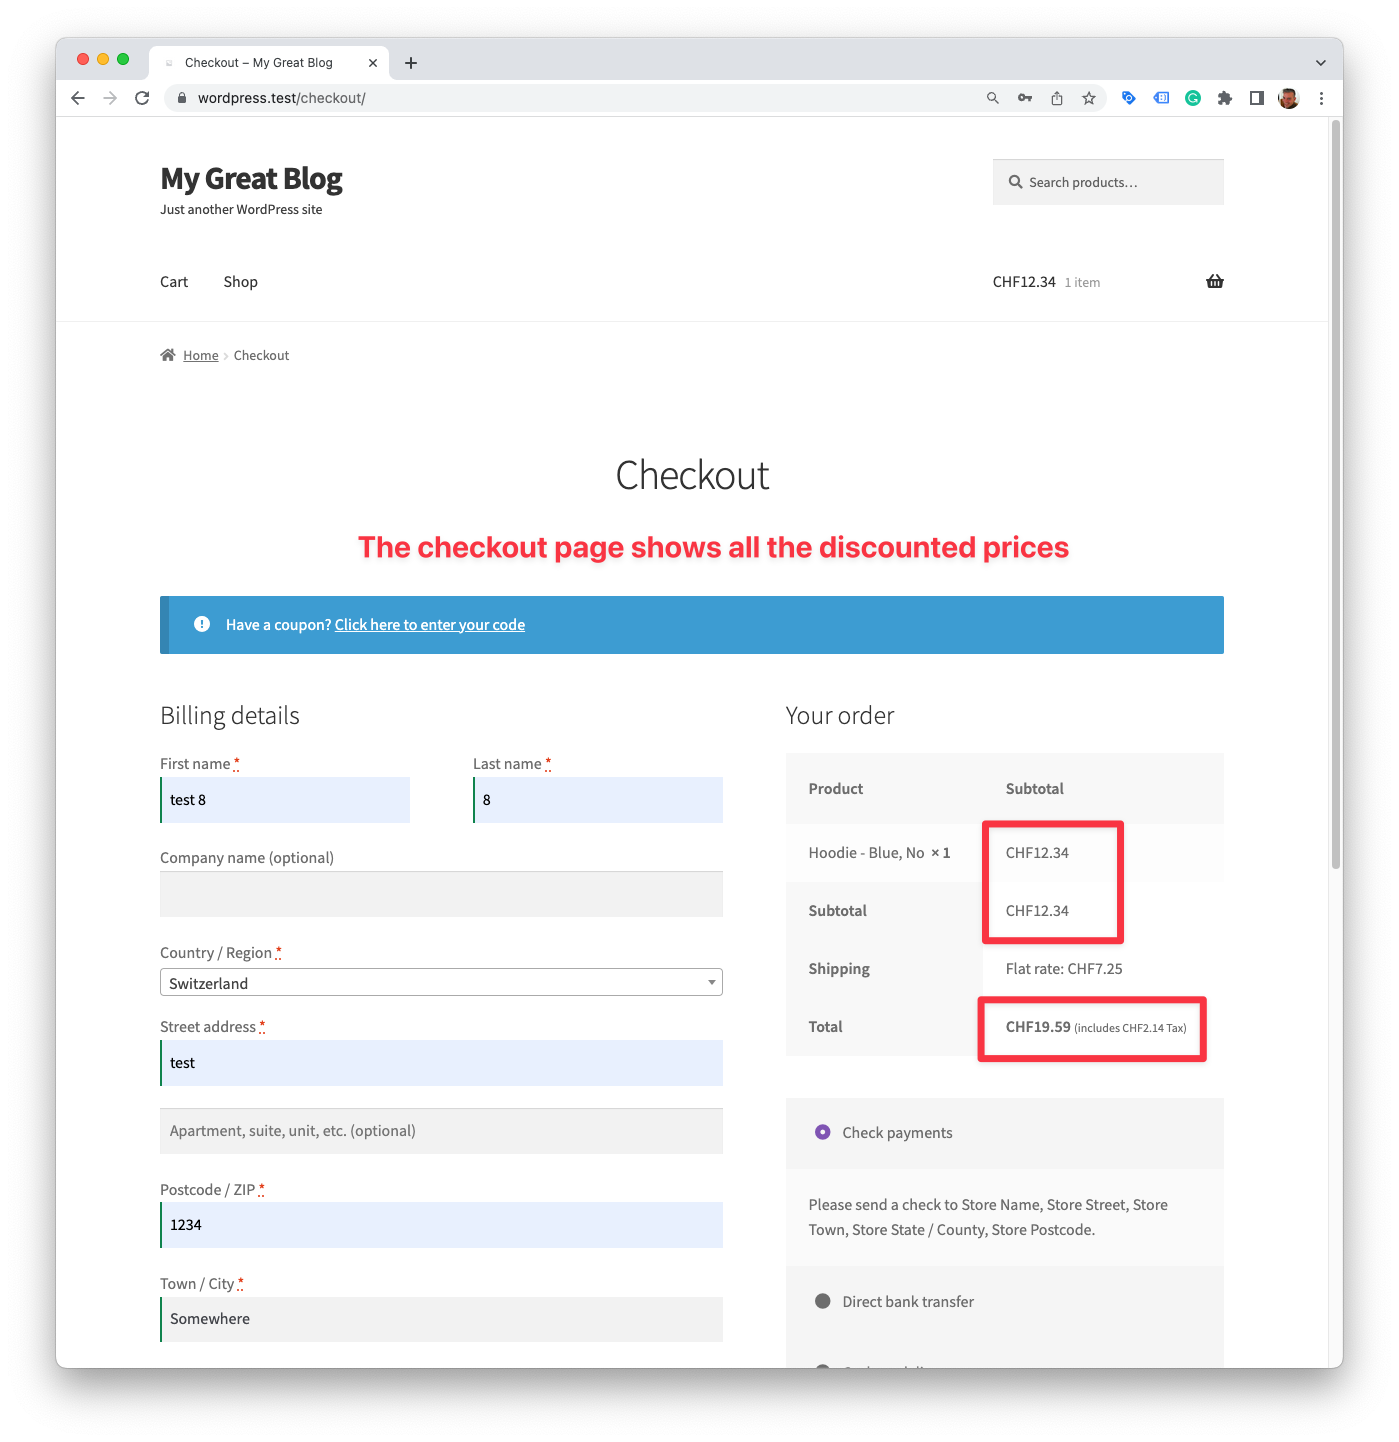
Remarks
↑ Volver al principioCurrency Switchers
↑ Volver al principioWe tested the plugin with the WPML currency switcher and it works as expected.
The plugin is compatible with every currency switcher that uses the woocommerce_currencies filter to set the active currency. Simply try it out with your currency switcher and let us know if it works or if you need help with getting it to work.
Caching
↑ Volver al principioThe plugin will disable caching once a link click with an Automated Discount payload reaches the website. So this should work out of the box. If not, there might still be a caching layer that needs exclusions to be set.
Please follow the troubleshooting guide for cache issues.
Troubleshooting
↑ Volver al principioViewing the Error Logs
↑ Volver al principioThe plugin outputs errors into the regular WooCommerce log directory. It is accessible by clicking on the View Logs link in the plugin’s settings window and choosing the most recent log with the slug sgadwc. It will show all errors that it encountered. If you don’t find a log with the slug sgadwc it means that no errors have been encountered.
The website still shows cached prices, even if a valid discount has been successfully received
↑ Volver al principioIt is likely your caching rules are too aggressive.
Make sure to exclude caching if the URL query parameter pv2 is present in the URL.
Example: https://example.com/socks/?pv2=1234
You also must ensure that caching is disabled as soon as a WooCommerce session is active. (Typically a WooCommerce session is created when a visitor adds a product to the cart.)
Make sure that the cache is disabled if at least one of the following server-side WooCommerce cookies has been set:
woocommerce_cart_hashwoocommerce_items_in_cartwp_woocommerce_session_(This cookie always attaches a session ID at the end. Make sure that the match is not set toexactbut will match any cookie which contains that cookie string.)
Caching
↑ Volver al principioIn general 99% of all incompatibilities are caused by caching.
There are two conditions that need to be met for Automated Discounts to work correctly:
- When the URL query parameter
pv2is present in the URL, caching must be disabled. - WooCommerce sessions must be properly handled by the caching system. Neither page cache, nor server object cache, or any other caching layer should cache pages when a WooCommerce session is active.
Known Incompatibilities
↑ Volver al principioWe have come across an install that uses Object Cache Pro (by Rhubarb Group), FlyingPress (by FlyingWeb) and the Astra Pro theme (by Brainstorm Force). Any one of these plugins or themes, or a combination of them, causes Automated Discounts to not work correctly because parts of the output get cached, including Ajax requests.
While FlyingPress may be configured to exclude caching, the other two plugins don’t offer a way to exclude caching for specific URLs or WooCommerce sessions.
Implementation recipes
↑ Volver al principioThe subsequent documentation outlines proven strategies to fulfill all business requirements. We have included only those methods that we have verified to be effective. If you have discovered alternative or superior approaches to address these business requirements, we encourage you to share your insights by submitting feeback through our support form.
Essential steps
↑ Volver al principio- Set up conversion cart data reporting.
- Save the
cost_of_goods_soldandauto_pricing_min_pricein a field for each product. - Upload the Google Merchant Center feed containing
cost_of_goods_soldandauto_pricing_min_price. - Apply for the Google Automated Discounts program at Google: Application Link
- Purchase and install the Google Automated Discounts for WooCommerce plugin.
- Double check that caching for Automated Discounts is disabled and caching for WooCommerce sessions when a visitor clicks on an Automated Discount link.
- Start running and optimizing the Google Automated Discounts program.
SweetCode Implementation Service
↑ Volver al principioEnhance your business effortlessly with SweetCode’s custom implementation services for Automated Discounts. While some steps are relatively simple, others — such as determining and setting the Cost of Goods Sold and Auto Pricing Min Price for each product — demand meticulous preparation. Businesses vary in their compatibility with the Automated Discounts program, and each one calls for a tailored approach to ensure accurate calculations.
To truly unlock the potential of Automated Discounts, a well-crafted and customized strategy is essential for seamless implementation, execution, and performance optimization.
Should you find any of these steps challenging, SweetCode is here to help. Our team of skilled developers and business economists will guide you throughout the setup process, actively implementing the necessary steps and fine-tuning the program for optimal results. To receive a personalized quote, simply contact us via our support form, and we’ll be eager to help you elevate your business’s efficiency and profitability.
Conversion Cart Data reporting
↑ Volver al principioThe Pixel Manager for WooCommerce is the sole verified plugin that seamlessly transfers conversion cart data out-of-the-box. You can obtain it from sweetcode.com and woocommerce.com.
Upon activation, simply enable Google Ads conversion tracking and input the Google Merchant Center ID. With these steps completed, conversion cart data will be automatically transmitted to Google.
INFO
If conversion cart data has never been sent before, the Automated Discounts program will take at least several days before recognizing that the data is being received.
Setting cost_of_goods_sold
For setting the cost_of_goods_sold we recommend the following plugin.
- WooCommerce Cost of Goods. The plugin doesn’t only set the Cost of Goods Sold (COGS). It also provides valuable reports on profit margins over all products sold.
Uploading the feed
↑ Volver al principioThere are two feed plugins that officially support the auto_pricing_min_price field or have a direct integration with the Google Automated Discounts plugin.
WooCommerce Product Feed Manager (by WPMarketingRobot)
↑ Volver al principioHere’s how to set the cost_of_goods_sold in the WooCommerce Product Feed Manager.
(This example shows the use of the _wc_cog_cost field created by the WooCommerce Cost of Goods plugin.)

Here’s how to set the auto_pricing_min_price in the WooCommerce Product Feed Manager.
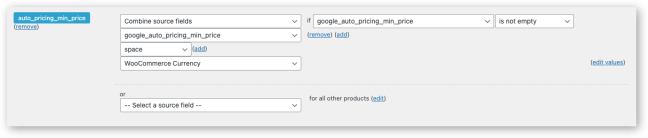
Google Product Feed for WooCommerce (by Ademti Software)
↑ Volver al principioWhen both plugins are active (Google Automated Discounts and Google Product Feed) you’ll see the auto_pricing_min_price field in the Google Product Feed settings (WooCommerce » Settings » Product Feeds). When enabling the field you can choose to have the values come from the pricing fields provided by the Google Automated Discounts for WooCommerce plugin:
Auto Pricing Min Price
↑ Volver al principioINFO
Available since version 1.0.11
The plugin offers a way to set the Auto Pricing Min Price on each product. The field can then be ingested by a feed plugin and output into the Google Merchant Center feed.
The main settings are:
- A settings field for saving an Auto Pricing Min Price manually on each product.
- For automatic calculation and batch processing, the plugin offers a filter that can be used to calculate an Auto Pricing Min Price.
- The automatic calculation happens each time a product is updated manually. But, if a shop manager chooses to upload product updates with an import plugin, the automatic calculation may not be triggered. In that case, the batch regeneration on all products of the Auto Pricing Min Price can be triggered manually or by activating a nightly, recurring batch process.
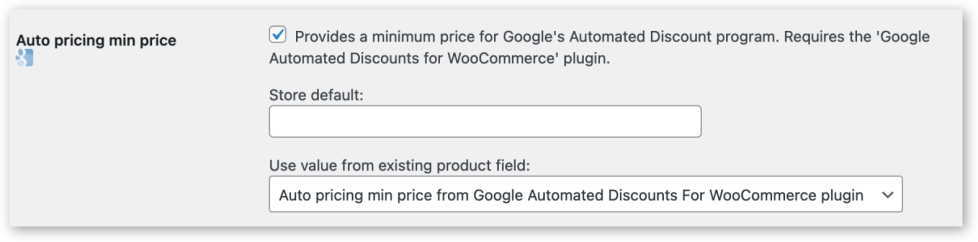
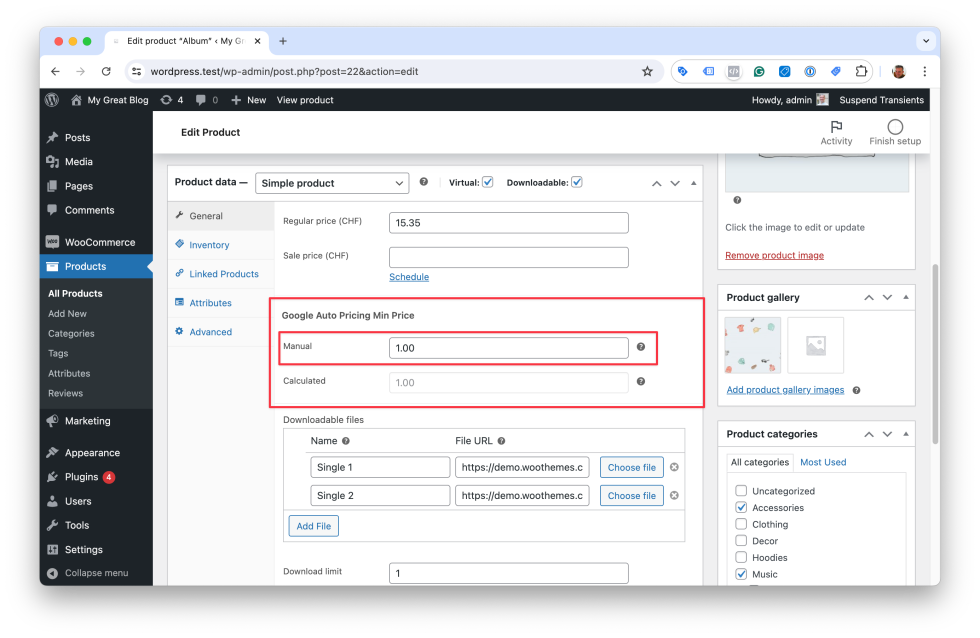
Manual Setting
↑ Volver al principioOnce enabled, you will see a new field in the pricing section of each product where you can set your Auto Pricing Min Price.
The manually set prices are saved in a meta field with the key _google_auto_min_price_man. This is the field you can use in your feed plugin to retrieve the manually set prices.
Automatic Calculation
↑ Volver al principioWhen you have dozens, hundreds, or thousands of products, automatically calculating the Auto Pricing Min Price may be more convenient.
For this case, the plugin offers a filter that can be used to calculate the Auto Pricing Min Price with any type of rule that you can imagine.
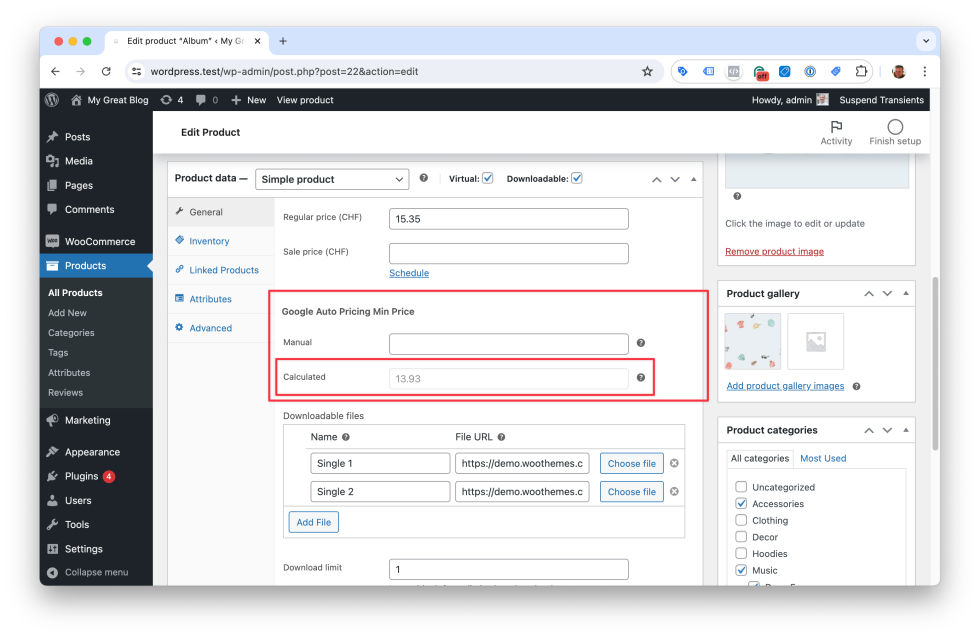
The automatic calculation is always triggered on a specific product when you manually update the product through the backend. However, if you upload product updates, such as prices, through some sort of import, the automatic calculation is not triggered. In that case, have a look at the scheduled and manual batch update features.
The automatically set prices are saved in a meta field with the key _google_auto_min_price_calc. This is the field you can use in your feed plugin to retrieve the automatically set prices. If a manually set field is present for a particular product, it will override the calculation and be saved in the same _google_auto_min_price_calc meta field. So you can use this field to retrieve all prices for your feed, the calculated prices and manual overrides.
Following, we provide several examples for the Auto Pricing Min Price calculation filter:
Example: How the filter works
/wp-content/themes/child-theme/functions.php

/**
 * This example subtracts 1 from the regular price and returns that new value.d
 *
 * The filter provides a default value, which is null, and the product object.
 *
 * As output you'll need return a new value, or null.
 **/
add_filter( 'sgadwc_google_auto_pricing_min_price_calculation', function ( $value, $product ) {

    $regular_price = $product->get_regular_price();

    return wc_format_decimal( $regular_price - 1, 2 );
}, 10, 2 );
Example: Return a value that is lowered by a specific percentage of the profit margin
/wp-content/themes/child-theme/functions.php

/**
 * This example takes the regular price and the COGS price that was saved by a different plugin in the
 * meta key _alg_wc_cog_cost.
 *
 * If no value is available in the meta key, null is returned.
 *
 * It then calculates an Auto Pricing Min Price that reduces the regular price by 20% of the profit margin.
 **/
add_filter( 'sgadwc_google_auto_pricing_min_price_calculation', function ( $value, $product ) {

    $regular_price = $product->get_regular_price();

    $cogs = $product->get_meta( '_alg_wc_cog_cost' );

    // Safeguard in case no COGS is set for this product
    if (empty( $cogs )) {
        return null;
    }

    $margin = $regular_price - $cogs;

    return wc_format_decimal( $regular_price - ( $margin * 0.2 ), 2 );
}, 10, 2 );
Example: Reduce the regular price to a fixed percent
/wp-content/themes/child-theme/functions.php

/**
 * This example takes the regular price and lowers it to a fixed percentage.
 **/
add_filter( 'sgadwc_google_auto_pricing_min_price_calculation', function ( $value, $product ) {

    $regular_price = $product->get_regular_price();

    return wc_format_decimal( $regular_price * 0.8, 2 );
}, 10, 2 );
Example: Add a fixed amount to the COGS
/wp-content/themes/child-theme/functions.php

/**
 * This example takes COGS and adds a fixed amount to it.
 **/
add_filter( 'sgadwc_google_auto_pricing_min_price_calculation', function ( $value, $product ) {

    $cogs = $product->get_meta( '_alg_wc_cog_cost' );

    // Safeguard in case no COGS is set for this product
    if (empty( $cogs )) {
        return null;
    }

    return wc_format_decimal( $cogs + 4.5, 2 );
}, 10, 2 );
Example: This is a complex example from a real webshop
/wp-content/themes/child-theme/functions.php

/**
 * This filter uses plenty of log outputs to help determine issues
 * with calculations on products that are missing information.
 **/
add_filter('sgadwc_google_auto_pricing_min_price_calculation', function ($value, $product) {

    $logger_source = 'sgadwc-auto-min-price-calculation';

    // If function get_product_condition does not exist, define it
    if (!function_exists('get_product_condition')) {

        function get_product_condition($product) {

            $attributes = $product->get_attributes();

            if (!isset($attributes['condition'])) {
                return null;
            }

            if ($attributes['condition'] == 'New') {
                return 'A';
            }

            if ($attributes['condition'] == 'Used') {
                return 'U';
            }

            return null;
        }
    }

    // Function to calculate the minimum price for a product
    if (!function_exists('get_auto_min_price')) {
        function get_auto_min_price($condition, $margin_percent, $regular_price) {

            if ($condition == 'A') {
                if ($margin_percent > 0.3) {
                    return $regular_price * 0.8;
                } else {
                    return $regular_price * 0.85;
                }
            }

            if ($condition == 'U') {
                if ($margin_percent > 0.3) {
                    return $regular_price * 0.75;
                } else {
                    return $regular_price * 0.85;
                }
            }

            return null;
        }
    }

	// Function to get the Cost of Goods Sold set by two different plugins
    if (!function_exists('get_cogs')) {
        function get_cogs($product) {

            $cogs = $product->get_meta('_wc_cog_cost');

            if (!empty($cogs)) {
                return $cogs;
            }

            $cogs = $product->get_meta('_alg_wc_cog_cost');

            if (!empty($cogs)) {
                return $cogs;
            }

            return null;
        }
    }

	// Get the COGS for this product
    $cogs = get_cogs($product);

    // Only continue to process if cost of goods sold is set, otherwise abort
    if (empty($cogs)) {
        wc_get_logger()->notice(
            'COGS is empty or not defined for the product ' . $product->get_id(),
            ['source' => $logger_source]
        );

        return null;
    }

	// Get the regular price for the product
    $regular_price = $product->get_regular_price();

    // If no regular price is set, abort
    if (empty($regular_price)) {
        wc_get_logger()->notice(
            'Regular price is empty for the product ' . $product->get_id(),
            ['source' => $logger_source]
        );

        return null;
    }

	// Calculate the margin on this product
    $margin = $regular_price - $cogs;

	// Calculate the margin percentage on this product
    $margin_percent = $margin / $regular_price;

	// If the margin is below 15%, abort
    if ($margin_percent < 0.15) {
        wc_get_logger()->notice(
            'The margin is below 15% for the product ' . $product->get_id(),
            ['source' => $logger_source]
        );

        return null;
    }

	// Get the condition of the product
    $condition = get_product_condition($product);

    // If the condition is null, abort
    if ($condition == null) {

        $message = '';

        // If the product is a variation, get the parent ID
        if ($product->is_type('variation')) {
            $parent_id = $product->get_parent_id();
            $message = 'Condition is not defined for the variation ' . $product->get_id() . ' of the product ' . $parent_id;
        } else {
            $message = 'Condition is not defined for the product ' . $product->get_id();
        }

        wc_get_logger()->notice(
            $message,
            ['source' => $logger_source]
        );

        return null;
    }

	// Calculate the auto min price
    $auto_min_price = get_auto_min_price($condition, $margin_percent, $regular_price);

    // If the auto min price is null, abort
    if ($auto_min_price == null) {
        wc_get_logger()->notice(
            'Auto Min Price could not be calculated for product ' . $product->get_id(),
            ['source' => $logger_source]
        );

        return null;
    }

    // Always return a float with 2 decimals
    return wc_format_decimal($auto_min_price, 2);
}, 10, 2);
Scheduled Regeneration
↑ Volver al principioOnce activated the plugin will run a batch update of the calculated Auto Pricing Min Price at 3:25 am (local time) every morning.
It requires the automatic calculation filter to be set.
The process is very resource efficient and reliable. It can run through thousands of products quickly while limiting memory use to 90% during execution.
Tests have shown that on an average server, it can process 10’000 products within 15 minutes.
Instant Regeneration
↑ Volver al principioYou can trigger the batch regeneration of all products anytime you need to. This may be convenient after you’ve done a manual import and update of product prices during the day.
Developers
↑ Volver al principioGlobal Functions
↑ Volver al principioif (function_exists( 'sgadwc_is_product_in_discount_session' )) {
$product_already_discounted = sgadwc_is_product_in_discount_session( $product_id );
// do something
}Limitations
↑ Volver al principioHere’s a list of limitations that we are aware of.
Retrieving Product Data through the REST API
↑ Volver al principioIf you are using a theme or plugin (eg. product filter) that retrieves product data through the WooCommerce REST API, you need to adjust the code to retrieve the prices discounted through Automated Discounts.
By default the WooCommerce REST API can’t return discounted prices of products that are in an Automated Discounts session.
To make the WooCommerce REST API much faster and efficient, it doesn’t load many of the WooCommerce functions, including the WooCommerce session handler. That’s why during a REST API call WooCommerce can’t determine if a product is in an Automated Discounts session and thus can’t return the discounted prices.
Here’s a comment of a WooCommerce developer on this topic: REST API doesn’t load all the theme code
He outlines a way how to load the WooCommerce session handler during a REST API call.
Another approach is to request the product data through a WordPress AJAX call. The WooCommerce session handler is loaded during an AJAX call. However, there is no standardized way to retrieve product data through an AJAX call. You would need to write your own AJAX handler (backend and frontend) and return the product data in the response.
Because both approaches highly depend on how the theme or plugin is coded, we can’t provide a standardized solution for this from our side.
FAQ
↑ Volver al principioIs the Google Automated Discounts plugin compatible with the HPOS (High Performance Order Storage)?
↑ Volver al principioYes, it is.
License Management
↑ Volver al principioLicense Recovery
↑ Volver al principioTo recover your license key and get a download link for the Google Automated Discounts for WooCommerce plugin, please use the license recovery form.