Use Google reCAPTCHA for WooCommerce to add CAPTCHA verification to supported WooCommerce, WordPress, and form-plugin submissions. Choose Google reCAPTCHA v2 or v3, reCAPTCHA.net, Google Cloud Fraud Defense, or Cloudflare Turnstile. The Checkout Rate Limiter adds temporary or permanent checkout restrictions when configured attempt limits are exceeded.
This guide covers version 1.9.31. Configure one service in General Settings, then enable the forms and actions that should use it. CAPTCHA reduces automated abuse; it does not guarantee that every fraudulent transaction or spam submission will be stopped.
Installation
↑ Back to top- Download the extension ZIP from your WooCommerce account.
- Go to WordPress Admin > Plugins > Add New Plugin > Upload Plugin.
- Select the ZIP, click Install Now, and activate the extension.
- Open reCaptcha in the WordPress admin menu. Existing installations should retain a backup and test upgrades on staging before updating a production store.
Choose a CAPTCHA service
↑ Back to top- Google reCaptcha: Google’s standard domain, with a v2 checkbox or background v3 scoring. Uses the matching site key and secret key.
- reCaptcha.net: The same Google reCAPTCHA service through an alternative domain. It supports the same Google-issued v2/v3 keys and Google dashboard. Use it when the standard Google domain is inaccessible.
- Google Cloud Fraud Defense: Uses Google Cloud assessments with a score-based website key, Google Cloud project ID, and server API key. Optional Account, Transaction and SMS protection require additional configuration and eligibility.
- Cloudflare Turnstile: Uses a Cloudflare widget site key and secret key. Verification is pass/fail; Google v2/v3 versions and score settings do not apply.
Google describes the alternative domain in its reCAPTCHA FAQ. reCAPTCHA.net is still Google’s service and still uses a necessary CAPTCHA cookie.
Get your keys
↑ Back to topChoose the credentials for your selected service: Google reCaptcha and reCAPTCHA.net use a site key plus its matching legacy secret. Google Cloud Fraud Defense uses a project ID, a score-based site key, and a separate Google Cloud API key. A legacy secret is not a Cloud API key.
Enter hostnames such asshop.example.com, without https:// or a page path. Keep domain verification enabled. Use separate keys for staging and production.
Legacy Google reCAPTCHA v2 keys
↑ Back to top- Open the reCAPTCHA registration page and sign in to your Google account.
- Enter a recognizable label, select Challenge (v2) or reCAPTCHA v2, then choose I am not a robot Checkbox. Do not select Invisible for this plugin’s v2 checkbox integration.
- Add your website domain, select a Google Cloud project if prompted, accept the required terms, and submit.
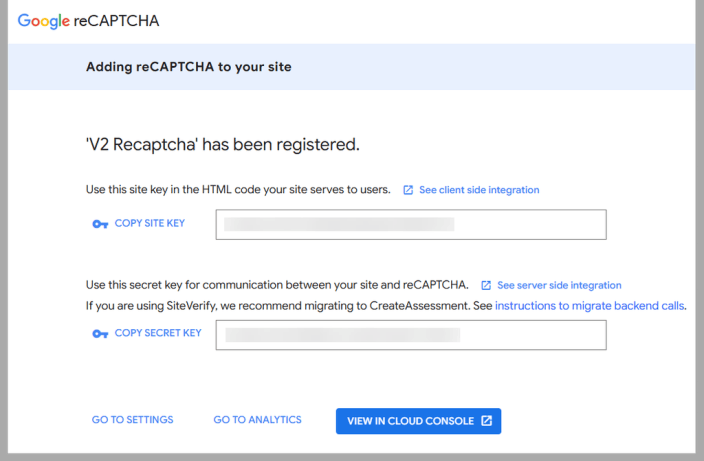
- Copy the generated Site Key and Secret Key from the key details/settings. Keep the secret private. If Google opens the Cloud console instead, use the Cloud-console instructions below.
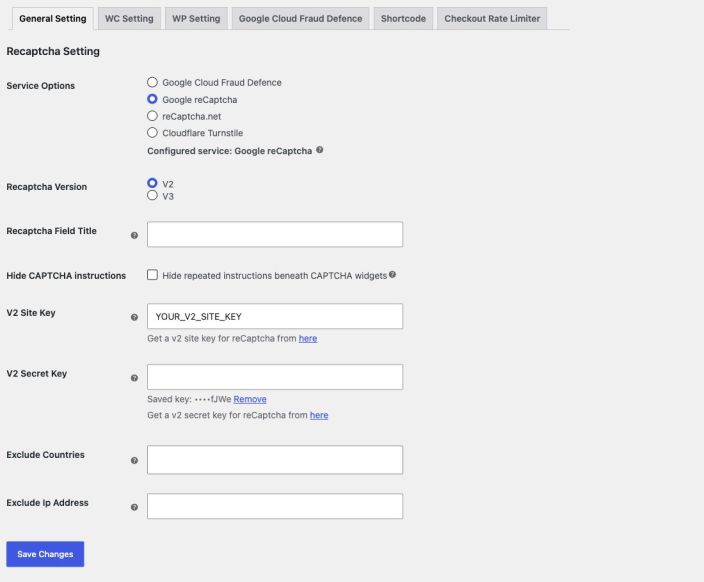
- In WordPress, open reCaptcha > General Settings. Select Google reCaptcha or reCaptcha.net and choose V2.
- Paste the site key into V2 Site Key and its matching secret into V2 Secret Key. Save Changes, enable a protected location and test its checkbox and submission.
Legacy Google reCAPTCHA v3 keys
↑ Back to top- Open the reCAPTCHA registration page and enter a new label.
- Select Score based (v3) or reCAPTCHA v3. Add the website domain, choose a project if prompted, accept the required terms and submit.
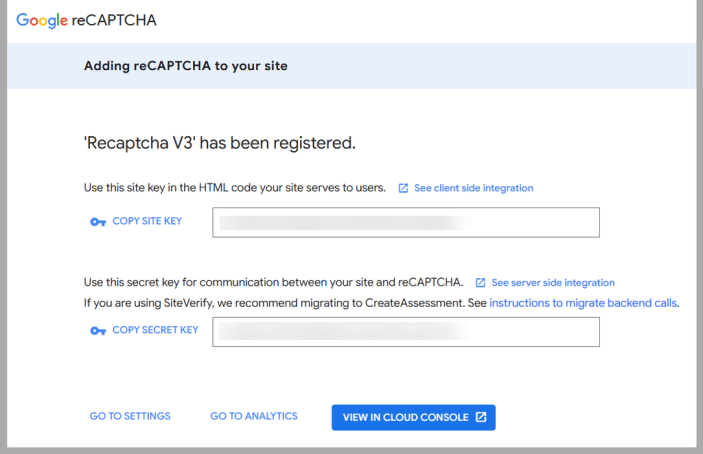
- Copy this key’s Site Key and Secret Key. Use a separate v3 pair; do not copy the v2 pair into the v3 fields.
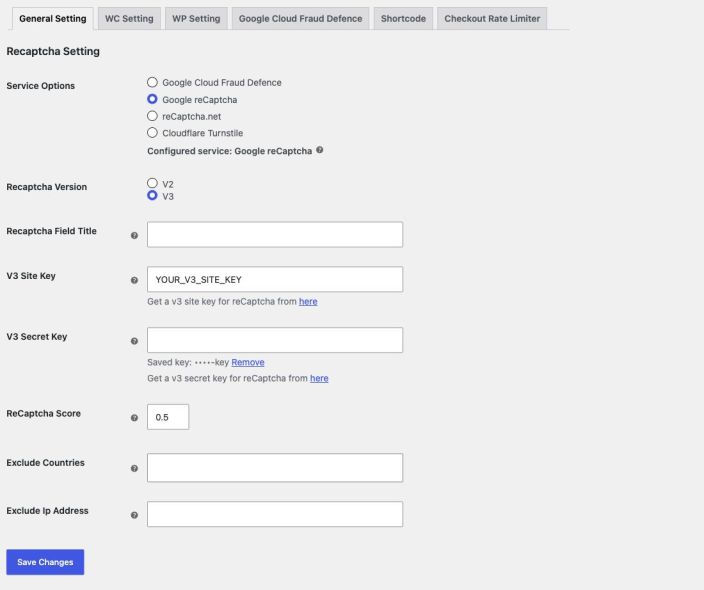
- In reCaptcha > General Setting, select Google reCaptcha or reCaptcha.net and choose V3.
- Enter the values in V3 Site Key and V3 Secret Key, set the score threshold and save. Enable a protected location, then submit its form to test verification.
v3 runs in the background without a checkbox or image puzzle. Scores below your threshold are rejected; a low score does not automatically trigger a v2 puzzle. See Google’s v3 guide.
Finding legacy keys in the Google Cloud console
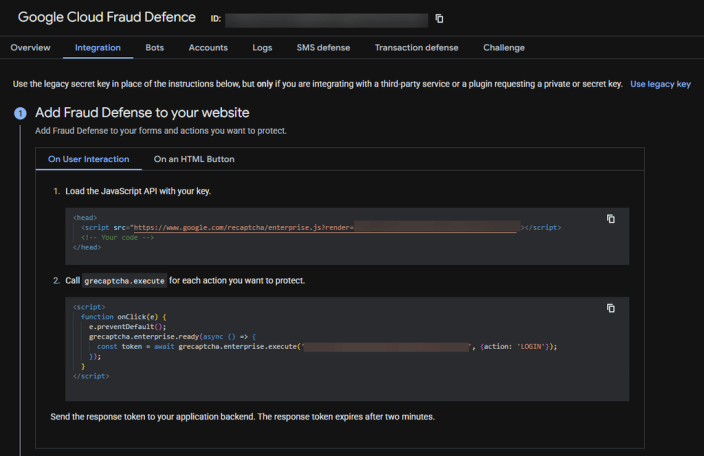
↑ Back to topIf Google sends you to Cloud instead of showing the legacy key pair, open Security > Fraud Defense > Keys, select the key and copy its Key ID as the site key. Check Platform details: Website • checkbox corresponds to v2; Website • score corresponds to v3. In Integration, select Use legacy key or Integrate with a third-party service or plugin to reveal the legacy secret. Some screens also offer Edit key > Secret key > Reveal. See Google’s key and secret lookup instructions.
Google Cloud Fraud Defence credentials
↑ Back to topThis service requires three different values. Selecting Web alone does not confirm that a key is score-based; check the created key’s type.
- Open the Google Cloud console. Use the project selector at the top to create or select your project. Copy its Project ID from project information, not the display name or project number.
- Open APIs & Services > Library, search for reCAPTCHA Enterprise API and enable it in that project.
- Open Security > Fraud Defense > Keys > Create key. Enter a name, select Web, add your domain and keep domain verification enabled.
- Create a score-based key, then confirm its details show Website • score. Copy its Key ID for the plugin’s Cloud Site Key. This build does not support checkbox or Universal keys in Cloud mode. See Google’s website key instructions.
- To get the separate API key, open APIs & Services > Credentials in the same project. Select Create credentials > API key and copy the generated key value. Do not use the legacy secret revealed in the site key’s Integration tab.
- Edit the API key. Under API restrictions, select Restrict key, choose reCAPTCHA Enterprise API and save. For server requests, use IP-address application restrictions with your hosting server’s outbound IP when available; website/referrer restrictions are for browser requests. Ask your host for the correct outbound IP. See Google’s API key management instructions.
- In WordPress, select Google Cloud Fraud Defence in reCaptcha > General Setting. Enter the project ID in Google Cloud Project ID, the score-based Key ID in Cloud Site Key, and the API key from Credentials in Cloud API Key.
- Run Test Cloud connection and then Save Changes. Enable the required protected locations and test a frontend submission. Tests consume assessment usage. Check current billing requirements and advanced-feature eligibility.
If Google reports “API key not valid”: confirm that Cloud API Key contains the value created under APIs & Services > Credentials, not the reCAPTCHA site key or legacy secret. Recheck the selected project, enabled API and key restrictions. Cloud configuration does not require pasting any API key into your theme.
Cloudflare Turnstile
↑ Back to top- Sign in to the Cloudflare dashboard and open Turnstile.
- Select Add widget, enter a widget name, and add the website hostnames. Choose the widget mode appropriate to your site.
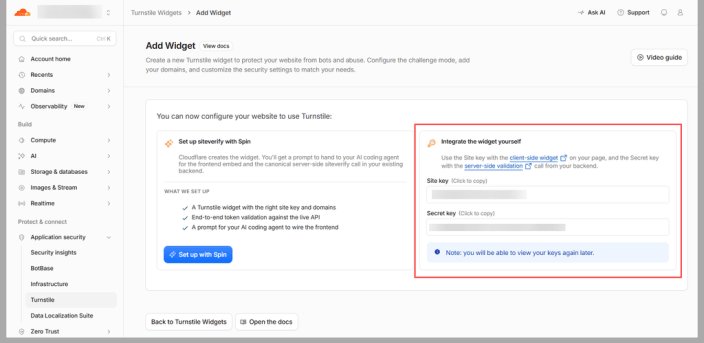
- Create the widget and copy its Site Key and Secret Key into the plugin. See Cloudflare’s current Turnstile setup guide.
Managed, Non-interactive and Invisible Turnstile widgets are supported. Widget behaviour is controlled by Cloudflare; not every visitor will need to interact with it.
General settings
↑ Back to topOpen reCaptcha > General Settings. Select the service, enter its credentials and click Save Changes. Selecting a radio button edits your pending choice; the configured-service label reflects the committed service rather than every unsaved selection.
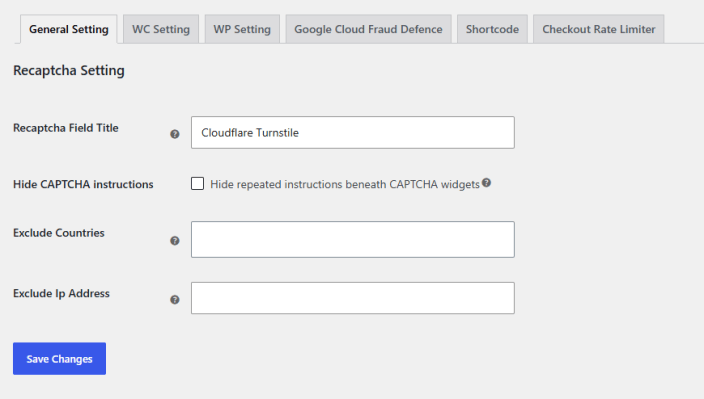
- Recaptcha Field Title: Sets a general label. Location-specific titles can be configured in the WooCommerce, WordPress and Shortcode tabs.
- Hide CAPTCHA instructions: Available for legacy v2 checkbox mode. Hide the repeated instructions beneath the plugin’s widgets. This row is hidden in v3, Cloud and Turnstile modes; its saved checkbox value is retained when hidden. It does not remove verification, provider branding or validation errors. Shared v2 dialog wording is configured separately under WC Add to Cart.
- Exclude Countries: Exempts selected countries from applicable CAPTCHA checks. Accurate detection depends on the site’s available geolocation information.
- Exclude IP Address: Enter comma-separated IPv4, IPv6 or CIDR entries, such as
192.0.2.10or192.0.2.0/24. Matching visitors are exempt from applicable CAPTCHA display and server validation. Invalid entries are rejected with settings feedback. A/0range excludes every address in that IP family. The Checkout Rate Limiter has its own separate IP exclusions. - Help icons: Use the question-mark icons beside settings for field-specific guidance.
Saved secret inputs are intentionally blank. A masked suffix indicates a stored secret. Leave the input blank to keep it, enter a replacement to change it, or use Remove and complete the indicated save/confirmation flow. Do not put a site key into a secret or API-key field.
Protection status: Incomplete required credentials disable the relevant CAPTCHA protection. A failed Cloud Save keeps the previously saved configuration, selected service, and protection status unchanged, and shows the error on the same page. Explicit credential removal and a rejected Turnstile configuration can change protection availability; read the displayed status notice. An ordinary shopper verification failure rejects that submission rather than disabling the service globally.
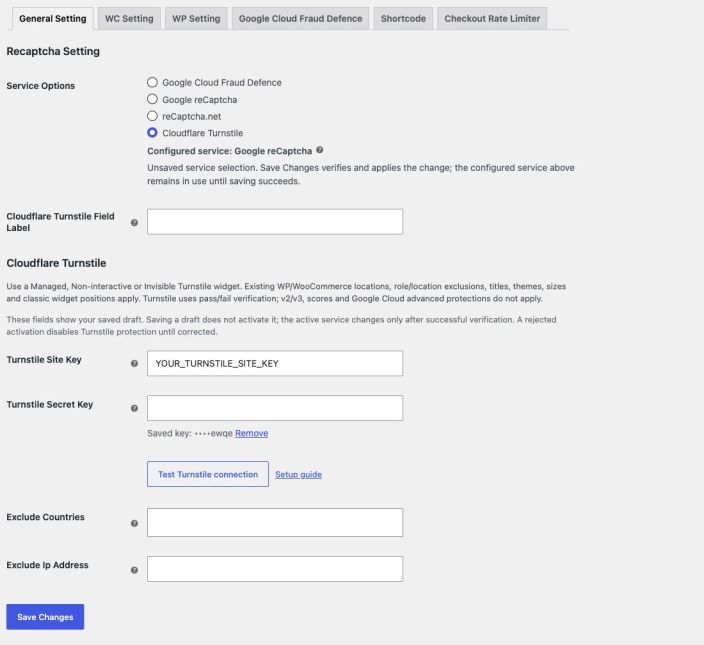
Cloud and Turnstile changes require successful verification before activation. Proposed Cloud changes are held temporarily while they are tested; they do not replace saved Cloud settings until all required checks and activation succeed. Turnstile can retain a draft that differs from its active configuration. Google v2/v3 settings must also be tested on the frontend after saving. The configured-service label alone is not a live health check. The former No-Conflict Mode option has been removed; the extension does not use it to remove other plugins’ scripts.
Google v2 and v3 settings
↑ Back to top- Recaptcha Version: Select V2 or V3. The editor shows the saved selection; V2 is used when no valid version has been saved. Each version retains its own key pair. Switching versions does not make a v2 key valid for v3.
- ReCaptcha Score: For v3, choose a threshold from 0.1 to 0.9. Scores below it are rejected. For example, 0.5 rejects a score of 0.3. A higher threshold is stricter and can reject legitimate visitors; it is not a percentage guarantee. Review actual traffic before increasing it.
Turnstile settings
↑ Back to topSelect Cloudflare Turnstile, add the widget keys, and use Test Turnstile connection. Click Save Changes to verify and activate the configuration. Then enable the required locations in WC Setting, WP Setting or Shortcode. Google score fields do not control Turnstile.
Cloud connection settings
↑ Back to top- Google Cloud Project ID: Use the project ID, not its display name or project number.
- Cloud Site Key: Use the score-based website key belonging to that project.
- Cloud API Key: Use the server API key, not a v2/v3 legacy secret.
- Minimum Bot Score: Requests below this score are blocked. Higher scores indicate more likely legitimate activity.
- Block Fraud Risk At or Above: Applies to enabled advanced risk checks. Higher fraud risk means more risky activity, so a lower cutoff is stricter. This is different from the bot-score threshold.
Run Test Cloud connection, then Save Changes to verify the connection and enabled features before activation. These tests use real browser tokens and consume assessment usage. Connection tests do not create an account, order, payment or SMS. Cloud uses background score-based verification on enabled forms, not the legacy v2 checkbox.
The two Cloud thresholds are independent numbers from 0 to 1. For example, a Minimum Bot Score of 0.5 and a fraud-risk cutoff of 0.8 are valid together. A lower minimum bot score than the fraud-risk cutoff is not, by itself, a validation error. If validation or a required verification test fails, correct the same-page error and save again; the proposed changes have not been committed.
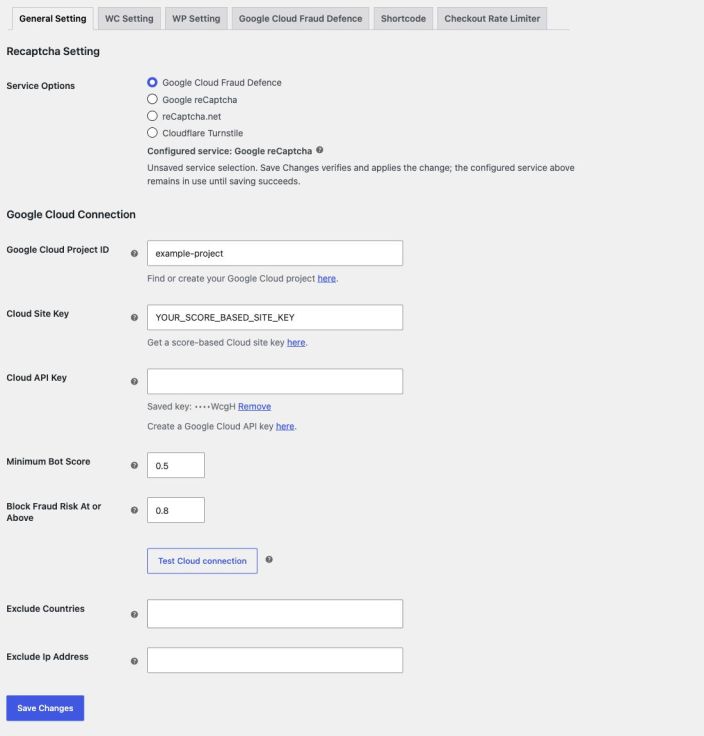
WooCommerce settings
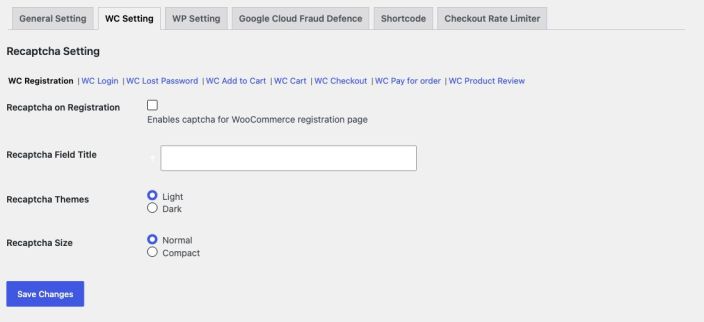
↑ Back to topOpen WC Setting and select the relevant subtab. Common controls include an enable checkbox, a field title, and, where available, user roles, position, theme and size. Click Save Changes within the selected subtab.
An empty role selection applies protection to all roles. Select Guest to target visitors who are not signed in. If a user has several roles, matching any selected role is sufficient. General country/IP exclusions still apply. Visible theme/size controls apply to checkbox widgets and compatible Turnstile displays; they do not turn score-based v3 or Cloud into a visible puzzle.
Registration login and lost password
↑ Back to top- WC Registration: Protects supported public WooCommerce account creation. The selected service is used for verification; the registration bypass protection is not limited to one provider.
- WC Login: Protects the WooCommerce login form.
- WC Lost Password: Protects WooCommerce password-reset requests.
Each subtab provides its own title and the applicable appearance controls. Public account creation during checkout and supported order-confirmation account creation are handled separately from simply adding products to a cart. Administrator/import operations and custom integrations require their appropriate authorized paths; custom code that inserts users directly outside supported hooks needs its own protection.
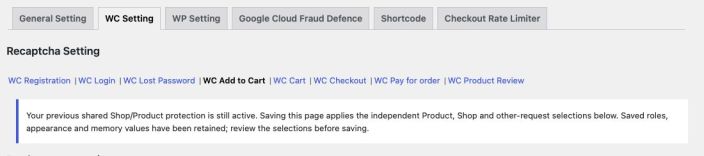
WC Add to Cart
↑ Back to topOpen WC Setting > WC Add to Cart. This single subtab replaces WC Shop and WC Product. It contains Product page settings, Shop page settings, shared verification memory, Other add-to-cart requests, and Verification dialog text, in that order. Save all these selections together with the Save Changes button at the bottom.
Existing installations: Your saved Product/Shop enable switches, roles, titles, placements, themes, sizes and memory preferences are retained. When upgrading from a build with shared Shop/Product enforcement, the existing shared policy remains active until an administrator reviews and saves this combined page. An informational notice identifies that state. Review all three protection choices before saving; the save applies the independent selections shown below.
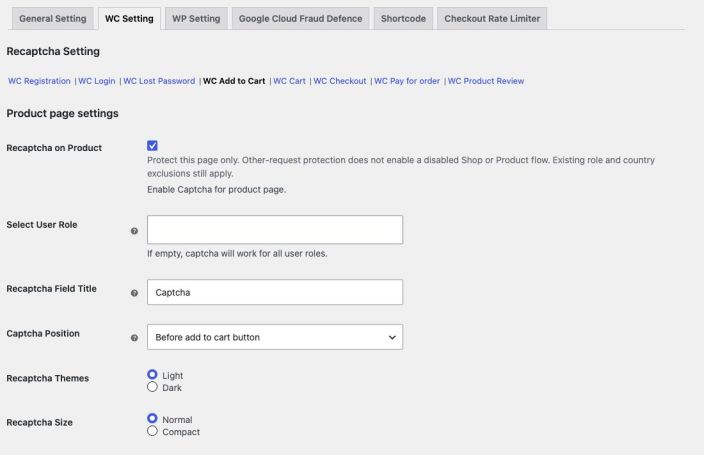
Product page settings
- Recaptcha on Product: Enable verification for supported add-to-cart actions in the Product flow. When the independent settings have been saved, enabling Product does not also enable Shop.
- Select User Role: Leave empty for all roles, choose Guest for logged-out visitors, or select the roles to protect. Any assigned matching role is sufficient.
- Recaptcha Field Title: Set the Product widget’s label.
- Captcha Position: Choose Before add to cart button or After add to cart button.
- Recaptcha Themes / Recaptcha Size: Choose Light or Dark, and Normal or Compact, for compatible visible widgets. Background v3/Cloud verification does not become a checkbox. External/affiliate outbound purchase links are outside the ordinary add-to-cart flow.
Shop page settings
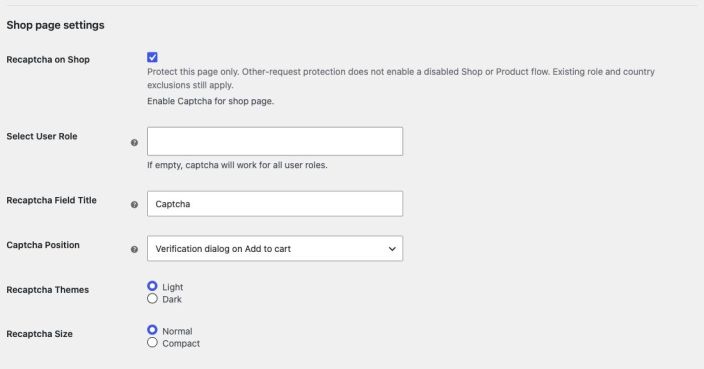
- Recaptcha on Shop: Enable supported Shop/archive add-to-cart verification independently of Product.
- Select User Role / Recaptcha Field Title: Configure the Shop audience and widget label separately.
- Captcha Position: Choose Verification dialog on Add to cart, Before shop products, or After shop products. The verification dialog is the default when no valid Shop placement has been saved. Existing valid Before/After placements remain selected on upgrade.
- Recaptcha Themes / Recaptcha Size: Set the Shop widget’s appearance. The Shop dialog uses these Shop settings; it does not inherit the Product theme or size.
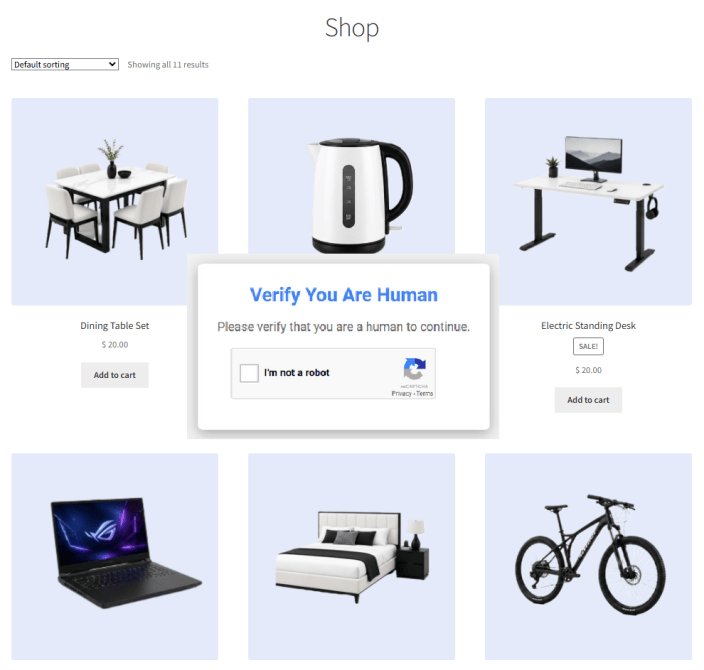
With the v2 dialog placement, clicking Add to cart opens verification and resumes that action after successful verification. Cancel or Escape closes the dialog without adding the item. v3 and Cloud remain background score checks; selecting a dialog placement does not add a fallback v2 puzzle. Turnstile follows its supported verification flow.
Remember add-to-cart verification
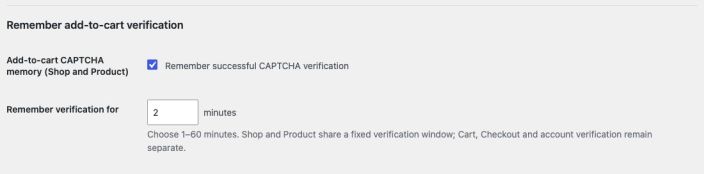
Enable Remember successful CAPTCHA verification to show the separate Remember verification for field. Enter 1–60 minutes. When the checkbox is off, both the duration label and input are hidden; the saved duration is retained.
Memory is off by default on a fresh installation, with a default duration of 2 minutes. Product, Shop and enabled Other add-to-cart requests share the same shopper-session verification window. Repeated actions do not extend its fixed expiry. Enabling memory does not enable a disabled Product or Shop flow. Cart, Checkout, Pay for order and account actions keep their separate verification requirements. Existing memory opt-ins are preserved; migration from separate older Shop/Product memory uses the shorter enabled duration where applicable.

Other add-to-cart requests
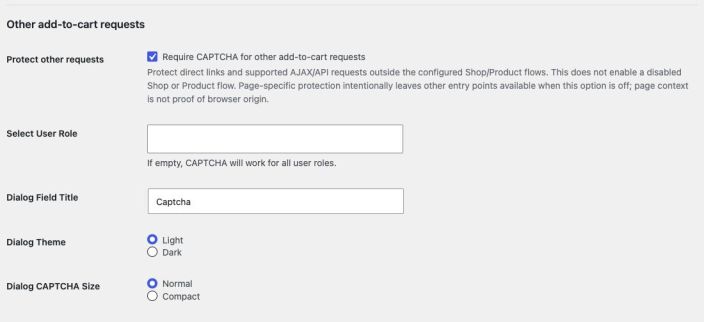
Enable Require CAPTCHA for other add-to-cart requests to cover direct add-to-cart links and supported AJAX/API requests outside the configured Product and Shop flows. Configure this section’s own user roles, Dialog Field Title, Dialog Theme and Dialog CAPTCHA Size.
This checkbox does not enable a deliberately disabled Product or Shop flow. For example, enable Product and Other requests but leave Shop off: Product and the supported Other requests require verification, while the disabled Shop flow remains available without a Shop CAPTCHA. To protect both page flows, enable both page switches.
When Other protection is off, those other entry points remain available. A bare direct URL or custom caller may receive a verification error rather than a popup, because it has no ordinary page button to resume. Use a supported verified button flow or integrate verification into that custom caller.
| Example saved selection | Product flow | Shop flow | Other supported requests |
|---|---|---|---|
| Product on; Shop off; Other off | Requires verification | Not protected by Shop | Not protected by Other |
| Product on; Shop off; Other on | Requires verification | Not protected by Shop | Requires verification |
| Product off; Shop off; Other on | Not protected by Product | Not protected by Shop | Requires verification |
| Product on; Shop on; Other on | Requires verification | Requires verification | Requires verification |
The examples assume the independent policy has been saved, the selected service is configured, the visitor matches the section’s role selection, and no general country/IP exclusion applies.
Verification dialog text
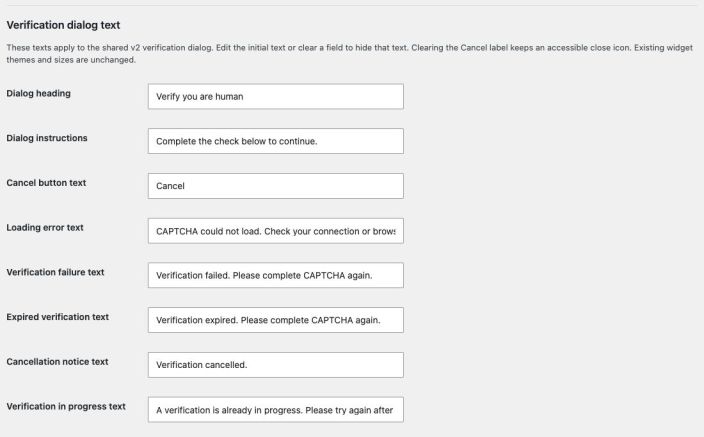
These eight plain-text fields appear after the Other request settings and apply to the shared v2 verification dialog. Fields initially contain the translated default text and show the same text as a placeholder. Edit the value to customize it. An explicitly saved blank hides that text on the frontend; the placeholder is not a fallback for a cleared value.
| Field | Initial text |
|---|---|
| Dialog heading | Verify you are human |
| Dialog instructions | Complete the check below to continue. |
| Cancel button text | Cancel |
| Loading error text | CAPTCHA could not load. Check your connection or browser blockers, then reload and try again. |
| Verification failure text | Verification failed. Please complete CAPTCHA again. |
| Expired verification text | Verification expired. Please complete CAPTCHA again. |
| Cancellation notice text | Verification cancelled. |
| Verification in progress text | A verification is already in progress. Please try again after it finishes. |
Clearing Cancel button text keeps an accessible close icon. Default labels/messages use the extension’s translation domain; saved custom strings support the connected multilingual string-translation integration. Until a new shared heading is saved, existing per-location dialog headings are retained. These text fields do not change widget themes or sizes, and do not customize Google/Cloudflare’s own branding, puzzle text or provider errors.
Cart
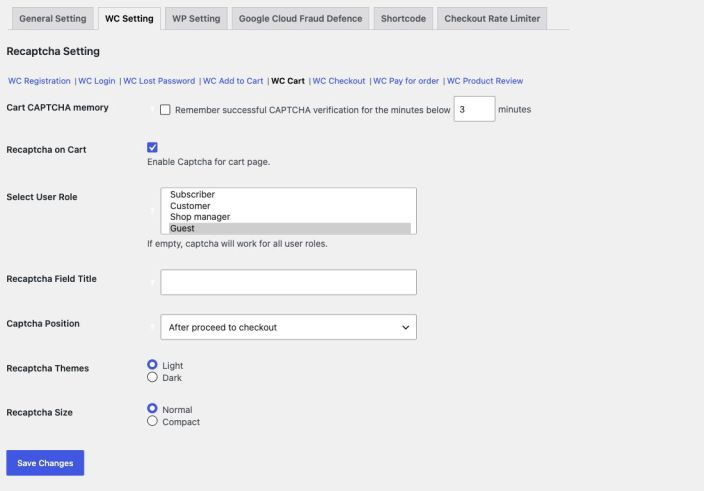
↑ Back to topEnable WC Cart to protect supported cart mutations, including quantity updates, removals and coupon actions. Cart Block and Mini-Cart Block flows can offer a verification dialog where no inline widget is available. A customer should receive a visible verification error when an action cannot proceed.
- Classic Cart position labels: Before proceed to checkout or After proceed to checkout. The actual location also depends on the cart template and selected hook.
- Cart CAPTCHA memory: A separate optional 1–60 minute window for repeated cart changes. It is off by default and does not extend with every action.
- Proceed to Checkout: Navigation itself is not the cart mutation being protected. Enable Checkout protection to validate checkout submissions, including visits that reach checkout directly.
Checkout
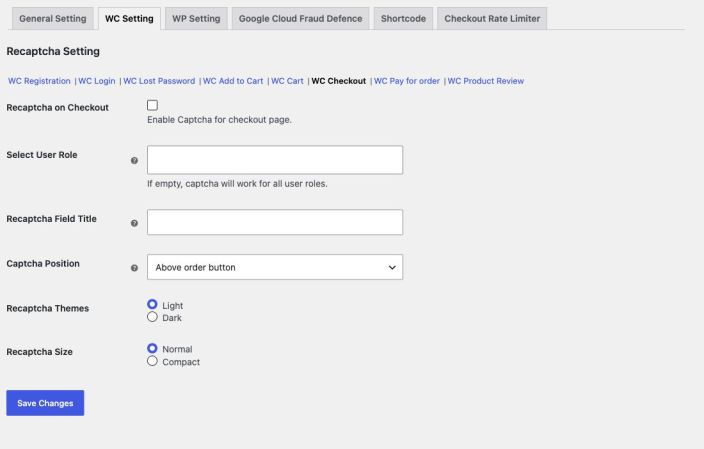
↑ Back to topEnable WC Checkout to verify supported checkout submissions. The Captcha Position menu retains these options:
- Before checkout form
- After customer details
- Before order notes
- After order notes
- Before payment
- Above order button — the default
- Below order button
Classic Checkout uses WooCommerce hooks. Checkout Blocks uses its integration and available block elements; the same label does not guarantee an identical visual location across checkout types, themes and providers. For example, the historical “Before checkout form” setting uses the billing-form hook on Classic Checkout. Test the configured checkout, including free orders and optional/hidden address or notes sections. Above order button is the recommended starting point. The additional After customer details placement is retained.
When Checkout protection applies to their role, signed-in customers and administrators require verification too. Prefilled billing/shipping details or a previous successful order do not grant a permanent exemption. In Checkout Blocks, the configured verification loads for these visits even when address fields are already filled.
A solved Cart or Shop CAPTCHA does not authorize Checkout. The PayPal Payments integration gates supported checkout initiation before payment so a customer must complete required verification first. This does not promise automatic compatibility with every gateway’s separate express buttons or custom payment route.
Pay for order and product reviews
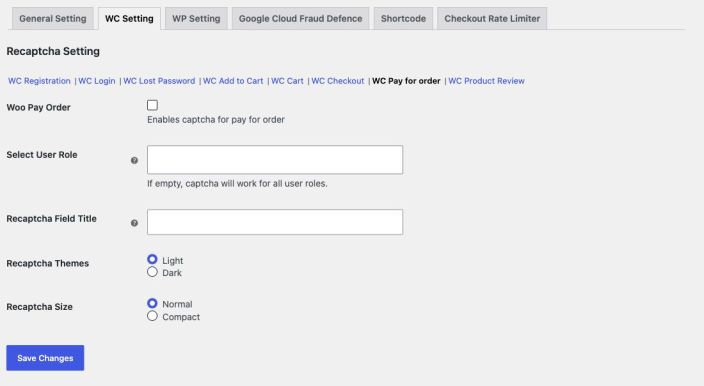
↑ Back to topWC Pay for order controls payment of an existing order through the supported pay-for-order flows. Configure its enable switch, roles, title and applicable appearance separately from ordinary Checkout. It is not the retired WC Payment Method subtab.
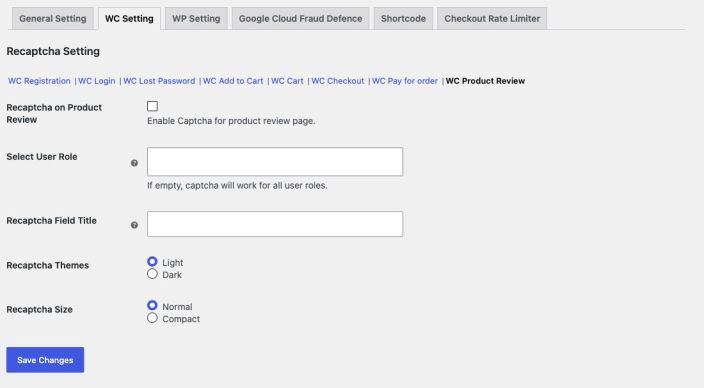
WC Product Review protects supported product-review submissions. Choose roles if required, then configure the title and appearance. Authorized moderation and administrator integrations can have separate handling from public customer submissions.
WordPress settings
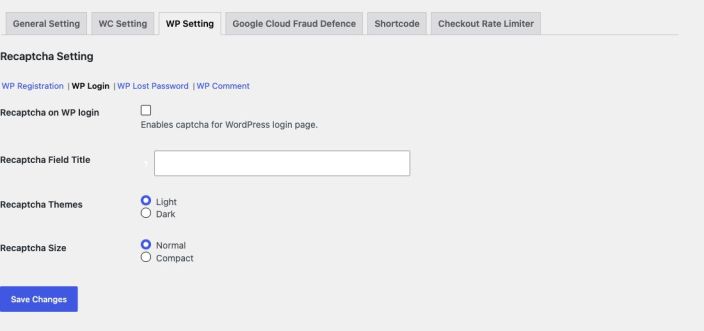
↑ Back to topOpen WP Setting. Configure each of these subtabs independently and save the changes:
- WP Registration: WordPress public registration. WordPress must also permit registration for its form to be available.
- WP Login: The WordPress login page and supported embedded WordPress login forms.
- WP Lost Password: Public password-reset requests. Authorized administrator reset operations are handled separately.
- WP Comment: Supported public comments, including covered REST comment/review submissions. Use the role selector where available.
Use the title, Light/Dark theme and Normal/Compact size where applicable to the selected provider. Save and test as the intended visitor role; a logged-in administrator is not always a suitable substitute for a guest test.
Google Cloud Fraud Defence protections
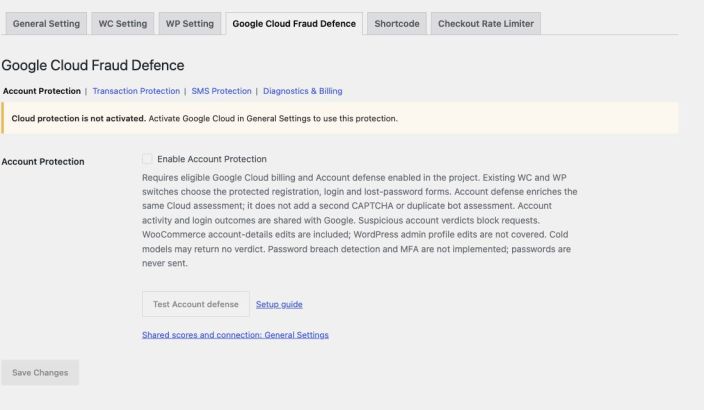
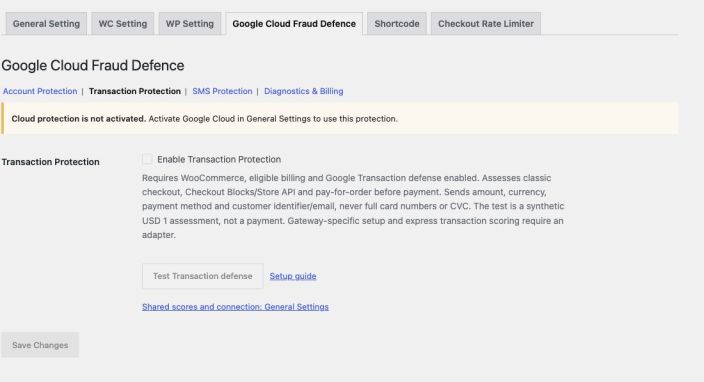
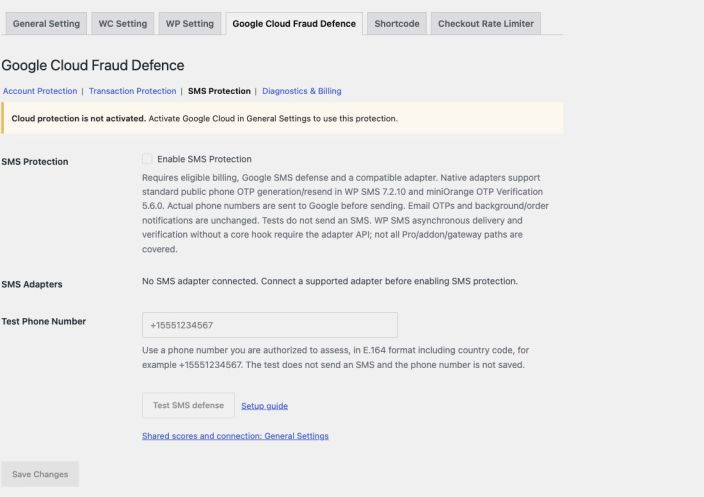
↑ Back to topThese subtabs add optional features to the Cloud service. They are unavailable until Google Cloud Fraud Defence is activated in General Setting. They do not activate simply because legacy Google or reCAPTCHA.net keys exist. The following screenshots show that inactive state intentionally.
Account Protection
↑ Back to topEnable Account Protection only after the project is eligible and Google Account defense is configured. It enriches supported login, registration, password-reset and WooCommerce account-details activity. Account identifiers/activity and outcomes are shared with Google. It does not add a second visible CAPTCHA, password-breach detection or multi-factor authentication. Passwords are not sent to Google. A new model can return no account verdict.
Use Test Account defense, review the response, then save. See Google’s Account defense setup.
Transaction Protection
↑ Back to topEnable Transaction Protection for supported WooCommerce checkout and pay-for-order assessments. It can send transaction amount, currency, payment method and customer identifiers/email to Google. Full card numbers and CVC are not sent by this integration. Google feature eligibility and billing are required; gateway-specific express scoring may require an adapter.
Test Transaction defense uses a synthetic assessment, not a real charge. See Google’s Transaction defense guidance.
SMS Protection
↑ Back to topSMS Protection requires eligible Google SMS defense configuration and a compatible SMS adapter. The integration supports specified public phone OTP generation/resend hooks in WP SMS and miniOrange OTP Verification; it is not a universal filter for every SMS plugin, gateway, or background message.
Review SMS Adapters before enabling it. A supported path sends the actual phone number to Google before sending. Enter an authorized test number in E.164 format, including country code, and use Test SMS defense. The test does not send an SMS. Email OTPs and ordinary order/background notifications are outside this SMS flow. See Google SMS defense.
Diagnostics and billing
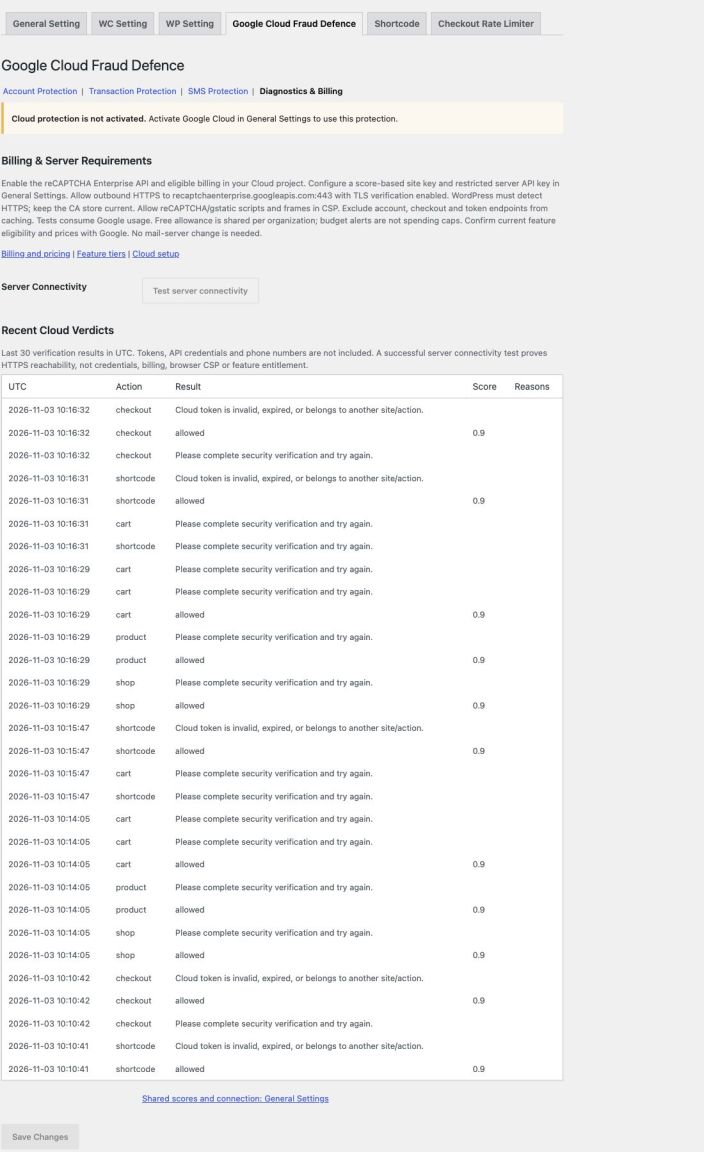
↑ Back to topUse Diagnostics & Billing to review server requirements, official billing links and the last 30 Cloud verification results in UTC. The table lists the action, result, score and reasons without exposing tokens, API credentials or phone numbers.
Test server connectivity checks HTTPS reachability. It does not prove that the API key, browser scripts, hostname permissions, billing or advanced-feature entitlement are correct. Run the real-token connection and feature tests as well. Confirm current Google pricing rather than assuming tests or advanced features are free.
Shortcode and form integrations
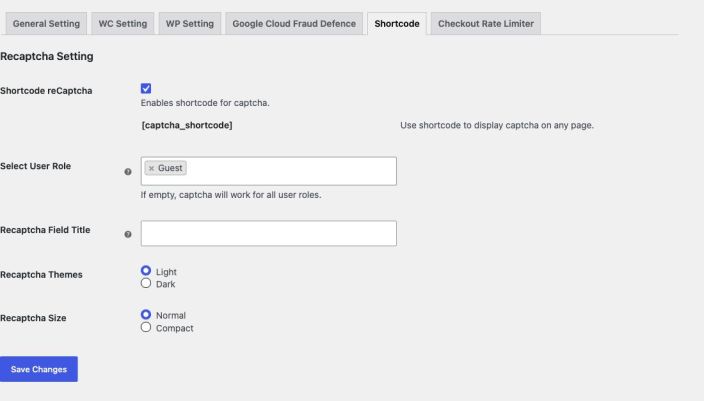
↑ Back to topOpen Shortcode, enable Shortcode reCaptcha, and configure roles, title and applicable appearance. Insert [captcha_shortcode] at the supported form location, then save and test the form.
Rendering a shortcode on an arbitrary page does not automatically protect every custom endpoint. The server processing the submission must use a supported integration or adapter. Current compatibility covers specific flows in Contact Form 7, WPForms, Ninja Forms, Formidable Forms, Jetpack forms and Ultimate Member. Placement and version-specific form features still require testing; do not add a second provider widget to the same form without checking both integrations.
Checkout Rate Limiter
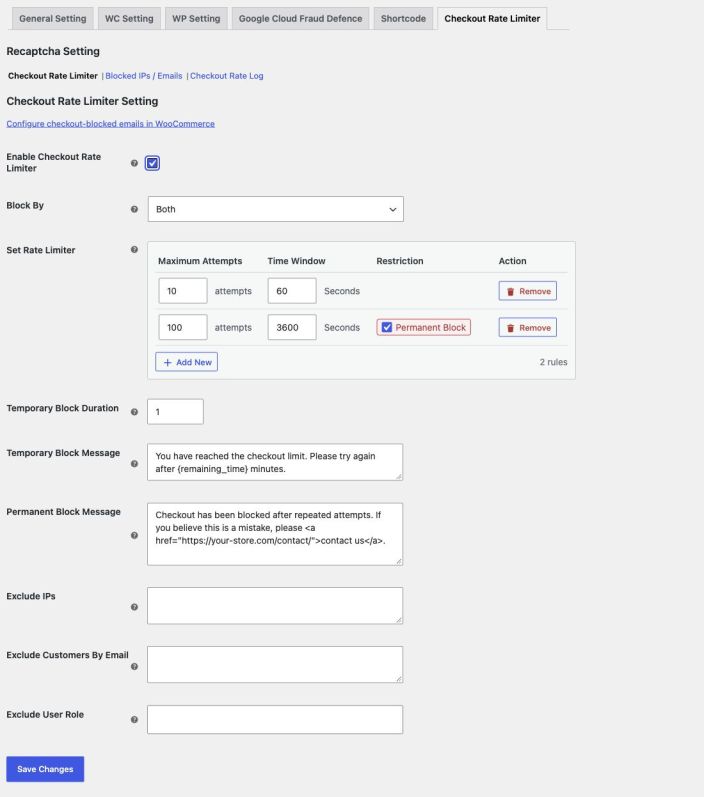
↑ Back to topOpen Checkout Rate Limiter > Checkout Rate Limiter and enable the limiter. It tracks applicable server-received checkout attempts rather than merely hiding the Place Order button. The limiter is shared across the supported CAPTCHA service types.
An attempt is counted when a covered server-side checkout verification step is reached, not simply every time the Place Order button is clicked. An order does not have to be created: failed CAPTCHA verification can count. A click that sends no request, or a request stopped by earlier validation before that step, is not necessarily counted. Do not use the limiter as a count of completed orders.
- Block By: Choose IP address only, Email only, or Both. The identity rules below determine which restrictions are safe to create automatically.
- Set Rate Limiter: Add rules with Maximum Attempts and a Time Window in seconds. Each rule counts attempts in its own window. A rule allowing 10 attempts blocks the next attempt when the limit is exceeded.
- Add New / Remove: Add or delete a rule. Only the final row offers Permanent Block; adding another row removes that selection from the preceding row. Review the final row before saving.
- Temporary Block Duration: Minutes for a temporary restriction after a rule triggers. This is separate from the rule’s counting window.
- Temporary Block Message: Use
{remaining_time}for the remaining time in minutes. It is not a remaining-attempts counter. - Permanent Block Message: Explain the restriction and how to contact the store. Safe links can be included directly, for example
<a href="https://your-store.com/contact/">contact us</a>. Classic notices can display a clickable link; Blocks/API errors use a plain-text version including the URL. - Exclusions: Configure Exclude IPs, Exclude Customers By Email and Exclude User Role. Supported IP exclusions include validated IPv4, IPv6 and CIDR entries. Review exclusions when investigating a block that does not apply.
Example: allow 10 attempts in 60 seconds with a temporary block, followed by a final rule allowing 100 attempts in 3600 seconds with Permanent Block selected. Choose limits appropriate to genuine customer traffic; permanent restrictions require careful review and manual unblocking.
Identity policy: Failed CAPTCHA attempts count against the requesting IP/session. A guest-entered email is not proof of ownership, even after CAPTCHA is solved: automatic guest-email limits are temporary and tied to the IP/session and email pair. They do not permanently block that email for everyone. Registered-account restrictions are tied to the authenticated customer and cannot be bypassed by changing only the billing email. Administrator-created email blocks can be permanent.
Ensure your host/CDN supplies the real visitor IP to WordPress. Untrusted forwarded headers are not a safe substitute. Shared IPs can belong to several genuine customers. Use the question-mark tooltips for field descriptions, then click Save Changes.
Blocked IPs and Emails
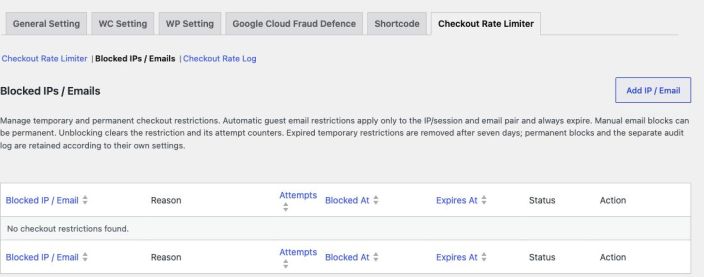
↑ Back to topOpen Blocked IPs / Emails to manage current checkout restrictions. The table shows the blocked identity, reason, attempts, blocked time, expiry, status, and available actions. Search can match the stored email or IP as well as the displayed identity. Use View where available for details and Unblock to remove a restriction and clear its attempt counters.
Manual restrictions remain available when automatic counting is disabled. If an identity is also excluded from limits, review the exclusion policy. Expired temporary restrictions are retained briefly and removed after seven days; permanent blocks are retained until removed. In Both mode, IP and email restrictions can be independent, so remove each restriction that should no longer apply.
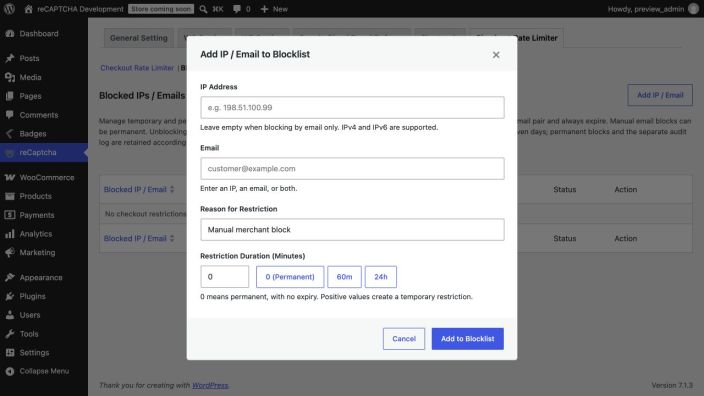
- Click Add IP / Email.
- Enter an IPv4/IPv6 address, an email, or both. Leave the other identity blank if it should not be blocked. Manual IP entries are individual addresses, not CIDR exclusion ranges.
- Enter a meaningful Reason for Restriction.
- Set Restriction Duration (Minutes): 0 means permanent; a positive value creates a temporary block. The 60m and 24h buttons fill common durations.
- Click Add to Blocklist. When both IP and email are supplied, they are separate manual restrictions, not an AND condition requiring both to match.
Checkout Rate Log
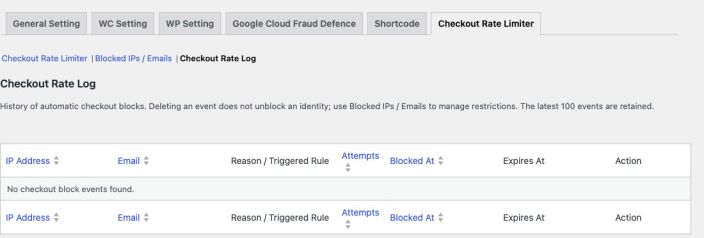
↑ Back to topThe Checkout Rate Log is a history of automatic block events, separate from the current blocklist. It includes IP address, email where applicable, reason/triggered rule, attempts, blocked time, and expiry. It is not a log of every successful checkout. The latest 100 events are retained.
The reason describes why the restriction was created. An automatic triggered-rule label comes from the configured rule and its attempt/time-window values; a manual restriction uses the administrator’s reason. Deleting a log event does not unblock anyone. Use the blocklist to remove a restriction.
Checkout blocked email
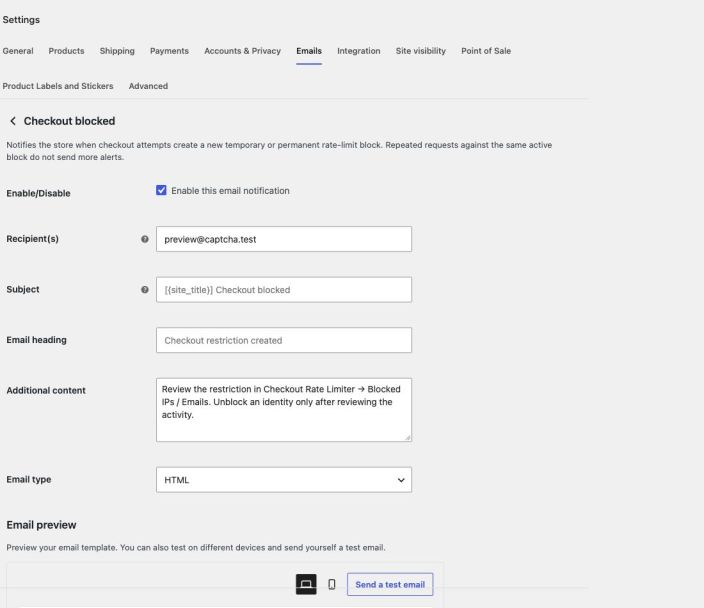
↑ Back to topOpen WooCommerce > Settings > Emails > Checkout blocked, or use the configuration link in the limiter settings. This administrator notification uses WooCommerce’s email framework, header and footer.
- Enable/Disable: Turn the notification on or off.
- Recipient(s): Enter recipients separated by commas.
- Subject: The default is
[{site_title}] Checkout blocked, without a trailing colon. Available placeholders include{site_title},{blocked_identity}and{block_duration}. - Email heading and Additional content: Customize the heading and merchant guidance.
- Email type: Select an available WooCommerce format, such as HTML, plain text or multipart.
The notification includes the identity/IP, email where applicable, reason, triggered rule, attempts, blocked time, duration and expiration. Alerts are for newly created automatic restrictions; repeated requests against the same active block do not send another alert each time. This notification is not an order-payment failure email or a log of every manually added block.
Does a permanent block notify the administrator?
A newly created automatic permanent restriction can send this email when the notification is enabled and recipients are configured. Temporary automatic restrictions use the same notification. Manually adding a permanent block does not send this automatic-block alert. Actual receipt still depends on WordPress/WooCommerce mail delivery.
For template overrides, use a child theme and copy the templates to your-child-theme/woocommerce/emails/ka-grc-checkout-blocked.php and your-child-theme/woocommerce/emails/plain/ka-grc-checkout-blocked.php. WooCommerce’s email settings show the source and destination paths. Keep overrides updated after plugin changes.
Testing and troubleshooting
↑ Back to top- Test the full flow: Use staging, confirm the saved provider/version and hostname, then test one successful verification and one unsolved submission for each enabled action. A visible widget or disabled button alone does not prove server enforcement.
- Empty Google charts: Confirm the dashboard key ID matches the key actually loaded on the protected page. v2 and v3 usually use different keys. Charts aggregate activity and may take time or sufficient traffic to appear; a page visit alone is not proof of a verification request. See Google analytics guidance.
- v3 rejects a visitor: Review the threshold and returned verdicts. Repeated automated tests can receive low scores. A score failure means validation rejected the request; do not treat it as evidence that no token was requested.
- Cloud API key not valid: Check the server API key, its project, API restrictions and enabled API. Do not paste the site key or legacy secret into Cloud API Key.
- Cloud key type error: Use a score-based website key. This Cloud integration does not accept checkbox or Universal keys.
- Scripts or widgets do not load: Review browser errors, CSP, ad/privacy blockers, firewall rules and hostname restrictions. Allow the selected provider’s required scripts and frames. Exclude protected forms and token endpoints from aggressive caching/minification rules, then retest.
- After an upgrade: Clear relevant browser/CDN/page caches and confirm the installed version and current frontend assets. Saved-secret fields should remain blank with a masked suffix, not show the site key copied into the secret.
- CAPTCHA still shows for an excluded IP: Confirm the exclusion was saved and matches the public address the website sees. IPv4/IPv6, a changed connection or a VPN can affect that address. Clear relevant cached pages and test again. General CAPTCHA exclusions and Checkout Rate Limiter exclusions are separate settings. If the hosting server reports the wrong visitor address, ask the host to correct visitor-IP detection.
- IP blocks affect everyone: Check whether WordPress sees a proxy/CDN address rather than the real visitor IP. Ask the host/CDN to restore it safely.
- Third-party forms or gateways: Test their actual submission mechanism. Another plugin can load its own CAPTCHA or use a separate endpoint; installing this extension does not make every custom route protected. The retired No-Conflict Mode is not available to remove those scripts.
- CAPTCHA and card testing: CAPTCHA and rate limits are layers of protection, not a guarantee against human attackers, stolen cards, or every bot. Combine them with suitable gateway/fraud controls. See WooCommerce’s card-testing guidance.