Payment Plans Suite allows customers to buy products through convenient installment payments.
Installation
↑ Back to top1. Download the payment-plan-suite.zip file from your WooCommerce account.
2. Go to WordPress Admin > Plugins > Add New and Upload Plugin with the file you downloaded with Choose File.
3. Install Now and Activate the extension.
More information at: Install and Activate Plugins/Extensions.
Setup and Configuration
↑ Back to topCreating Plans
↑ Back to topPlans must be created in order for the plugin to work(for both Product Level Payment Plan and Cart Level Payment Plan). To create a new plan go to “WooCommerce > Payment Plan Suite > Plans” and click “Add Plan” button.
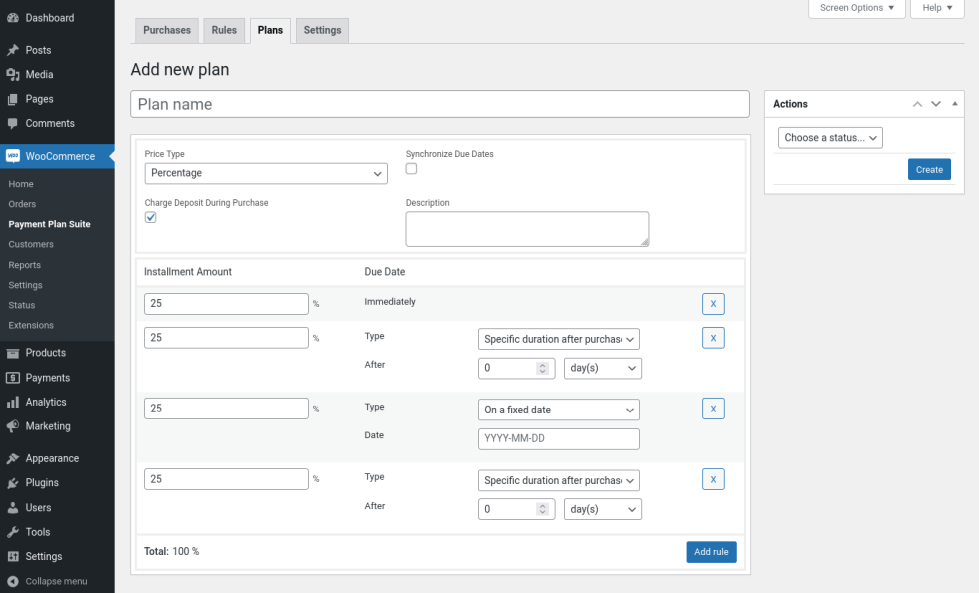
Give the plan name in the title field. The name given here will be displayed for the customers in the frontend.
Price Type: Select “Fixed” in this option to set fixed price for each installment. The price set for each product will be overridden if you have set fixed price type. Select “Percentage” in this option to set percentage value for each installment. Percentage will be calculated from Regular/Sale price of the product.
Charge Deposit During Purchase: If you want to get a deposit amount at the time of purchase, then enable this option. If disabled, 0 amount will be charged at the time of purchase.
Description: You can describe about the plan details here. The given description will be displayed for the customers in the frontend.
Synchronize Due Dates: Enable this option if you want the due date for each installment to be set on specific specific date of the month
If “Synchronize Due Dates” option is enabled,
Synchronization Start Date: Set the 1st installment due date in this option. Setting past date here won’t be a problem. This option is mainly focused on getting date of the month.
Installment Frequency: Set the gap between due dates using this option. You can set 1, 2, 3, 4, 6 and 12 months as frequency.
Click “Add Rule” button to add an installment and click the button multiple times to add multiple installments as per your requirement.
Installment Amount: For each installment you have to set the installment amount/percentage.
If “Synchronize Due Dates” option is disabled,
Click “Add Rule” button to add an installment and click the button multiple times to add multiple installments as per your requirement.
Installment Amount: For each installment you have to set the installment amount/percentage.
Due Date: If you have enabled “Charge Deposit During Purchase” option, then the due date for the 1st installment will be automatically set as “Immediately” meaning 1st installment amount will be charged at the time of purchase. If deposit option is disabled, then you need to set the due date for 1st installment along with all the other installments using the below options.
Type: Select “Specific duration after purchase date” if your requirement is to dynamically set the due date based on purchase date. If you have set “After 10 days”, then it means the due date will be after 10 days of previous due date or after 10 days of purchase date. Select “On a fixed date” if your requirement is to set a static due date and set the due date in “Date” field.
Synchronization example:
Synchronization Start Date – 01/01/2023
Installment Frequency – 2 months
Based on the above values, due dates will be set as below:
- 01/01/2023
- 01/03/2023
- 01/05/2023
- 01/07/2023
- 01/09/2023
- 01/11/2023
- 01/01/2024
- 01/03/2024
Number of installments created – 3 (click Add rule 3 times)
Case 1:
Purchase Date – 10/02/2023
Due Dates:
- Installment 1 – 01/03/2023
- Installment 2 – 01/05/2023
- Installment 3 – 01/07/2023
Case 2:
Purchase Date – 25/11/2023
Due Dates:
- Installment 1 – 01/01/2024
- Installment 2 – 01/03/2024
- Installment 3 – 01/05/2024
Creating Rules
↑ Back to topAfter creating the payment plans, the next step is to link the plans with Rules. In order to show payment plan options, at least 1 rule must be created.
Creating Rules – Product Level
To create a new rule for product level, go to “WooCommerce > Payment Plan Suite > Rules > Product Level” and click “Add Rule” button.
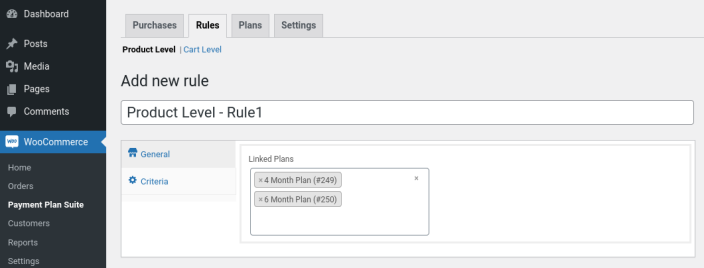
Give the name for the rule in Title field. The title is only for your reference purpose. It won’t be displayed anywhere for the customers in the frontend.
General
Linked Plans – You have to search and select the previously created plans in this option.
Criteria
Product Filter: Using this filter you can show/limit this rule only for specific products. The payment plan linked to this rule will be available for the applicable products.
User Filter: Using this filter you can show/limit this rule only for specific users. The payment plan linked to this rule will be available only for the selected users.
Creating Rules – Cart Level
To create a new rule for cart level, go to “WooCommerce > Payment Plan Suite > Rules > Cart Level” and click “Add Rule” button.
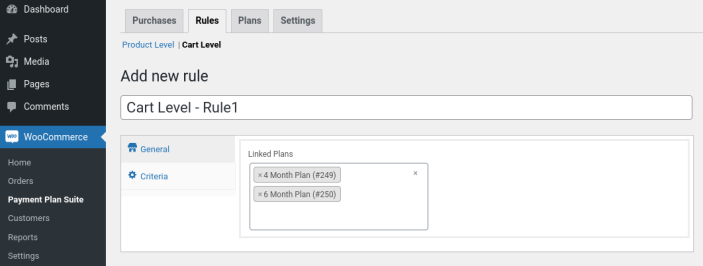
Give the name for the rule in Title field. The title is only for your reference purpose. It won’t be displayed anywhere for the customers in the frontend.
General
Linked Plans: You have to search and select the previously created plans in this option.
Criteria
User Filter: Using this filter you can show/limit this rule only for specific users. The payment plan linked to this rule will be available only for the selected users.
Minimum Subtotal: If you want the rule to be applied only if the cart subtotal is greater than or equal to a set value, then set the minimum cart subtotal in this option. If you don’t want to give a minimum limit, then leave the field empty.
Maximum Subtotal: If you want the rule to be applied only if the cart subtotal is lesser than or equal to a set value, then set the maximum cart subtotal in this option. If you don’t want to give a maximum limit, then leave the field empty.
Plugin Setup
↑ Back to topAfter creating plans and linking the plans with Rules, you just have to do some mandatory setup and other advanced optional setup. To setup the plugin, go to “WooCommerce > Payment Plan Suite > Settings”.
General
General Settings

Product Level Plan Purchase: If your requirement is to give payment plan option for each product in single product page, then select “Optional/Mandatory” in this option. If “Optional” is selected, full payment option will be available for customers in addition to payment plan options. If “Mandatory” is selected, full payment option will be hidden for the customers which means customer can purchase the product only with payment plan options.
Cart Level Plan Purchase: If your requirement is to give payment plan option for whole cart items in cart and checkout pages, then select “Optional/Mandatory” in this option. If “Optional” is selected, they can choose between Full Payment and Installment Payment. If “Mandatory” is selected, Full Payment option won’t be available for customers which means they can place the order only with payment plan options.
Payment Method Settings
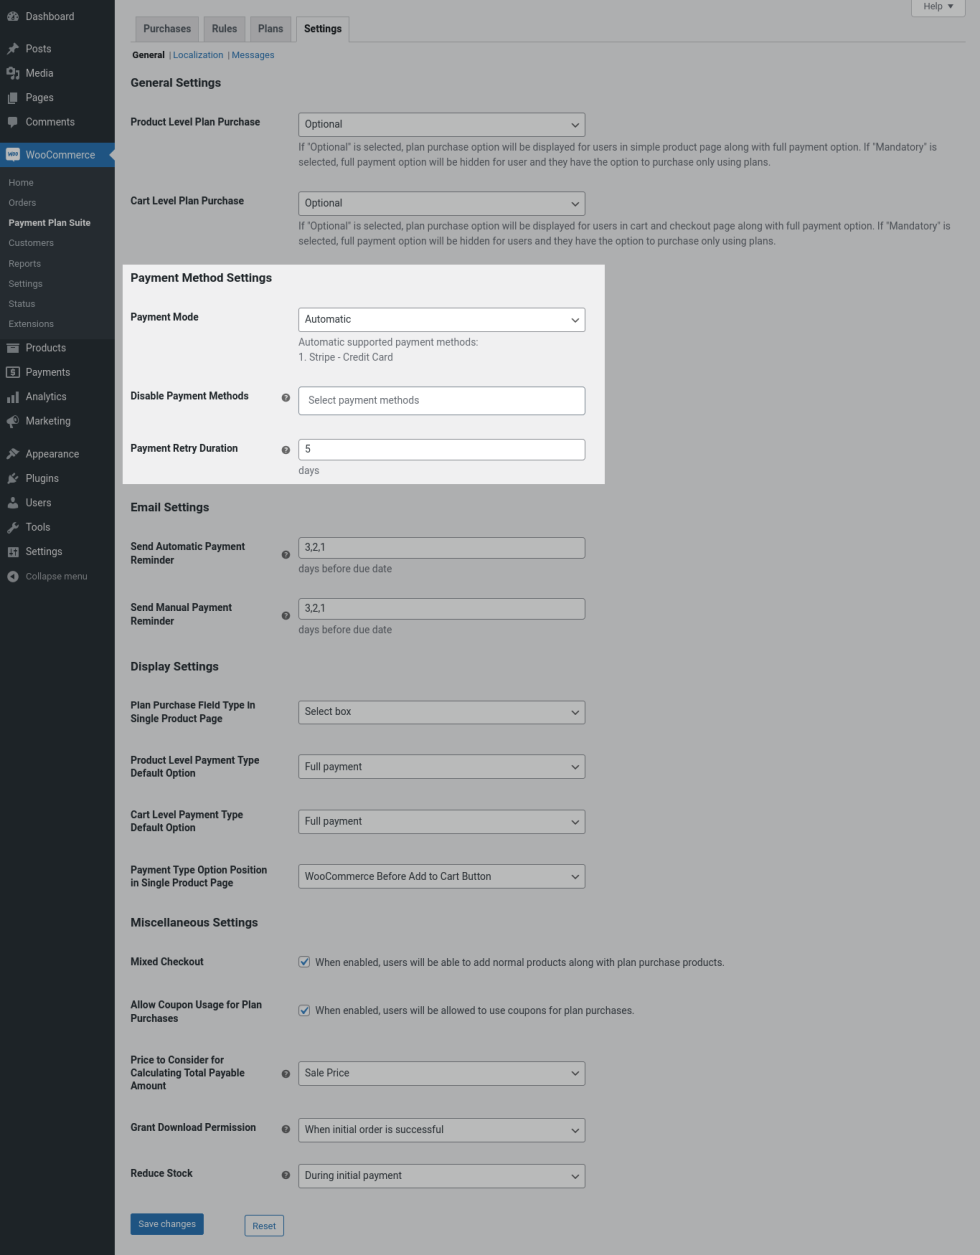
Payment Mode: Select “Automatic” if you want the future installments to be charged automatically from the customer account. Select “Manual” if you want to get manual payments. In manual mode, customers can pay their installments using the pay link which they can find in the payment reminder emails sent automatically from the plugin. Else, they can pay from their “My Account Page > Plan Purchases > View the respective plan purchase” and click the pay link.
Automatic supported payment methods:
Stripe – Credit Card(using Stripe for WooCommerce plugin)
Disable Payment Methods: If you want to hide any specific payment methods for plan purchase orders, then select the payment methods here.
Payment Retry Duration: If the purchase is made in Automatic mode and if an installment payment fails, plugin will retry for payments from the default card which the customer has set in their “My Account page > Payment Methods” section. Payment retry will trigger once every day. How many days the payment has to be retried can be configured in this option.
Email Settings
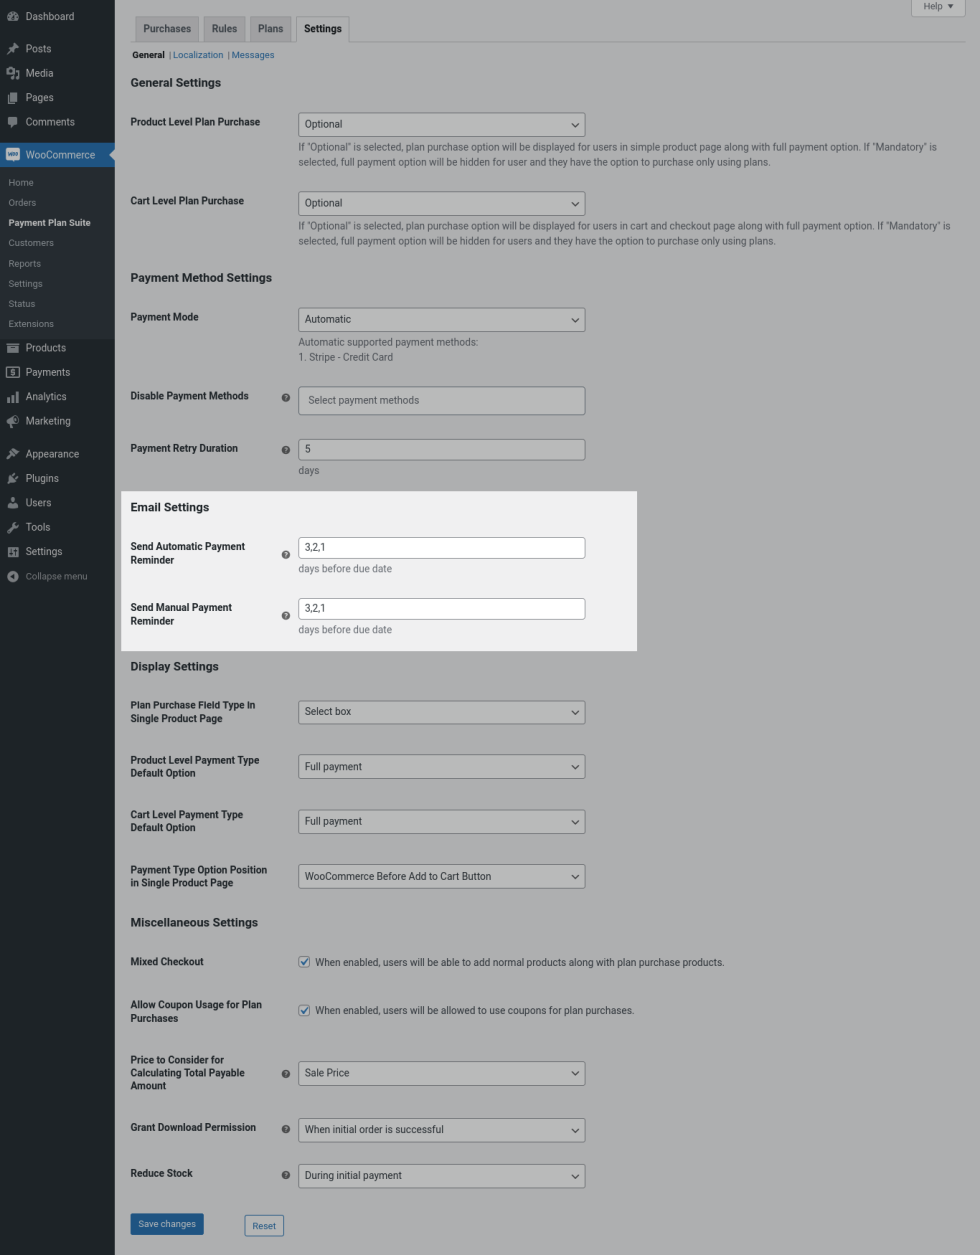
Send Automatic Payment Reminder: If the plan purchase is made in automatic payment mode, then automatic payment reminder emails can be sent to the customers to remind them that installment is due and to load sufficient balance in their account. Before how many days of due date you have to sent the reminder can be set here. To send multiple reminders before multiple days of due date, set the days in descending order separated by comma.
Send Manual Payment Reminder: If the plan purchase is made in manual payment mode, then manual payment reminder emails can be sent to the customers to remind them that installment is due and to make the payment(pay link will be available in this email which when clicked they will be redirected to Pay for Order page). Before how many days of due date you have to sent the reminder can be set here. To send multiple reminders before multiple days of due date, set the days in descending order separated by comma.
Display Settings
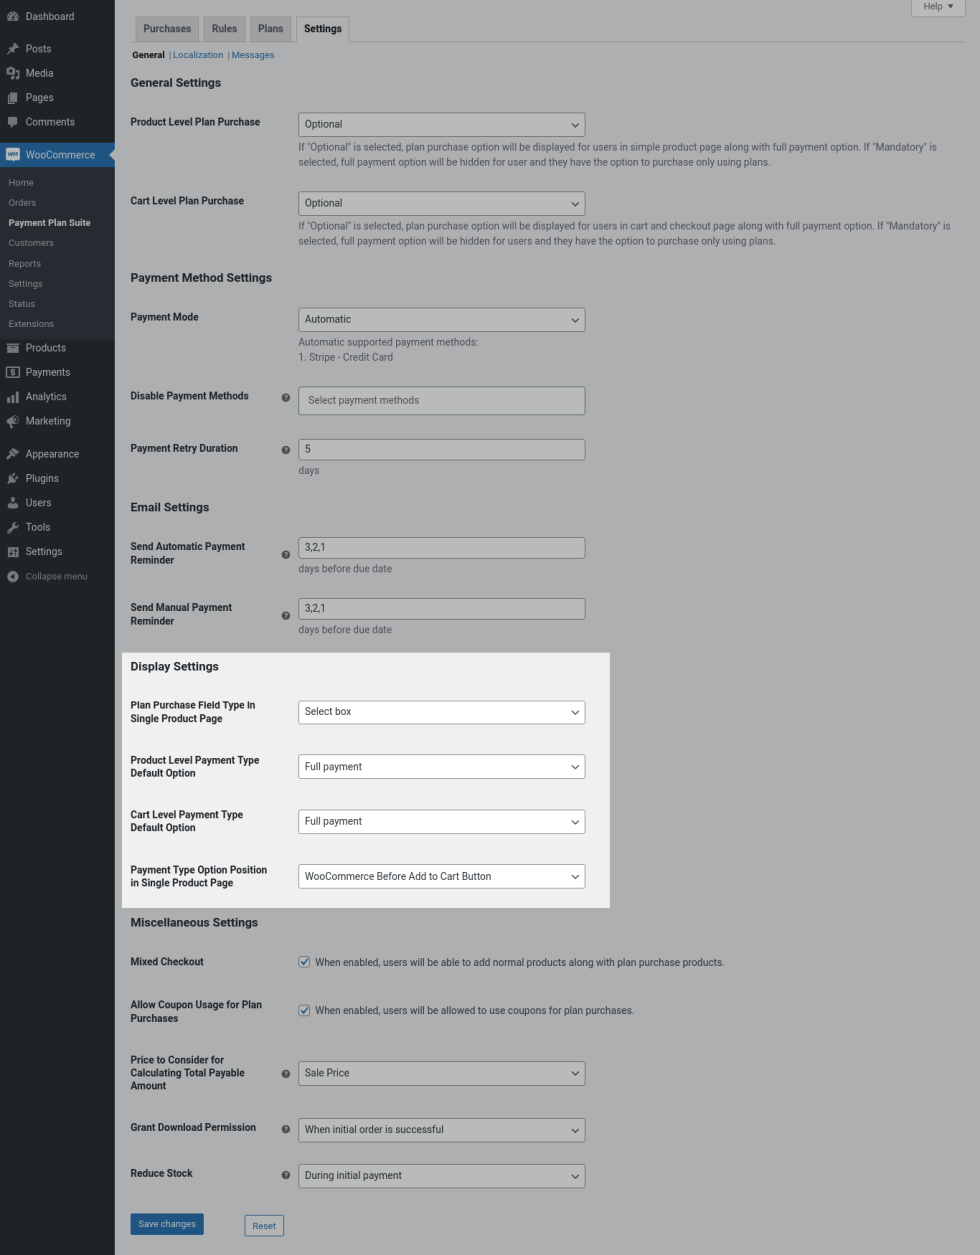
Plan Purchase Field Type in Single Product Page: For product level, to display payment plan options, you can choose between “Selectbox” and “Radio button” field types here.
Product Level Payment Type Default Option: Using this option, for products that have payment plans enabled, you can set the default selection (full payment or installment payment).
Cart Level Payment Type Default Option: Using this option, in cart and checkout pages you can set the default selection (full payment or installment payment).
Payment Type Option Position in Single Product Page: You can customize the position to display payment plan options in single product page from the list of available hooks here.
Miscellaneous Settings

Mixed Checkout: Enable this option to allow customers to add products with payment plan and normal products to the cart and purchase in a single checkout.
Allow Coupon Usage for Plan Purchases: Enable this option to allow customers to use coupons for plan purchases. If coupon is applied, then the discount will be split across installments.
Price to Consider for Calculating Total Payable Amount: For Percentage type payment plans, if the product is on sale, then the price will be calculated from the Sale Price by default. If you want the price to be calculated from Regular Price, then select “Regular Price” here.
Grand Download Permission: If the product is downloadable, then when to give download access of the files can be controlled using this option. To give access as soon as initial order status becomes processing/completed select “When initial order is successful”. To give access only after successful payment of final installment, select “When final order is successful”.
Reduce Stock: One product stock will be reduced for every plan purchase for the respective product. When to reduce the stock can be controlled using this option. Select “During initial payment” to reduce the stock immediately after placing the order. Select “During final payment” to reduce the stock only after final payment.
Localization
To customize the labels displayed in frontend, go to “WooCommerce > Payment Plan Suite > Settings > Localization”.
Messages
To customize the messages displayed in frontend, go to “WooCommerce > Payment Plan Suite > Settings > Messages”.
Usage
↑ Back to topCustomers Purchasing Products using Payment Plans – Product Level
↑ Back to top- On single product page, customers can see “Payment Type” option and if they choose “Installment payment”, then have to choose payment plan option from the available list and add the product to the cart.
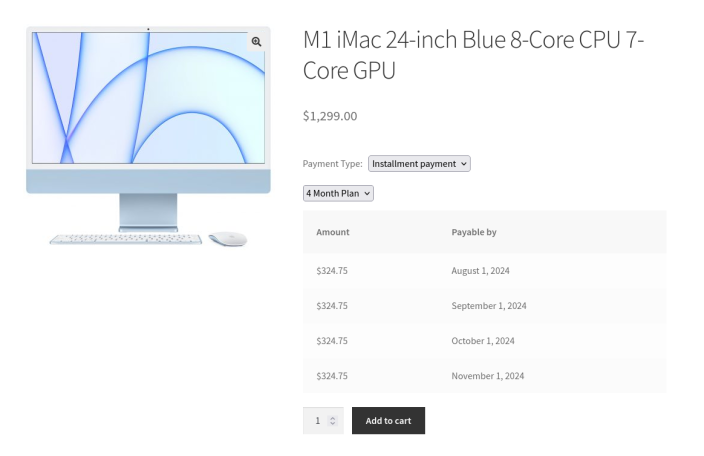
Choosing Product Level Payment Plan Options in Single Product Page
- Customers can add multiple products with different plans as per their needs. For example, they can add 1 product with 3 installment, another product with 6 installment and another product by making full payment, etc. Customers can also add multiple products with same installment too.
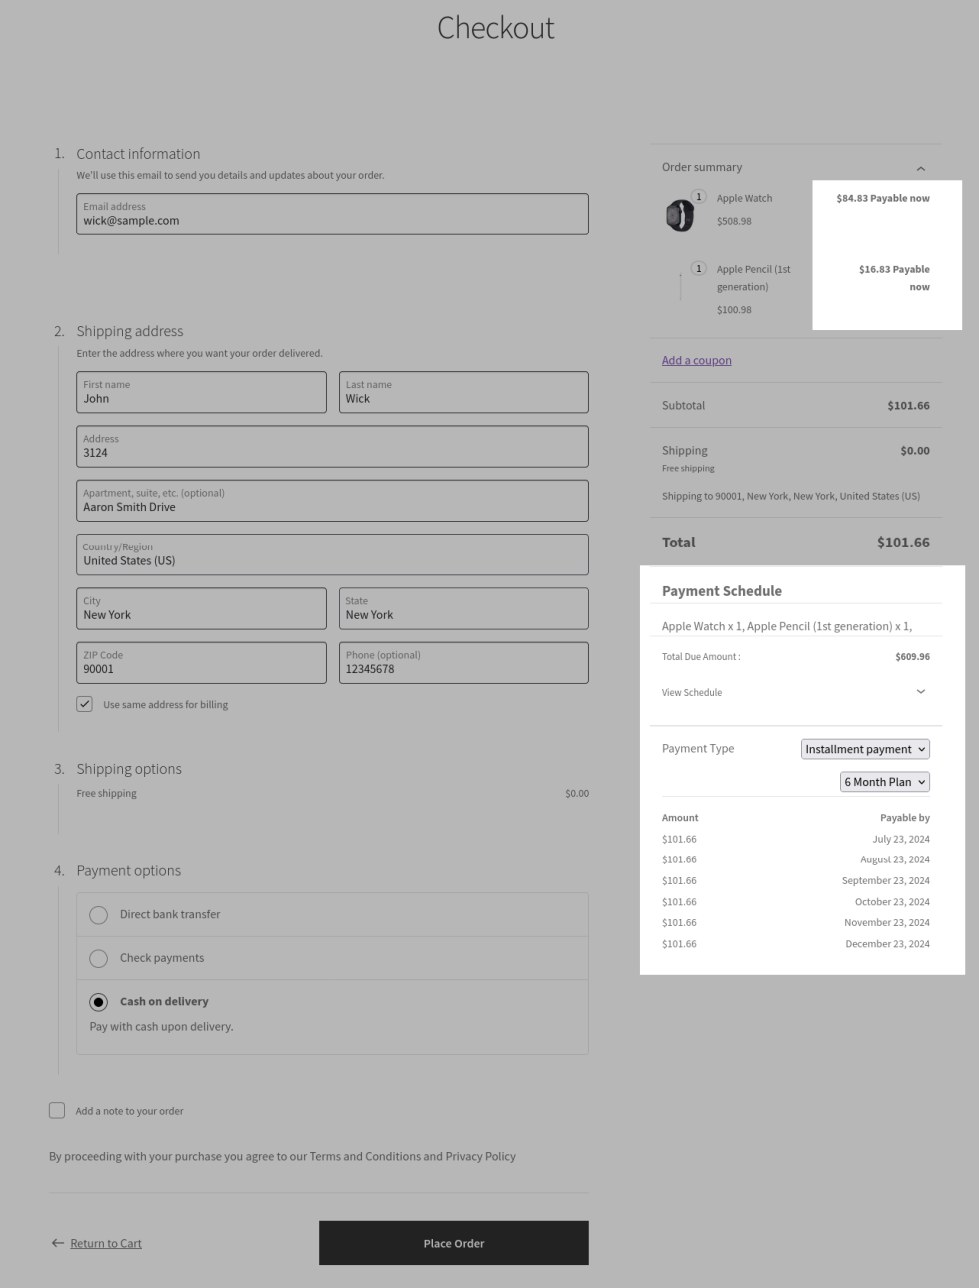
- After adding the products to the cart, they can see the complete details of their future payments in “Payment Schedule” section in cart and checkout page.
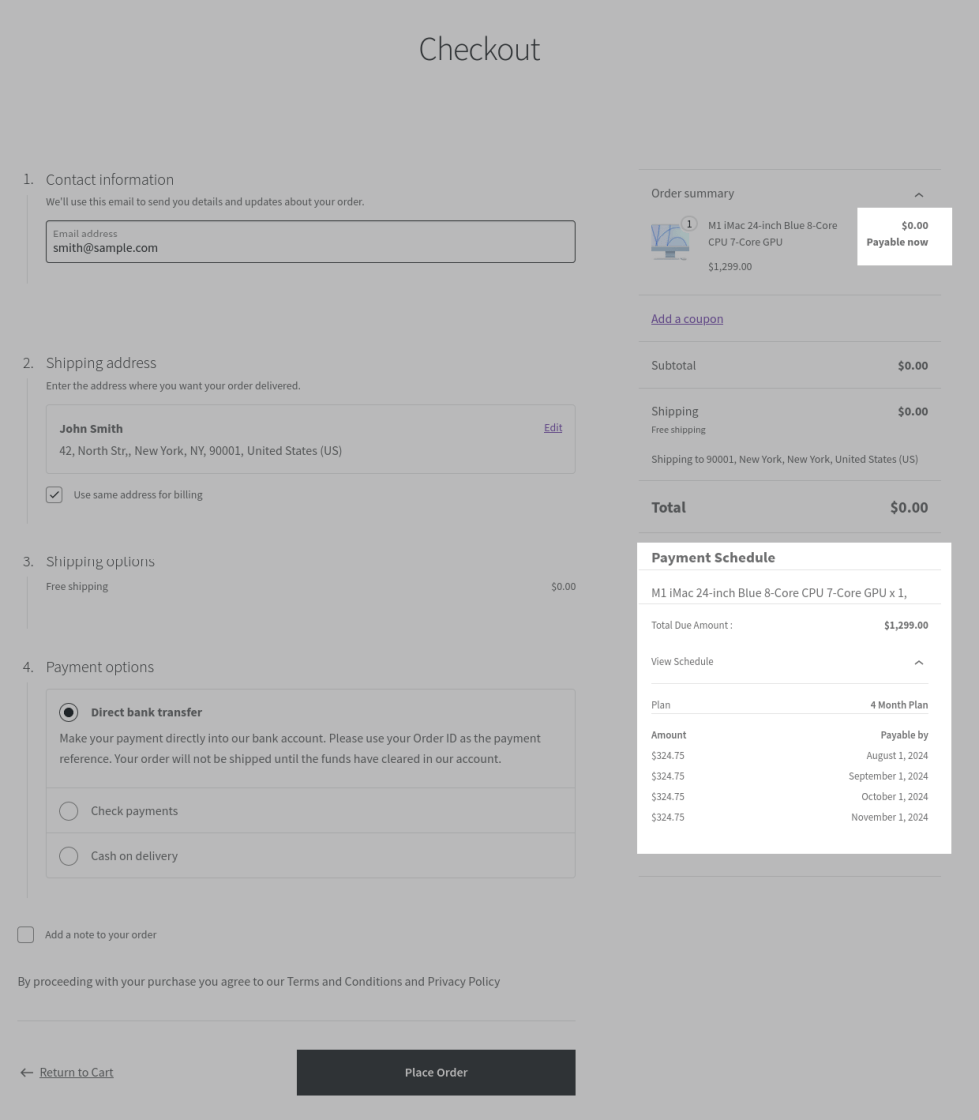
Product Level Payment Plan Details in Checkout Page
- Finally, they have to place the order.
Customers Purchasing Products using Payment Plans – Cart Level
↑ Back to top- Customers have to add products to the cart(only using Full Payment).
- In cart and checkout page, if they choose “Installment payment” option in “Payment Type”, then they can choose the payment plan from the list of available plans.
Choosing Cart Level Payment Plan Options in Checkout Page
- Once the plan is selected, their whole cart items will be converted to payment plan purchase and they can see their installment details in “Payment Schedule” section in the cart and checkout pages.
- Finally, they have to place the order.
Payment Plan Purchase – Admin Management
↑ Back to topOnce the payment plan order is placed, admin can see the list of purchases in “WooCommerce > Payment Plan Suite > Purchases”.
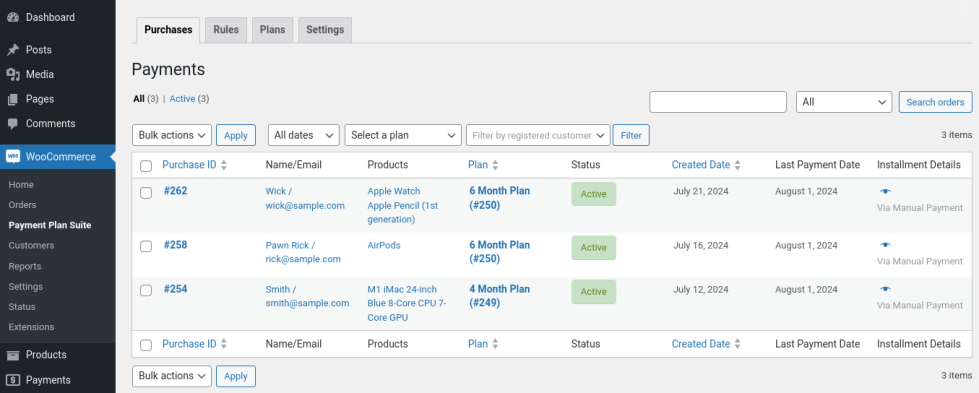
On editing the purchase, you can see the complete details of the payment plan purchase.

Edit Payment Plan Purchase – Admin View
Update Due Amount/Due Date
↑ Back to topIf you want to edit installment date/installment amount, then you have to edit the respective plan purchase where you can find “User Payment Installments” section where you can see the actual schedule.
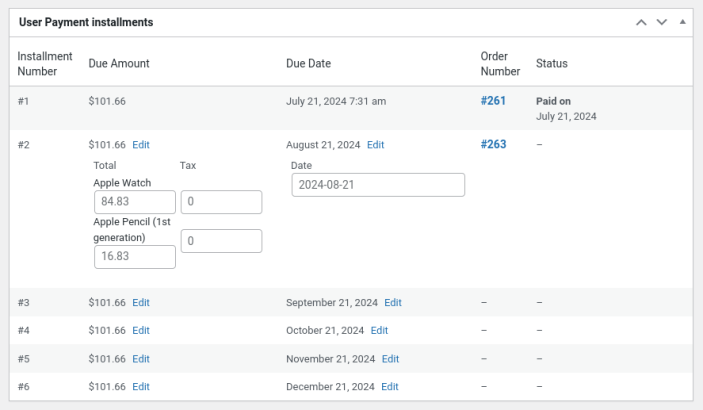
For the respective installment, you can find “Edit” option near Due Amount/Due Date for that specific installment.
After editing the amount/date, Update the purchase.
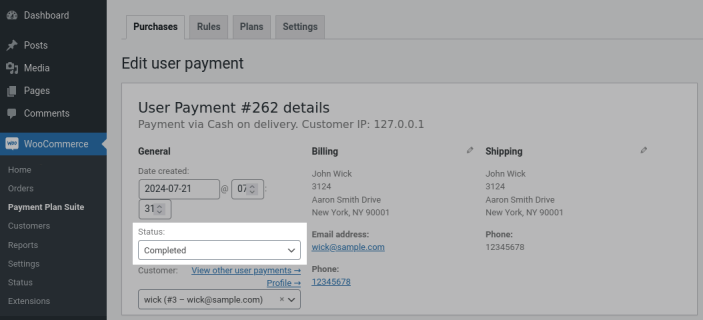
Manually Updating the Payment
If you have already received payment from the customer(outside WooCommerce) and if you want to update the payment, then edit the respective plan purchase and under “User Payment Installments” table, click the Order Number which was generated finally and you will be redirected to edit order page of the respective order.
Update the order status to Processing/Completed so that the plugin will recognize it as payment received.
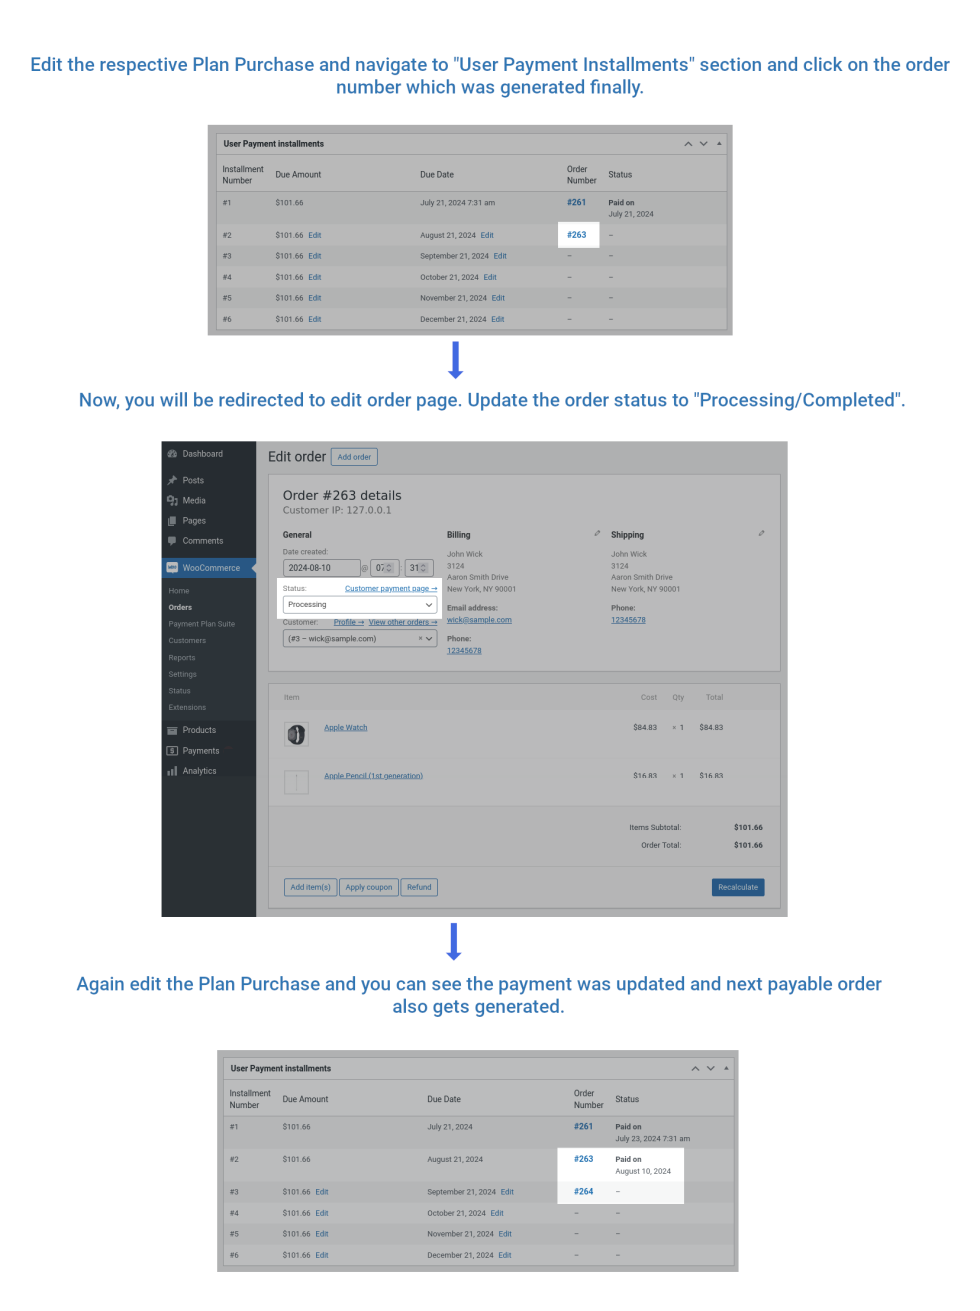
Admin Updating an Installment Payment on Receiving the Payment Outside WooCommerce
Manually Completing the Payment Plan Purchase
↑ Back to topIf you have already received all the installment payments from the customer(outside WooCommerce) and if you want to mark the payment completed, then edit the respective plan purchase and update the status to “Completed” so that future payments won’t be charged from the customer.
Admin Manually Completing the Payment Plan Purchase
Payment Plan Purchase – Customer Management
↑ Back to topMaking Installment Payments – Manual Mode
Method 1
Customers have to redirect to their “My Account page > Plan Purchases > View the respective purchase”
Click the order number of last generated installment order and customer will be redirected to Pay for order page where they can make the payment.
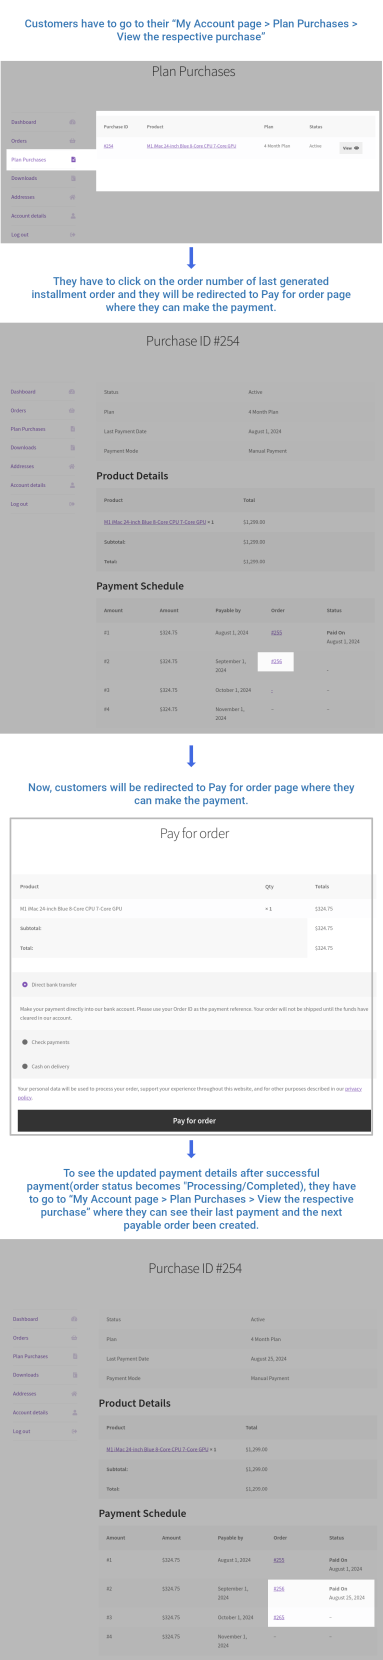
Customers Paying for the Installment Due Manually
Method 2
Customers will receive payment reminder emails with link to pay.
When the pay link is clicked, they will be redirected to Pay for order page and they can make the payment.
Making Installment Payments – Automatic Mode
↑ Back to topIf the purchase is made in automatic mode, then customer don’t have to do anything from their side. Exactly on the due date, due amount will be automatically debited from the customer account.
Behavior on Missing of Installment Payment Due
↑ Back to topIf customer doesn’t make the payment on/before due date, the Plan Purchase status will be automatically moved to “Overdue” status.
In this status, customer can still make the payment.
If admin likes to cancel the Plan Purchase, then go to “WooCommerce > Payment Plan Suite > Plan Purchases > Edit the respective purchase” and change the status to “Cancelled”.
Note: Refunding Plan Purchases has to be managed by admin manually.
Translation
↑ Back to topPayment Plan Suite is translation-ready, meaning you can edit the PO files by translating the text in any language. The steps to perform the translation are as follows. For example, a translation to French.
The steps to do the translation are as follows. For eg let us consider translation to French.
- Download and install Poedit
- Open the file payment-plan-suite -> languages folder -> payment-plan-suite.pot using Poedit.
- Create a new translation file by clicking Create new translation button
- Choose the Source text and set its corresponding French text in Translation Text Area.
- Save the changes.
- Save the file name as payment-plan-suite-fr_FR.po.
- If you are using WordPress Version 3.9.13 or below, then in wp-config.php define the WPLANG as French. Syntax is define(‘WPLANG’, ‘fr_FR’);
- If you use WordPress Version 4.0 or above, go to WordPress dashboard -> Settings -> General and select the Site Language as French.