Keep your customers informed via SMS and improve your customer service by sending them automated SMS text messages with order & delivery updates. Send SMS updates to customers when their order status is updated, when it’s shipped or when it’s out for delivery… You can also manually send SMS messages through the Edit Order screen.
Monitor your store in real-time, even when away from your PC, and be up-to-date about new orders, refunds, shipment status & delivery, low stock, new customer sign ups and more
SMS for WooCommerce is a comprehensive solution designed to automate customer communication through SMS notifications. It allows store owners to send timely order status updates, delivery notifications, and important alerts directly to customers’ mobile phones, reducing the need for manual follow-ups and support inquiries.
Getting started
↑ Back to topKey Features
↑ Back to top- Automated Order Updates: Trigger SMS notifications automatically when order statuses change (e.g., Processing, Shipped, Completed).
- Admin Monitoring: Receive real-time SMS alerts for new orders, stock levels, and other critical store activities.
- Gateway Integration: Connect with over a dozen popular SMS service providers including Twilio, Vonage, and ClickSend.
- Manual Messaging: Send custom, one-off messages to customers directly from the order dashboard.
- Customer Preferences: Allow customers to opt-in or opt-out of SMS notifications during or after checkout.
- Intelligent Scheduling: Set “Quiet Hours” to prevent messages from being sent during inappropriate times.
Settings
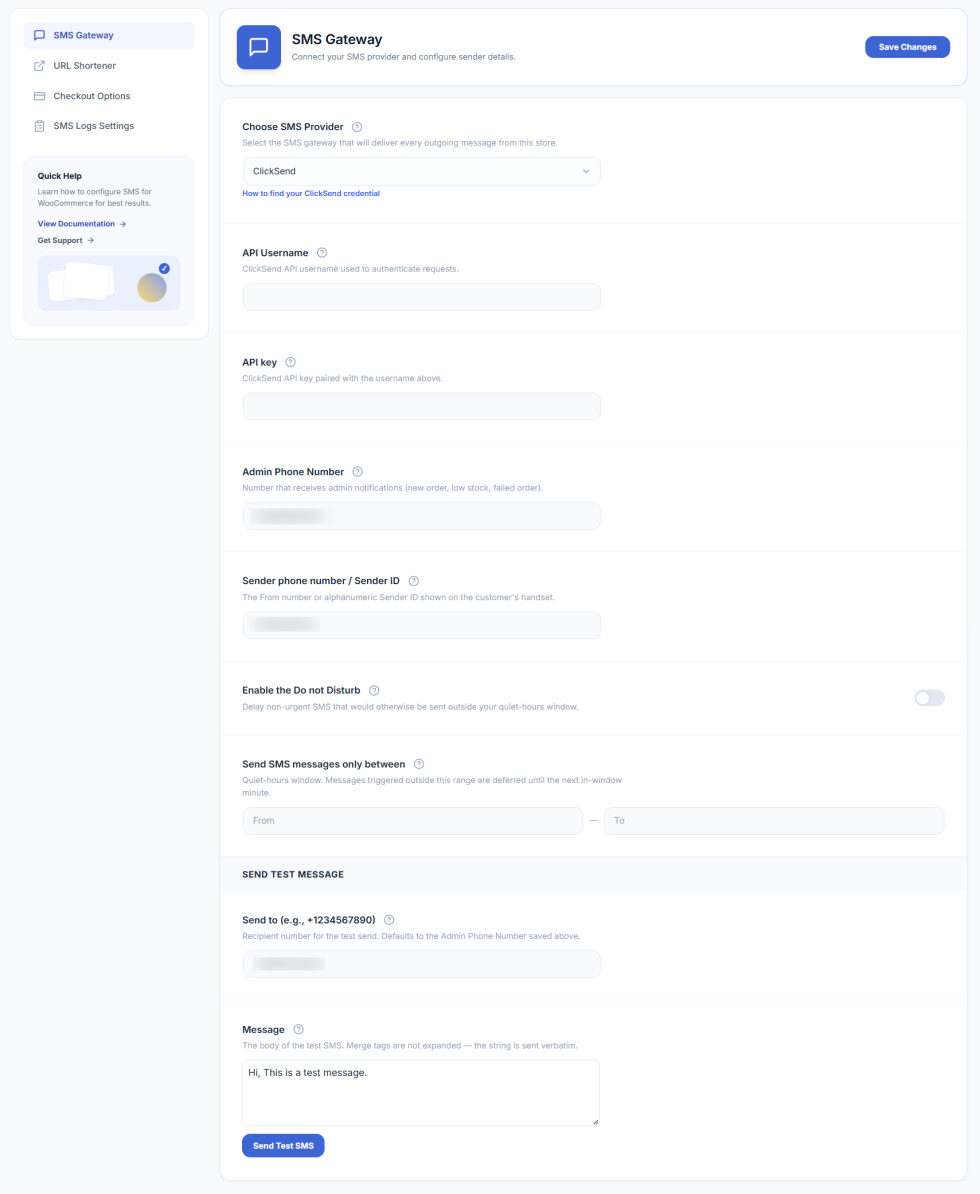
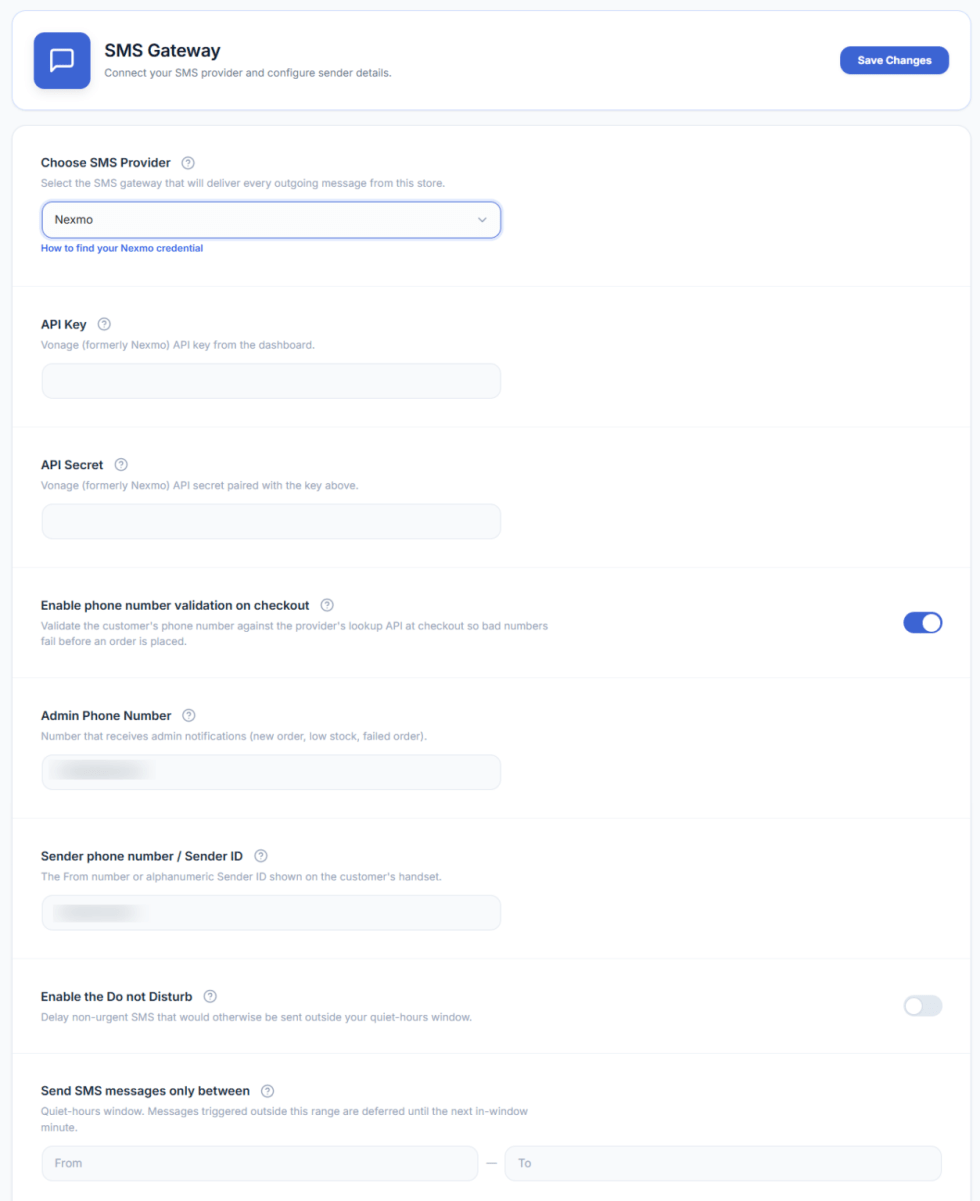
↑ Back to topThis feature allows your WooCommerce store to send SMS notifications to customers and store administrators. You can connect your store to a supported SMS service directly from the WooCommerce settings by entering the details provided by your SMS provider. Once connected, your store will be able to send important updates through SMS. A test option is available to ensure everything is set up correctly and messages are delivered successfully.
To connect your SMS Service to your WooCommerce store, navigate to: WooCommerce > SMS Settings and open the SMS service provider panel:
How to connect an SMS service provider ?
↑ Back to topTo enable SMS notifications, you need to select an SMS service provider and enter the details provided by that service.
- Go to WooCommerce → SMS Settings.
- Open the SMS Gateway section.
- Select your SMS service provider from the dropdown list.
- Enter the API credentials provided by your SMS service.
- Add the admin phone number where you want to receive store notifications.
- Enter the sender phone number or sender ID provided by your SMS service.
- Save your changes.
How to control SMS sending times (quiet hours) ?
↑ Back to topLimit SMS delivery to specific business hours to avoid contacting customers late at night.
- Go to WooCommerce → SMS Settings.
- Enable the workflow that restricts SMS sending to specific hours.
- Define the allowed time range for sending messages (for example, 9 AM to 6 PM).
- Save your changes.

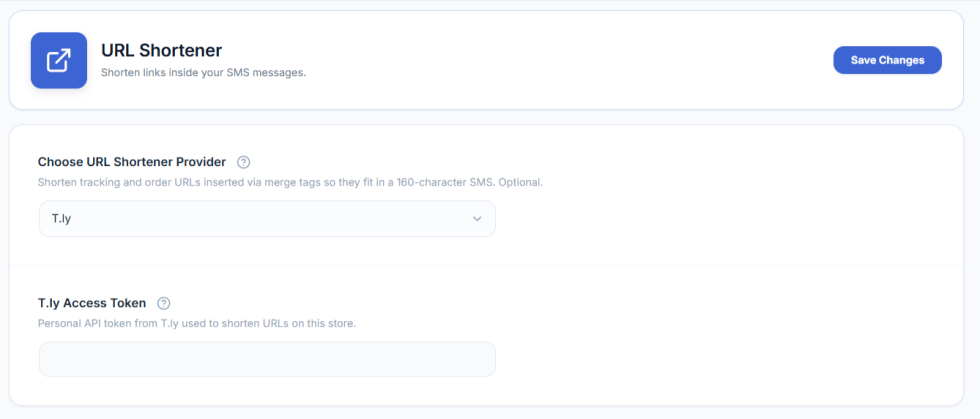
How to shorten links in SMS messages ?
↑ Back to topConfigure a URL shortener to keep SMS messages concise and within character limits.
- Go to WooCommerce → SMS Settings.
- Choose the URL shortening service you want to use.
- Copy the access token from your URL shortener account.
- Paste the token into the SMS settings area.
- Save your changes.
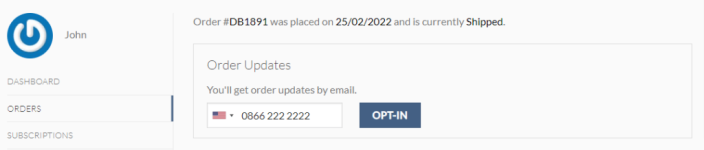
How to allow customers to opt out after checkout ?
↑ Back to topEnable customers to stop receiving SMS notifications through self-service options on their order pages.
- Ensure SMS opt-in is enabled during checkout.
- Allow customers to access SMS preferences from the order confirmation page and the view order page.
- Let customers opt out directly from these pages without contacting support
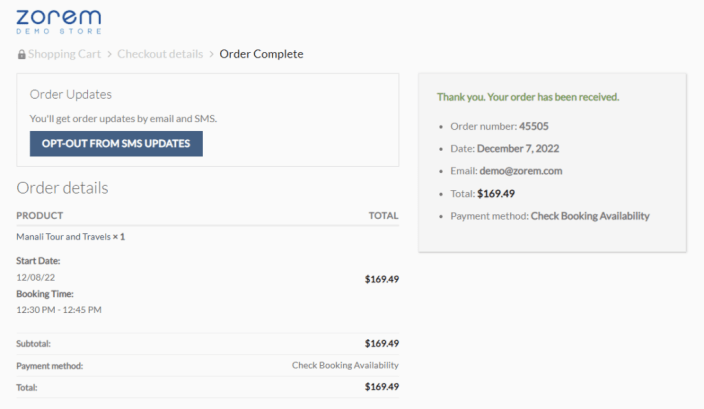
Post-Checkout Opt-in
↑ Back to topIf a customer is opted-in for SMS notifications and wants to opt-out, the customer can do so from the Order Confirmation page and View Order page.
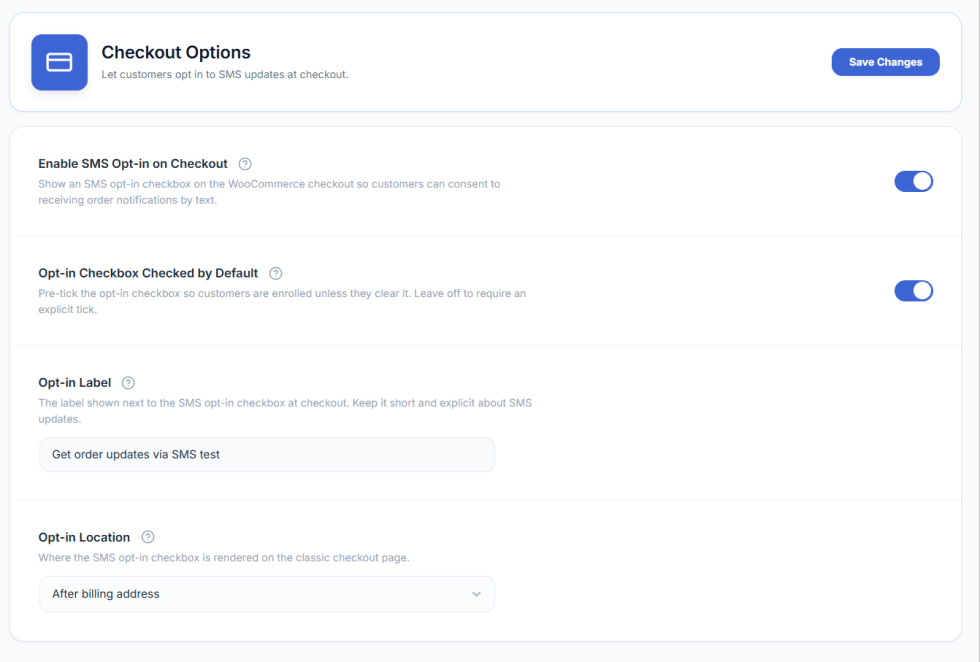
How to control customer opt-in at checkout ?
↑ Back to topThis process sets up a workflow where customers must explicitly choose to receive SMS updates, ensuring compliance and valid data collection.
- Go to WooCommerce → SMS Settings.
- Enable the workflow that requires customers to opt in to SMS notifications during checkout.
- Decide whether the opt-in checkbox should be pre-selected or require manual confirmation.
- Customize the opt-in label so customers understand what they are agreeing to.
- Choose where the opt-in option appears on the checkout page.
- If you are using supported providers (such as Vonage or Twilio), enable phone number validation so incorrect numbers are blocked during checkout.
- Save your changes.
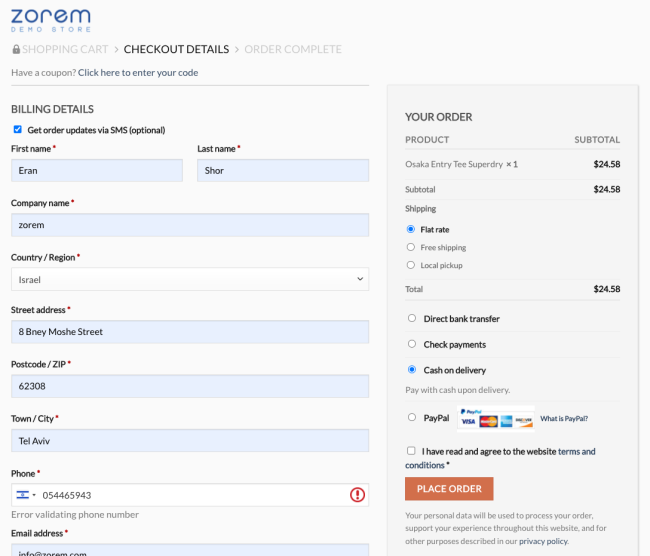
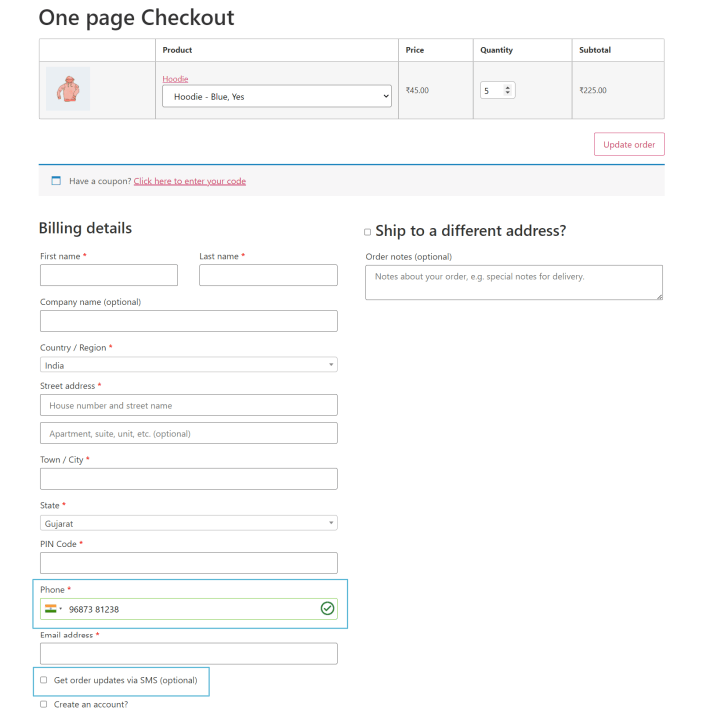
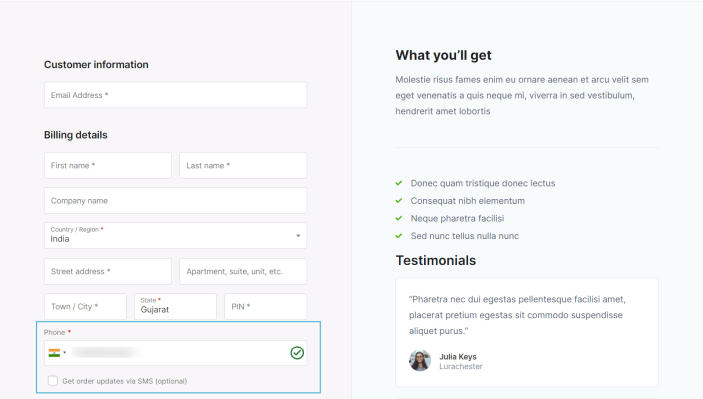
The Checkout Experience
↑ Back to topIn this example, the SMS opt-in option is enabled and the phone number validation is enabled (only available for Twilio and Nexmo) – The customers entered a non valid phone number:
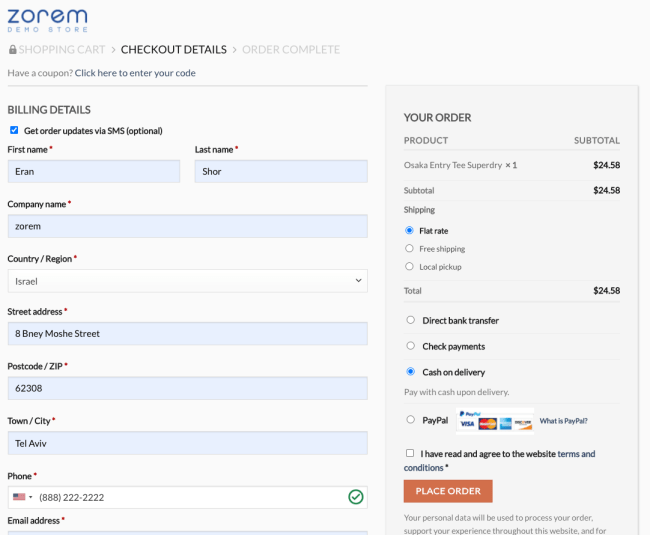
In this example, the SMS opt-in option is enabled and the phone number validation is enabled (only available for Twilio and Nexmo) – The customers entered a valid phone number:
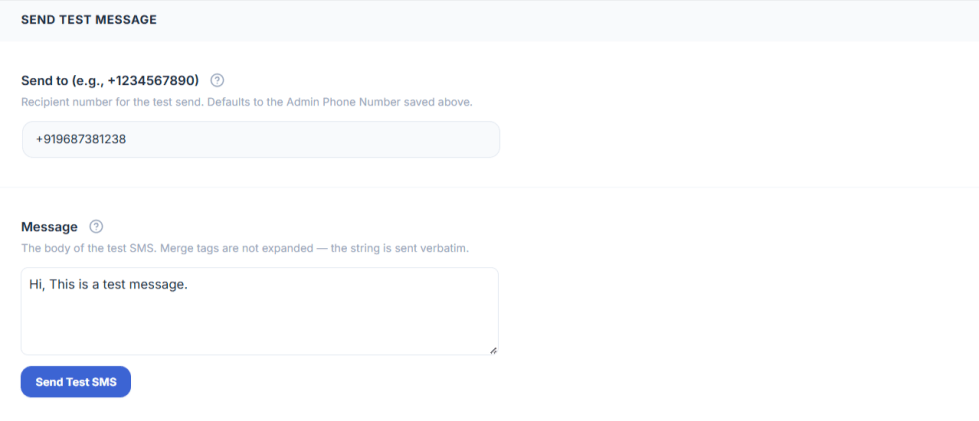
How to Send a Test Message ?
↑ Back to topTo test your SMS service connection, you can send a test message from within the settings panel.
SMS notifications
↑ Back to topSMS for WooCommerce allows you to automatically send SMS notifications for key WooCommerce order events. You can notify customers when an order status changes (Processing, On Hold, Completed, Cancelled, Refunded, Failed, Draft, and custom statuses) and fully customize the SMS content using dynamic placeholders.
The plugin also supports Admin SMS notifications for events such as new orders, backorders, order cancellations, refunds, failed payments, and product stock updates. Built-in placeholders let you include order, customer, and product details in messages, ensuring timely and informative SMS alerts for both customers and store administrators.
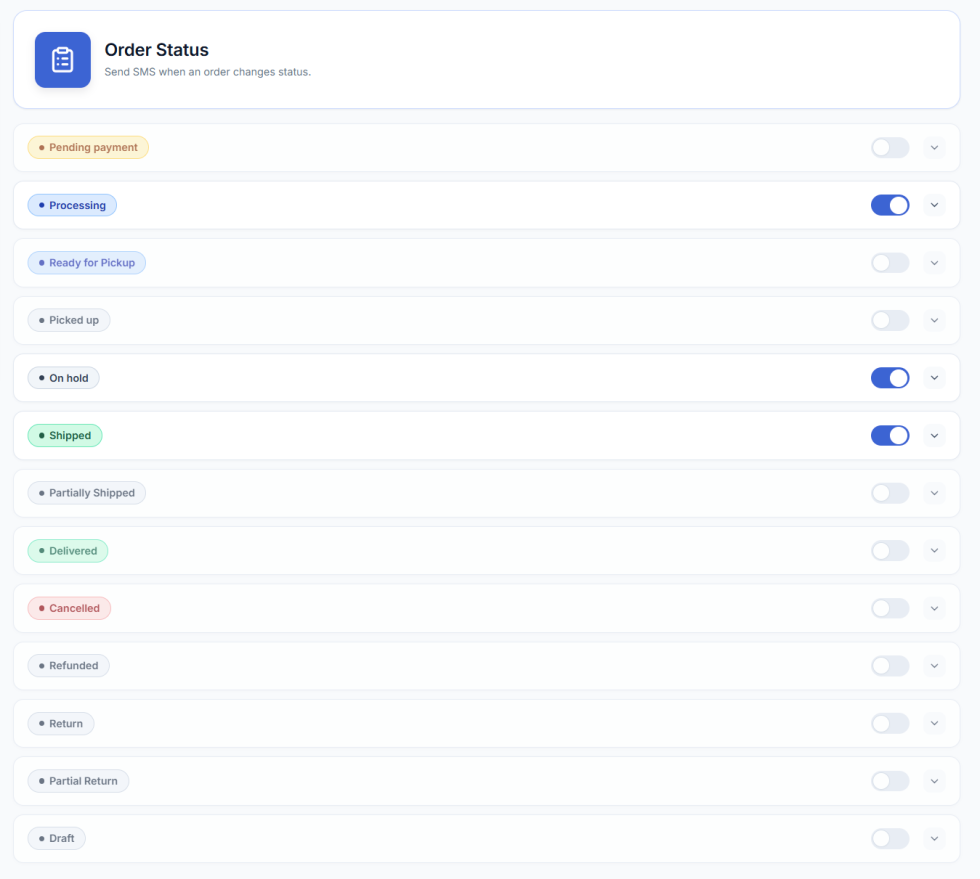
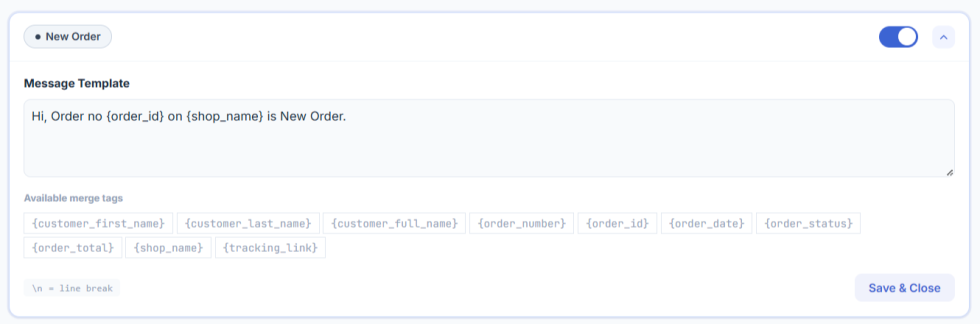
How to send SMS updates for order status changes ?
↑ Back to topConfigure automatic messages to trigger when an order moves through key stages like processing, shipping, or refunding.
- In your WordPress admin, go to WooCommerce → SMS Settings → SMS Notifications.
- Open the section for customer order notifications.
- For each order event you want customers to be informed about, enable the corresponding notification.
- Review the SMS message that will be sent when the order reaches that stage.
- Customize the message text using placeholders where needed.
- Save your changes.
| Processing | SMS Notification sent when an order’s status changes to ‘Processing’. |
| On Hold | SMS Notification sent when an order’s status changes to ‘On Hold’. |
| Completed | SMS Notification sent when an order’s status changes to ‘Completed’. |
| Cancelled | SMS Notification sent when an order’s status changes to ‘Cancelled’. |
| Refunded | SMS Notification sent when an order’s status changes to ‘Refunded’. |
| Draft | SMS Notification sent when an order’s status changes to ‘Draft’. |
| Custom Order Statuses | SMS Notifications for WooCommerce supports the core WooCommerce order statuses and will detect any custom order status that is created in your WooCommerce store. |
How to customize customer SMS messages using placeholders ?
↑ Back to topPersonalize automated messages by inserting dynamic data tags like order ID, billing name, or payment URLs.
- Open WooCommerce → SMS Settings → SMS Notifications.
- Select a customer notification message to edit.
- Insert placeholders directly into the message text where dynamic data should appear.
- Use \n to create line breaks if needed.
- Save your changes.
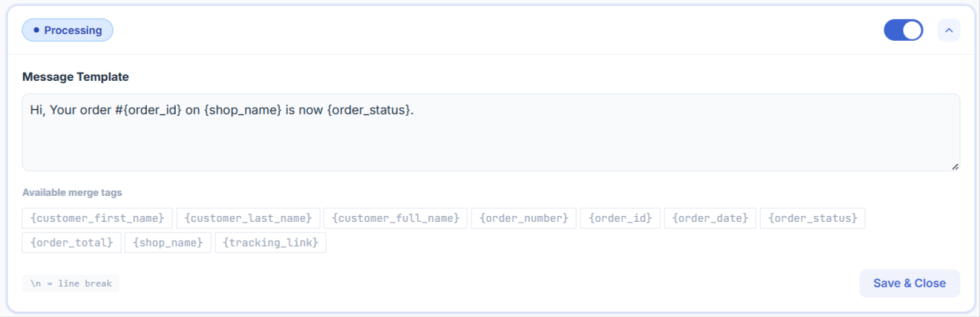
Available placeholders for customer order SMS:
- {shop_name} – the name of your site
- {order_id} – the order number/ID
- {order_count} – the number of orders the customer has placed
- {order_amount} – the total amount of the order
- {order_status} – the status of the order
- {billing_name} – the customer’s full name from the billing information
- {billing_phone} – the customer’s Phone number from the billing information
- {billing_first} – the customer’s first name from the billing information
- {billing_last} – the customer’s last name from the billing information
- {shipping_name} – the name used in the order shipping information
- {shipping_address} – the full formatted shipping address
- {shipping_address_1} – the first line of the shipping address
- {shipping_address_2} – the second line of the shipping address
- {shipping_city} – the city from the shipping information
- {shipping_postcode} – the postal/ZIP code from the shipping information
- {shipping_country} – the country from the shipping information
- {payment_url} – the URL for the customer to complete payment for the order
- {shop_url} – the URL of your shop’s homepage
- {email} – the customer’s email address
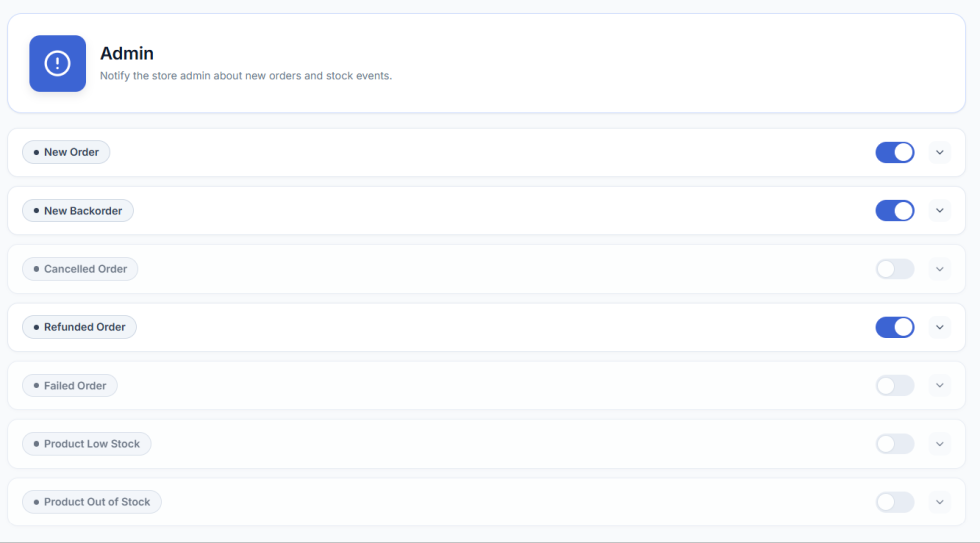
How to receive admin SMS alerts for store activity ?
↑ Back to topSet up alerts to your own phone for critical events like new orders, low stock, or refunds.
- Go to WooCommerce → SMS Settings → SMS Notifications.
- Open the admin notifications section.
- Enable SMS alerts for the store events you want to track.
- Customize the message text for each event.
- Save your changes.
| New Order | New order SMS notifications are sent when a new order is received. |
| New Backorder | Backorder SMS notifications are sent when Product quantity is out of stock. |
| Canceled Order | When the order is canceled by the Customer or admin, canceled SMS notifications are sent. |
| Refunded Order | When the order is refunded, Refunded notifications are sent. |
| Failed Order | When the order status is failed, Failed order notifications are sent. |
| Product Low Stock | Product Low stock SMS is set, When Product stock is going low |
| Product Out of Stock | When the product’s stock is out of stock, Notifications are sent. |
How to customize admin SMS messages using placeholders ?
↑ Back to topEnhance admin alerts with specific details like product SKU, stock quantity, or shipping method.
- Open WooCommerce → SMS Settings → SMS Notifications.
- Edit an admin notification message.
- Insert placeholders where dynamic data should appear.
- Use \n to format multi-line messages.
- Save your changes.
Available placeholders for admin SMS:
- {shop_name} – the name of your site
- {product_formatted_name} – Product name with Qty
- {product_name} – Product name
- {product_sku} – Product SKU
- {quantity} – back order quantity.
- {order_id} – back order id.
- {stock_quantity} – get product qty after law stock.
- {billing_last} – the customer last name from the billing information
- {order_amount} – order amount
- {order_status} – Order Status
- {billing_name} – Billing Name
- {billing_phone} – Billing Phone Number
- {shipping_name} – Shipping Name
- {shipping_method} – Shipping Method
- {billing_first} – Billing First name
- {billing_last} – Billing Last name
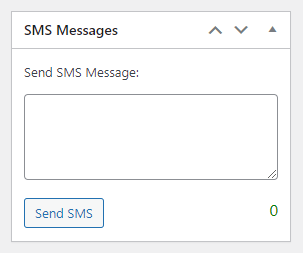
How to send manual SMS to a customer from an order ?
↑ Back to topSend a one-off custom message directly from the order screen for exceptions or personal follow-ups.
- In your WordPress admin, go to WooCommerce → Orders.
- Open the order you want to contact.
- Scroll to the SMS section in the order edit screen.
- Enter the message you want to send to the customer.
- Review the phone number shown for the order.
- Send the SMS.
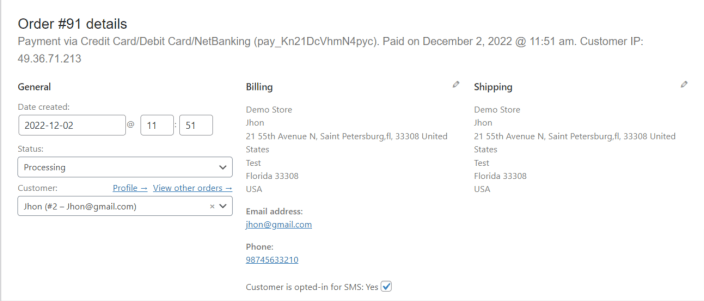
How to manage customer SMS opt-in from order admin ?
↑ Back to topManually update a customer’s SMS consent status directly within their order details.
- Go to WooCommerce → Orders.
- Open the order you want to update.
- Locate the SMS opt-in status in the order admin panel.
- Change the customer’s status to opt in or opt out as requested.
- Save or update the order.
Compatibility
↑ Back to topThis plugin should be compatible with any WooCommerce plugin that creates custom order statuses.
How to send shipment SMS using Advanced Shipment Tracking ?
↑ Back to topNotify customers automatically when shipment tracking info is added via the AST plugin.
- Ensure Advanced Shipment Tracking is active.
- Go to WooCommerce → SMS Notifications.
- Enable SMS notifications for shipment-related order updates.
- Edit the SMS message that is sent when shipment data is added.
- Insert shipment placeholders (e.g., {tracking_number}) where appropriate.
- Save your changes.
Available Placeholders for orders SMS
Use the following variables to dynamically add order information to your SMS messages. These work for both customer and admin messages. See below if you want to add your own messages variables.
- {shipping_method} – the shipping method for the order
- {tracking_number} – the tracking number/s for the order
- {tracking_provider} – the shipping provider for the tracking number
- {tracking_link} – the tracking link for the order
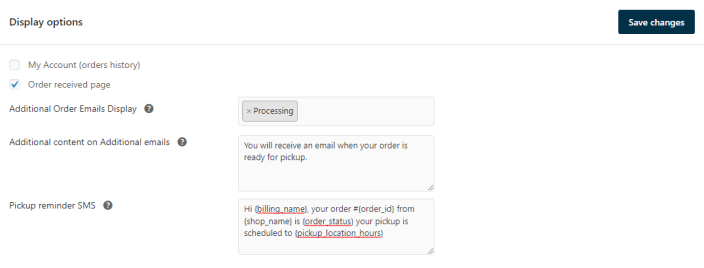
How to send pickup SMS using Advanced Local Pickup ?
↑ Back to top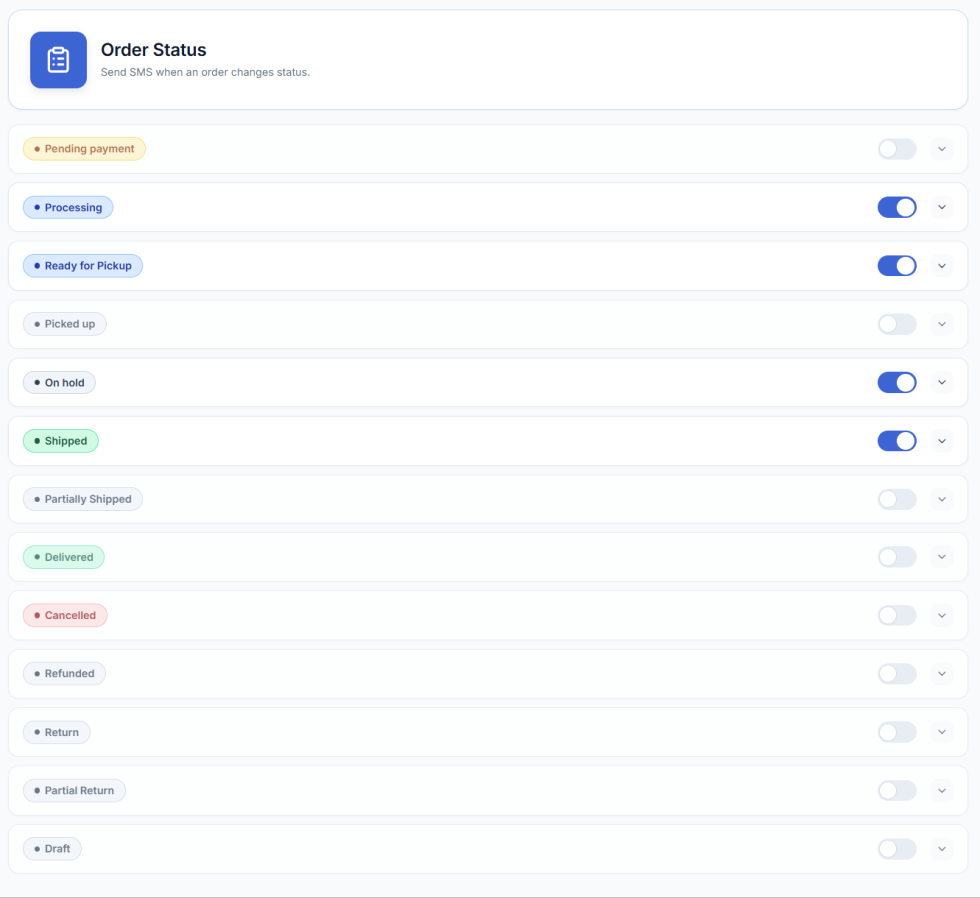
Alert customers when their order is ready for pickup or has been collected.
Local pickup SMS Placeholders
Use the following variables to dynamically add pickup information to your SMS messages. See below if you want to add your own message variables.
- {pickup_location_name} – the pickup location name for the pickup information
- {pickup_location_address} – the pickup location address for the pickup information
- {pickup_location_hours} – the pickup location business hours for the pickup information
- {pickup_location_appointment} – the pickup location appointment details for the pickup information
Pickup reminder SMS
You can edit the Pickup reminder message content by the pickup reminder SMS option.
Available placeholder: {pickup_location_name}, {pickup_location_address}, {pickup_location_hours}, {pickup_location_appointment}
How to send shipment status SMS using TrackShip for WooCommerce ?
↑ Back to topTrackShip brings a branded tracking experience into your store’s admin and allows you to provide Amazon style custom experience post-checkout. SMS for WooCommerce is fully compatible with TrackShip for WooCommerce, when both plugins are installed and your store is connected to TrackShip, you’ll see a Shipment Tracking tab in the WooCommerce > SMS Notifications and you can enable automatic SMS notifications based on shipment status events.
Send updates for specific delivery milestones like “Out for Delivery” or “Delivered” via TrackShip.
- Connect your store to TrackShip.
- Go to WooCommerce → SMS Notifications and open the Shipment Tracking section.
- Enable SMS notifications for specific shipment status events.
- Customize each shipment status message using placeholders like {shipment_status}.
- Save your changes.
How to send booking SMS using Booking & Appointment Plugin ?
↑ Back to topThe booking & Appointment Plugin for WooCommerce plugin allows customers to book appointments, and make reservations. SMS for WooCommerce is fully compatible with Booking & Appointment Plugin for WooCommerce, and you can trigger SMS messages for each of the available email notifications and reminders.
Appointments SMS Notifications
- Activate the plugin.
- Go to WooCommerce → SMS Notifications → Bookings.
- Enable booking and appointment SMS notifications.
- Customize admin and customer messages with placeholders like {booking_date}.
- Save your changes.
Booking notifications
- Admin New Appointment – Enable to send admin notification when a new booking comes. When enabled, you can enter a comma-separated list of recipients, determine when the reminder should be sent, and customize the message.
- Admin cancellation – Enable to send admin users a notification when a booking is canceled. When enabled, you can enter a comma-separated list of recipients and customize the message.
- Admin Rescheduled – Enable to send admin users a notification when an Appointment is rescheduled. When enabled, you can enter a comma-separated list of recipients and customize the message.
- Customer reminder – Enable to send customers a reminder before a booking begins. When enabled, you can then determine when the reminder should be sent and customize the message.
- Customer confirmation Pending – Enable this to send customers a notification when booking confirmation is pending.
- Customer confirmation – Enable this to send customers a notification when a booking is confirmed and moves to “Confirmed” status.
Appointments Placeholders
- {booking_id} – the booking id
- {booking_start_time} – the booking’s start time
- {booking_end_time} – the booking’s end time
- {booking_date} – the booking’s date (uses the site’s date format)
- {person_count} – if the booking has a “persons” field, insert the person count for the booking
- {resource} – if the booking has a resource, inserts the selected resource for the booking
The following Placeholders can be used within booking SMS messages (in addition to the default placeholders):
Checkout example for Bookable products:

How to send subscription SMS using WooCommerce Subscriptions ?
↑ Back to topWooCommerce Subscriptions allow you to sell products and services with recurring payments. SMS for WooCommerce is fully compatible with the WooCommerce subscription, and you can trigger SMS messages for each of the available email notifications.
Subscription SMS Notifications
- Activate WooCommerce Subscriptions.
- Go to WooCommerce → SMS Notifications → Subscription SMS.
- Enable subscription-related notifications for events like renewal, cancellation, or expiration.
- Customize messages for each subscription event.
- Save your changes.
Subscription notifications
- Admin New Renewal – Enable to send admin notifications. When your store is received New renewal order, you can enter a comma-separated list of recipients, and customize the message.
- Admin Subscription Switched – Enable to send admin notifications. When your store is received a New subscription switched the order, and you can enter a comma-separated list of recipients, and customize the message.
- Customer Processing Renewal – Enable to send customer notifications. When the renewal order is in processing, you can customize the message.
- Customer Completed Renewal – Enable to send customer notifications. When the renewal order is complete, you can customize the message.
- Customer On-hold Renewal – Enable to send customer notifications. When the renewal subscription is On-hold, you can customize the message.
- Customer Subscription Switch – Enable to send customer notifications. When the subscription is switched by the customer, you can customize the message.
- Admin Cancelled Subscription – Enable to send admin notifications. When the subscription is canceled, you can enter a comma-separated list of recipients, and customize the message.
- Admin Expired Subscription – Enable to send admin notifications. When the subscription is expired, you can enter a comma-separated list of recipients, and customize the message.
- Admin Suspended Subscription – Enable to send admin notifications. When the subscription is suspended, you can enter a comma-separated list of recipients, and customize the message.
How to include tracking details using WooCommerce Shipment Tracking ?
↑ Back to topThe SMS for WooCommerce is 100% compatible with the WooCommerce Shipment Tracking extension, you can include the shipping provider, tracking number and a tracking link in the Completed order status.
- Activate WooCommerce Shipment Tracking.
- Go to WooCommerce → SMS Notifications.
- Edit the completed order SMS message.
- Insert shipment placeholders like {tracking_provider}, {tracking_number}, and {tracking_link}.
- Save your changes.
Available Placeholders for Shipment Tracking
Use the following variables to dynamically add order information to your SMS messages. See below if you want to add your own messages variables.
- {tracking_provider} – the shipping provider for the tracking number
- {tracking_number} – the tracking numbers for the order
- {tracking_link} – the tracking link for the order
How to collect SMS opt-in using CheckoutWC ?
↑ Back to topEnable customers to opt in or out of SMS notifications when using CheckoutWC.
- Activate CheckoutWC.
- Visit the checkout page.
- Confirm the SMS opt-in checkbox is displayed properly.
- Allow customers to opt in or out before placing the order.
How to collect SMS opt-in using Cashier one-page checkout ?
↑ Back to topManage SMS consent on a one-page checkout powered by Cashier.
- Enable Cashier’s one-page checkout.
- Visit the checkout page.
- Confirm the SMS opt-in option is visible on the page.
- Allow customers to opt in or out before completing checkout.
How to collect SMS opt-in using WooCommerce Checkout & Funnel Builder by CartFlows ?
↑ Back to topEnable SMS opt-in functionality when using CartFlows for checkout and funnel pages.
- Enable CartFlows checkout.
- Open a CartFlows checkout step.
- Confirm the SMS opt-in option is shown to customers.
- Allow customers to opt in or out before completing checkout.
How to send vendor and customer SMS using Dokan Multivendor Marketplace?
↑ Back to topAutomatically notify vendors, admins and customers via SMS whenever something important happens in your Dokan marketplace — new vendor registrations, new orders, product approvals, withdrawal requests, refunds and more — using the Dokan Multivendor Marketplace plugin together with SMS for WooCommerce.
Requirements
Requires Dokan Multivendor Marketplace (free or Pro) and SMS for WooCommerce to both be installed and active on your site.
Setup Instructions
- Ensure Dokan Multivendor Marketplace is installed and active.
- Go to WooCommerce → SMS Settings → Settings and configure your SMS gateway (Twilio, Nexmo, MSG91, Lox24 or any of the supported providers).
- Make sure the Admin Phone Number and Sender Phone Number are saved on the Settings tab — admin events require the admin phone to be set.
- Go to WooCommerce → SMS Settings → SMS Notifications → Dokan.
- Enable the toggles for the vendor, admin and customer events you want to send SMS for.
- Edit the SMS message template for each event. Use placeholders like {vendor_name}, {order_number} and {withdrawal_amount} to personalise the message. Only placeholders that resolve for that specific event are listed in the sidebar.
- Click Save & Close to save your changes.
Available SMS events for Dokan
The Dokan integration supports 14 events grouped by recipient.
Vendor lifecycle (Admin & Vendor)
- New Vendor Registered (Admin) – A new vendor signs up on your marketplace.
- Vendor Welcome (Vendor) – Vendor account is created.
- Vendor Approved (Vendor) – Admin enables / activates the vendor account.
- Vendor Disabled (Vendor) – Vendor account is disabled by the admin.
Orders (Vendor)
- New Order (Vendor) – A new order containing the vendor’s products is placed. Fires on processing, on-hold or completed and deduplicates so the same order never sends twice.
Products (Admin & Vendor)
- New Product Added (Admin) – Vendor submits a new product for review.
- Product Approved (Vendor) – Admin publishes a pending vendor product.
- Product Rejected (Vendor) – Admin rejects a product (rejection reason supported on Dokan Pro 3.16+).
- Product Resubmitted (Admin) – Vendor resubmits a previously rejected product.
Withdrawals (Admin & Vendor)
- Withdrawal Requested (Admin) – Vendor submits a withdrawal request. Listens on both the legacy and modern REST endpoints, with dedup so a single request never fires twice.
- Withdrawal Approved (Vendor) – Admin approves the withdrawal.
Refunds (Admin & Customer)
- Refund Requested (Admin) – Customer requests a refund on a vendor order.
- Refund Approved (Customer) – Vendor or admin approves the refund.
Shipping (Customer)
- Shipment Tracking Added (Customer) – Vendor adds shipment tracking to an order.
Available placeholders for Dokan SMS
Use the following variables in your SMS message templates to include dynamic information. The settings page sidebar shows only the placeholders that resolve for the specific event being edited.
Common (every event)
- {vendor_name} – Vendor display / store name
- {vendor_store_url} – Public URL of the vendor store
- {vendor_email} – Vendor’s email address
- {vendor_dashboard_url} – Vendor dashboard URL
- {shop_name} – Your store name
- {shop_url} – Your store URL
- {email} – Recipient’s email
Order events (vendor_new_order, refund_*, shipment_tracking)
- {order_id} – WooCommerce order ID
- {order_number} – Order number (display)
- {order_amount} / {order_total} – Order total
- {item_count} – Number of items in the order
- {billing_name} / {billing_first} / {billing_last} – Customer name
- {billing_phone} – Customer phone
Product events (new_product, product_approved, product_rejected, product_resubmitted)
- {product_name} – Product title
- {product_url} – Public product permalink
- {rejection_reason} – Admin’s reason for rejecting (Dokan Pro 3.16+)
Withdrawal events
- {withdrawal_amount} – Withdrawal amount (formatted in your store currency)
- {withdrawal_method} – Payout method (PayPal, bank, etc.)
- {withdrawal_id} – Withdrawal ID
Refund events
- {refund_amount} – Refund amount
- {refund_reason} – Customer’s stated reason
- {refund_status} – Refund status
Shipment tracking
- {tracking_number} – Shipment tracking number
- {tracking_provider} – Shipping carrier name
How to send membership SMS using MemberPress?
↑ Back to topAutomatically notify members and admins via SMS for every important MemberPress event — new signups, successful payments, failed charges, refunds, subscription cancellations, expiry reminders and more — using the MemberPress plugin together with SMS for WooCommerce.
Requirements
Requires MemberPress and SMS for WooCommerce to both be installed and active on your site.
Setup Instructions
- Ensure MemberPress is installed and active.
- Go to WooCommerce → SMS Settings → Settings and configure your SMS gateway (Twilio, Nexmo, MSG91, Lox24 or any of the supported providers).
- Make sure the Admin Phone Number and Sender Phone Number are saved on the Settings tab — admin events require the admin phone to be set.
- Make sure each member has a phone number saved on their WordPress profile (or have them enter it via your standard MemberPress signup form).
- Go to WooCommerce → SMS Settings → SMS Notifications → MemberPress.
- Enable the toggles for the member and admin events you want to send SMS for.
- Edit the SMS message template for each event. Use placeholders like {member_name}, {membership_name} and {transaction_amount} to personalise the message. Only placeholders that resolve for that specific event are listed in the sidebar.
- Click Save & Close to save your changes.
Available SMS events for MemberPress
The MemberPress integration supports 20 events grouped by category.
Signups
- Member Signup Completed (Member) – New member completes signup for a membership.
- New Member Signup (Admin) – Admin alert when a new member signs up.
Transactions
- Payment Completed (Member) – Initial / one-time payment is captured successfully.
- Payment Completed (Admin) – Admin alert when a payment is received.
- Renewal Payment Completed (Member) – A recurring subscription renewal payment succeeds. Only the renewal txn fires here — the very first transaction goes through Payment Completed so you never get two SMS for one event.
- Payment Failed (Member) – A payment attempt (initial or renewal) fails.
- Payment Failed (Admin) – Admin alert when a member’s payment fails.
- Payment Refunded (Member) – Admin refunds a transaction.
- Transaction Expired / Access Ended (Member) – A non-recurring transaction reaches its access expiry date.
Subscription lifecycle
- Subscription Created (Member) – Recurring subscription is set up.
- Subscription Cancelled (Member) – Subscription is cancelled (access continues until the paid period ends).
- Subscription Cancelled (Admin) – Admin alert when a subscription is cancelled.
- Subscription Expired (Member) – Subscription reaches the end of its paid period.
- Subscription Paused (Member) – Subscription is paused.
- Subscription Resumed (Member) – Previously paused subscription resumes.
Scheduled reminders
- Before Subscription Expires (Member) – Reminder sent before a non-recurring access period ends.
- After Subscription Expires (Member) – Win-back reminder sent after expiry.
- Before Subscription Renews (Member) – Pre-billing reminder before a recurring renewal.
- Before Credit Card Expires (Member) – Warning when the member’s stored card is about to expire.
- Before Trial Ends (Member) – Reminder shortly before a free / paid trial ends.
Available placeholders for MemberPress SMS
Use the following variables in your SMS message templates to include dynamic information. The settings page sidebar shows only the placeholders that resolve for the specific event being edited.
Common (every event)
- {member_name} – Member’s full name (first + last)
- {member_first} – Member’s first name
- {member_last} – Member’s last name
- {member_email} – Member’s email address
- {shop_name} – Your store name
- {shop_url} – Your store URL
- {email} – Recipient’s email
- {account_url} – Member’s MemberPress account page URL
Membership
- {membership_name} – Name of the membership product
- {membership_url} – Public URL of the membership
- {checkout_url} – Direct checkout link for the membership (handy in expiry / win-back messages)
Transaction events
- {transaction_amount} – Transaction amount, formatted in your store currency
- {transaction_id} – MemberPress transaction ID
Subscription events
- {subscription_id} – MemberPress subscription ID
- {renews_at} – Next renewal date
- {expires_at} – Expiry date
Credit card reminder
- {cc_exp_month} – Stored card expiry month
- {cc_exp_year} – Stored card expiry year
How to send wishlist SMS using YITH WooCommerce Wishlist?
↑ Back to topAutomatically notify the admin when a customer adds an item to their wishlist, and notify customers when their wishlist items come back in stock, go on sale or have a promotional offer — using the YITH WooCommerce Wishlist plugin together with SMS for WooCommerce.
Requirements
Requires YITH WooCommerce Wishlist (free or Premium) and SMS for WooCommerce to both be installed and active on your site. Back-in-stock, on-sale and promotion notifications additionally require the YITH Wishlist Premium email campaigns to be configured — the SMS messages piggy-back on those same triggers.
Setup Instructions
- Ensure YITH WooCommerce Wishlist is installed and active.
- Go to WooCommerce → SMS Settings → Settings and configure your SMS gateway (Twilio, Nexmo, MSG91, Lox24 or any of the supported providers).
- Make sure the Admin Phone Number and Sender Phone Number are saved on the Settings tab — the “Item Added to Wishlist” alert is sent to the admin phone.
- For customer notifications, make sure the customer has a phone number on their WordPress / WooCommerce profile.
- Go to WooCommerce → SMS Settings → SMS Notifications → YITH Wishlist.
- Enable the toggles for the events you want to send SMS for.
- Edit the SMS message template for each event. Use placeholders like {member_name}, {product_name} and {sale_price} to personalise the message.
- If you want to send back-in-stock, on-sale or promotion SMS, schedule the matching YITH Wishlist email campaign — the SMS will be dispatched at the same time as YITH sends its email.
- Click Save & Close to save your changes.
Available SMS events for YITH Wishlist
The YITH Wishlist integration supports 4 events.
- Item Added to Wishlist (Admin) – A customer (logged-in or guest) adds a product to their wishlist. The SMS is sent to the admin phone number so you know there is fresh shopping intent on the site.
- Back in Stock (Member) – One or more out-of-stock items on the customer’s wishlist are back in stock. Fires from YITH’s send_back_in_stock_mail trigger.
- Wishlist Items On Sale (Member) – One or more items on the customer’s wishlist are now on sale. Fires from YITH’s send_on_sale_item_mail trigger and includes the sale price and discount percent.
- Promotion Broadcast (Member) – Admin sends a promotional broadcast from the YITH dashboard. Fires from YITH’s send_promotion_mail trigger.
Available placeholders for YITH Wishlist SMS
Use the following variables in your SMS message templates to include dynamic information. The settings page sidebar shows only the placeholders that resolve for the specific event being edited.
Common (every event)
- {member_name} – Customer’s full name (falls back to “a guest” for guest wishlist activity)
- {member_first} – Customer’s first name
- {member_last} – Customer’s last name
- {member_email} – Customer’s email address
- {shop_name} – Your store name
- {shop_url} – Your store URL
- {email} – Recipient’s email
- {wishlist_url} – URL of the customer’s wishlist
Product (all events)
- {product_name} – Product title
- {product_url} – Public product permalink
- {product_price} – Current product price
Batch (Back in Stock & On Sale)
{item_count}– Number of wishlist items the SMS covers
Price change (On Sale only)
- {regular_price} – Product’s regular price
- {sale_price} – Sale price
- {discount_percent} – Discount as a percentage (e.g. “20%”)
Translations
↑ Back to topSMS Customer Notifications for WooCommerce is localized/ translatable by default and compatible with WordPress translation plugins, we added translation to the following languages:
- English – default
- German (Deutsch)
- Spanish (Spain)
- French (France)
- Gujarati
- Hebrew
- Arabic
- Hindi
- Dutch
- Polish
- Portuguese (Brazil)
- Portuguese (Portugal)
- Russian
- Swedish
- Italian
- Bulgarian
- Danish
- Latvian
- Norwegian (Bokmål)
- Turkish
- French (Canada)
How to change the plugin language ?
↑ Back to topConfigure SMS for WooCommerce to display in your preferred language using built-in translations
- Go to WordPress Dashboard → Settings → General.
- Under Site Language, select your desired language from the dropdown.
- Save your changes.
- The plugin interface will automatically switch to the selected language if a translation is available.
How to translate SMS messages using WPML ?
↑ Back to topCreate multilingual SMS templates for stores serving customers in different languages.
- Install and activate the WPML plugin.
- Go to WPML → String Translation.
- Search for “SMS for WooCommerce” in the domain filter.
- Locate the SMS message templates you want to translate.
- Click on the translate icon next to each message.
- Enter translations for each language you support.
- Save your translations.
Bulk Translation via WPML Translation Dashboard
To translate multiple SMS For Woocommerce strings at once:
- Log in to your WordPress dashboard.
- Navigate to WPML > Translation Dashboard.
- Scroll down to the Other texts (Strings) section.
- In the Filter by field, search for CEV PRO strings using any of the following key names:
smswoo_wc_status_processing_sms_templatesmswoo_wc_status_pickup_sms_templatesmswoo_booking_admin_reminder_sms_template
- Once the relevant strings are displayed, you can translate them in bulk:
- Select the checkboxes for all the strings you want to translate and click Translate your content.
At Step 2, choose your translation method. To quickly translate multiple strings, choose Translate automatically from the dropdown. For the best results, ensure your translation engine is Private Translation Cloud (PTC), WPML’s proprietary AI. The Translation Dashboard shows you the cost of automatic translation in euros and credits. If you want to translate strings yourself, choose Translate myself.
When ready, click Translate.
With automatic translation, you’re all set! PTC translates your selected content in a few minutes. If you’ve chosen to translate yourself, navigate to WPML > Translations to add your translations for each string.
Sync Your Translations
Once you’ve translated the strings, ensure they are synced across your website. If you’ve chosen to publish without review, WPML automatically applies translations. Otherwise, go to WPML > Translations to review translated content and publish.
How to customize SMS templates using Loco Translate ?
↑ Back to topEdit plugin strings and SMS templates to match your store’s specific wording and tone.
- Install and activate the Loco Translate plugin.
- Go to Loco Translate → Plugins.
- Find and select SMS for WooCommerce from the list.
- Choose the language you want to edit or create a new translation.
- Click Edit to open the translation editor.
- Search for the text strings you want to customize.
- Enter your custom translation in the text field.
- Save the translation file.
How to get the SMS Provider API keys
↑ Back to topClickSend
↑ Back to topHow to get your ClickSend API Key:
- Login into your ClickSend account.
- Navigate to Developers > API Credentials
- You will need to enter Username & API key in your General Settings.
- Copy the API Key and use it in the SMS Customer Notifications for WooCommerce provider settings.
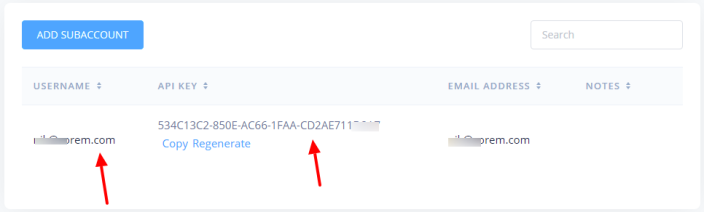
- Click on the Numbers > SMS and copy the phone number that you will enter in your General Settings as Sender phone number.

Fast2SMS
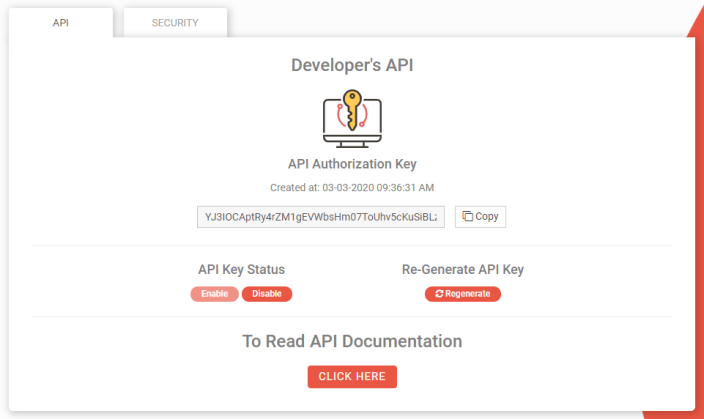
↑ Back to topHow to get your Fast2SMS API Key:
- Login into your Fast2SMS account.
- Go to Dashboard > Dev API and Copy your API Authorization Key.
- You will have to enter API key in your SMS Settings.
Vonage (Nexmo)
↑ Back to topHow to get your API Key:
- You can find your Nexmo API Keys by login into your Nexmo account.
- You can copy your API key & API Secret from Nexmo Dashboard.

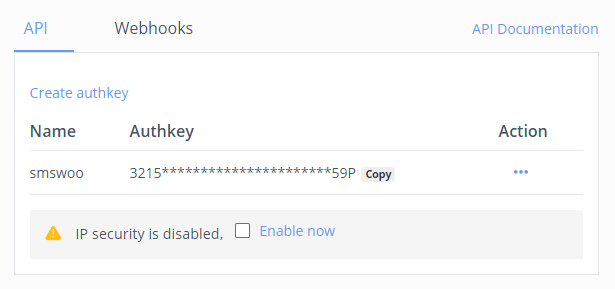
MSG91
↑ Back to topHow to Get MSG91 API keys
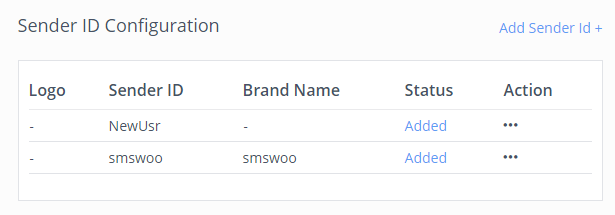
- Login into your MSG91 account.
- Go to Dashboard and Copy your Authkey and Sender ID.
- You will have to enter Authkey and Sender ID SMS Settings.
Twilio
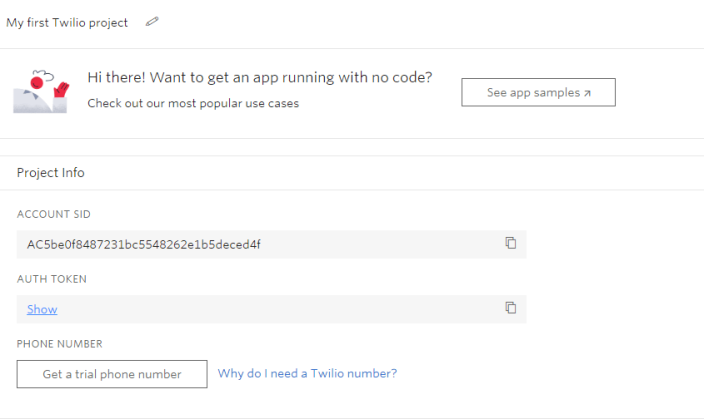
↑ Back to topHow to get the Twilio API Key
- Login into your Twilio account.
- Copy your Account SID and Auth Token.
- Copy the phone number and put as a Sender ID.
- You will have to enter Username & API key & Sender ID in your SMS Settings.
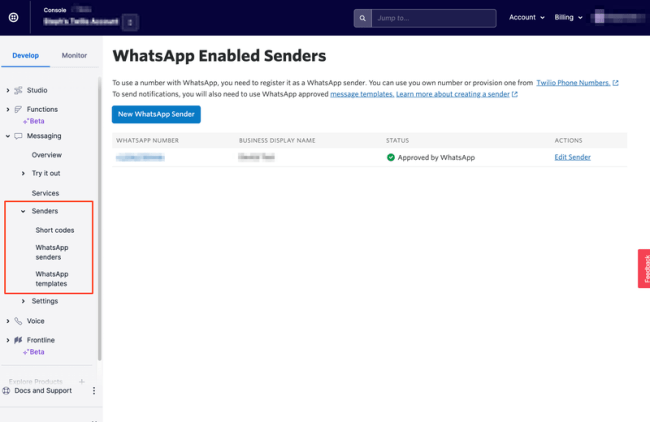
Twilio WhatsApp
↑ Back to topFor WhatsApp messages, your Account SID and Auth Token remain the same.
Go to Messaging > Senders > WhatsApp Senders in the Console. Here, you can see the list of your WhatsApp-enabled Twilio phone numbers (senders). use this phone number as Sender ID and put it as a Sender ID in your SMS Settings.
SMSAlert
↑ Back to topHow to get the SMSAlert API Key
- Login into your SMS Alert account.
- Go to Api keys and Copy your Auth key
- Go to Sender ID and Copy your Sender ID
- You will have to enter Auth key and Sender ID in your General Settings.

WhatsApp Business
↑ Back to topHow to get the WhatsApp Business credential
- Go to App Dashboard > WhatsApp > Getting Started and copy your Authorization token and Phone number ID.
- You will have to enter the Authorization token in the SMS Service Provider’s settings and the Phone number ID in your SMS Settings.
ProSMS
↑ Back to topHow to get the ProSMS API Key
- Login to your ProSMS account.
- Go to ProSMS Settings > API and Copy your API key.

- Go to Sender Name and Copy your Sender name/ number.

- You must enter the API key and Sender name in your SMS Settings.
SMSdk
↑ Back to topHow to get the SMSdk API Key
- Login to your SMSdk account.
- Go to SMSdk Settings > API and Copy your API key.
- Go to Sender Name and Copy your Sender name/ number.
- You must enter the API key and Sender name in your SMS Settings.
SMSala
↑ Back to topHow to get the SMSala API Key
- Go to Sender ID and copy your Sender ID
- You will have to enter API ID and API Password and Sender ID in your General Settings.
BulkGate
↑ Back to topHow to get the BulkGate API credentials
- Login to your BulkGate account.
- Go Modules & APIs section and if you haven’t created HTTP Simple API, click on HTTP Simple API and create API.

- Copy your Application ID and Application Token and enter them into the SMS Service Provider’s settings.
- The sender id refers to the table below, and if You have a Text sender, you will have to enter gText in the General Settings as a Sender phone number / Sender ID.
| VALUE | DESCRIPTION |
|---|---|
gSystem | System number |
gShort | Short Code |
gText | Text sender |
gMobile | Mobile Connect – Sends SMS message through the Mobile Connect app |
gPush | Mobile Connect push – Sends a notification to the Mobile Connect app |
gOwn | Own Number (number verification required) |
gProfile | BulkGate Profile ID |
<int> | BulkGate Profile ID |
Octopush
↑ Back to topYou can use Octopush to send out the order status update, and shipping & delivery SMS notifications to your customers.
Setup Octopush SMS Integration
To set up the SMS notifications, on your WordPress admin, go to SMS Settings > Settings, and click on the SMS Service Provider:
- Select Octopush from the list of SMS service providers
- Add your Octopush Login id, Octopush API key, and Sender phone number (given to you by Octopush)

How to get your Octopush API Key:
- Login into your Octopush account.
- Navigate to API Credentials
- You will need to enter your Login key & API key in your General Settings.
- Copy the API Key and use it in the SMS provider settings.

About Octopush
Octopush lets you send SMS messages globally, through A Web Based SMS Portal or Transactional SMS via SMS Gateway API. Using octopush SMS you can be confident your customers and staff are receiving and reading your SMS messages.
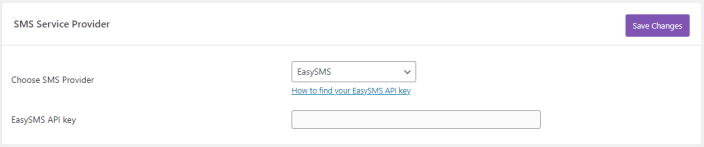
EasySMS
↑ Back to topYou can use EasySMS to send out the order status update, and shipping & delivery SMS notifications to your customers.
Setup EasySMS SMS Integration
To set up the SMS notifications, on your WordPress admin, go to SMS Settings > Settings, and click on the SMS Service Provider:
- Select EasySMS from the list of SMS service providers
- Add your EasySMS API key, and Sender phone number (given to you by EasySMS)
How to get your EasySMS API Key:
- Login into your EasySMS account.
- You will need to enter your Use API key in your General Settings.
- Copy the API Key and use it in the SMS provider settings.
About EasySMS
EasySMS lets you send SMS messages globally, through A Web Based SMS Portal or Transactional SMS via SMS Gateway API. It also allows the Administrator to manage the automatically sent SMS notifications for customer sign-ups and on-demand SMS messages to any international mobile phone number.